

Chapter 2: Testing Serial Lines |
Loopback Tests 81 |
|
|
|
|
NOTE On Sangoma cards with the PMC Sierra chipset, all ports must be configured with the same line type (for example, all T1 or all E1).
Loopback Tests
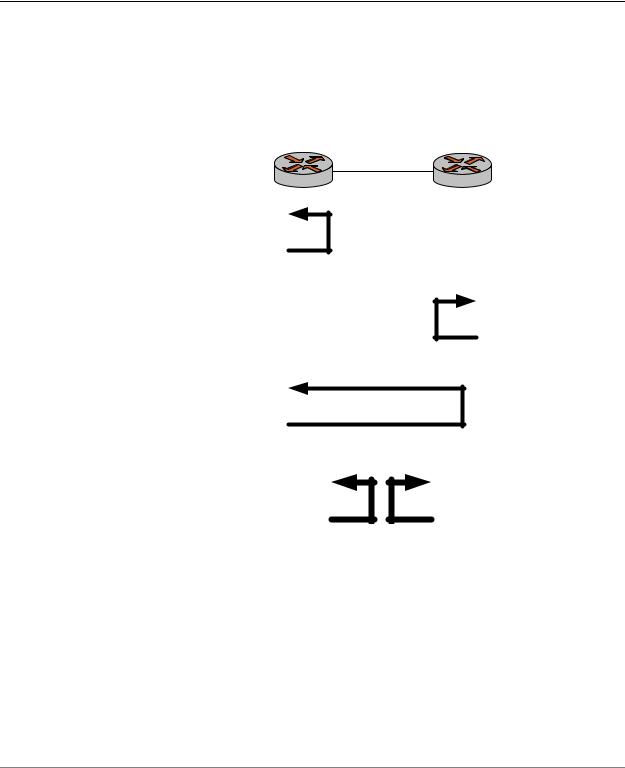
Figure 2-3 shows two Vyatta devices, R1 and R2, connected via a serial line. The tests that follow describe the steps that could be performed to diagnose a communication problem between the two devices.
Figure 2 3 Sample scenario for loopback testing
R1 |
R2 |
wan0 |
wan0 |
Test 1: System-facing loopback on local system as close to line as possible (either analog or local loopback)
Test 2: System-facing loopback on remote system as close to line as possible (either analog or local loopback)
Test 3: Line-facing loopback on remote system (typically line loopback )
Test 4: Physical loopbacks on local and remote systems
The general strategy is to sequentially test for problems in the local system, in the remote system, and in the circuit connecting the two. To do this, the loopback operational commands are used. Examples of successful and unsuccessful tests are shown in loopback test command.
Test 1: Test the Local System
The first step is to determine whether there is a problem on the WAN card on the local system (that is, a problem on the local WAN interface). To check this, a loopback is defined as close to the line as possible and the loopback test is run on the local system (R1 in the example), as shown in Example 2-1.
WAN Interfaces |
R6.3 v01 |
Vyatta |

Chapter 2: Testing Serial Lines |
Loopback Tests 82 |
|
|
|
|
Example 2 1 Testing the local WAN interface
Step |
Command |
|
|
Activate an analog loopback on the local |
vyatta@R1:~$ loopback up wan0 analog |
system. |
|
|
|
Send test data through the loopback. |
vyatta@R1:~$ loopback test wan |
|
|
Deactivate the analog loopback on the |
vyatta@R1:~$ loopback down wan0 analog |
local system once the test is complete. |
|
|
|
If this test fails, there is a problem on the local WAN interface. If this test succeeds, the problem has not been isolated: proceed to Test 2.
Test 2: Test the Remote System
The second step is to determine whether there is a problem on the WAN card in the remote system (that is, on the remote WAN interface). To check this, a loopback is defined as close to the line as possible and the loopback test is run on the remote system (R2 in the example).
Example 2 2 Testing the remote WAN interface
Step |
Command |
|
|
Activate an analog loopback on the |
vyatta@R2> loopback up wan0 analog |
remote system. |
|
|
|
Send test data through the loopback. |
vyatta@R2> loopback test wan0 |
|
|
Deactivate the analog loopback on the |
vyatta@R2> loopback down wan0 analog |
remote system once the test is complete. |
|
|
|
If this test fails, there is a problem on the remote WAN interface. If this test succeeds, the problem must be in the circuit between the two interfaces: proceed to Test 3.
Test 3: Test the Circuit
The third step is to confirm a problem with the circuit between the two devices. To do this, a line-facing loopback is defined on the remote system and then the loopback test run from the local system.
WAN Interfaces |
R6.3 v01 |
Vyatta |

Chapter 2: Testing Serial Lines |
Loopback Tests 83 |
|
|
|
|
Example 2 3 Testing the circuit
Step |
Command |
|
|
Activate a line facing loopback on the |
vyatta@R2> loopback up wan0 line |
remote system. |
|
|
|
Send test data through the remote |
vyatta@R1:~$ loopback test wan0 |
loopback from the local system. |
|
|
|
Deactivate the line loopback on the |
vyatta@R2> loopback down wan0 line |
remote system once the test is complete. |
|
|
|
If this test succeeds, all of the components are working properly.If this test fails, there is a problem on the physical interface of either the local or the remote WAN interface: proceed to Test 4.
Test 4: Test the Physical Interfaces
The fourth step is to confirm a problem on the physical interface of the WAN card on either the local or the remote system. You can create the physical loopback in a number of ways:
•Using a physical loopback plug
•Using a loopback at a patch panel
•Using a loopback at the circuit provider
In each case, the idea is to provide a loopback that is external to the WAN card and then run the loopback test on the system with the physical loopback installed. Example 2-4 shows a physical loopback test run on the local system.
Example 2 4 Testing a physical loopback on the local system
Step |
Command |
|
|
Send test data through the physical |
vyatta@R1:~$ loopback test wan0 |
loopback on the local system. |
|
|
|
If the test is successful on the local system, run the same test on the remote system. If the test on the remote system is also successful, this indicates a problem with the circuit between the two devices (and therefore a problem for the circuit provider to resolve), since all other components have been tested.
WAN Interfaces |
R6.3 v01 |
Vyatta |