

Word 2010
.pdfAutoCorrect Entry
The AutoCorrect feature corrects the most common typing errors as you work through your document. For example, the most common misspelling of "the" is "teh". AutoCorrect will automatically fix this error as soon as you press the spacebar or begin a new paragraph after the misspelled word.
You can also add your own AutoCorrect entries and use it to replace abbreviations or codes that you create to automate typing certain words, i.e. "eu" becomes "European Union".
Practice
Adding an entry to AutoCorrect
In this exercise, you will add an AutoCorrect entry to automate the insertion of often-used text.
1.Click the File tab.
2.Click the Word Options button. Select Proofing.
3.Under the AutoCorrect options, click the AutoCorrect Options button.
4.In the Replace box, type “eu” and press the Tab key.
5.In the With box, type “European Union”.
6.Click Add and then OK. Return to your document.
7.Type “eu” and press spacebar. The text “eu” automatically changes to “European Union”.
Trust Center
A Word document containing programming code (macros) can be harmful to your computer. Documents that are downloaded from the Internet or not from a trusted source may have malicious programming code. Before you realize it someone may delete your files or read your personal information such as credit card information. By default Word 2010 does not open documents with programming code (.docm extensions).
To change the default setting to open .docm files;
Adding a new entry
Customizing Word and Securing Documents |
121 |
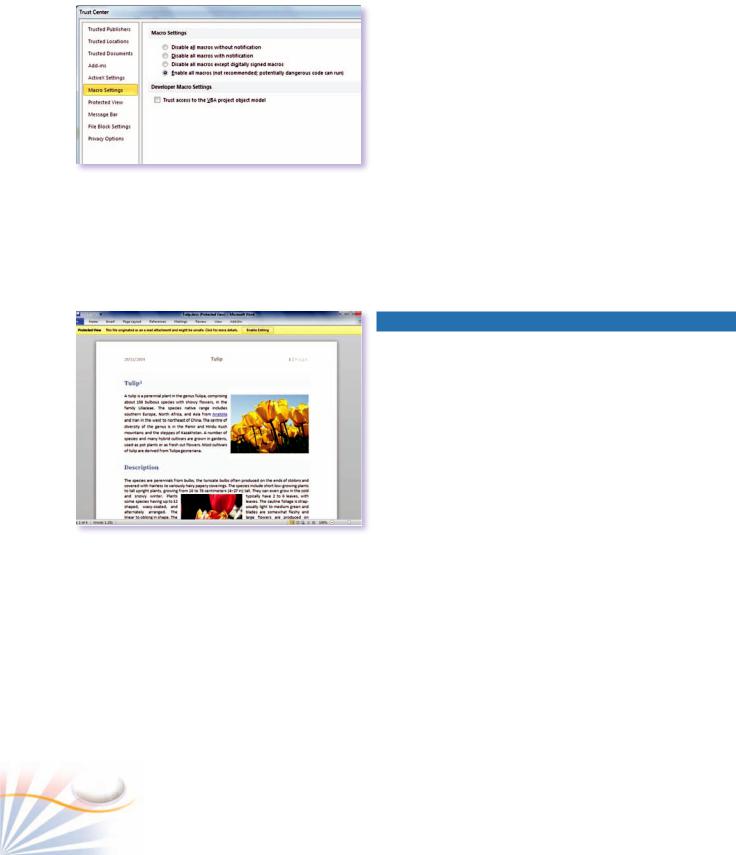
Changing Macro settings
Protected view
122
1.Click the File tab, and then click the Word Options. The Word Options dialog box opens.
2.Click the Trust Center command on the Word Options dialog box.
3.Click the Trust Center Settings… button under the Microsoft Word Trust Center section.
4.Select the Enable all macros under Macro Settings.
Protected View
When you open a document downloaded from the internet or an e-mail attachment, Word displays it in the Protected View. A document in the Protected View is a read-only document.
If you are sure that the document is secure to open;
1.Click the Enable Editing button under the Ribbon.
Securing Documents
You can inspect a document for any remaining private or inappropriate information; restrict access, or add a digital signature. The Info menu on the File tab provides necessary options to make documents safe for sharing and distributing.
Protecting Documents from Changes
You can give other users limited access on your documents to edit such as tracking changes, comments. To set restrictions on a document;
1.Click the Review tab. Click the Restrict Editing button in the Protect group.
The Restrict Formatting and Editing pane opens to the right side of the document.
2.Under Editing restrictions, check the Allow only this type of editing in the document box.
3.Check the Allow only this type of editing in the pane under the Editing restrictions section. Choose the Tracked changes on the menu.
The Editing restrictions and Start enforcement sections show more options.
4.Under Start enforcement section, click Yes, Start Enforcing Protection button.
Chapter 10

Start Enforcing Protection dialog box opens.
5.Enter a password for protection. Click OK to apply restrictions.
The users will be able to edit the document but the changes they make will be tracked.
To stop the protection;
1.Click the Stop Protection button on the Restrict Formatting and Editing pane.
2.Enter the password.
Restrict Formatting and Editing pane
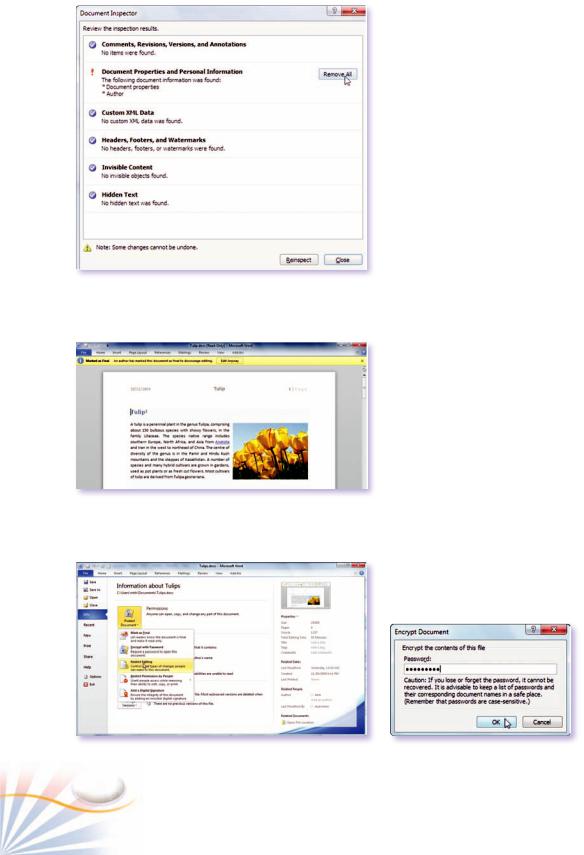
Inspecting Documents
While you work on a document, Word automatically saves personal information and hidden data.
The Document Inspector finds and removes all extraneous and potentially confidential information.
1.Click the File tab; and then click the Info command.
The Info pane shows the information saved with the file.
2.Click the Check for Issues button, select Inspect Document on the menu.
3.By default all the options are checked in the Document Inspector dialog box. Click Inspect.
The Info window
Customizing Word and Securing Documents |
123 |
The Document Inspector window
The document Marked as Final
Encrypting a Document
To remove the Document Properties and Personal Information from the document;
4.Click the Remove All button next to that line.
Finalizing Documents
Before you share a document with other people, you can use the Mark as Final command to discourage users to make changes on the documents. The Mark as Final command does not create any restrictions on the document.
1.In the Info pane, click Protect Document button, and then click Mark as Final.
2A window shows that a document will be marked as final and then saved. Click OK.
Word hides the commands on the Ribbon.
Encrypting Documents
When a document is encrypted, a password is required to open it. After the password is provided the documents can be formatted as usual.
To encrypt a document;
1.In the Info pane, click Protect Document button, and then click Encrypt with Password.
2.Type a password for the document in the Encrypt Password window. Click OK. Confirm the document password in the next window.
3.Save and close the document.
When you try to open the document, Word asks you to enter the password to open the document.
Enforcing a password
124 |
Chapter 10 |
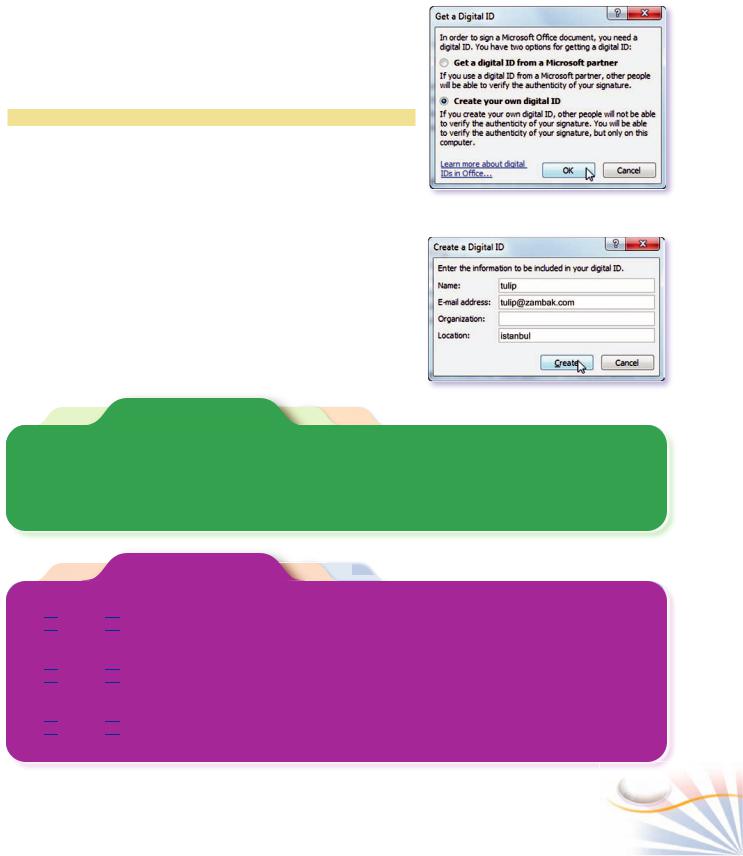
Signing Documents Digitally
A Digital Signature is an electronic certificate of authentication in a Word document. You must have a digital ID from a commercial web site to use a digital signature. Otherwise a digital signature can only be confirmed on the computer it is issued.
Practice
In the following exercise, you will add a digital signature into a document.
1.In the Info pane, click Protect Document button, and then click Add a Digital Signature.
2.Choose Create your own digital ID option in the Get a Digital ID dialog box. Click OK.
3.Type in the purpose of the signing in the Sign dialog box. Click the Create button.
Fill In The Blank
Adding a Digital Signature
Creating a Digital ID
1.The _______ feature corrects the most common typing errors as you work through your document.
2.____________ finds and removes all extraneous and potentially confidential information.
3.A_____________ is an electronic certificate of authentication in a Word document.
True or False
1.By default, Word 2010 opens all Word documents with any extensions.

 True
True 
 False
False
2.You can change the color scheme of the Word program.

 True
True 
 False
False
3.Opening a Word document with a programming code inside doesn’t pose a threat to your computer.

 True
True 
 False
False
Customizing Word and Securing Documents |
125 |

Multiple Choice Questions
1.What is a Digital Signature?
a.It is a faint image which appears on the background of a document.
b.A scanned image of a signature inserted in a document.
c.It is a special character on the Symbols dialog box.
d.It is an electronic certificate of authentication in a document.
2.What are the hazards of opening word documents with programming code (*.docm)? (Choose two answers)
a.You can save your files quickly.
b.Intruders may have access to your personal information.
c.A document with programming code provides less formatting options.
d.A malicious program may gain access to your files and delete them.
3.How can you give other people limited control such as editing comments on your documents?
5.You want Word to auto replace your abbreviations. How can you achieve this?
a.Use Prepare menu and add new abbreviations.
b.Use the AutoCorrect and create abbreviations and their replacements.
c.Use the Synonyms.
d.Create a hyperlink for each abbreviation.
6.How can you finalize a document so that it will be only read-only?
a.Signing with a digital signature
b.Use Mark as final feature.
c.Use Auto-Correct dialog box.
d.Enforce Protection.
7.What happens if you encrypt a document?
a.It only allows a limited editing on the document.
b.The document is secured against any virus threat.
c.A password is required to open the document.
d.The document becomes a read only file.
a.By Finalizing documents.
b.By using the Restrict Formatting and Editing pane.
c.By changing the Trust Center settings.
d.By using the Document Inspector.
4.What should you do to remove your personal information from your documents?
8.Which command group on the File tab provides necessary options to make documents safe for sharing and distributing?
a.Word Options
b.Prepare for sharing
c.Save As
d.Recent
a.Run Trust Center.
b.Customize Word not to include any personal information.
c.Use the Inspect Document command to remove personal information.
d.Save your documents with .docm extensions.
9.Which of the following settings are customized in the Word Options dialog box? (Choose two answers)
a.Save settings
b.Printer Properties
c.Encrypting documents
d.Word color scheme
126 |
Chapter 10 |
Chapter 1 |
Chapter 4 |
|
|
|
|
Fill in the blank
1.word-processor
2.Ctrl+S
3.Insertion point (Cursor)
True or False |
|
|
|
||
1. |
T 2. T |
3. F |
|
|
|
Multiple choice questions |
|
|
|||
1. |
D |
2. |
B |
3. |
A, C |
4. |
C |
5. |
A |
6. |
B |
7. |
D |
8. |
A, C |
9. |
D |
10. C
Chapter 2
Fill in the blank
1.Ctrl + A
2.the mouse button
3. Ctrl + X, Ctrl + V
Multiple choice questions |
|
|
|||
1. |
A, B, C |
2. |
B |
3. |
C |
4. |
A, D |
5. |
A |
6. B |
|
7. |
C |
8. |
A, B, C, D |
9. |
A |
10. B
Chapter 5
Fill in the blank
1.Cover Page gallery
2.Page numbers
3.Webdings
Multiple choice questions |
|
|
|||
1. |
D |
2. |
A, C, D |
3. |
A |
4. |
A, B |
5. |
C, D |
6. |
B |
7. |
A, B |
8. |
D |
9. |
B, D |
10. D
True or False |
|
Chapter 6 |
|
|
|
|
||||
|
|
|
|
|
|
|
||||
1. |
T |
2. F |
3. T |
|
Fill in the blank |
|
|
|
||
|
|
|
|
|
|
|
|
|||
Multiple choice questions |
|
1. rows, columns |
2. in a cell |
|
||||||
1. |
B, C |
2. B |
3. A, B, D |
3. cell |
|
|
|
|
||
4. |
D |
5. B, C, D |
6. D |
Multiple choice questions |
|
|||||
7. |
B |
8. A, C |
9. A, B, C |
|
||||||
1. D |
2. |
A |
|
3. A |
||||||
10. |
C |
|
|
|
||||||
|
|
4. C |
5. |
A, B, D |
6. C |
|||||
|
|
|
|
|
||||||
Chapter 3 |
|
7. A, B |
8. |
A, B |
|
9. A, B, C |
||||
|
10. A, C, D |
|
|
|
|
|||||
Fill in the blank |
|
Chapter 7 |
|
|
|
|
||||
1. the pragraph dialog box launcher |
|
|
|
|
||||||
|
|
|
|
|
|
|||||
2. style |
3. Ruler |
|
Fill in the blank |
|
|
|
||||
|
|
|
|
|
|
|
|
|||
True or False |
|
1. Clip Art |
|
|
2. brightness |
|||||
1. |
F |
2. T |
3. T 4. T 5. F |
|
3. Drawing |
|
|
|
|
|
Multiple choice questions |
|
True or False |
|
|
|
|
||||
1. B |
2. B, C |
3. A, C |
1. T |
2. |
F |
|
3. T |
|||
4. |
C |
5. B |
6. D |
Multiple choice questions |
|
|||||
7. |
B, C |
8. A, C, D |
9. A, C |
|
||||||
1. A, B |
2. |
D |
|
3. A, C |
||||||
10. |
A, B, C |
11. A, B |
12. C, D |
|
||||||
4. A |
5. |
A, C |
|
6. C |
||||||
13. |
A |
14. A, B |
15. C |
|
||||||
7. C |
8. |
A |
|
9. A, D |
||||||
16. |
D |
17. A, C |
18. C |
|
||||||
10. A, B, D |
|
|
|
|
||||||
19. |
D |
20. D |
21. B |
|
|
|
|
|||
|
|
|
|
|
|
|||||
22. |
A, C |
23. C |
24. A, C |
|
|
|
|
|
|
|
25. |
A |
26. B, D |
27. A, C |
|
|
|
|
|
|
|
Chapter 8
Fill in the blank |
|
|
|
||
1. |
SmartArt |
|
|
2. WordArt |
|
3. |
A text box |
|
|
|
|
True or False |
|
|
|
|
|
1. |
F |
2. |
F |
3. |
F |
Multiple choice questions |
|
||||
1. |
A, C, D |
2. |
A, C |
3. |
B |
4. |
A |
5. |
C |
6. |
A, B |
7. |
C |
8. |
A, D |
9. |
B |
10. A, B, C
Chapter 9
Multiple choice questions |
|
|
|||
1. |
B |
2. |
B, C |
3. |
B |
4. |
C |
5. |
C |
6. |
A |
7. |
B, C |
8. |
B |
9. |
A, B, D |
10. C |
11. B |
|
|
||
Chapter 10
Fill in the blank
1.Auto Correct
2.Document Inspector
3.Digital Signature
True or False |
|
|
|
|
|
1. |
F |
2. |
T |
3. |
F |
Multiple choice questions |
|
|
|||
1. |
D |
2. |
B, D |
3. |
B |
4. |
C |
5. |
B |
6. |
B |
7. |
D |
8. |
B |
9. |
A, D |

A
Accepting and Rejecting Changes: 113
AutoCorrect: 122, 123
B
Blank Document: 14
Bold: 30, 38
Bookmark: 111, 112
Borders and Shading: 47, 48, 77
Bulleted and Numbered List: 45, 46
C
Calculating Tables: 79, 80
Center: 42, 50, 51
Change Case: 41
Chart Layouts and Formats: 100
Charts: 98, 99
Clear Formatting: 40
Clip Art: 84, 85
Clipboard: 29, 41
Close: 11, 16, 19, 33, 86
Columns: 49, 50, 74, 75, 77, 78, 79, 98
Compatibility Mode: 19
Converting a Document: 19
Copy and Move: 28, 29
Cover Pages: 69
Creating a Chart: 98
Creating a Table: 74
Customizing Word: 122
D
Date and Time: 70, 71, 108, 109
Dialog Box Launchers: 40
Digital Signature: 124, 127
Document Views: 20
Drawing: 8, 84, 87, 91, 92, 94
Drop Cap Letters: 68
E
Effects: 39, 48, 87, 90, 91, 102, 103
Encrypting Documents: 126
Equation: 66, 67
Exit Word: 19
F
File Types: 17
Fill Color: 76, 91, 93, 100
Find and Replace: 30, 31
Font Formatting: 38, 75, 76
Footnotes and Endnotes: 109, 110
Format Painter: 41
G
Gallery: 39, 52, 53, 66, 68, 69, 76, 84, 86, 90, 91, 101, 103
Go to: 26, 112
Grouping and Ungrouping: 94
H
Headers and Footers: 8, 61, 108
Help: 11, 21
Hyperlinks: 111
I
Indenting: 41, 42, 43
Insert: 13, 29, 33, 49, 51, 66, 67, 70, 74 Inserting / Deleting Cells, Columns, and Rows: 78
Inserting Pictures: 85
Insertion Point: 10, 13, 26, 28, 45, 51, 66, 74, 111
Inspecting Documents: 125 Italic: 38, 53
J
Justify: 42
K
Keep Lines Together: 44
Keep with Next: 44
L
Layout: 8, 14, 60, 61, 93, 99, 100, 110 Left: 9, 13, 26, 42, 50, 51, 60, 75, 80, 89, 113
Letter: 8, 13, 28, 38, 45, 61, 114, 116, 117
Live Preview: 40, 53, 74, 122
M
Macros: 17, 123
Mail Merge: 8, 114
Making Comments: 112
Margins: 60, 69
Merge and Split Cells: 79
Multilevel Lists: 46
O
Open: 8, 13, 17, 18
Ordering: 45, 94
Orientation: 13, 60, 61, 110
Overtype: 13
P
Page Backgrounds: 48
Page Borders: 48
Page Breaks: 41, 44, 110
Page Numbers: 8, 69, 70
Page Setup: 60
Paper Size: 60, 61, 63
Paragraph Alignment: 42
Paragraph Formatting: 41
Paragraph Spacing: 43, 44
Password: 125, 126
Picture Adjustments: 86
Positioning Pictures: 90
Printing: 8, 13, 20, 49, 61, 62
Protected View: 124
R
Read Only: 124
Removing Backgrounds: 87
Research Task Pane: 32
Resizing and Cropping Pictures: 88
Resizing and Moving Tables: 78
Right: 20, 26, 27, 42, 50, 51, 60
Rotating and Moving Pictures: 89
S
Save As: 15, 16, 67
Save: 13, 15, 16, 18, 53, 116
Securing Documents: 124 Selecting Tables: 75 Selecting Text: 27 Sending and Sharing: 21 Shadow: 90
Signing Documents: 127 Smart Art Graphics:101, 102 Sorting Tables: 80
Spelling and Grammar: 8, 31, 32 Styles: 38, 46, 50, 52, 53, 68, 76, 90, 93, 98, 103
Symbols: 8, 45, 67
T
Tabs: 50, 51, 52
The Backstage: 13, 14, 18, 19 The File tab: 13
The Mini Toolbar: 38, 39
The Mini Translator: 34
The Navigation Pane: 30, 112 The Quick Access Toolbar: 18 The Ribbon: 10, 12, 18, 52, 62 The Trust Center: 123 Themes: 53
Thesaurus: 33
Tracking Document Changes: 113 Translating Text: 34
U
Undo and Redo: 30
W
Watermark: 48, 49
Word Options: 122, 123
WordArt: 100, 102, 103