

Word 2010
.pdf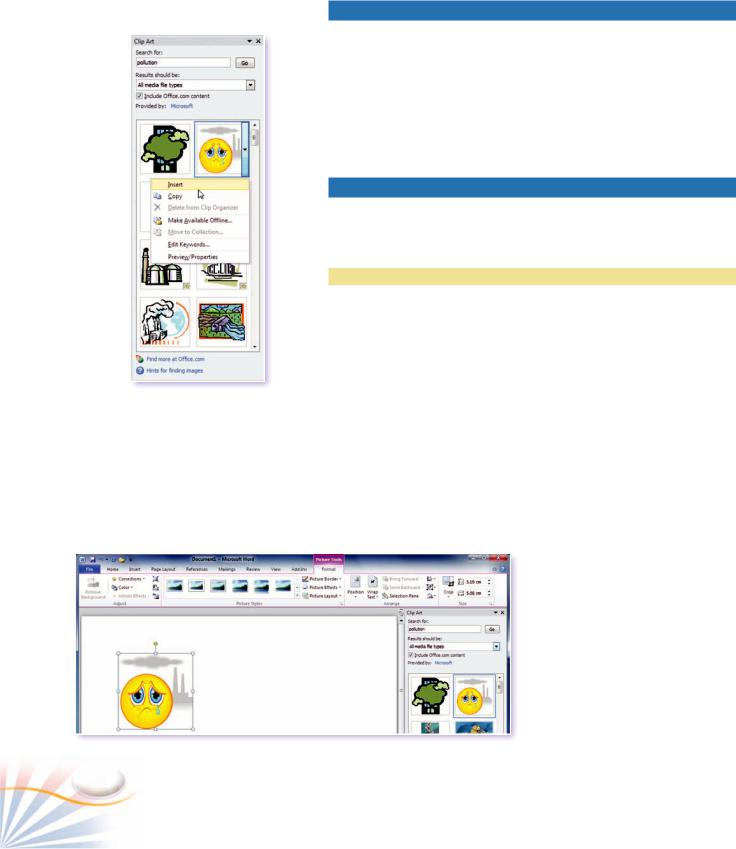
Pictures and Drawings
Pictures and drawings make your documents interesting, easy to read, and well-supported. There is a lot of difference between a document with only text and a document with pictures and drawings.
Most of the tools you need for working with pictures and drawings are located in the Illustrations group on the Insert tab. The steps for inserting and formatting drawings are basically the same for Pictures, Clip art etc.
Clip Art
Word comes with its own Clip Art gallery of images, sounds, and animations. All of the clips are categorized to make them easy to find. The Clip Art task pane enables you to search online for various clips.
Practice
Inserting ClipArt
In this exercise, you will insert Clip Art from the Clip Art task pane.
1. |
Click the Insert tab; click Clip Art on the Illustrations group. |
2. |
In the Search for box, type a Clip Art category or the specific Clip |
Searching for Clip Art |
Art name that you want to use. |
3. |
Click the Go button. |
There are also online clips on the Microsoft Office online website. If it is the first time you have used search on the Clip Art pane, Word displays a confirmation message.
4.If you have a connection to the Internet, then click Yes to include online search results. The search results matching the search criteria displays in the Clip Art task pane.
Clip Art and Clip Art Task Pane
82 |
Chapter 7 |
5.Use the scroll bar to move through the search results. Hold your mouse on a selection of Clip Art to get information about it.
6.Double-click the Clip Art that you want to insert.
Or click the large down arrow next to the clip art and then select Insert.
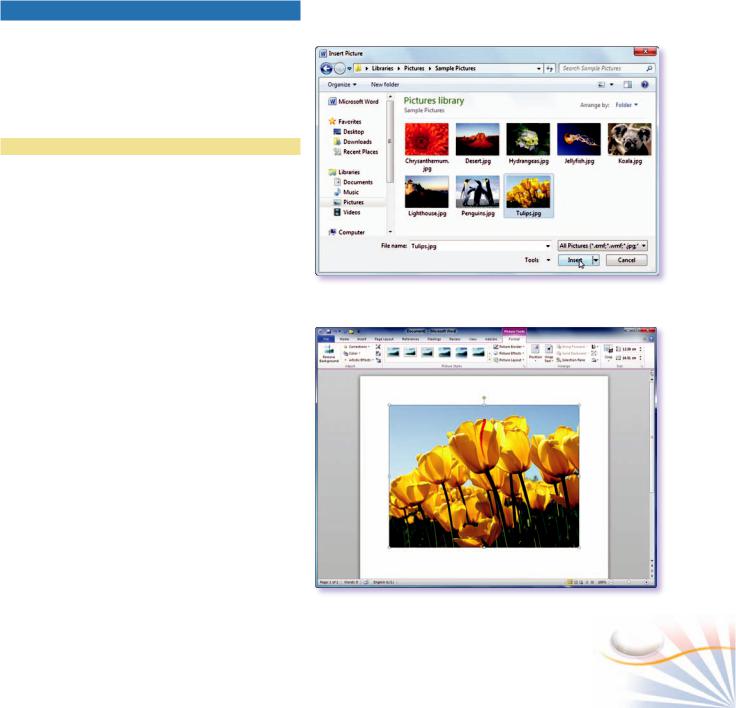
Inserting Pictures
Pictures are graphics that are created outside of Word. You can insert pictures created with other programs such as Paint, Adobe Photoshop, and Adobe Illustrator. There are also photo galleries on the Internet where you can search for pictures.
Practice
Inserting a picture
In the following exercise, you will insert a picture in a document.
1.Locate the insertion point where you want to insert the picture.
2.Click the Insert tab; click the Picture button on the Illustrations group.
The Insert Picture dialog box opens.
3.Select the file location and name and then click Insert.
The picture is inserted into the document.
To insert a picture from a digital camera;
1.Click the Picture button; in the Insert Picture dialog box, select the location of the digital camera.
Inserting a picture
The Picture Tools Format tab and the inserted picture
Pictures and Drawing |
83 |
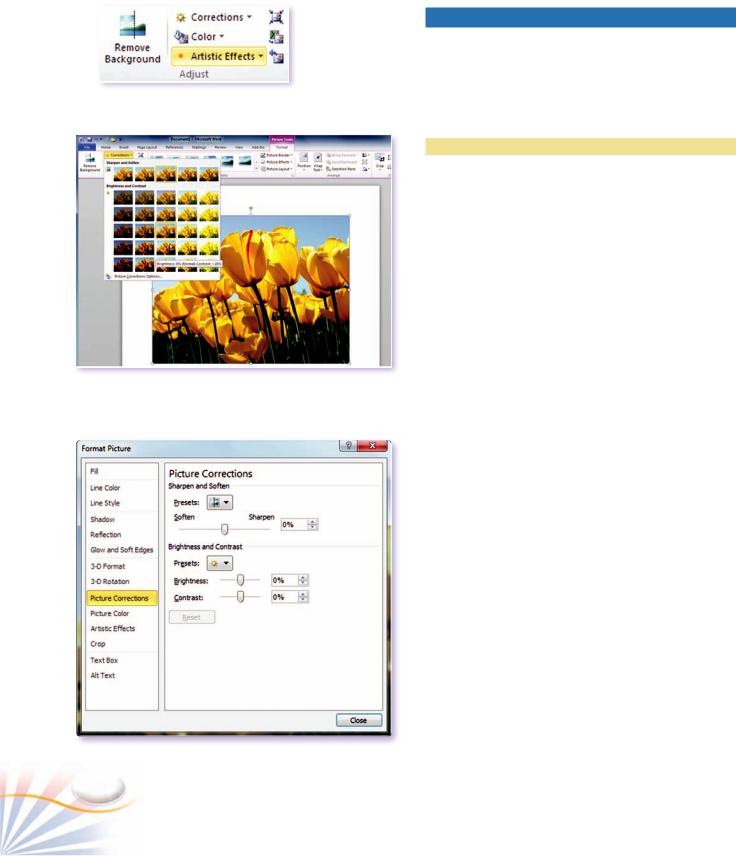
The Adjust group
Corrections gallery
The Format Picture dialog box.
Picture Adjustments
The Adjustments group enables you adjust picture color properties, compress the pictures in a document, and remove all the applied formats from pictures.
Practice
Picture Brightness & Contrast
The ratio of light to dark in a picture is called brightness. Contrast is the difference between light and dark.
You can adjust the brightness and contrast level of a picture;
1.Click the picture to select and activate the Picture Tools Format tab.
2.In the Adjust group, click the Corrections button.
3.To change the levels of the brightness and contrast, choose an option from the gallery.
Picture Corrections Options command on the Brightness or Contrast menu allows you more precise adjustments.
3.Click the Picture Corrections Options command on the Corrections menu.
4.Use the Brightness and Contrast sliders to get your desired effect. Click Close.
If you want to restore the original picture;
1.Click Reset Picture to discard any changes you have made.
84 |
Chapter 7 |
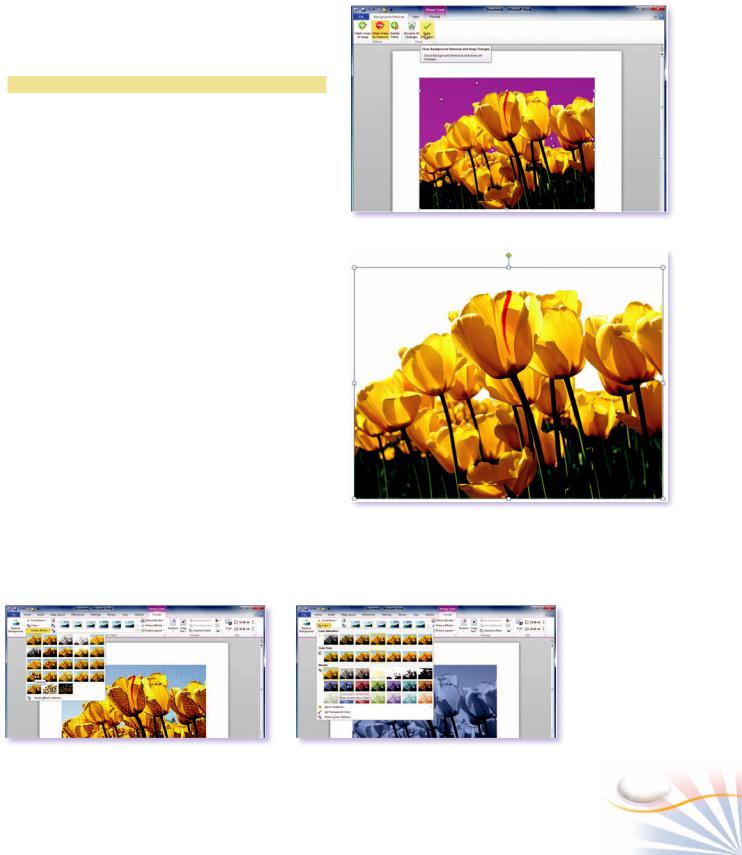
Remove Picture Backgrounds
The Remove background removes the background of a picture.
Practice
Removing Backgrounds
In the following exercise, you will remove the background of a picture.
1. Click the picture. In the Adjust group, click the
Remove Background button. |
|
|
The picture appears with the background |
Removing picture backgrounds |
|
highlighted in purple color. |
||
|
2.Click and drag on the selection handles to resize to area to keep. Use the buttons in the Background Removal tab to keep or remove the portions of the picture
3.Click Keep Changes button in the Close group.
Change Color and Artistic Effects
You can adjust the color saturation and color tone of a picture, recolor it, or change the transparency. An Artistic effects makes a picture look more like a sketch, drawing, or painting
1.Click the picture. In the Adjust group, click the Color button.
2.Choose a recolor option in the gallery. Under Picture Tools, on the Format tab, in the Adjust group, click Color.
Applying an artistic effect
After removing the background
Applying a new color to a picture
Pictures and Drawing |
85 |
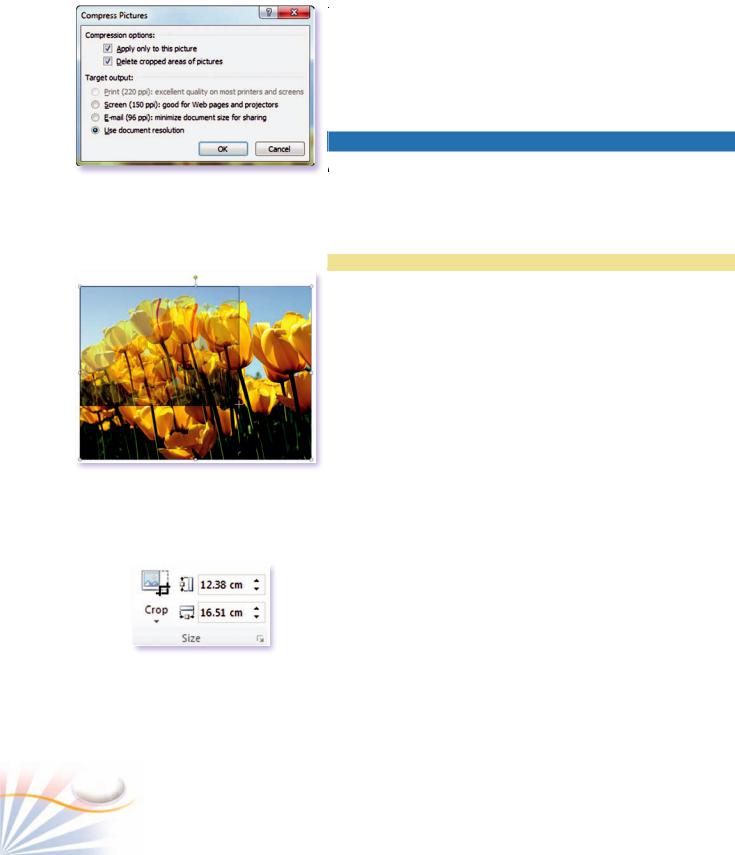
Compressing Pictures
Resizing a picture
The Size group
The Compress Pictures button decreases a document’s file size by compressing and reducing the quality of the pictures in the document.
1.Click the Compress Pictures button in the Adjust group. Use the Options button to change the compression setting.
2.Click OK.
Resizing and Cropping Pictures
A picture is displayed in its full size when inserted into a document. Sometimes the dimensions is too large to fit into your document or cannot be seen clearly. Or you need to use only a part of the picture. To change the dimensions of a picture, resize it, and to change the amount of the picture displayed, crop it.
Practice
Resizing a Picture
In this exercise, you will resize a picture.
1.Select a picture by clicking over it. The Sizing handles will display on the borders of the picture.
You can resize your picture by dragging any of the sizing handles of the picture. Use sizing handles in the corners to keep the original aspect ratio (width/height) of the picture.
2.Position your mouse over one of the sizing handles.
To increase the size, drag your mouse away from the center of the picture, to decrease the size, move the mouse towards the center of the picture.
As you resize the picture, both the original sized image and a faint copy of the new size is displayed.
3.Release the mouse when you get the desired size.
To specify the size of the picture precisely;
1.Click in the Shape Height and/or Shape Width boxes in the Size group.
2.Type the new height or width value.
Resizing pictures doesn't change the documents file size.
1.In the Adjust group; click the Reset Picture button which removes all formatting on the picture and returns it to its original size.
86 |
Chapter 7 |
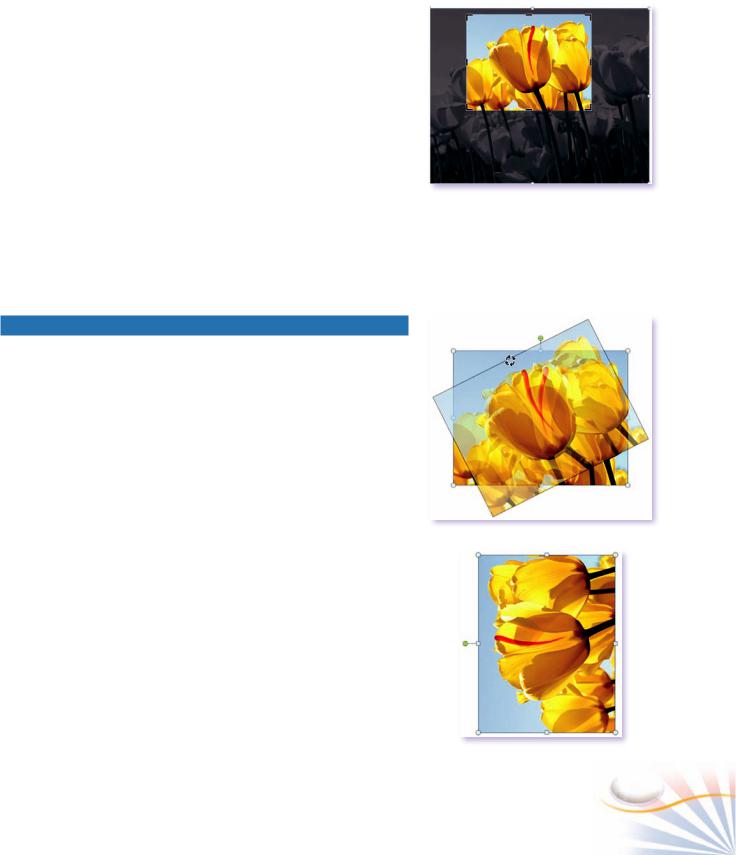
Cropping a picture
If you need only some part of a picture;
1.Select the picture that you want to crop.
2.Click the Crop button in the Size group.
3.Drag a cropping handle. When you are done, release the mouse.
4.Press Enter to finish cropping.
You can also use the Size dialog box for resizing, rotating, scaling, and cropping pictures.
1.Click the Size dialog box launcher in the Size group. The Size dialog box opens.
2.Use the boxes in the dialog box.
Rotating and Moving Pictures
To rotate a picture;
1.Select the picture and click the Rotate button in the Arrange group.
2.Click the Rotate Left 90 command.
You can adjust the picture to any angle with free rotating.
To free rotate the picture;
3.Position your mouse on the green handle on the top edge of the picture.
The mouse pointer changes to a curved arrow.
4.Drag your mouse to rotate the picture.
You can move a picture by dragging and dropping anywhere in the document. If you hold down the Ctrl key while dragging a picture, you can get a copy of it.
To move a picture;
1.Select the picture and drag it to the location where you want it.
Cropping a picture
Rotating a picture
The picture rotates 90 degrees to the left
Pictures and Drawing |
87 |
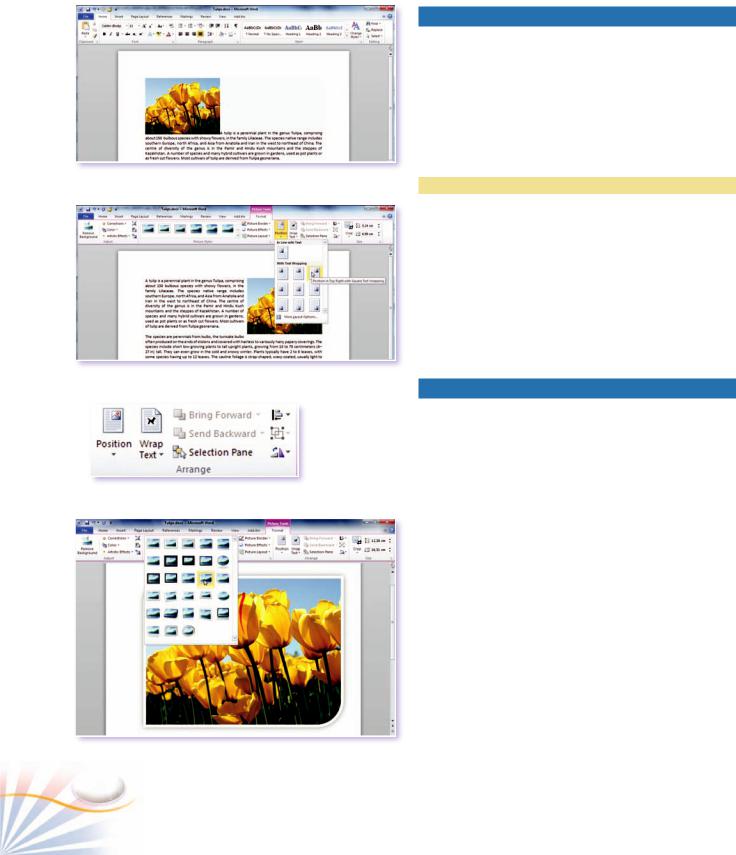
Positioning Pictures
Word inserts pictures with the Inline with the Text option which places a picture in a separate line from the text. Positioning enables you to position a picture to a different location than default.
The Text Wrapping button is used to control how text is placed around a picture in the document.
In Line with Text positioning
Practice
Positioning a Picture
1.Insert a picture in a paragraph.
2.Click the Position button in the Arrange group.
3.Choose Position in Top Right with Square Text Wrapping from the gallery .
The picture is positioned so that it is aligned with the top and right of the paragraph.
Changing picture position with text wrapping
Picture Styles and Effects
The Picture Styles Gallery provides a variety of different styles.
1. Click the picture.
The Arrange group
2. Choose a style in the Picture Styles gallery or click the More button next the gallery to get more styles.
3.Select Rounded Diagonal Corner, White option.
You can apply additional effects to a picture by using the Picture Effects button. With the combination of Picture Styles, you can get thousands of effects on the picture.
1.Click the Picture Effects button in the Picture Styles group.
2.Apply a shadow effect to your picture.
The Picture Styles gallery
88 |
Chapter 7 |
Drawings
A drawing is an object such as a shape, a diagram, a line, that you create using drawing tools within Word.
Word is a word processor program, so it has limitations in drawing detailed graphics. To draw detailed graphics you need to use an advanced graphic drawing program such as Corel Draw or Adobe Illustrator.
Practice
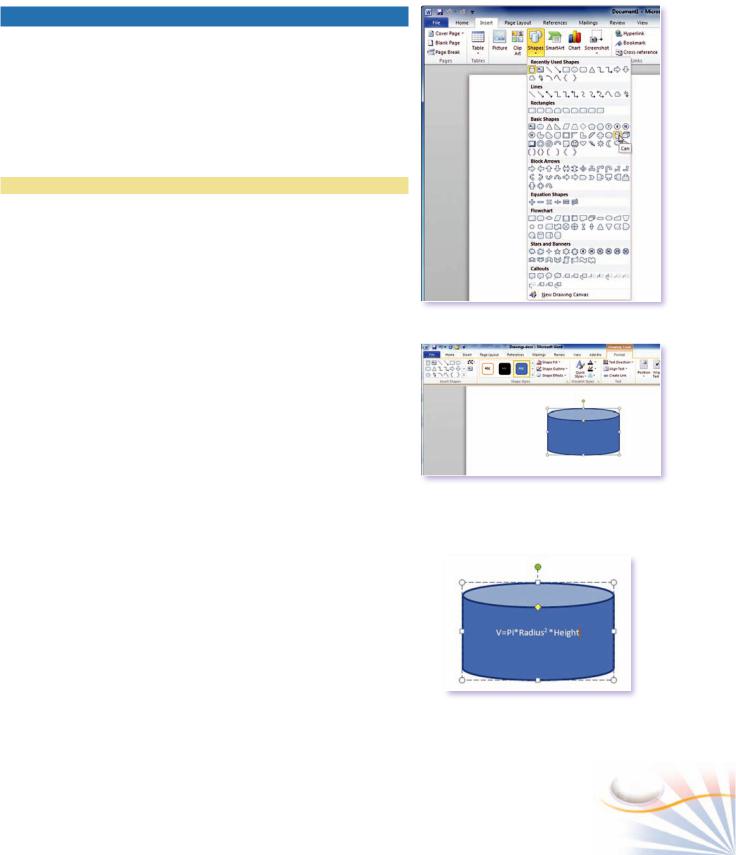
Inserting Shapes
1.On the Insert tab, click the Shapes button in the Illustrations group. The Shapes gallery enables you to insert several preformatted shapes.
2.Click the Can shape under Basic Shapes on the Shapes gallery.
3.Click in the document where you want the drawing an object.
Or drag the mouse in the document to create it.
To draw a shape while keeping its proportions, hold down the Shift key while you are drawing.
When you finish drawing a shape, it is selected and the Ribbon displays the Drawing Tools Format tab.
The Drawing Tool Format tab enables you to fill color in drawing, change the border properties, apply 3-D effects etc.
Add Text to Drawings
You can type a text inside a drawing object.
In this exercise you will insert a text inside a drawing object.
1.Click on the drawing.
2.Type in the text. You can format the text inside a shape like any other text in a document.
To align the text inside a drawing object, use the Text group in the Drawing Tools Format tab.
Shapes gallery
Creating shapes
Typing in a drawing object
Pictures and Drawing |
89 |
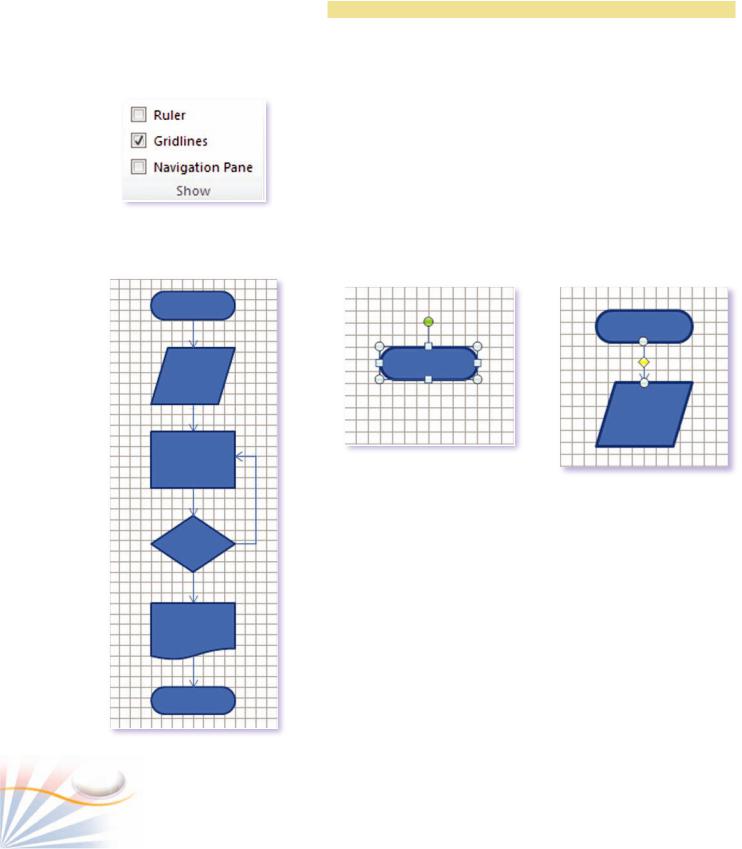
The Show group
Flowchart
Practice
Adding Shapes
In the following exercise, you will create a program algorithm using the Flowchart shapes.
1.Click the Shapes button in the Illustrations group.
Or in the Drawing Tools format tab, click the more button in the Insert Shapes group
2.In the Flowchart section, click Flowchart: Terminator shape To see the exact location of the drawing object in the document.
3.Click the View tab. Check the Gridlines box in the Show group.
Flowchart: Terminator
Joining two shapes
4.Add the second shape Flowchart: Data and draw a line between the two shapes.
5.Click on the arrow shape. Drag the up handle to the first shape. The arrow shape attaches to the first shape. Drag and attach the second handle to the second shape.
6.Add the shapes to finish your drawing as you see it in the picture.
90 |
Chapter 7 |