

Word 2010
.pdfChanging the Printer Settings
You can further change the print settings;
1.Click the Printer Properties link under the Printer button.
The Printer Properties window of the selected printer opens.
You can change the print properties such as print quality, paper size on the properties window. Each printer may have different settings on the properties window.
Setting print quality in Printer Properties window.
Case Study
Creating and Printing a Brochure
Step-1 Connect to the Internet to prepare a brochure for your hometown.
The brochure should show scenic and historic places of your hometown and have at least 4 pages.
Step-2 Create a new document from scratch or use Microsoft Office online for a template.
Step-3 Set the paper size to A4. Change the paper margins of the pages; Left 3cm, and Right 3cm.
Step-4 Type or paste the information you gathered. Use a page for each place you want to include in your brochure. Ask your teacher to how to include pictures and graphic content on your pages.
Step-5 Click the File tab and the Print command to preview your document. Click the Print button. Save the document as Brochure.docx.
Page Setup and Printing |
61 |

Multiple Choice Questions
1.Select the commands in which you can switch page orientations. (Choose three answers)
a.Under Orientation in the Page Setup dialog box.
b.The Orientation button in the Quick Access toolbar.
c.The Page setup group in the Print Preview window.
d.The Orientation button in the Page Setup group.
2.Which of the following shortcut keys opens the Print window?
a. Ctrl - V |
b. Ctrl - P |
c. Ctrl - C |
d. Shift - P |
3.How can you switch a Letter-size document to an A4-size document?
a.Select Narrow margins in the Page Setup group.
b.Change the page orientation to Landscape.
c.Switch the paper size to A4 in the Size menu in the Page Setup group.
d.Open the Devices and Printers window, and then select Print to A4 size.
4.Which of the following can be customized to display the Quick Print button? (Choose two answers)
a.The Ribbon
b.The Print window
c.The Page Setup group
d.The Quick Access toolbar
5.A document in portrait mode prints:
a.Fewer characters per line than the same document in landscape.
b.The same characters per line than the same document in landscape.
c.More characters per line than the same document in landscape.
d.Smaller fonts in order to fit the same amount of characters per line as landscape.
6.How many margins are on a page?
a.Two (header and footer)
b.Four (top, bottom, right, left)
c.Two (landscape and Portrait)
d.Two (top and bottom)
7.A text document with two pages has a small amount of text on the second page. How can you print it on a single page?
a.Click the Shrink button in the Print window.
b.Change the Page alignment in the Page dialog box.
c.Set custom margins and reduce the margin spaces to fit all the text to the first page.
d.Zoom out in the Print window.
8.In the Print window , you can change the
_________. (Choose all that applies)
a.Page margins.
b.Number of copies of a print document.
c.Size of a document.
d.Printing range of a document.
9.A document consists of 6 pages. Which of the following page ranges prints page1, page2, page3, page5, and page6 of the document?
a. 1-3, 5-6 |
b. 1-6, 4 |
c. 1-6 |
d. 1, 2, 3-6 |
10.Pages box under the Page range section in the Print window provides_______.
a.Selecting different printers
b.Selecting Print Range
c.Paper Source
d.Number of copies
62 |
Chapter 4 |
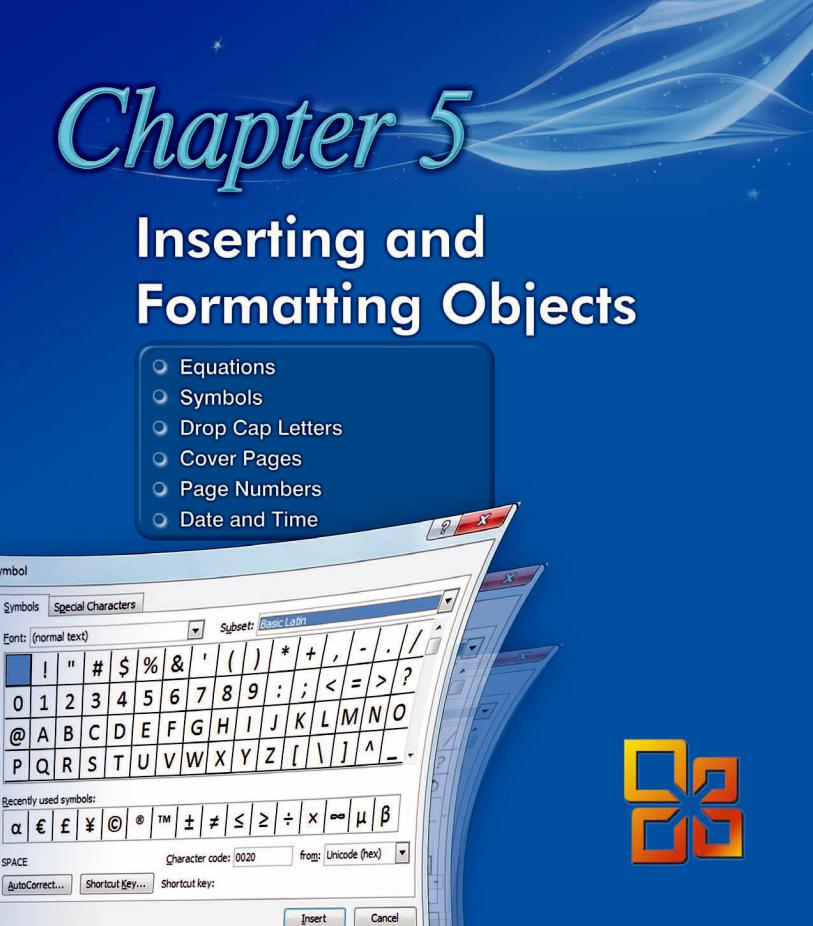
The Equation gallery
Quadratic Formula
Equation box
Equations
Word includes an Equation editor which enables you to use and insert mathematical equations, and scientific functions in documents.
Practice
Creating an Equation
In the following exercises; you will create an equation object.
1.Locate the insertion point where you want to insert the equation.
2.On the Insert tab, click the arrow next to the Equation button in the Symbols group.
The Equation gallery displays commonly used equations on which you can click to insert in a document.
3.Scroll down on the menu and click to insert the Quadratic Formula.
The selected equation is inserted in an equation text box at the location of the insertion point
4.Use the Symbols and the Structures on the Equation Tools Design tab. You can edit an equation as an ordinary text. When you are done, click anywhere inside the document, and outside the equation object.
To create an equation from scratch;
1.Locate the insertion point where you want to insert the equation.
2.On the Insert tab, click the Equation button in the Symbols group. A blank equation box is inserted.
3.Type the equation by using the mathematical symbols, structures in the Symbols and Structures groups on the Equation Design Tools tab.
64 |
Chapter 5 |
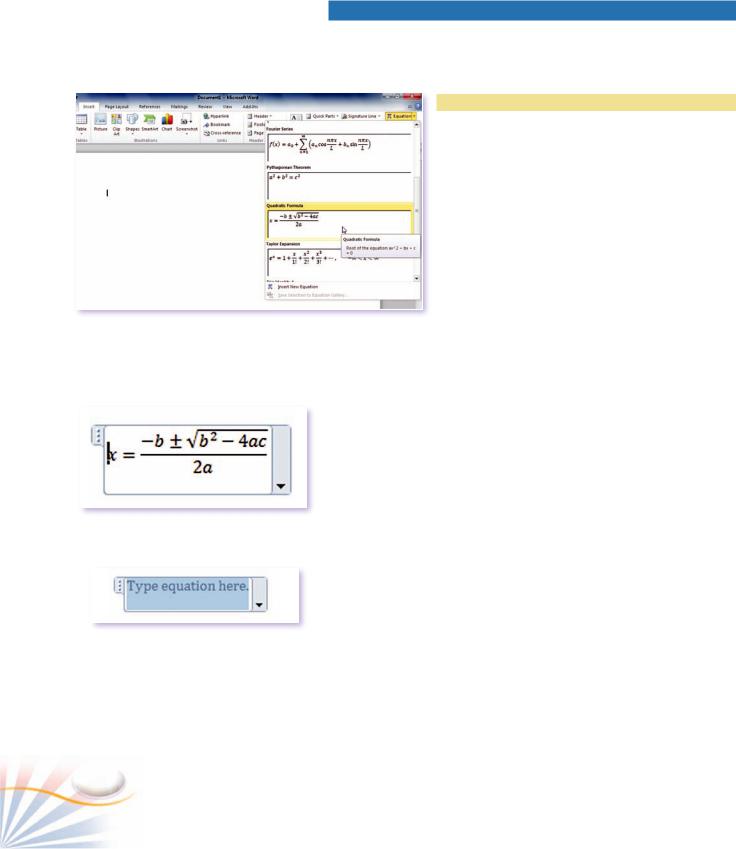
To change the symbols displayed in the Symbols group;
1.On the Equation Design Tools tab, click the More button in the Symbols group.
2.Click the down arrow next to Basic Math to view all the categories.
You can add your equation into the
Equation gallery; Inserting a Structure to an Equation
1.Click the equation, and then click the arrow next to the equation.
2.Select Save as New Equation on the menu.
3.Click OK.
The equation is now available in the Equation gallery.
To edit an equation;
1.Click the equation.
2.Use the commands Equation Design Tools tab to edit the equation object.
To remove an equation from a document;
1.Select the equation. Press the Delete key.
Symbols
You can insert characters and symbols which are not present on the keyboard such as a copyright© or trademark TM symbols into documents. You can format the symbols just like any other text in a document.
Practice
Inserting Special Symbols
In this exercise, you will insert a copyright symbol into a document.
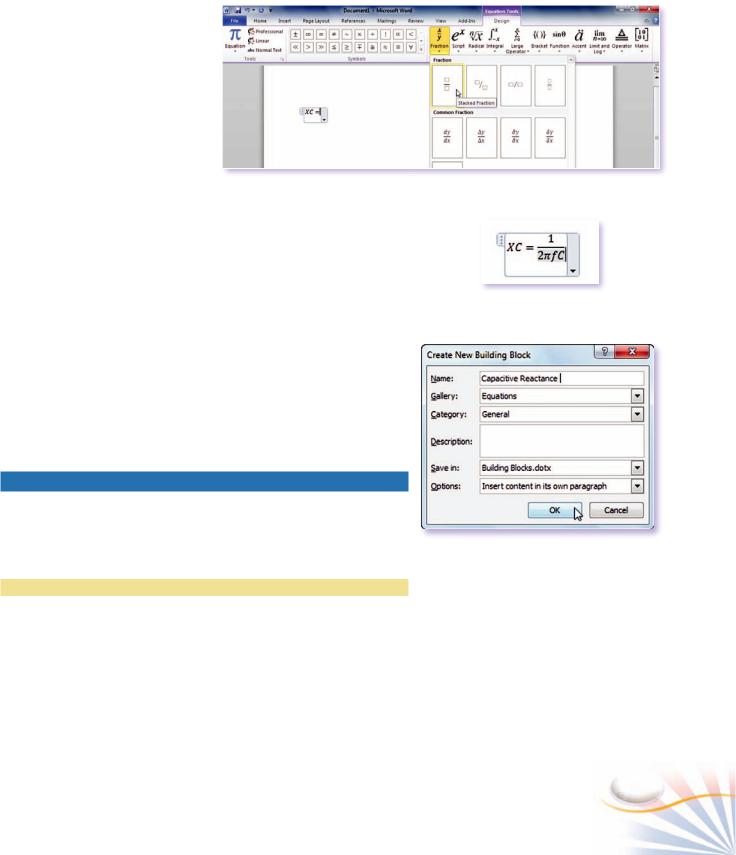
1.On the Insert tab, click the Symbol button in the Symbols group.
2.Click the copyright© symbol.
Typing an Equation
Saving an Equation into the Equation Gallery
The copyright symbol is inserted at the location of the insertion point. The Symbol dialog box enables you to make a selection from various symbol types.
Inserting and Formatting Objects |
65 |
The Symbol gallery
The Symbol dialog box
3.Click More Symbols on the Symbols menu.
4.Select a symbol and click the Insert button to insert into your document.
Depending on the number of Fonts installed on your computer, there are many symbols available to use such as:
Windings: Includes decorative symbols which you can use for a bulleted list.
Webdings: Small pictures specifically designed to be used on Web Pages.
5.On the Symbols tab of the dialog box, click the arrow next to the Font box, and click Webdings in the list. The Symbols dialog box displays symbols available in Webdings font face.
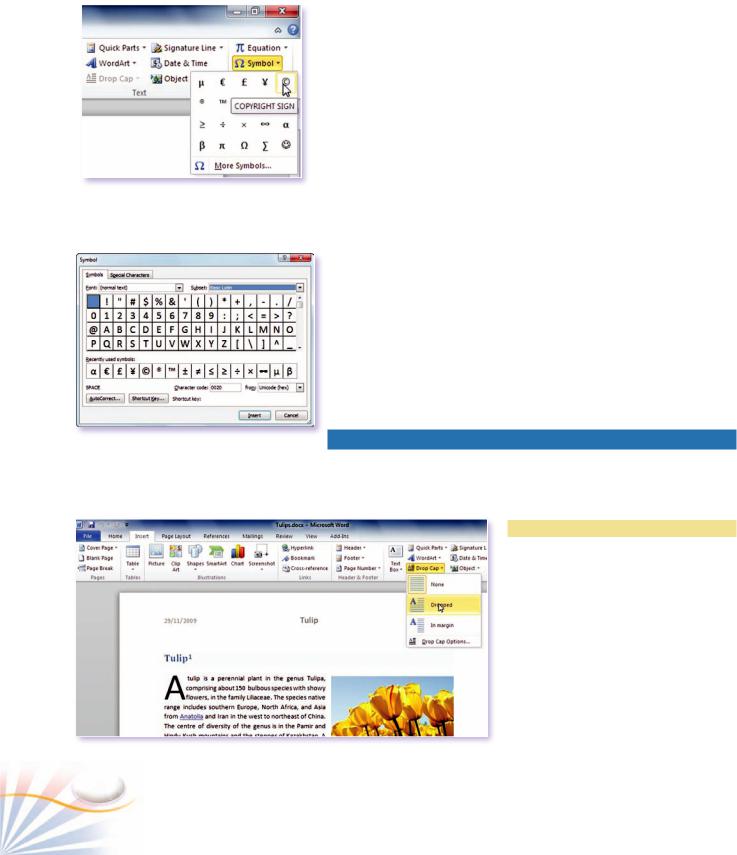
Drop Cap Letters
Drop Cap is an enlarged, decorative capital letter that appears at the beginning of a paragraph. Drop caps are suitable for newspaper or magazine styles, and multiple columned texts.
Practice
Applying a Drop Cap
In this exercise, you will apply a Drop
Cap to a paragraph.
1. Click over the paragraph where you want to apply a Drop Cap.
2. On the Insert tab, click Drop Cap in the Text group.
3. Click Dropped or In Margin commands.
Drop Cap gallery
66 |
Chapter 5 |
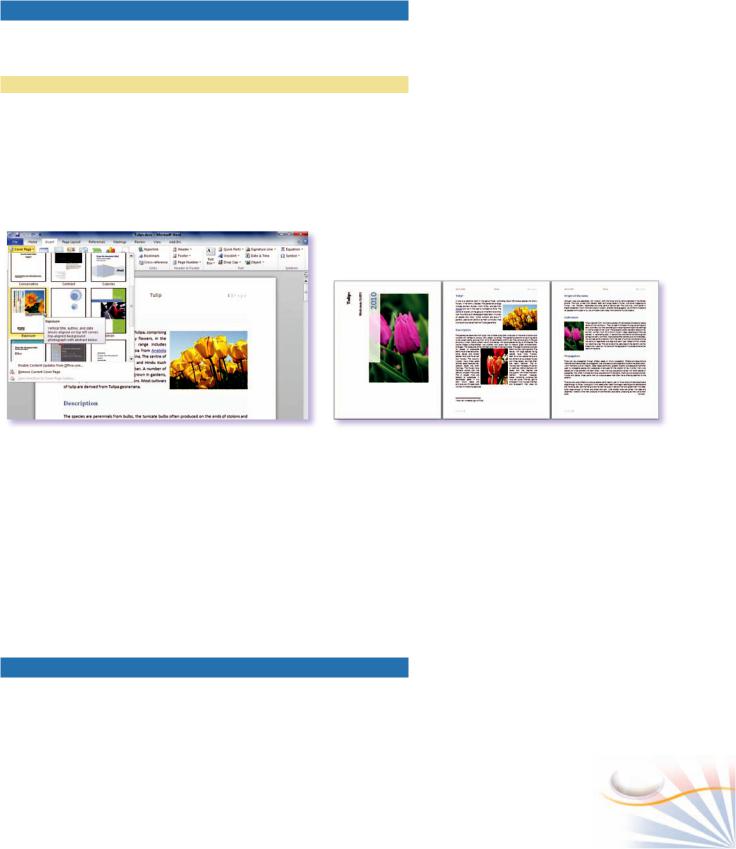
Cover Pages
The Cover Page gallery provides 15 different templates for cover page designs.
Practice
1.Click the Insert tab.
2.Click the Cover Page button in the Pages group.
3.Choose a template from the Cover Pages gallery.
The Cover page is always inserted as the first page of the document.
|
|
|
|
|
|
Cover Page gallery and inserting a cover page |
|
A document with a cover page |
4.Type in and replace the text and the images in the page with your own text and images.
Removing a Cover Page
You can remove a cover page or insert a different one;
1.Click the Cover Page button in the Pages group.
2.Click the Remove Current Cover Page command at the bottom of the Cover Pages gallery.
Page Numbers
Page numbers will be very helpful to identify each page in the document which is longer than one page. You can insert page numbers in different formats and place them in the margins of each page.
Inserting and Formatting Objects |
67 |
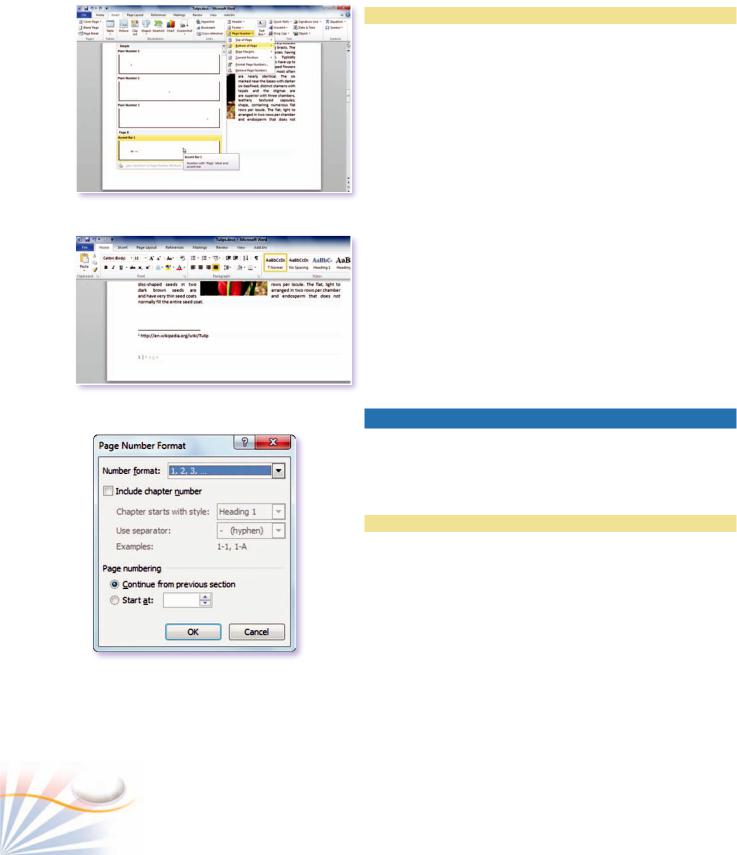
Page Numbers gallery
A page number
Page Number Format dialog box
Practice
Inserting Page Numbers
In this exercise, you will create simple page numbering;
1.On the Insert tab, click the Page Number button in the Header & Footer group.
Specify the position and alignment of the page numbers. Each option on the menu displays a gallery.
2.Select the Bottom of Page option and click Plain Number2 in the gallery.
A page number is inserted at the bottom of each page in the document.
The Page Numbers dialog box enables you to further format the page numbers.
3.Click the Format Page Numbers command on the Page Number menu.
The Page Numbers Format dialog box opens.
4.Click the Number format arrow and click the number format you want in the list.
Date and Time
You can insert the today's date and time as regular text or as a field into a document. A field is a placeholder for information that is inserted and updated from another source. Word gets the today's date and time from the computer's clock.
Practice
Inserting Date and Time
In this exercise you will insert a date which updates itself whenever the document is opened.
1.Locate the insertion point where you want the date or time to appear,
2.On the Insert tab, click the Date & Time button in the Text group.
68 |
Chapter 5 |
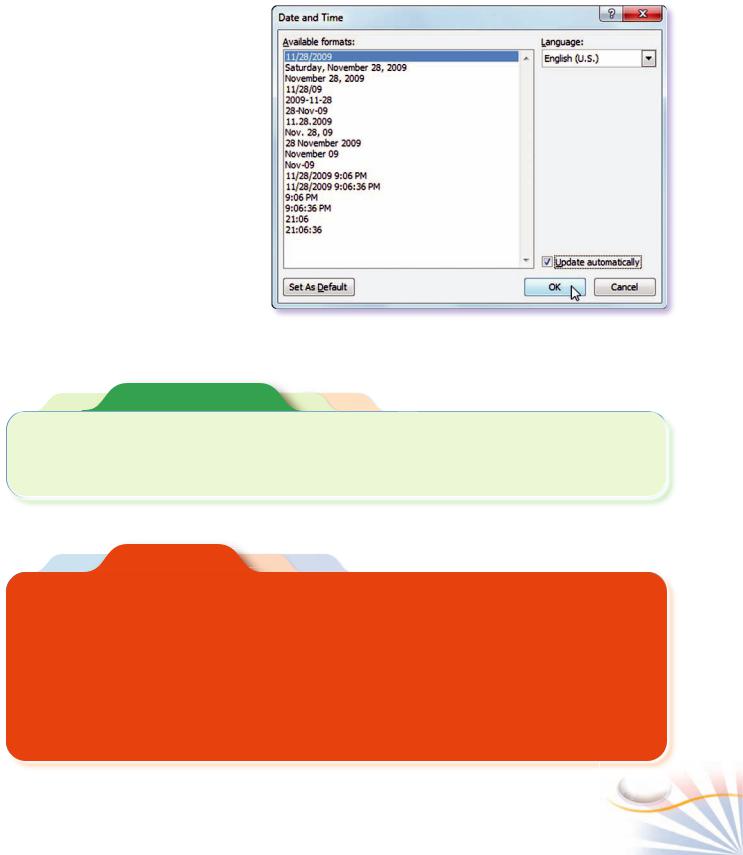
The Date and Time dialog box opens.
3.In the Available formats list, choose a Date and Time format.
The Update automatically option inserts the date and time as a field.
4.Check the Update automatically checkbox. Whenever you open this document, the Date and Time in the field will be updated and show the current date and time.
5.Click OK.
Inserting Date and Time
Fill In The Blank
1. |
The ______________________ provides different |
3. _____________ are small pictures specifically |
|
templates for cover page designs. |
designed to be used on Web Pages. |
2. |
_____________ is used to identify pages in a |
|
|
document. |
|
|
|
|
Case Study
Inserting and Formatting Objects
Step-1 Open the Brochure.docx document you have created in the previous chapter.
Step-2 Create a cover page for the document. Select the Motion style or a style with a picture in the Cover Page gallery.
Inserting and Formatting Objects
Step-3 Insert a page number for each page except the cover page. Position the page number at the bottom of each page.
Step-4 Insert the current date at the bottom of the cover page.
Step-5 Use a drop cap at the introduction paragraph of the brochure.
Step-6 Save the document.
69

Multiple Choice Questions
1.A ____________ is a large dropped capital letter that you place at the beginning of a paragraph.
a. Graphical start letter |
b. Starting letter |
c. Drop letter |
d. Drop Cap |
2.Which of the following options can be changed in the Page Numbers dialog box? (Choose three answers)
a.Page number format.
b.Page number alignment.
c.Chapter number.
d.Starting page number.
3.How can you add an equation into the Built-in equation gallery?
a.Right-click and use Save as New Equation command on the equation.
b.Type the equation in the Built-in equation gallery.
c.Open the symbols gallery and select the Add Equation command.
d.Use the commands on the Structures group.
4.Select the locations in which a page number is displayed. (Choose all that applies)
a.In the left and right margins
b.At the top and bottom of a page
c.In the first line of the document
d.On the title bar
5.A time field shows the incorrect time in a Word document. What should you do to correct it? (Choose two answers)
a.Open the Date and Time dialog box and select another time format.
b.Manually type the time in the field.
c.On the field right click; and select the Update Field command on the pop-up menu.
d.Set the correct time in computer's clock.
6.If you want to update a date text to the current date each time you open a document, you need to;
a.Right click over the date and choose update.
b.Check the "update automatically" box when you insert the date for the first time.
c.Use Windows, and Word update.
d.Change the date settings of your computer.
7.Which of the following are true about the Drop Cap menu? (Choose two answers)
a.You can use more than 3 lines for a Drop Cap.
b.Dropped text can be placed in the margin area of a document.
c.A Drop Cap has a fixed style so its font color never changes.
d.You can use up to 3 Drop Caps in a page.
8.Select the sentence which is true about Symbols.
a.Symbols only can be formatted in the Symbols dialog box.
b.Special symbols can be inserted by typing with the keyboard.
c.All the fonts have the same symbol characters.
d.You can insert symbols with short-cut keys.
9.Which of the following is true about an equation object? (Choose two answers)
a.Double click over an equation to edit it.
b.Use the Symbols group to create special mathematical characters inside the Equation editor.
c.You cannot add new equations to the Equation gallery.
d.You can format the text color of an equation object.
10.What happens if you click the Cover Page button when you are working at the 3rd page of your document?
a.The cover page is inserted at the current location.
b.The cover page is inserted at the end of the document.
c.Word displays a dialog box to ask a location for the cover page.
d.The cover page is inserted as the first page of the document.
70 |
Chapter 5 |