

Word 2010
.pdf1.Click on a text. In the Home tab; move your mouse over one of the styles in the Quick Style gallery in the Styles group.
Live preview shows how it will look if
you applied the highlighted style.
2.Click the More button next to the Quick Style gallery.
3.Select and click to apply a style.
Creating a Quick Style
In this exercise, you will create your own paragraph Quick Style.
1.Select a paragraph with formatting information; such as font color, size, align left, and italic etc.
2.In the Styles group, click the More button next to the Quick Styles.
3.Click Save Selection as a New Quick Style command. Create New Style from the Formatting dialog box opens.
The Style gallery
Creating a Quick Style
4.The current name will be highlighted. Type a new style name in the Name: box. Click OK.
Themes
A theme applies to the entire document. The purpose of a theme is to change the fonts or colors in a consistent way across a document without redefining the individual styles.
1.On the Page Layout tab; click the Theme button in the Themes group.
2.Select a built-in Theme in the gallery
Themes gallery
Formatting Characters and Paragraphs |
51 |

Case Study
Opening, editing, and saving a document
Step-1 Type the text "Happy Birthday"
Step-2 Select the text line "Happy Birthday".
Step-3 To copy text, press Ctrl + C or click the copy button in the Clipboard group.
Step-4 Paste the text two times; press Ctrl + V two times or click the paste button two times in the Clipboard group.
Step-5 Select the first "Happy Birthday" and open the Font dialog box:
Click the Font dialog box launcher in the Font group.
Apply the following formats to the first "Happy Birthday" text:
Step-6 Font: Arial; Font Style: Bold; Size: 24 pt.; Font Color: red
Effect: Double Strikethrough
Character Spacing: Scale: 150%
Select the second "Happy Birthday" text.
Align the selected text at center:
Step-7 Click the center alignment button in the Paragraph group.
Open the Font dialog box.
Apply the following formats to the second "Happy Birthday"" text:
Font: Font Style: Italic, Size: 26 pt., Font
Color: blue, Effect: Small caps
Character Spacing: Spacing: Expanded by: 3 pt.
Creating Customized Lists
Step-1 Create a blank word document.
Step-2 Type the document title as "World Cup 2010 Countries and Players"
Step-3 Create an imaginary group list of World Cup 2010 football games. There should be 4 different countries.
Step-4 For each country type four player names just below their country names.
Step-5 Select all the country names and player names together.
Step-6 Click the Numbering button in the Paragraph group.
A numbered list appears from number 1 to number 20.
Step-6 Select the players of the first country in the numbered list.
Step-7 Press the Tab key on the keyboard or click the Increase Indent button in the Paragraph group.
A Multilevel list is created and the players get letters instead of numbers in the list.
Step-8 Save the document as "Sports.docx"
Step-9 Repeat the steps for the remaining countries in the list.
52 |
Chapter 3 |
Fill In The Blank
1.To display the Tabs dialog box, click
______________________________ and then click Tabs.
2.A ___________ is a group of paragraph and character formats stored under a name.
3. You can set tabs using Format, Tabs or using the______________.
True or False
1.Subscripted texts are those that appear raised above other text on a line.

 True
True 
 False
False
2.Borders can be applied on all the edges of a paragraph.

 True
True 
 False
False
3.When text is formatted into a bulleted or numbered list, one bullet or number is assigned to each line.

 True
True 
 False
False
4.The Tab key is used to align text in a document.

 True
True 
 False
False
5.You cannot use images, symbols or special characters to create bulleted lists.

 True
True 
 False
False
Projects
1.Create an outlined, bulleted document about computer parts, both hardware and software. Give examples about the software and hardware in the list. (Ask your teacher about software and hardware)
2.Create a list about four famous writers from your country. Write down their names and their books. Use tab stops in the list.
Formatting Characters and Paragraphs |
53 |

Multiple Choice Questions
1.Which of the format property of paragraphs should be set before applying a multilevel list?
a. Tab stops |
b. Indents |
c. Lines |
d. Styles |
2.What are the advantages of using tab stops? (Choose two answers)
a.The documents aligned with tab stops display improperly when transferred to other computers.
b.Tab stops makes text alignment very easy.
c.Documents are created more accurately.
d.Tab stops with the tab key makes typing more accurate.
3.How can you end numbering in a list? (Choose two answers)
6.Which one of the following statements is false?
a.Numbers are useful for items in a particular order.
b.You can change the color of the bullets in a list.
c.You can separate items in a list by beginning each item with a bullet or number.
d.Bullets are useful for items in a specific order, such as a recipe.
7.How can you remove a tab stop from the Ruler? (Choose two answers)
a.Double-click on the tab stop.
b.Drag and drop the tab stop on the Ribbon.
c.Drag and drop the tab stop on the document area.
d.Right click on the tab stop and choose clear.
a.Press enter twice at the end of the list.
b.Restart the computer.
c.Click the Numbering button at the end of the list.
d.Press the Tab key at the end of the list.
4.When a new paragraph is inserted in a numbered list_________.
a.A new numbering sequence starts from the insertion point.
b.Word asks you to enter a number for the new paragraph.
c.The paragraph automatically takes a number in the list.
d.Word starts a new paragraph without a number.
5.A_________ is a list that contains several levels of items, with each level displaying a different numeric, alphabetic, or bullet symbol.
a.Bullet level list
b.Multilevel list
c.Table list
d.Style list
8.Which of the followings are true? (Choose three answers)
a.A Tab stop is a position you set for placing and aligning text on a page.
b.A Tab stop is a place at which one page ends and another page begins.
c.You can easily move a tab to a different position on the ruler.
d.When you no longer need a tab, you can remove it.
9.Which of the following text alignments are done with tab stops? (Choose two answers.)
a.Left Tab style aligns text on the left at the tab position.
b.Right Tab style aligns text to the right side of a document page.
c.Center Tab style centers text at the tab position.
d.Justify Tab style aligns text on both sides of tab stops.
54 |
Chapter 3 |

10.Which of the following properties can be formatted using the Paragraphs dialog box? (Choose three answers)
a.Line space between paragraph lines
b.Space between paragraphs
c.Indent space of paragraphs
d.Page size of documents
11.Select the statements that are true about paragraph borders. (Choose two answers)
a.You can apply borders to all sides of a paragraph.
b.Paragraphs cannot contain border and shading together.
c.Borders should be applied to each paragraph separately.
d.A paragraph can have different border line styles and colors from the rest of document.
12.Which of the following actions change the formatting of a paragraph? (Choose two answers)
a.Clicking the Clipboard button in the Paragraph group.
b.Clicking the Format Painter in the Clipboard group.
c.Aligning the paragraph with Align Text Right button in the Paragraph group.
d.Indenting the paragraph.
13.Which of the following indents all the text in a paragraph except the first line?
a. Hanging indent |
b. |
First line indent |
c. Right paragraph indent |
d. |
Decrease indent |
14.Select the properties you can set in the Column dialog box. (Choose two answers)
a.Set the number of columns.
b.Change the spacing between columns.
c.Change the font formatting of column text.
d.Set the paragraph alignments in columns.
15.What is the Orphan Control?
a.It keeps the paragraph and the following paragraph on the same page.
b.It keeps all lines of a paragraph on the same page.
c.It prevents the first line of a paragraph from being printed at the bottom of a page.
d.It suppresses line numbering.
16.Which feature of Word enables you to see formatting of a text without having to apply it first?
a. Paragraph dialog box |
b. |
Format Painter |
c. The Mini Toolbar |
d. |
Live Preview |
17.Select the sentences which are true about Font formatting. (Choose two answers)
a.The Format Painter copies the format of a text to other text.
b.Changing the font type of an Italic text, clears it's Italic formatting.
c.You can change the capitalization of a text.
d.You cannot apply more than two formatting to a text.
18.Which of the following happens after applying Ctrl + U and Ctrl + I short-cuts to format a clear text?
a.The text becomes bold.
b.The text becomes italic.
c.The text becomes italic and underlined.
d.The text becomes underlined.
19.How can you change the case of a text with all capital letters to sentence case without retyping it?
a.Use Undo end Redo commands on the Quick Access toolbar.
b.Select the first character of the text and use Grow button in the Font group.
c.Select the text, and choose the Sentence case button in the Font group.
d.Use the Capitalize Each word button in the Font group.
Formatting Characters and Paragraphs |
55 |

20.Which of the Word 2010 feature allows you apply one-click font and paragraph formatting to whole document?
a.The Font group
b.The Paragraph group
c.Tabs
d.Styles
21.Which of the following displays formatting commands for texts and paragraphs whenever a text is selected?
a.Themes
b.The Mini toolbar
c.Styles
d.Font group
22.Select the Word features that allow you to use page background colors and faint background images? (Choose two answers)
a.Page Color
b.Indenting
c.Watermark
d.Themes
23.What should you do to use font and paragraph formats of a text for your future documents?
a.Create a Template
b.Create a Format Painter style
c.Create and save a Quick style
d.Create a new Font group
24.Select the sentences that are true about Styles. (Choose two answers)
a.A style is a group of paragraph and character formats.
b.Word does not allow creating a new style.
c.A style’s color scheme can be changed using Themes gallery.
d.By default Word applies Heading style to the text.
25.The last line of a paragraph displays at the beginning of the next page. What should you do keep the entire paragraph in the same page?
a.In the Paragraph dialog box, check the Widow control box.
b.Increase the line spacing of the paragraph
c.Indent the last line of the paragraph
d.Use the Backspace key to move the line to the previous page.
26.Select the options which are used to clear text formatting. (Choose two answers)
a.Clear All Formatting checkbox in the Clipboard group.
b.Ctrl + Space short-cut keys.
c.Select the whole document and press the Space key.
d.In the Font group, click the Clear Formatting button.
27.How is the Font size of a selected text formatted? (Choose two answers)
a.Using the Grow Font and Shrink Font buttons in the Font group.
b.Applying Ctrl + B and Ctrl + G short-cut keys.
c.Using Font Size box in the Font group.
d.Changing the Spacing in the Advanced tab of the Font dialog box.
56 |
Chapter 3 |

The Margins gallery
The Page Setup dialog box.
Page Setup
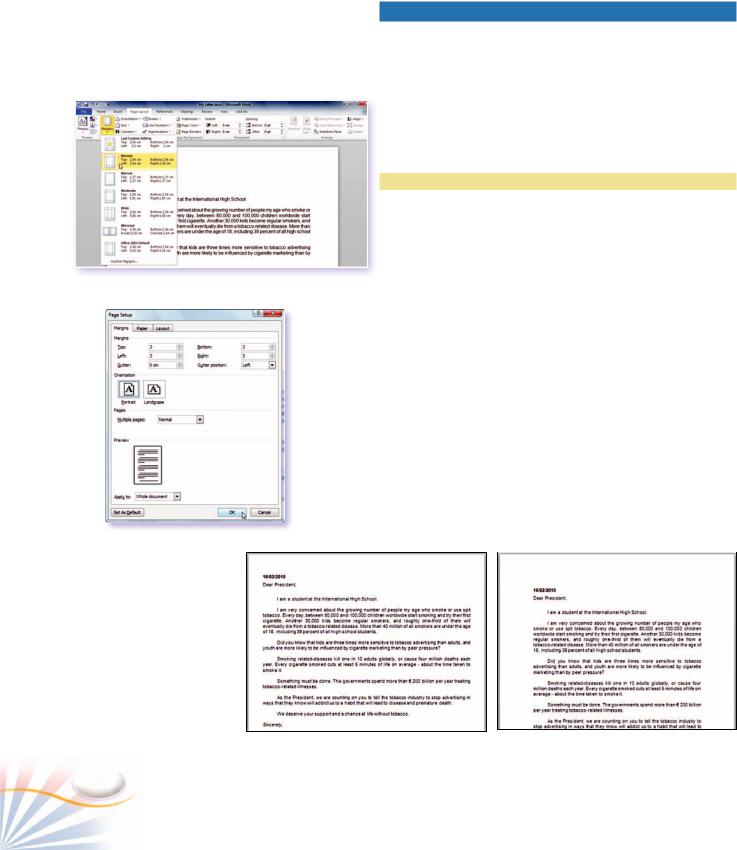
The Page Setup group in the Page Layout tab contains commands for page formatting such as margins, page orientation and paper size.
Margins
Margins are the white areas between text and the edges of a page. Margins can be changed to make more text fit on a page, or to add extra space for binding documents.
Practice
Changing Margins
In this exercise, you will change the page margins.
1.Click the Page Layout tab.
2.Click the Margins button in the Page Setup group.
3.Select the Moderate option.
To set custom margins;
1.Click the Page Setup dialog box launcher in the Page Setup group; or click the Custom Margins button on the Margins menu; or double-click on the left Ruler.
The Page Setup dialog box opens.
The Page Setup dialog box is used to define the margins, paper options, and layout properties of pages in the document.
1.Under the Margins; change the size for the Top, Bottom, Left and Right margins to 3 cm. Click OK.
Narrow margins |
Custom margin settings |
58 |
Chapter 4 |
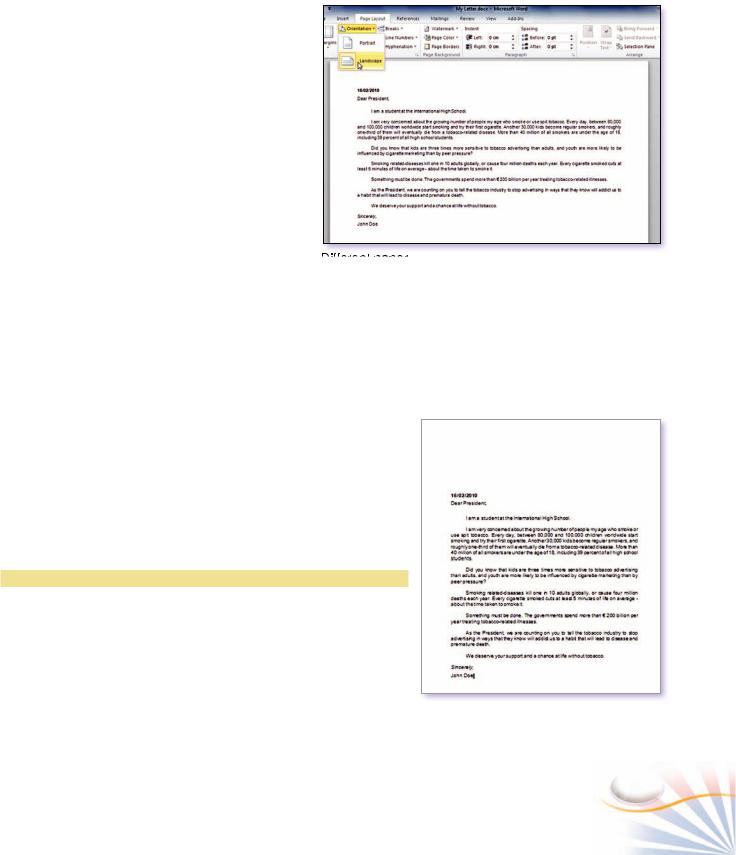
Orientation
Portrait (vertical) orientation is used for traditional printing like letters, reports, and notes. Landscape (horizontal) orientation can be used for slides, title pages or for the objects which don't fit in the document using portrait orientation.
To set the page orientation as landscape;
1.Click the Orientation button in the Page Setup group.
Or in the Page Setup dialog box; select the Landscape option.
Paper Size
A document can be printed on different sizes of paper. Different paper types like flyers, envelopes, and poster papers can be used for printing. A4 (21 cm x 29.7 cm) is one of the international standard size paper. Letter (21,59 cm x 27,94 cm) is the standard size for North American countries.
In order to change the paper size of a document;
1.Click Size button in the Page Setup group. Select the A4 size on the Size menu.
Or on the Size menu, click the More Paper Sizes option. The Page Setup dialog box opens.
2.Click the Paper tab and then select the new size under the Paper size.
Layout
The Layout tab allows you to change the location of headers and footers in the margin area. You can also align the whole text in a page.
Practice
Changing the Alignment of a Page.
1.Click the Layout tab in the Page Setup dialog box.
2.In the Page section, click the vertical alignment drop-down arrow and select Bottom. Click OK
Landscape layout
The text moves to the bottom of the page.
Page Setup and Printing |
59 |
Devices and Printers window
The Print window
Printing specific pages and selecting number of copies.
Setting up a Printer
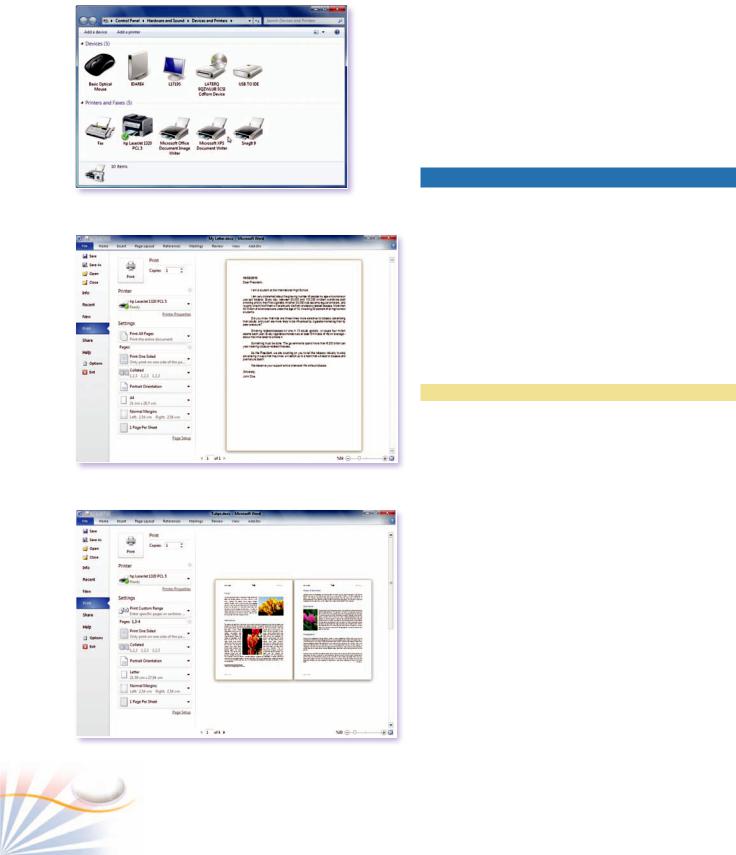
The computer must be connected to a local or network printer device to print documents. To see the available printers;
1.Click the Start button, and click Devices and Printers command. The Devices and Printers window displays the installed printers.
Printing
One of the most important functions of Word is printing a finished document. You can print all pages, just the page containing the insertion point, or selected pages in Print view. Clicking the Quick Print button prints the entire document. By default, the Quick Print button is not visible on the Ribbon. Customize the Ribbon and the Quick Access toolbar to display the Quick Print button.
Printing Specific Pages and Selecting Number
of Copies.
Practice
In this exercise, you will print pages 1, 3, and 4 two times.
1.Open a document at least four pages.
2.Click the File tab, and click to Print command. Or press Ctrl + P.
3.Under the Print section, in the Copies box; type 2.
4.Under the Settings section, in the Pages box; type 1, 3-4.
5.Click the Print button.
60 |
Chapter 4 |