

Word 2010
.pdf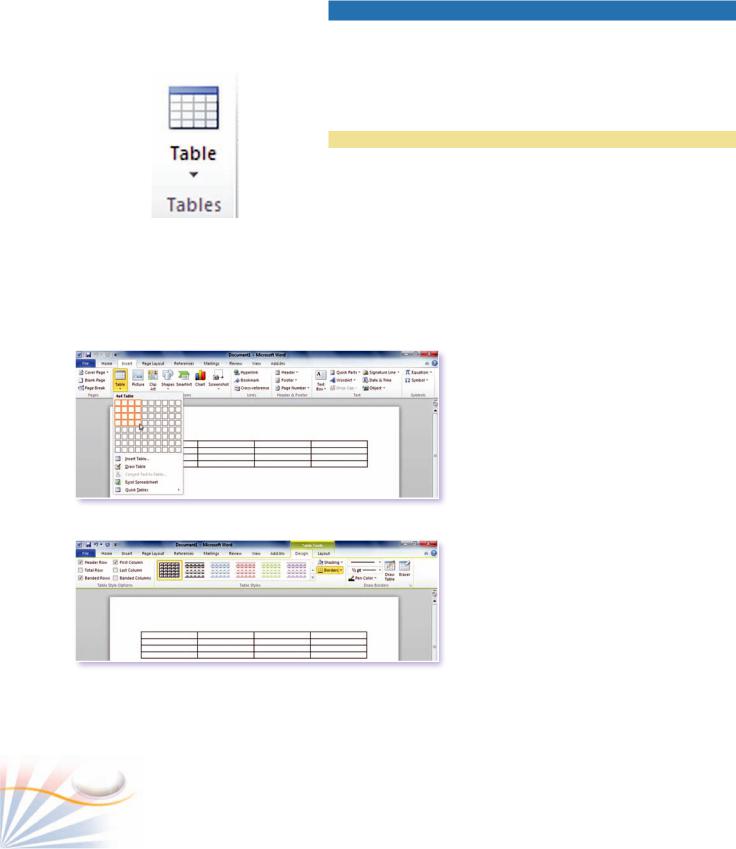
Tables
A table enables you to arrange text, data, and numbers in columns and rows. The items in a table are easier to edit and are precisely positioned in a document.
By using tables you can create forms, sort data, track information and make mathematical calculations.
Practice
Creating a Table
Word lets you create a table in several ways. Before creating a table, you must plan your table: how many columns and rows you will need,
if you will use functions, what the table borders will look like, etc.
Tables button
In the following exercises, you will insert a table into a document in different ways.
To insert a table by using the insert table button;
Creating a table
The Table Tools Design tab and a table with 4 x 4
1.Position the insertion point where you want to insert a table
2.Click the Insert tab; click the Table button in the Table group.
The Table button enables you to create a table using several methods, such as selecting the number of rows and columns on a grid, or using the Insert Table dialog box.
3.Move your mouse on the grid to select the table size. Word highlights the cells as you drag across them. Make a selection of 4 rows and 4 columns. Live preview shows the table at the insertion point in the document.
4.Click the lower-right cell in the selection. A blank table with 4 rows and 4 columns is inserted in your document.
72 |
Chapter 6 |

The Insert Table dialog box is useful when creating large tables, or tables that require a specific number of columns and rows beyond the scope of the Insert Table menu.
To insert a table by using the Insert Table dialog box;
1.Click the Insert tab; click the Table button in the table group.
2.Select the Insert Table command on the menu. The Insert Table dialog box opens.
3.Enter the number of columns and the number of rows.
4.Click OK. The table is inserted in the document.
The Insert Table dialog box.
Entering Data into a Table
You may enter data in a table by keyboard or copy it from another document or table. To enter data into a cell, click in the cell and type the data. Use the Tab key and arrow keys or the mouse to switch between cells.
Formatting the Text of a Table |
Entering data into a table |
You can apply all text formatting options; font formatting, text alignment etc.; to a table's text like any other text in a Word document.
Selecting Tables
In order to modify the table contents or borders you need to know how to select tables, cells, rows, and columns.
1.On the Table Tools Layout, click the Select button in the Table group. Click a command.
TO |
DO THIS |
|
|
|
|
|
|
|
|||
|
|
|
|
|
|
select a table |
click the table move handle. |
|
|
|
|
select a cell |
click on the left side of the data in the cell |
|
|
|
|
select a column |
click the outside area of the table just above |
|
|
|
|
the column. |
|
|
|
||
|
|
|
|
||
select a row |
click the outside area of the table to the left of |
|
|
|
|
the row. |
|
|
|
||
|
|
|
|
||
select multiple |
click the first cell, hold down the Shift key, and |
|
|
|
|
press the arrow keys to select adjacent cells in |
|
|
|
||
cells |
|
|
|
||
a column or row. |
The Select button in the Table group |
||||
|
|||||
|
|
||||
|
|
|
|
|
|
Tables |
73 |

Table Styles
The Table Styles gallery, the quickest way to format a table, enables you to choose from many built-in styles.
In this example you will apply a preformatted style to your table.
1. Click the table to apply a style and click the Table Tools Design tab. You can simply apply a style to your table by clicking one of the styles in the Styles gallery
To see all available styles;
2. Click the More button next to the Style gallery.
3. To select a style, click the mouse on the option.
The style of the table changes.
The Table Style gallery
Modifying Table Styles
You can change some of the style options, such as colors and borders, apply additional formats, and create your own style.
1.Select the table, and then click the More button next to the Style gallery.
2.Select the Modify Table Style command. The Modify Styles box displays the currently applied style.
3.Use the Formatting area to change the border color, fill color, font formatting, etc. Click OK.
Table Borders
Word automatically creates ½ point black borders around every cell of a table. Editing and customizing table borders are pretty much the same as editing paragraph borders.
Practice
Changing Borders
In the following exercise, you will change a table's borders.
1.Select the table, and then click the down arrow next to the Borders button.
74 |
Chapter 6 |
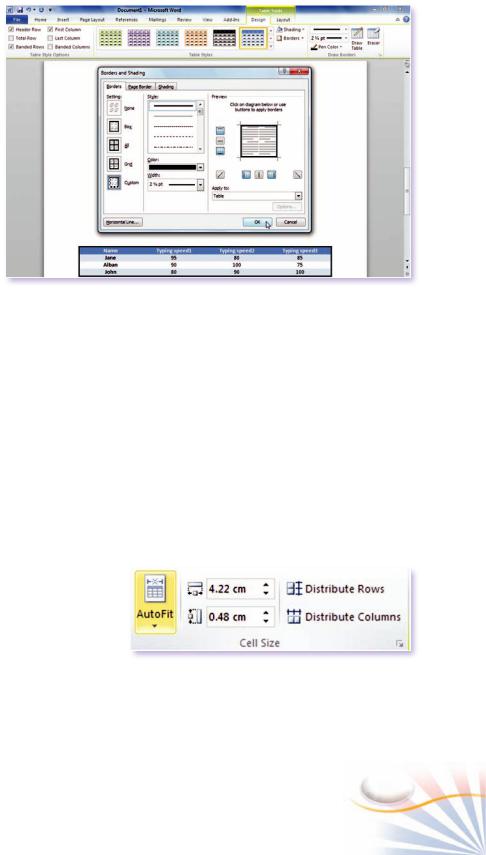
2. Click the Borders and Shading
|
command. |
|
|
The last border option under Setting |
|
|
section enables you to define custom |
|
|
borders. To set custom borders, you |
|
|
need to click the custom button then |
|
|
select border lines in the preview |
|
|
window. |
|
3. |
Click OK. |
|
Apply Shading |
|
|
You can use shading to emphasize some |
|
|
parts of a table. Shading enhances a |
|
|
table's design. |
|
|
To apply shading; |
|
|
1. |
Select the cells where you want to |
The Border and Shading dialog box and applying a table border |
|
apply shading. |
|
2.Click the down arrow next to the Shading button in the Table Tools Design tab.
You can choose different colors or create a custom shading color.
3.Click to select a color.
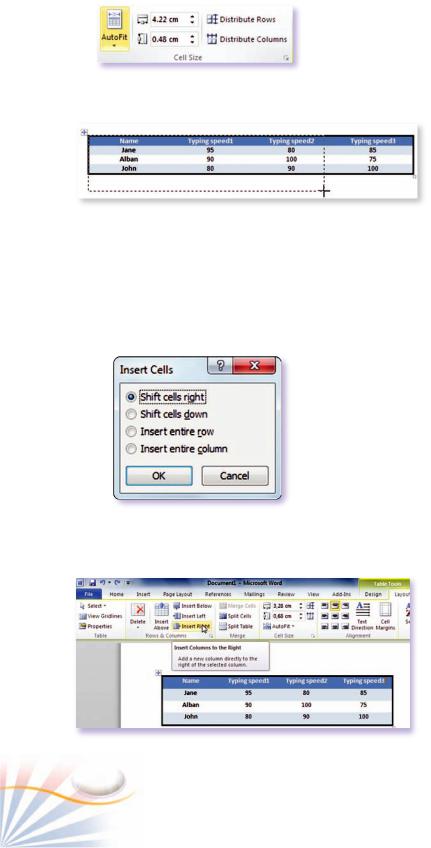
Resizing Columns and Rows
The Cell Size group enables you to change the height and width of rows and columns. You can enter the size by using the Width and Height boxes.
1.Click inside a cell.
2.On the Table Tools Layout tab.; type the new cell size in the boxes in the Cell Size group.
The cell adjusts to its new size. You can also resize a row or column, by dragging its border.
3.Use the Distribute Rows and the Distribute Columns buttons to set all rows or columns to the same height or width.
The Cell Size group
Tables |
75 |
|
|
|
|
|
|
|
|
Resizing and Moving Tables |
|
||||||
|
|
|
|
|
|
|
|
|
|||||||
|
|
|
|
|
|
|
|
A table can be resized or moved. A four headed moving arrow and a |
|||||||
|
|
|
|
|
|
|
|
resizing handle will displays on the corners of the table when it is |
|||||||
|
|
|
|
|
|
|
|
selected. |
|||||||
|
|
|
The Cell Size group |
||||||||||||
|
|
|
|
|
|
|
|
|
|
|
|||||
|
|
|
|
|
|
|
|
|
|
|
|
|
|
||
|
Four sided arrow |
|
|
|
|
|
|
|
|
|
1. To move the table, click and drag the four |
||||
|
|
|
|
|
|
|
|
|
|
|
|
|
|
||
|
|
|
|
|
|
|
|
|
|
|
|
|
|
||
|
|
|
|
|
|
|
|
|
|
|
|
|
|
sided arrow to the place where you want the |
|
|
|
|
|
|
|
|
|
|
|
|
|
|
|
table to be, and then release your mouse. |
|
|
|
|
|
|
|
|
|
|
|
|
|
|
|
2. To resize the table, drag the resizing handle. |
|
|
|
|
|
|
|
|
|
|
|
|
|
|
|
||
|
|
|
|
|
|
|
|
|
|
|
|
|
|
|
|
|
|
|
|
|
|
|
|
|
|
|
|||||
|
|
|
|
|
New table size |
|
|
Resizing handle |
|
|
|||||
|
|
|
|
|
|
|
|
Inserting / Deleting Cells, Columns, and Rows |
|||||||
|
|
|
|
|
|
|
|
As you edit the information in a table, you might need to add and |
|||||||
|
|
|
|
|
|
|
|
delete cells, rows and columns. |
|||||||
|
|
|
|
|
|
|
|
|
|
|
|
|
|
|
|
|
|
|
|
|
|
|
|
Practice |
|
||||||
|
|
|
|
|
|
|
|
Inserting Cells |
|||||||
|
|
|
|
|
|
|
|
In this exercise, you will insert new cells into your table. |
|||||||
|
|
|
|
|
|
|
|
1. Click in a cell. |
|||||||
|
|
|
|
|
|
|
|
2. On the Table Tools Layout tab, click the arrow button to open the |
|||||||
|
|
|
|
|
|
|
|
|
Table Insert Cells dialog box in the Rows and Columns group. |
||||||
|
|
|
|
|
|
|
|
3. Choose the Shift cells right option. |
|||||||
|
|
|
The Insert Cells dialog box |
4. Click OK. |
|||||||||||
|
|
|
|
|
|
|
|
|
|
|
|
|
|
|
|
|
|
|
|
|
|
|
|
|
|
|
|
|
|
Practice |
|
|
|
|
|
|
|
|
|
|
|
||||||
|
|
|
|
|
|
|
|
|
|
|
|
|
|
Inserting Rows and Columns |
|
|
|
|
|
|
|
|
|
|
|
|
|
|
|
In this exercise, you will insert a column into a table. |
|
|
|
|
|
|
|
|
|
|
|
|
|
|
|
1. Locate your insertion point in the cell you want |
|
|
|
|
|
|
|
|
|
|
|
|
|
|
|
the new column or row to be adjacent to. |
|
|
|
|
|
|
|
|
|
|
|
|
|
|
|
2. On the Table Tools Layout tab; click the Insert |
|
|
|
|
|
|
|
|
|
|
|
|
|
|
|
Right button in the Rows and Columns group. |
|
|
|
|
|
|
|
|
|
|
|
|
|
|
|
|
|
|
|
|
Inserting a new column |
|
|
|
|
|
|
|
|
||||
|
|
|
|
|
|
|
|
|
|
|
|
|
|
|
|
76 |
Chapter 6 |
3.Type “Average Speed” in the first cell of the column.
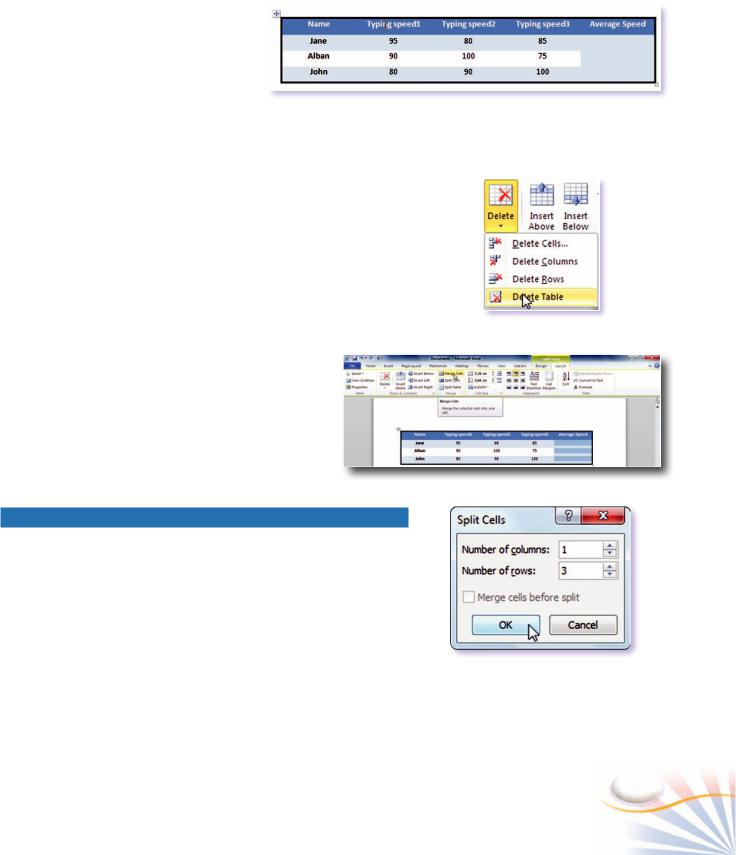
Delete Cells, Columns and Rows
To remove empty or unwanted cells, rows
or columns, or a table;
The Table after inserting a column
1.Select the cells, columns or rows that you want to delete.
2.In the Rows & Columns group, click the Delete button and then select a command.
Merge and Split Cells
The Merge Cells command combines several cells into a single cell.
To merge cells;
1.Select the empty cells in the “Average Speed” column.
2.On the Table Tools Layout tab, click the Merge Cells button in the Merge group. The selected cells become a single cell.
|
The Split Cells command does the opposite of the Merge Cells |
Deleting tables |
|
and divides a single cell into many cells. |
|
1. |
Select the cell you have created with the Merge Cell |
|
|
command. |
|
2. |
Click the Split Cells button in the Merge group. |
|
3. |
In the Number of columns box, type “1” and in the |
|
|
Number of rows box, type “3”. Click OK. |
|
The selected cell splits into 3 cells.
Merging Cells
Calculating Tables
You can calculate values and use functions such as Sum and Average in a table. However, it is better to use a worksheet program such as Excel to carry out more complicated functions.
The Split Cells dialog box.
Tables |
77 |

Practice
Calculating Values in a Cell
In this exercise, you will calculate values in a cell;
1.Click in the cell at the end of the second row.
2.On the Table Tools Layout tab, click the Formula button in the Data group.
A formula consists of an equal sign followed by a function name such as SUM, AVERAGE.
1.Click the Paste function down arrow, and select “AVERAGE” from the list.
2.Type “LEFT” between the parentheses for the location of the cells on which you want to perform the calculation. Click OK.
3.Calculate the average of the remaining rows.
Creating a formula and calculating tables
Sorting Tables
Word has the ability to sort items in a table. You can easily reorganize and reorder your data; sort paragraphs and numeric values by alphabetical, numerical or chronological order.
Practice
Sorting Data in a Column
In this exercise, you will sort values in a column of your table.
1.Click in the table. On the Table Tools Layout tab, click the Sort button in the Data group.
The Sort dialog box opens.
2.Under Sort by and select “Average Speed”.
3.Click the arrow next to Type box and select Number.
4.Select the sort order as Descending. Click OK.
The Sort dialog box and sorting tables
78 |
Chapter 6 |
Case Study
Creating, Editing and Calculating a
Table
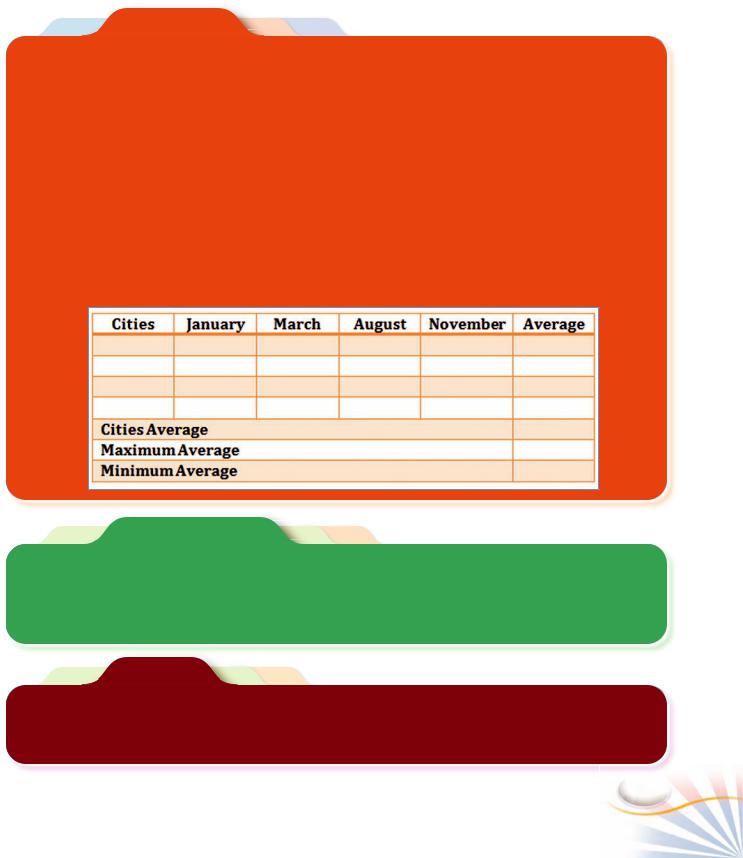
Step-1 Use the Insert Table button to create a 5×5 table (5 rows, 5 columns).
Step-2 In the first row of the table, define the column titles as Cities, January, March, August, and November.
Step-3 In the Cities column, enter the names of 4 cities in your country.
Step-4 Connect to the National Weather Service site of your country on the Internet. Get the average temperature of each city for the given months. Enter this data into your table.
Step-5 Insert a new column to the right side of the table. Name the column title as "Average".
Step-6 Use functions to calculate the yearly average for each city in the Average column.
Step-7 Insert three more rows at the bottom of your table. Name the rows as Cities average, Minimum average, and Maximum average.
Step-8 Use the Tables Styles gallery to apply a style to the table.
Step-9 Calculate the country averages, Minimum averages, and Maximum averages in the related cells.
Step-10Save the document as Mytable.docx.
Fill In The Blank
1.In the Insert Table dialog box you can enter the number of ______ and the number of _______.
2.When additional columns or rows are needed, place your insertion point _________ you want your column or row adjacent to.
3. A _________ is the intersection of a column and a row in a table.
Projects
1.Create the weekly lesson schedule of your class.
2.Design a table to list and sort the hobbies of your classmates.
3.Design a table for a student's report card. Show each term's marks and averages on the table.
Tables |
79 |

Multiple Choice Questions
1. Which of the following cell formulas is valid?
a. Average (right) |
b. =Sum (average) |
c. =Sum (all) |
d. =Sum (left) |
2.What is the quickest way to format a plain table?
a.The Table Styles gallery
b.The Borders and Shading dialog box
c.The Format Painter
d.The Font dialog box.
3.How can you sort alphabetically, from A to Z, the contents of a table column?
a.Click in the column, use Ascending option in the Sort dialog box.
b.Select the column, use Descending option in the Sort dialog box.
c.Select the column and then click the Sort button in the paragraph group.
d.Select the column and double click on the selection.
4.To merge cells in a table, use the ______ in the Merge group.
a.Merge tables command
b.Table command
c.Merge Cells button
d.Merge rows and columns button
5.Select the sentences that are true about tables. (Choose all that apply)
a.You can resize and move tables.
b.You can apply preformatted styles to a table.
c.You cannot insert and delete rows or columns from a table that contains data.
d.Formulas are used in tables.
6.What is the minimum number of rows and columns that a table can have?
a.2 Rows and 1 Column
b.2 Rows and 2 Columns
c.1 Row and 1 Column
d.1 Row and 2 Columns
7.Select the functions which are used inside a table cell. (Choose two answers)
a. SUM |
b. MIN |
c. SORT |
d. TIME |
8.Select the ways to make cell, row, column, and table selections. (Choose two answers)
a.Click the table move handle.
b.Use the Select button in the Table group.
c.Double-click in the cell.
d.Press Ctrl + A in the table to select all the cells.
9.Which are the methods that you can use to create a table? (Choose three answers)
a.Click the Table button, and drag the table size on the grid.
b.Click the Table button, click the Insert Table command and then enter the table dimensions.
c.Click the Table button, click the Draw Table command, and then draw the table
d.Click the Table button, and select the Convert to List command.
10.Which of the following are true about table styles? (Choose three answers)
a.A different border style can be used for each cell.
b.All the cells should have same shading settings.
c.The Table styles gallery provides preformatted table styles to use.
d.You can create and save your own table styles.
80 |
Chapter 6 |