

Word 2010
.pdfPractice
In the following exercise; you will indent a paragraph in your document.
Indenting Text.
1.Click in the paragraph starting with the text “I am very concerned”.
2.In the Paragraph group, click the Increase Indent button. The whole paragraph moves to the right.
If you only want to indent the first line of the paragraph
3.Click in the first line of the paragraph. and press the Tab key Or click the Paragraph dialog box button;
The Paragraph dialog box opens.
Under the Indentation, choose the First Line option in the Special box.
4.Click OK in the Paragraph dialog box.
5. Indent the remaining paragraphs. |
Indenting options |
Line and Paragraph Spacing
You can change the amount of spacing between lines in a paragraph or between paragraphs by using the Spacing section in the Paragraph dialog box.
To change line spacing;
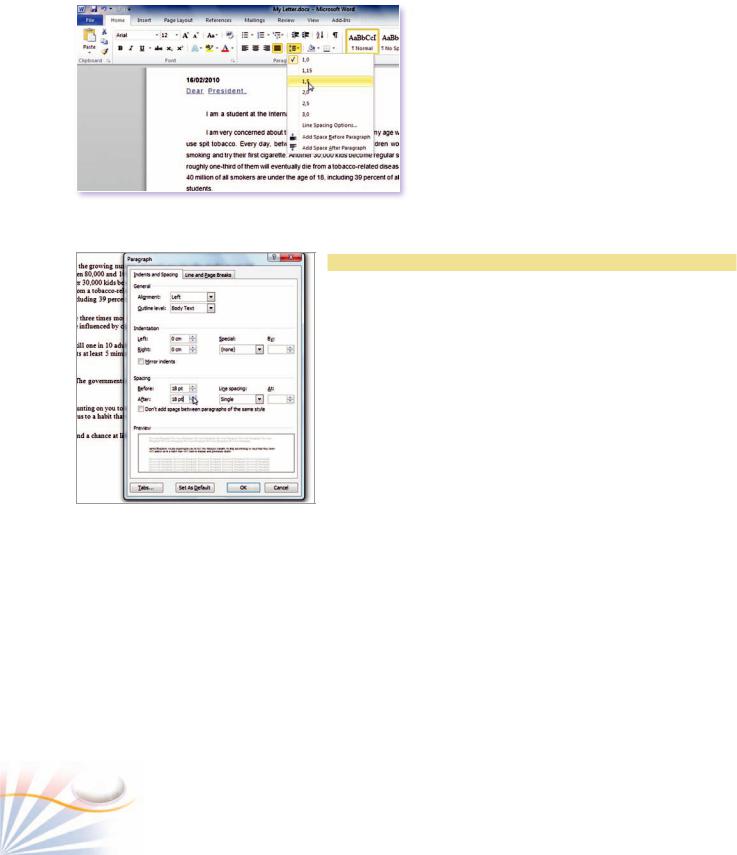
In this exercise, you will change the amount of spacing between lines in a paragraph.
1.Select the whole document.
2.Click the Line Spacing button in the Paragraph group.
On the menu; select 1.5.
Or on the Line Spacing menu, click the Line Spacing Options command.
The Paragraph dialog box opens.
Indenting paragraphs
Formatting Characters and Paragraphs |
41 |
3. Select the Indents and Spacing tab.
4. In the Line Spacing box, click the arrow and select 1.5 lines.
5. Click OK. The paragraph line spacing changes to
1.5 lines.
Document with 1,5 Line Spacing
Practice
Changing Paragraph Spacing.
In this exercise, you will change the amount of spacing between paragraphs.
1.Select the first four paragraphs in your document.
2.In the Paragraph group, click the Paragraph dialog box button; Or on the Page Layout tab, use the Paragraph group.
3.In the Spacing section, click the up arrow until you reach 18 pt. in the Before box.
4.In the Spacing section, click the up arrow until you reach 18 pt. in the After box.
Spacing Between Paragraph
|
Line and Page Breaks |
|
There are other useful paragraph rules that you can apply by clicking |
|
the Line and Page Breaks in the Paragraph dialog box. Such as |
|
Widow/Orphan Control, Keep Lines Together etc. These options are |
|
summarized as follows. |
|
|
Option |
Description |
Widow/Orphan control |
Prevents the last line of a paragraph from being printed at the top of a page (widow) |
or the first line of a paragraph from being printed at the bottom of a page (orphan). |
|
Keep with next |
Keeps the paragraph and the following paragraph on the same page. |
Keep lines together |
Keeps all lines of a paragraph on the same page. |
|
|
42 |
Chapter 3 |
Bulleted and Numbered Lists
Bulleted and Numbered lists make your document more readable and enable you to point out important parts of a document.
Bullets |
Special characters, symbols, and pictures |
Numbers |
Numerals, roman numerals, and letters |
|
|
Use Numbers when the ordering of the paragraphs and items is important (i.e. legal documents, instructions, manuals).
Use Bullets when the ordering doesn’t matter (i.e. a shopping list).
The Numbered documents are easy to edit. When you add or remove paragraphs or items, the Numbered list renumbers automatically. For instance, a new paragraph at the end of the list gets the next consecutive number.
Practice
Creating Bulleted and Numbered Lists
In this exercise, you will create a list from scratch.
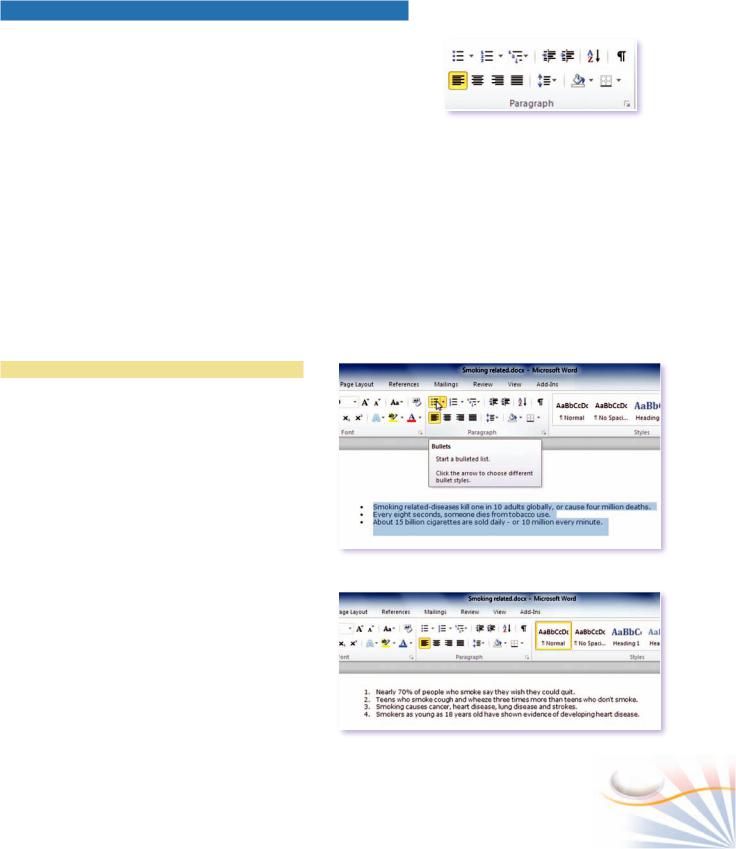
1.Place the insertion point where you want to create the list.
2.Click on the Numbering or Bullets button in Paragraph group.
Word indents the line.
3.Type the first item and press Enter. To end a Bulleted and Numbered List;
4.Click on the Numbering or Bullets button in the Paragraph group.
Or press Enter twice at the end of the list.
You can create space between the list items as you do on paragraphs spacing.
The Paragraph group
Bulleted list
Numbered list
Formatting Characters and Paragraphs |
43 |

Customizing a Bulleted list
A Multilevel List
Practice
Customizing Bulleted and Numbered List
In a bulleted list, instead of using regular bullets you can select a different character, a picture bullet, or change indents. You can customize numbered lists and choose different number styles and fonts like in a bulleted list.
In this exercise, you will customize a bulleted and numbered list.
1.Select the list or list items. In the Paragraph group, click the arrow next to the Bullets button;
2.Choose a new bullet from the Bullet Library.
There are seven bullet styles but you can define more;
3.Click the Define New Bullet command on the menu. Use the Symbol or Picture button to select a bullet style.
4.Click the Font button, and change the color of the bullet. Click OK.
To convert the bulleted list to a numbered list;
1.Select the list. Click the Numbering button in the Paragraph group.
Multilevel Lists
A Multilevel List format enables you to organize documents with hierarchical content such as law and scientific literature. In order to create a multilevel list, the paragraphs must be indented.
Practice
Creating a Multilevel List
1.Indent the paragraphs by their levels in the list
2.Select the paragraphs. Click the Multilevel List button in the Paragraph group.
3.From the List Library menu, choose a list style.
Each indentation level gets a different number formatting.
44 |
Chapter 3 |

Yocu can also easily convert a bulleted or numbered list to multilevel list with the Tab key.
1.Place the insertion point after the number in your Numbered list.
2.Press the Tab key; the paragraph is indented and gets a different letter or number.
Borders and Shading
You can add borders and shading around pages and text selections to emphasize a section or to enhance the look of the document.
Practice
Apply a Border and Shading
In this exercise, you will apply a border around a paragraph.
1.Click the paragraph starting with the text “Did you know that”.
In the Paragraph group, click the arrow next the Borders button;
2.From the menu, choose the Outside Borders option.
3.Click the arrow next the Shading button in the Paragraph group.
4.Under the Theme colors, click the color blue.
The background of the paragraph is filled with blue shading.
Practice
Change the Border and Apply Shading
In this exercise, you will change the color, style and width of a border and apply shading to a paragraph.
1.Click the paragraph starting with the text “Did you know that”.
2.In the Paragraph group, click the arrow next to the Borders button;
3.Click the Borders and Shading command on the menu.
Formatting Characters and Paragraphs
Applying a border
Applying a shading
45
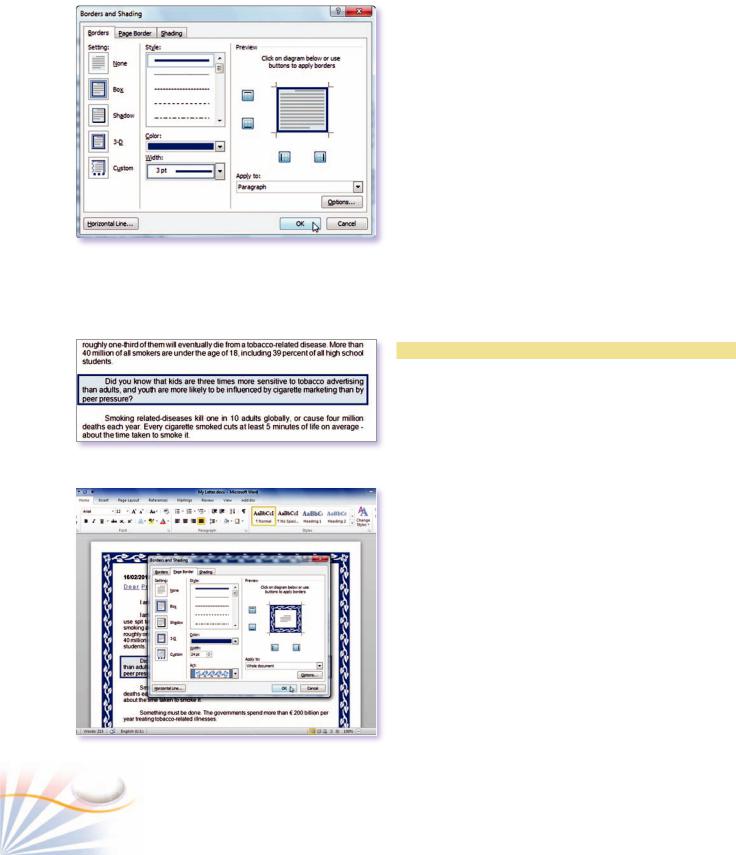
The Borders and Shading dialog box enables you to create and modify the paragraph, and page borders, and shadings. By customizing line styles and colors you can get different border effects for each paragraph or the whole document.
4.In the Width section, select 3 pt.
5.In the Color section, select the color Dark Blue.
6.Click OK.
The Borders and Shading dialog box
Changing borders and applying shading
Adding a page border
Practice
Adding a Page Border
In this exercise, you will add Page Borders to your document.
1.In the Borders and Shading dialog box , click the Page Border tab.
Or on the Page Layout tab, click the Page Borders button in the Page Background group.
2.In the Art section, select any art picture.
3.In the Apply To section, select the Whole Document.
4.Click OK.
Page Backgrounds
You can add a background to your document such as a Watermark, color or a texture.
Page background colors are applied by using the Page Color button in the Page Background group. Fill effects command at the bottom of the Page color menu allows you to select effects from four different categories.
A watermark is a faint graphic image at the background of a document.
46 |
Chapter 3 |

Practice
Applying Watermark
In this example, you will insert a watermark and apply a page color to your document,
1.Click the Page Layout tab.
2.In the Page Background group, click the Watermark button.
3.Click one of the options. Word inserts the watermark on every page of the document. You can also create a custom watermark or insert a picture watermark.
4.Click the Page Color button in the Page Background group.
5.Choose a color on the menu. Word applies the background color to the document.
To be able to print the document with the background color;
1.Click the File tab; open the Word Options from the Background view menu.
2.Click Display command on the left side of the dialog box.
3.Under the Printing Options; check in the box Print background color and images.
Columns
You can change the number of columns in a document or a section of a document. You can create newspaper columns, parallel columns and uneven columns before entering text or apply columns to existing text.
The document with a page color and a watermark.
Applying columns
Formatting Characters and Paragraphs |
47 |
The Columns dialog box
Creating a line between two columns
Practice
Creating Columns
In this exercise, you will create two columns in your document.
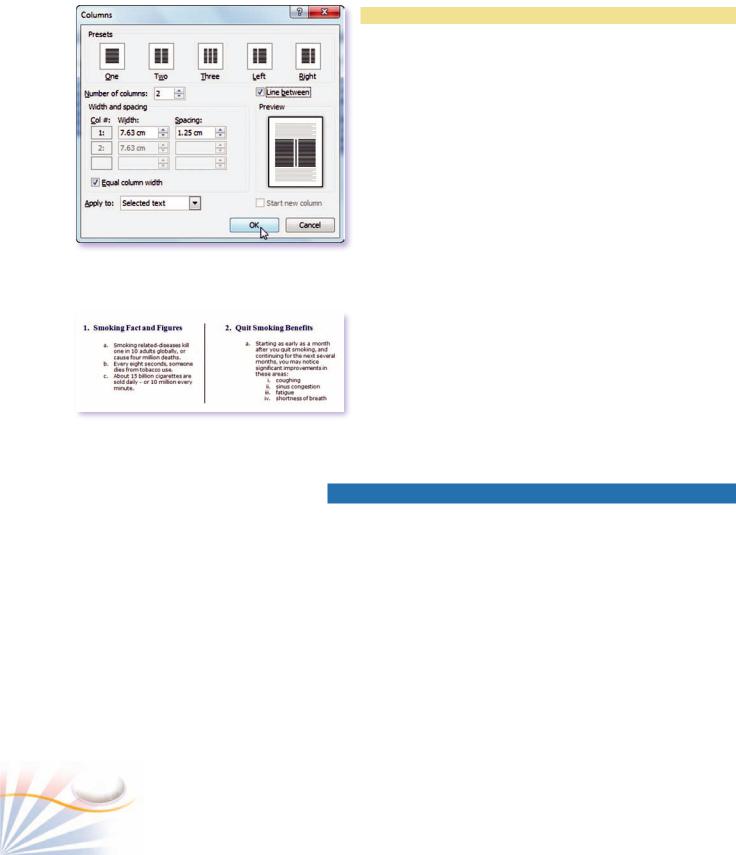
1.Select the whole document.
2.Click the Page Layout tab.
3.Click the Columns button in the Page Setup group; select Two on the menu.
The Columns dialog box enables you to create and modify the columns with several options.
To create a line between the columns;
1.Click the Columns button, and then click the More Columns option.
2.Check the Line between box to apply a line between the columns.
3.Click OK.
Tabs
Texts aligned with the space key are displayed improperly when the document is reformatted or transferred to other computers. By using the Tab key and Tab stops you can create and format documents easier and faster.
Tab Styles
In Word, there are several Tab types: left, right, center, and decimal. Left align tabs are the most used Tab style. By default, Word set left aligned tabs every 1.27 cm.
The following example shows how to use tab stops. The dashed line indicates the location of the Tab stop.
48 |
Chapter 3 |

|
|
Left |
Aligns text on the left at the tab position |
|
|
||
|
|
||
|
|
Right |
Aligns text on the right at the tab position |
|
|
||
|
|
||
|
|
||
|
|
Center |
Centers text at the tab position |
|
|
||
|
|
||
|
|
||
|
|
Decimal |
Aligns a column of numbers with the |
|
|
||
|
|
||
|
|
||
|
|
|
decimal at the tab position |
|
|
Bar tab |
Inserts a vertical bar at the tab stop. |
|
|
||
|
|
||
|
|
Item |
Price |
|
CPU |
155$ |
Left Aligned |
Mainboard |
75$ |
Right Aligned |
HDD |
100$ |
Center Aligned |
RAM |
25.4$ |
Decimal Aligned |
Setting Tab Stops
There are two ways to create tab stops; using the Tabs menu or using the Ruler. For more accurate and precise settings; use the Tabs dialog box.
In this exercise, you will set tab stops using the Tabs dialog box.
1.Create a new document.
2.Place the insertion point where you start typing.
3.In the Page Layout tab, click the Paragraph dialog box launcher, and then click the Tabs button.
4.In the Tab stop position text box, type the tab position as 1 cm. Make sure the left alignment checkbox is selected.
5.Click Set. Repeat the steps for 5 cm.
6.Click OK.
Each time when you press the Tab key, the insertion point moves from |
Setting tab stops |
||
|
|||
one Tab stop to the next one. |
|
||
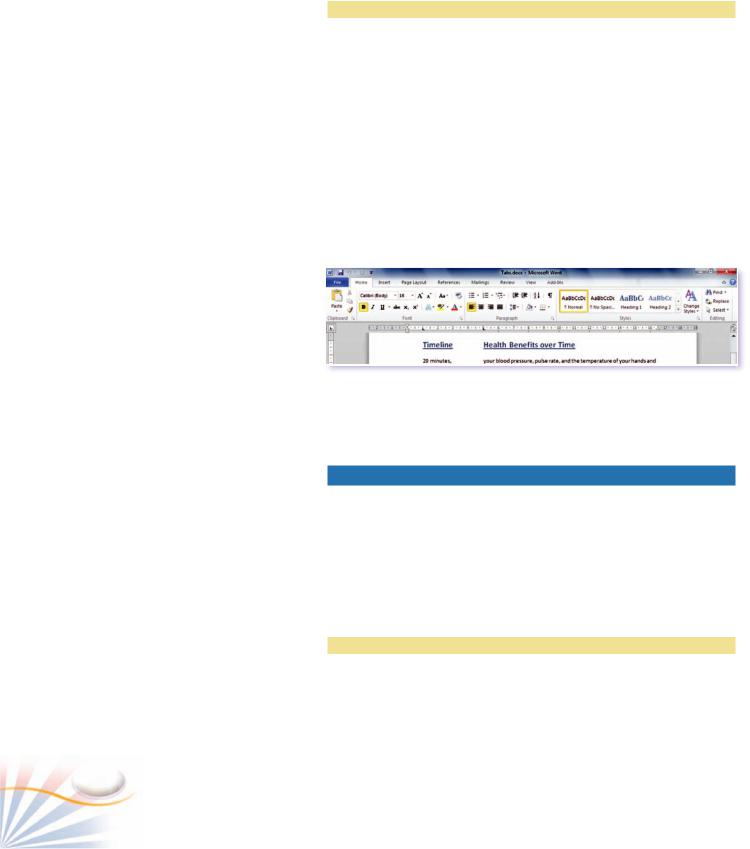
7. |
Press the Tab key, type |
|
|
|
|
||
|
“timeline”, press the Tab key, |
|
|
|
and type “Health Benefits over |
|
|
|
Time”. |
|
|
8. |
Type the text in separate lines. |
|
|
|
|
|
|
A Document with two tab stops
Formatting Characters and Paragraphs |
49 |
Practice
To set Tabs stops using the Ruler;
When you set a tab stop, you can see it on the Ruler and change its location by dragging it.
1.Locate the insertion point where you start typing.
If the horizontal ruler is not visible, click the View ruler button at the top of the vertical scroll bar.
2.Set the tab stops by clicking on the ruler. You can drag the tab stops left or right along the ruler to a different position.
3.To change the tab style click on the Tab style button that is located on the far left of the Ruler.
Removing Tabs
The Ribbon and the Ruler
To remove existing tabs; simply drag them from the ruler to the document area, to the Ribbon or on the tabs dialog box; select the tab you want to remove and click the Clear button.
Styles
A style is a group of paragraph and character formats stored under a name. Style is a time saving feature that you can apply to a text or a document at once.
Quick Styles
Word provides a gallery with sets of Quick Styles. A gallery is a group of built-in styles and formats. You can simply apply any one of these Quick Styles by clicking over it.
Practice
Applying Styles
By default, Word applies the Normal style to the text you enter. In order to apply a different style than the Normal style;
50 |
Chapter 3 |