

Visual Web Developer™ 2005 Express Edition For Dummies - Alan Simpson
.pdf40 Part I: Planning a Web Site
To keep the privileged members-only content separate from the general content, you need a folder, perhaps named MemberPages. Keep all your privileged content in the MemberPages folder. Keep general content out of that folder. The MemberPages folder can be just a regular folder in which you store pages.
To create a folder in Visual Web Developer, right-click the site name at the top of Solution Explorer and choose New Folder. Then type the folder name and press Enter. Figure 3-1 shows an example where I’ve added a new, regular folder named MemberPages. As its name implies, the MemberPages folder will (eventually) contain pages that only site members can access.
Figure 3-1:
Aregular folder
named MemberPages has been added to the site.
There is nothing special about the MemberPages folder. It’s just an empty folder in which you can store pages. If you want to use that MemberPages folder to store privileged members-only content, you need some means of distinguishing between site members and the general riff-raff (anonymous users). In other words, your site needs an infrastructure that can store information about site members, allow site members to log into their user accounts, and so forth. To create that infrastructure, you use the Web Site Administration Tool.
Using the Web Site Administration Tool
The Web Site Administration tool, often abbreviated WAT, is the tool you use to administer access to pages within your Web site. To start the tool, follow these steps:
1.If you haven’t already done so, start Visual Web Developer and open your Web site.
2.Choose Website ASP.NET Configuration from the menu bar.
The tool opens in a Web browser like the one in Figure 3-2.

Chapter 3: Configuring a Membership Site |
41 |
The tabs near the top of the page (Home, Security, Application, and Provider), and links on the Home tab, provide tools both for creating a membership site and for managing a membership site after it’s created. The first step to setting up a membership site is to make sure Visual Web Developer can connect to SQL Server, the database program used to store information about users. To test your connection, follow these steps:
1.Click the Provider tab or the Provider Configuration option on the Home tab.
2.Choose the Select A Single Provider For All Site Management Data option.
Figure 3-2:
The Home
tab in the
Web Site
Administra-
tion Tool.
3.Make sure that AspNetSqlProvider is selected, as shown in Figure 3-3. (Most likely there won’t be any other options to select anyway).
Figure 3-3:
Link to test your SQL Server connection.

42 Part I: Planning a Web Site
4.Click the Test link to the right of your selection to make sure your site can connect.
5.You should see a message that reads “Successfully established a connection to the database.” Click OK.
If the test fails the first time, just try again. Sometimes it takes a few tests for the connection to work.
6.Click the Back button in the lower-right corner of the page.
7.Click the Home tab in the Web Site Administration Tool.
At this point, you’ve told VWD that you want to use SQL Server as your site’s database management system for storing information about users and user accounts. The next step is to choose an authentication type.
Choosing an authentication type
If you’ve ever set up any kind of an account on any Web site, you know that in order to log in you must enter two pieces of information: Your user name (or e-mail address) and your password. The user name defines who you are. Your password verifies that you actually are who you say you are (assuming you haven’t been handing out your password to people). That two-step process is known as authentication because it both identifies you and verifies that you are who you say you are.
In Visual Web Developer, you can choose between two forms of authentication: Windows authentication or Forms authentication. Windows authentication works only on a small Web site used within a local network. Assuming you intend on putting your site on the Internet, you’ll need to follow these steps to choose Forms authentication:
1.In the Web Site Administration Tool, click the Security tab.
2.Click the Select Authentication Type option under Users on the Security tab.
3.On the next page (Figure 3-4) choose the From the Internet option.
4.Click the Done button.
With the data provider and authentication mode selected, you’re ready to set up your site’s security by defining the access rules of your site. The first step is to create a role that will distinguish members of your site from anonymous users who are just looking around.

Chapter 3: Configuring a Membership Site |
43 |
Figure 3-4:
Choosing Forms authentication for an Internet Web site.
Creating Roles to Categorize People
If you think about how a business is organized, access to business resources and information tends to be based on people’s roles within the company. For example, executives might have access to everything, managers have access to sensitive information within their department, and workers have access to whatever they need to do their jobs. Your role in the company determines your access to information.
In a membership Web site, access to information is also based on roles. A person who just browses to the site is an anonymous user because he hasn’t signed into an account to identify who he is. To separate the anonymous users from people who are members with accounts, you need a role, perhaps named SiteMembers. In order for someone to be considered a SiteMember, she must have an account on the site, and must log into that account. After she’s logged into her account, the person is no longer in the anonymous user role. Instead, that person is in the SiteMembers role.
To use roles in your Web site, you first have to enable that feature via the
Web Site Administration Tool by following these steps:
1.If you haven’t already done so, click the Security tab in the Web Site Administration Tool.
2.If roles aren’t already enabled, click the Enable Roles link.
The center pane near the bottom of the Security tab now provides a link titled Create or Manage Roles as shown in Figure 3-5.
Do not create a role for anonymous users. Anyone visiting your site is by default an anonymous user, and you need not define such a role in the Web Site Administration Tool.

44 Part I: Planning a Web Site
Figure 3-5:
Roles are enabled, so you can create or manage roles.
After you’ve enabled roles, you can define roles for people who visit your site. In a simple membership site, you really only need one role, like SiteMembers. To create a role, follow these steps:
1.On the Security tab of the Web Site Administration Tool, click the Create or Manage Roles option.
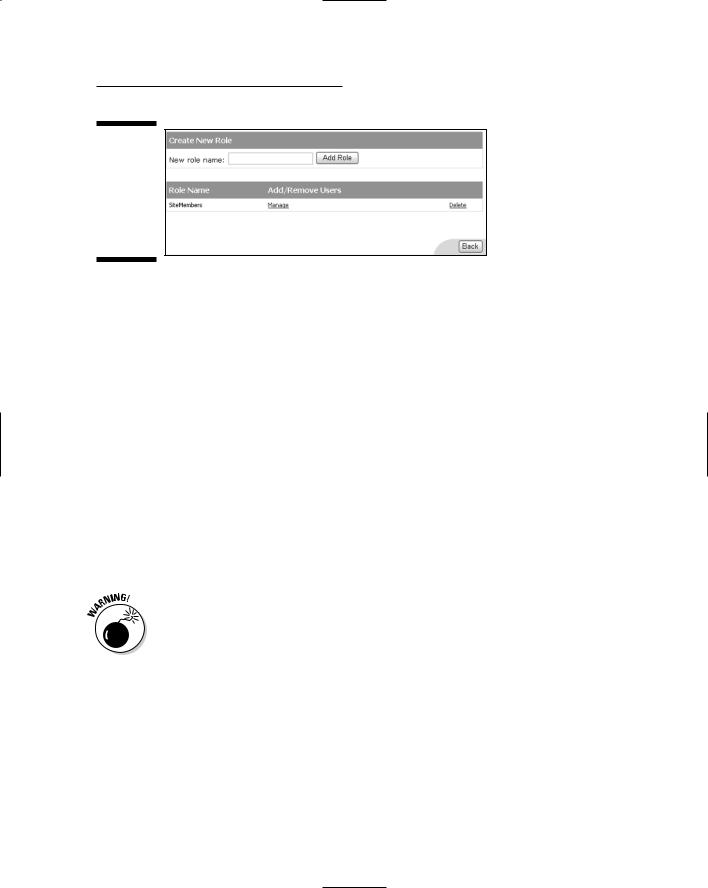
2.Under the Create New Role heading on the next page, type a role name.
For example, in Figure 3-6 I’m about to create a role named SiteMembers.
3.Click the Add Role button.
Figure 3-6:
About to create a role named SiteMembers.
The page changes slightly to show the roles you’ve already created. For example, in Figure 3-7, you can see where I’ve created the SiteMembers role. You could, at this point, create more roles by entering role names and clicking Add Role for each role you want to create. For this example I’ll just stick with the SiteMembers role. When you’re done creating roles, click the Back button.
After you’ve clicked the Back button, you’re returned to the Security tab of the Web Site Administration Tool.
Sometimes it helps to hear things explained in two or more ways. For a different explanation on using the Web Site Administration Tool, click the How Do I Use This Tool? link near the upper-right corner of the Web Site Administration Tool. Then click the Web Site Administration Tool – Security tab in the Overview page that opens. Also, pay attention to the text that appears on every page that opens in the Web Site Administration Tool.
Chapter 3: Configuring a Membership Site |
45 |
Figure 3-7:
The Site-
Members role is created and added to the list of role names.
Creating Access Rules
The whole purpose of creating roles is to distinguish among different types of people visiting your site, so you can control who has access to what. The way you do that is by defining access rules for different roles.
For example, at the start of this chapter I created a folder named MemberPages. The plan is to put all privileged content into that folder, to keep it separate from regular content that all users can view. But to make that happen, we need an access rule that denies anonymous users access to that MemberPages folder. You use the Web Site Administration tool to create access rules. Here are the steps:
1.In the Web Site Administration Tool, click the Security tab (if you aren’t already there).
2.In the column titled Access Rules, click the Create Access Rules link.
3.In the left column of the resulting Add New Access Rule page, click the name of a content folder for which you want to create a rule.
The term content folder means regular folders you created yourself, like my MemberPages folder. There’s no need to assign permissions to the root folder at the top, or special folders like App_Data. Those predefined special folders already have all the permissions they need for the site to work correctly but remain secure. Changing those permissions will likely cause a world of confusion and problems for you. And all for naught because you shouldn’t have messed with them in the first place.
4.In the center column, choose the role for which you want to create an access rule.
For example, in Figure 3-8, I’ve chosen MemberPages as the folder for which I want to create a rule. In the middle column I’ve chosen Anonymous Users as the role for which I want to create a rule.

46 Part I: Planning a Web Site
Figure 3-8:
SiteMembers is the selected folder; Anonymous Users is the selected role.
5.In the Permission column, choose whether you want to Allow or Deny people in the selected role access to the selected folder.
For example, in Figure 3-8, I’ve chosen the Deny option. In other words, the three selections made in Figure 3-8 define a rule that says “Anonymous users cannot access pages in the folder named MemberPages.”
6.Click OK.
At this point, you have defined one access rule. There may be times when you need to manage (view, change, or delete) access rules you’ve already defined. Which brings us to . . .
Managing access rules
To review, change, or delete access rules you’ve defined in the past, click the Manage Access Rules link on the Security tab of the Web Site Administration Tool. The Manage Access Rules page of the tool opens.
Why does it say “Select a directory”?
You might have noticed the term “directory” under “Add New Access Rule” in Figure 3-8. The term directory is just another word for folder. Directory is the older term, harkening back to the early days of computing before there were icons on the screen to represent such things. The term folder is used more often
now, because icons that represent folders always look like little manila file folders. That’s because a computer folder (or directory) is a “container” in which you store files, just as a folder in a file cabinet is a container in which you store paper documents (files).

Chapter 3: Configuring a Membership Site |
47 |
It’s important to keep in mind that access rules are defined on a folder-by- folder basis. Therefore, in the left column of the page that opens, your first task will be to click on the name of the folder for which you want to view or change access rules.
For example, in Figure 3-9 I’ve already clicked on Manage Access Rules to get to the page shown. I’ve also already clicked on MemberPages in the left column to see access rules for that specific folder. The center column shows all the rules defined (so far) for that MemberPages folder.
Figure 3-9:
Viewing access rules for the MemberPages folder.
Notice that with MemberPages selected in the left column, the first rule denies anonymous users access to the MemberPages folder. Below that is a dimmed, unchangeable rule that reads Allow [all]. It’s important to understand that rules are applied in top-to-bottom order. Because the Deny permission is listed first, anonymous users won’t be able to access pages in the MemberPages folder. However, everyone else will have access to that folder.
In this example, “everyone else” means SiteMembers, because that’s the only other role a person could possibly belong to in this particular Web site because it’s the only other role we’ve created.
There is no way, and no reason, for you to change, remove, or worry about that dimmed Allow rule that applies to [all] users. That rule is fixed and based on the most fundamental (yet unspoken) rule of all, which can be stated like this:
If you have information you don’t want to share with others, don’t publish that information on the Internet.
The Allow [all] rule is based on the simple fact that if you’re publishing information on the Web, you’re doing so because you do want to share that information with other people. The Deny access rule just refines that basic assumption by saying “I do want to share information in the MemberPages folder with some people who visit my site. I just don’t want to share that information with anonymous users who visit the site.”
That’s all you need to prevent anonymous users from accessing membersonly content in the MemberPages folder. So let’s take a moment to review, in English, what you’ve done in the above steps:

48 Part I: Planning a Web Site
Created a folder named MemberPages for storing pages to be published on the Web.
Created a role named SiteMembers that defines people who have an account and are logged into an account (as opposed to anonymous users).
Created an access rule that prevents anonymous users from getting to members-only content in the MemberPages folder. SiteMembers will have access to that content (because there’s no Deny rule preventing them from viewing the contents of that folder).
All of that is just an example. A site can have many content folders, many roles, and many access rules to control exactly who has access to what. But in the interest of keeping it simple and sane, we’ll stick with the relatively easy example you’ve already defined here: The site contains a folder named MemberPages in which you can put members-only content.
At the moment, there’s no way to test whether or not this will actually work. One reason why is that there is no user account on the site, and hence nobody in the SiteMembers role. For another, there is no content in the MemberPages folder to try to access. We can deal with the first problem by creating a hypothetical user account and putting that user in the SiteMembers role. As you’ll see next, you can use the Web Site Administration Tool to create that user account.
Creating a User Account
You need at least one user account to work with while developing your Web site, just for testing and debugging purposes. You might as well create an account for yourself. To do so, you need to be in the Web Site Administration tool. If you’ve been following along, you’re already in that tool. Otherwise, choose Website ASP.NET Configuration to get into the tool.
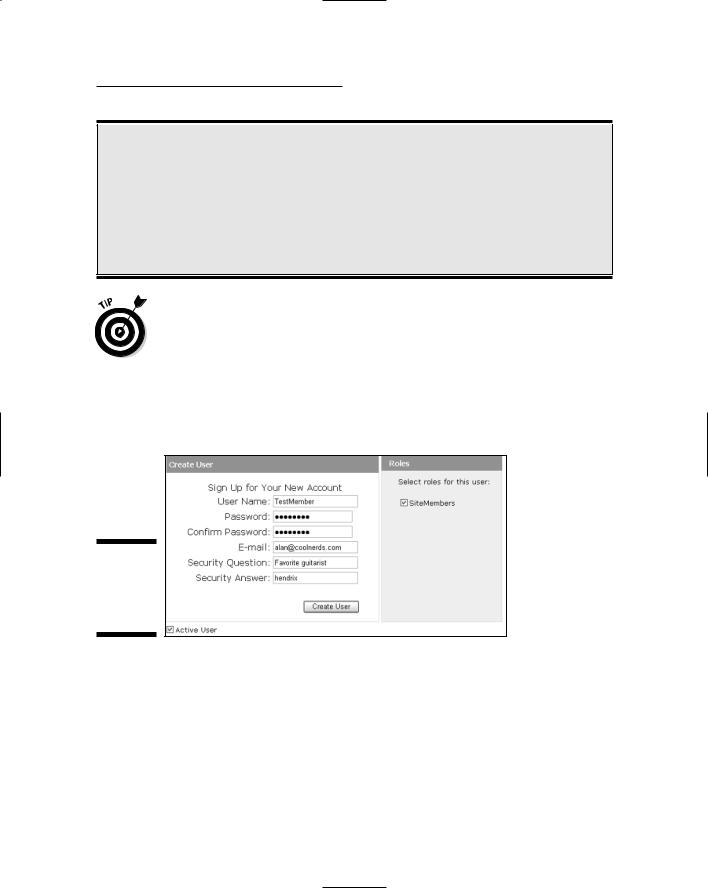
In the Web Site Administration tool, click the Security tab. Then click Create User in the left column under the Users heading. Doing so will take you to the Create User page where you can define a user account.
Because the account is purely hypothetical, it doesn’t much matter what you enter as a User Name, E-mail address, Security Question, and Security Answer. However, the password must be at least seven characters in length and must contain at least one non-alphanumeric character (that is, a punctuation mark). So, for testing purposes, use a password like:
password!
Chapter 3: Configuring a Membership Site |
49 |
Active versus inactive users
Your membership system can consist of active and inactive accounts — which can be handy in a situation where people pay dues to maintain their accounts. If a member stops paying her dues, you can keep her in the database as an inactive user. You can then keep the user out
of privileged content, but still have the user’s information in the database. This is better than deleting the user account because you can use the information in the database to send e-mail messages to inactive users, reminding them to pay their dues.
Chapter 7 covers ways that you can relax the password requirements so that users can enter passwords they’re more likely to remember.
Because the real goal of this hypothetical account is to make sure the SiteMembers role works as intended, you need to select (check) the SiteMembers check box to the right of the Create User form. Figure 3-10 shows an example where I’ve created a hypothetical user named TestMember, and have placed that user in the SiteMembers role.
Figure 3-10:
A hypothetical user named TestMember.
Near the bottom of the form you’ll notice an Active User check box. You’ll want to make sure that box is selected (checked). Then just click the Create User button. You’ll get some feedback indicating that the account has been successfully created. Click Continue to return to the Create User page. Because you only need one user account to test things out, you’re finished here. Click the Back button in the lower-right corner of the Create User page to return to the Security tab of the Web Site Administration tool.