

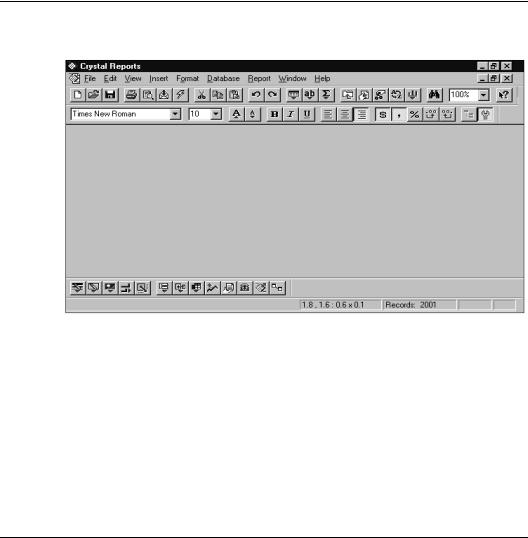
The application window
The application window is clear and easy to understand.
●The title bar identifies the current report and it contains the standard Windows buttons.
●The menu bar appears just below the title bar.
●The standard toolbar appears just below the menu bar.
●The format bar appears just below the standard toolbar.
●The supplementary toolbar appears just above the status bar.
●The status bar appears at the bottom of the window.
Menu bar
The menu bar is the command center of Seagate Crystal Reports. Each option on the menu bar activates a drop-down menu of commands that you can use to create, modify, print, and save your reports.
52 |
Seagate Crystal Reports User’s Guide |
The menu bar contains the following menus:
|
● File menu |
|
● Edit menu |
|
● View menu |
|
● Insert menu |
|
● Format menu |
|
● Database menu |
|
● Report menu |
|
● Window menu |
|
● Help menu |
File menu |
The File menu includes commands you can use to open, close, and |
|
save files, to save files under a different file name, and create new |
|
reports, mailing labels, and cross-tabs, as well as several other |
|
kinds of reports. It also includes a command you can use to exit |
|
the program. Additionally it contains commands that enable you |
|
to preview your report before printing, to export your report to a |
|
disk file in a variety of formats, to send your report to a printer, to |
|
change page margins, and to select a printer if you want the report |
|
to print on something other than the default printer. You can also |
|
add summary information to help you identify your report as well |
|
as change the default settings so the program works the way that |
|
is the most efficient for you. Search for File menu Commands in |
|
online Help. |
Edit menu |
The Edit menu includes commands you can use to modify aspects |
|
of your report. It includes commands to undo and redo actions, to |
|
edit fields, formulas, summaries, subreport links, OLAP |
|
members, OLE objects, and OLE links, to view a sample of the |
|
data in a selected field, and to cut, copy, and paste report and OLE |
|
objects.You can also use Edit menu commands to show, hide, |
|
move, merge, or delete report sections, delete groups, and to |
|
convert static OLE objects to editable bitmaps. Search for Edit |
|
menu commands in online Help. |
Getting to Know Seagate Crystal Reports |
53 |
View menu
Insert menu
Format menu
Database menu
The View menu includes commands you can use to modify the user interface of the program. View menu commands enable you to show or hide the standard and supplementary toolbars, format bar, and status bar, to zoom in and out on your report to view it at different magnifications, and to turn guidelines, the grid, and the rulers on and off. You can also toggle the Group Tree view on and off from the View menu. Search for View menu commands in online Help.
The Insert menu includes commands you can use to insert database fields, text objects, formula fields, parameter fields, cross-tab objects, subtotals, grand totals, summaries (counts, averages, etc.), groups, sections, and several special fields such as print date and page number. The Insert menu also includes commands that enable you to insert group name fields, subreports, graphics, lines, boxes, graphs, and OLE objects into your report. Search for Insert menu commands in online Help.
The Format menu includes commands you can use to change the look of the elements in your report. It includes commands for changing fonts and for adding field borders, background color, and drop shadows. The Format menu has commands for formatting fields that are embedded in text objects, for formatting individual paragraphs in those text objects, and for entire sections of the report as well. There are also commands for formatting graphs as well as formatting and pivoting cross-tabs. Finally, using Format menu commands, you can have the program automatically arrange report objects, apply professionally designed styles to the entire report, and move objects in a stack of objects forward and backward. Search for Format menu commands in online Help.
The Database menu includes commands you can use to add and delete tables for use with your reports, to change the alias used to identify a table, and to link and unlink tables. It has commands for logging on and off SQL and ODBC servers, for showing Essbase report scripts, showing and editing SQL queries, and modifying parameters for stored procedures. The Database menu also has commands that direct the program to look for tables in new locations, change database drivers used in your report, to remove tables from a report and to adapt your reports appropriately if there are minor changes in table structure. Search for Database menu commands in online Help.
54 |
Seagate Crystal Reports User’s Guide |

Report menu
The Report menu includes commands you can use to select the records or groups to be included in your report, select the order in which report data is to be sorted (by record or by group), specify subreport links, and specify a print date for your report. It has commands for updating the data used in a report and for gathering all the files you need for distributing your reports. You can also use one of the Report menu commands to create an executable version of your report that you can share with others that do not have Seagate Crystal Reports. Search for Report menu commands in online Help.
Window menu
Help menu
The Window menu includes commands you can use to rearrange icons and windows. It also lists the report windows that are open and includes a command that lets you close all report windows at once, if desired. Search for Window menu commands in online Help.
The Help menu includes commands you can use to access Seagate Crystal Reports online Help index and search facility that provides context sensitive Help. It has commands for registering the program, accessing technical information about your computer system, and creating a technical support request. You can toggle the Welcome dialog box on and off, and if connected to the internet, you can access several key pages of the Seagate web site using commands on the Help menu. One final command, gives you information about the version of the program you are using. Search for Help menu commands in online Help.
Standard toolbar
Seagate Crystal Reports groups several commonly used commands on the standard toolbar that remains on screen at all times (unless you decide to toggle it off in the Toolbars dialog box).
The standard toolbar eliminates some of the steps needed to activate the commands and can thus greatly speed your work in creating reports. Each command available via the standard toolbar is discussed in online Help. (Search for each command by name.)
Getting to Know Seagate Crystal Reports |
55 |

NOTE: In the 32-bit version of Seagate Crystal Reports, you can
move the standard toolbar to another fixed location in the window or set it up as a floating palette. See How to move and
resize toolbars and the format bar, Page 80.
If you are not sure what a button on the standard toolbar does, place the pointer over the button and hold it there. A Tool Tip will appear, giving you a quick description of the button.
The buttons on the standard toolbar perform the following functions:
Create a new report.
Open an existing report.
Save your report.
Send your report to a printer.
Preview your report in the Preview Tab.
Export your report to a file or e-mail.
Refresh report data.
Cut selected object/data to the Clipboard.
Copy the selected object/data to the Clipboard.
Paste object/data from Clipboard to the report.
Undo an action.
56 |
Seagate Crystal Reports User’s Guide |