


Overview
Before you begin
The following tutorial has been designed to give you confidence when creating your first report.
You begin by learning the basic concepts - calling up a database, placing some fields on your report, then selecting specific records to be included. You will also learn how to:
●insert and move database fields,
●add and format a title,
●display your report in the Preview Tab so you can fine-tune your work,
●use the Select Expert to ensure your report includes only the data you need,
●move objects,
●group and sort data,
●insert pictures, and
●print your report.
This tutorial assumes you are familiar with Microsoft Windows and uses conventional names and procedures common to the Windows environment. If you are not familiar with Windows, you may have trouble understanding basic procedures such as scrolling and clicking. Please refer to the documentation that came with Microsoft Windows for further explanation of these procedures. Also, see Command, button, key, and control conventions, Page 3, for a description of the conventions used in this manual.
The default font for all report sections in the program is set to Times New Roman, 10 point. If you have changed the default font, or if your printer does not support this font, the field size, field spacing, and screen shots will look different than those included in this tutorial.
This tutorial has been designed using Microsoft Windows 95 and Win NT 4.0. Screen shots may vary slightly if you are using Windows 3.1, or NT 3.51.
166 |
Seagate Crystal Reports User’s Guide |

If you are not familiar with the Seagate Crystal Reports environment, please review the following sections before beginning this tutorial:
●Getting to Know Seagate Crystal Reports, Page 51, which explains the main application window, the Design and Preview Tabs, the menu bar, standard and supplementary toolbars, format bar, and status bar, as well as many other features of the program.
●How to add, delete, and move guidelines, Page 82, and How to move and position objects using guidelines, Page 83.
●Other fundamentals, Page 76, which describes working with the grid, free form placement of objects using guidelines, as well as a description of how to work with sections and objects.
Getting started
In this tutorial you will get an introduction to the program as you create a Customer List report. The Customer List is one of the most basic business reports and typically has information such as Customer Name, City, Region, and Contact Name.
Creating your report
Click the NEW button on the standard toolbar. The Report Gallery appears.
The Report Gallery contains a number of buttons. These buttons open the Experts that guide you through the creation of specific kinds of reports. Since you will be learning reporting concepts here, you can skip the Experts and build your report from scratch. After you have completed this tutorial, you may want to build some reports using the Experts to decide which method of report construction you are most comfortable with.
Tutorial - Customer List |
167 |
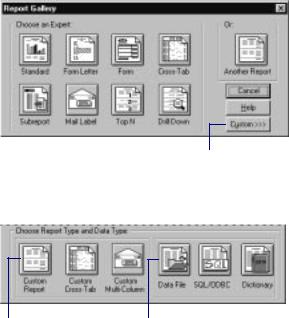
2 Click the Custom button.
The Report Gallery expands to reveal several custom report options.
Selecting a database to use
3 Click the Custom |
4 Click the Data |
Report button. |
File button. |
The Report Gallery disappears, and the Choose Database File dialog box appears.
NOTE: You can also create reports based on SQL/ODBC data sources, dictionary files, or query files. See Queries, Page 467, and
Dictionaries, Page 491, for more information.
The next step in creating a report is to select a database. Select the CRAZE.MDB sample database for this tutorial.
In the Choose Database File dialog box, select the file CRAZE.MDB from the File Name list box. This file was installed in the \CRW directory (or the directory in which the program resides).
168 |
Seagate Crystal Reports User’s Guide |

Click OK to open the file. The Select Tables dialog box appears.
!Because you are only dealing with customers in this tutorial, you will only need to select the Customer table. Click Customer to highlight it and click OK.
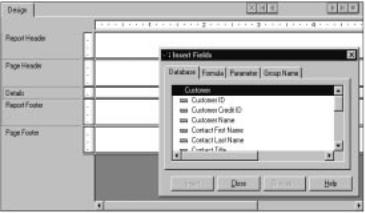
The Design Tab appears with the Insert Fields dialog box active.
Tutorial - Customer List |
169 |
Report sections
NOTE: If you choose more than one table in the Select Tables dialog box, the Visual Linking Expert will appear. For more information on linking, see How to add and link multiple tables, Page
116, and search for Visual Linking Topics Index in Seagate Crystal Reports online Help.
The Design Tab is divided into five sections: Report Header (RH),
Page Header (PH), Details (D), Report Footer (RF), and Page Footer (PF). If at any time you are unsure of the report section you are working in, simply look to the shaded area to the left at the report which always displays the section names or the initials that designate the names. See Design Tab, Page 66.
●If you have already toggled the Short Section Names in Design check box on in the File Options dialog box prior to reading this tutorial, the Report Header, Page Header, Details, Report Footer and Page Footer section names will appear as RH, PH, D, RF and PF respectively.
●If you have not toggled the Short Section Names in Design check box on, follow these steps:
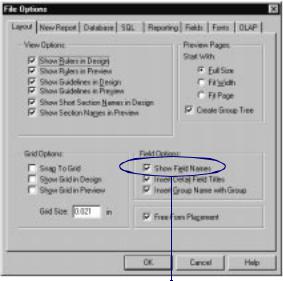
Choose the OPTIONS command on the File menu. The File Options dialog box appears with the Layout Tab active.
170 |
Seagate Crystal Reports User’s Guide |
Inserting a field
Toggle the Show Short Section Names in Design check box on.
! Click OK to return to your report.
The Insert Fields dialog box appears automatically with the Database Tab active because it is almost certain you will want to insert database fields when you create a new report.
This dialog box is set to remain on screen until you click the Close button. All of the tables available for use in your report are listed in this box.
You can move the dialog box to another location on the screen by clicking on its title bar and dragging it to a new location. You can
Tutorial - Customer List |
171 |
also resize the dialog box by dragging any of its edges with the resize cursor. See Cursors, Page 64.
You will now start placing objects on your report by inserting the Customer Name field.
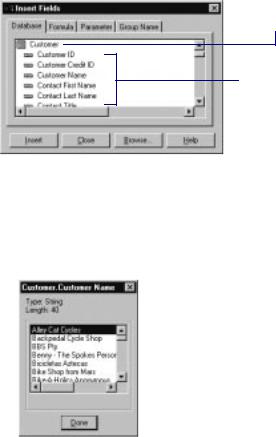
First, familiarize yourself with the Database Tab of the Insert Fields dialog box.
The Customer table.
The fields in the
Customer table.
Highlight a field name in the dialog box by clicking the name once. When you highlight a field name, you can review the values for that field as well as the field type and size by clicking the Browse button. The Browse dialog box appears listing the field name, type, length, and a subset of field values.
When you finish reviewing the data, click the Done button to return to the Insert Fields dialog box.
!Highlight the Customer Name field and drag it into the Details section of your report.
172 |
Seagate Crystal Reports User’s Guide |

"An object frame appears with the arrow cursor as you drag the field onto your report.
●The object frame represents the object you have just selected for placement.
●The size of the object frame approximates the size of the data in the field selected.
#Move the object frame as far to the left as you can in the Details section. If you move the field too far to the left, the arrow cursor will turn into a stop cursor indicating that you can not drag the field that far. See Cursors, Page 64. Keep in mind that you can not place any objects outside the page margin.
The Design Tab should look similar to this:
Understanding |
Before you go any further, take a look at the field you just placed |
fields |
in the Details section. |
|
|
|
● First of all, the object frame indicates that when your report |
|
is printed, a field value will appear where the box is |
|
positioned. |
|
● The X's in the object frame indicate that the database field |
|
contains a text string. Other data types have different |
|
character representations. For example, a currency data |
|
type is represented by $55,555.56. |
|
● The number of X's in the object frame is the data width, the |
|
maximum number of characters in the field as defined by |
|
the database. The width of the object frame is the field |
Tutorial - Customer List |
173 |
Selecting fields
Resizing fields
width (the amount of space allocated to the field for printing). Initially it is set to the width needed to display the maximum number of characters in the field (using the font selected for the field). You can change this width by resizing the field.
●The size of the X's indicates the point size selected for the characters in the field.
●The font and style (Bold, Underline, etc.) used in displaying the X's indicate the font and style selected for the characters in the field. You will learn how to make changes to these attributes later in the tutorial.
●The line spacing is adjusted to the point size selected for the characters in the field.
When a field is selected, the object frame appears with a handle (box) on its right, left, top, and bottom edge. These handles indicate that the field is selected, and therefore active. To do anything with a field (change the font, move it, etc.), you first have to select it.
●Position the cursor inside the object frame and click once. The handles appear indicating the object is selected.
●Move the cursor away from the object frame and click in an empty part of the window. The handles disappear.
That’s all it takes to select and deselect objects.
As you can see, the Customer Name field takes up quite a bit of space on your report. To resize the field, follow these steps:
Click the Customer Name field to select it.
Press the Ctrl key and click the field heading. This selects both objects.
!Move the cursor over the resizing handle on the right edge of the fields until the cursor turns into a resizing cursor. See
Cursors, Page 64.
"Resize the fields to the left until they are approximately two inches in length.
174 |
Seagate Crystal Reports User’s Guide |
Adding
additional fields
Reviewing your work
Next, you will insert two additional fields in your report. This time, however, you will add them at the same time by using the Ctrl-click combination.
Highlight the City field in the Insert Fields dialog box, press the Ctrl key on your keyboard, and highlight the Country field. Release the Ctrl key. If you scroll through the field list, you will notice that both fields remain selected.
NOTE: Using the Ctrl-click combination allows you to pick a noncontinuous range of fields. You can use the Shift-click combination to pick several fields from the list that are continuous.
Click the Insert button to place the fields.
!Move the cursor over your report. An object frame appears along with the arrow cursor.
"Place the fields to the right of the Customer Name field. Click once to insert the fields. Both fields appear in the Details section of your report in the same order they are listed in the Insert Fields dialog box.
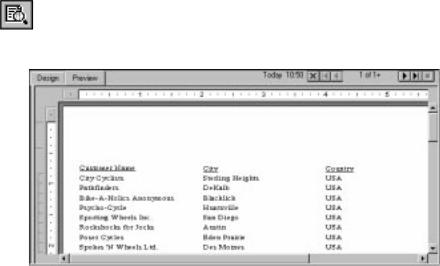
Now let’s see how your report looks with three fields placed and positioned.
Click the PRINT PREVIEW button on the standard toolbar to activate the Preview Tab.
Your screen should look similar to this:
Tutorial - Customer List |
175 |
Displaying field names
NOTE: The first time you preview your report, you must click the PREVIEW button on the standard toolbar to activate the Preview
Tab. The Preview Tab appears to the right of the Design Tab. You can then simply switch between designing and previewing your report by clicking the corresponding tab.
You have the beginnings of a customer list report, but you still have several fields to add.
When you are finished reviewing your report, return to the Design Tab by clicking once on the Design Tab.
Field pictures have been discussed, but there will be times when you want to see the field names in the Design Tab.
Choose the OPTIONS command from the File menu. The File Options dialog box appears with the Layout Tab active.
2 Toggle the Show Field Names check box on and click OK when finished.
Now in the Design Tab you will see the actual field names instead of field pictures (X, $, #, etc.).
176 |
Seagate Crystal Reports User’s Guide |

Combining
database fields in a text object
Instead of adding the Contact First Name and Contact Last Name fields as separate objects, you can insert both fields in a text object. This allows you to control the formatting of both fields by making changes to only one object. When you insert fields in a text object, the fields are automatically trimmed (they do not have any extra white space on either side). This is important because a field is a fixed size but the data in the fields can vary in size leaving various amount of unwanted white space.
Click the INSERT TEXT OBJECT button on the standard toolbar. An object frame appears next to the arrow cursor as you move the cursor over your report.
Insert the field to the right of the fields in the Details section. The Design Tab automatically scrolls to the right, if necessary, as you drag the field. When you click to place the object, a text object appears and the horizontal ruler of the Design Tab changes to a ruler/tab selector that is used for editing the text object. When you click an empty area of the report or a field object, the standard Design Tab ruler appears.
!Click once on the border of the text object to select it for resizing. Handles appear on all sides of the object.
"Move the cursor over the right sizing handle of the text object and increase the width by about 1 inch. You may need to scroll to the right and continue resizing.
#Double-click in the text object to select it for editing. Notice the insertion point is now flashing within the text object.
$Highlight the Contact Last Name field in the Insert Fields dialog box. Remember, you can move the Insert Fields dialog box by dragging and dropping it by its title bar.
% Click the Insert button.
&Move the cursor over the text object until your cursor becomes a drag and drop cursor. See Cursors, Page 64.
' Click once to place the field in the text object.
Your cursor now appears after the Contact Last Name field within the text object. Type a comma and a space after the Contact Last Name.
Tutorial - Customer List |
177 |

Adding
summary information
In the Insert Fields dialog box, highlight the Contact First Name field.
Click the Insert button.
! Move the cursor over the text object until your cursor becomes a drag and drop cursor. Move the cursor to the right of the comma and space you just typed, and click once. The field will be inserted to the right of the comma and space.
" You are finished inserting fields, so click Close in the Insert Fields dialog box.
# Click the Preview Tab to look at the fields you just placed.
Your report should now look similar to this:
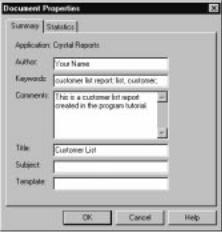
The next step is to add summary information to your report. Adding summary information allows you to specify the author, title, and subject of the report, as well as any keywords or comments you have related to the report. If a template is used when creating the report, you can specify that as well. When you add summary information, users can find information related to the report quickly. Summary information will also appear in the Reports at a Glance application. See the Reports at a Glance online Help (RPTGLANC.HLP) located in the \CRW directory (or directory in which the program resides).
Choose the SUMMARY INFO command on the File menu. The Document Properties dialog box appears with the Summary Tab active.
178 |
Seagate Crystal Reports User’s Guide |
Adding a title
Enter information about your report in the text boxes provided as shown above. Be sure to enter the title “Customer List” in the Title text box. This information will be used in the next section of the tutorial.
! Click OK when finished.
As you can see, the report looks incomplete without a title. Although you can add a title using a text object, you can also tell the program to take the title information directly from the Title text box of the Document Properties dialog box.
Click the Design Tab to activate it.
Choose the REPORT TITLE command from the Insert|Special Field menu.
! Move the cursor over your report. An object frame appears.
"Position the object frame in the upper left-hand corner of the Page Header (PH) section of your report and click once to place the object.
# Click the Preview Tab to review your changes.
As you can see, the report title object displays the title that you entered in the Title text box of the Document Properties dialog box.
Tutorial - Customer List |
179 |

Formatting objects
Now you can format the report title. This time, however, you will remain in the Preview Tab to do the work. This will make it easier to see your work while you are formatting the title.
To center the title, you will first need to expand the title field box so it's about the same width as the data in your report. To do this, click the object to select it.
Position your cursor on the right edge of the object until the cursor turns into a resizing cursor. Drag the right edge of the field box until it is even with the right edge of the data in the Contact Name field object.
You have created a large field that extends from the left edge to the right edge of your report.
!With the report title object still selected, click the CENTER ALIGNMENT button on the format bar. The title is centered within the object.
"Right-click the object and choose the CHANGE FONT command from the shortcut menu. The Format Editor appears with the Font Tab active. Search for Format Editor in Seagate Crystal Reports online Help.
#Set the report title to a larger, bolder version of the active font by choosing Bold from the Style drop-down box and 16 (or a point size suitable to the font you are using) from the Size drop-down box.
$Change the color of the text by choosing Maroon from the Color drop-down box. Notice that the Sample box shows an example of how the text will look.
% Click OK when finished.
&Resize the report title object vertically to accommodate the size of the report title.
180 |
Seagate Crystal Reports User’s Guide |
The title is now formatted to stand out on your report.
Adding a field heading
Saving your report
As you can see the Contact Name field is the only field without a heading. In this section you will create a heading using a text field.
Return to the Design Tab.
Click the INSERT TEXT OBJECT button on the standard toolbar. An object frame appears next to the arrow cursor as you move the cursor over your report.
!Place the object in the Page Header (PH) section above the contact name object.
" Type “Contact Name” in the text object.
#While the text object is still in edit mode, highlight the field heading.
$ Click the UNDERLINE button on the format bar.
The Contact Name field now has a heading that looks just like the other field titles.
Click the SAVE button on the standard toolbar to save your work. Since this is the first time you are saving the report, the File Save As dialog box appears displaying the default directory where the database resides.
Type CUSTLIST.RPT in the Filename edit box and click Save. Your report is saved to the default directory where the program resides.
Tutorial - Customer List |
181 |