

- •Using Your Sybex Electronic Book
- •Acknowledgments
- •Contents at a Glance
- •Introduction
- •Who Should Read This Book?
- •How About the Advanced Topics?
- •The Structure of the Book
- •How to Reach the Author
- •The Integrated Development Environment
- •The Start Page
- •Project Types
- •Your First VB Application
- •Making the Application More Robust
- •Making the Application More User-Friendly
- •The IDE Components
- •The IDE Menu
- •The Toolbox Window
- •The Solution Explorer
- •The Properties Window
- •The Output Window
- •The Command Window
- •The Task List Window
- •Environment Options
- •A Few Common Properties
- •A Few Common Events
- •A Few Common Methods
- •Building a Console Application
- •Summary
- •Building a Loan Calculator
- •How the Loan Application Works
- •Designing the User Interface
- •Programming the Loan Application
- •Validating the Data
- •Building a Math Calculator
- •Designing the User Interface
- •Programming the MathCalculator App
- •Adding More Features
- •Exception Handling
- •Taking the LoanCalculator to the Web
- •Working with Multiple Forms
- •Working with Multiple Projects
- •Executable Files
- •Distributing an Application
- •VB.NET at Work: Creating a Windows Installer
- •Finishing the Windows Installer
- •Running the Windows Installer
- •Verifying the Installation
- •Summary
- •Variables
- •Declaring Variables
- •Types of Variables
- •Converting Variable Types
- •User-Defined Data Types
- •Examining Variable Types
- •Why Declare Variables?
- •A Variable’s Scope
- •The Lifetime of a Variable
- •Constants
- •Arrays
- •Declaring Arrays
- •Initializing Arrays
- •Array Limits
- •Multidimensional Arrays
- •Dynamic Arrays
- •Arrays of Arrays
- •Variables as Objects
- •So, What’s an Object?
- •Formatting Numbers
- •Formatting Dates
- •Flow-Control Statements
- •Test Structures
- •Loop Structures
- •Nested Control Structures
- •The Exit Statement
- •Summary
- •Modular Coding
- •Subroutines
- •Functions
- •Arguments
- •Argument-Passing Mechanisms
- •Event-Handler Arguments
- •Passing an Unknown Number of Arguments
- •Named Arguments
- •More Types of Function Return Values
- •Overloading Functions
- •Summary
- •The Appearance of Forms
- •Properties of the Form Control
- •Placing Controls on Forms
- •Setting the TabOrder
- •VB.NET at Work: The Contacts Project
- •Anchoring and Docking
- •Loading and Showing Forms
- •The Startup Form
- •Controlling One Form from within Another
- •Forms vs. Dialog Boxes
- •VB.NET at Work: The MultipleForms Project
- •Designing Menus
- •The Menu Editor
- •Manipulating Menus at Runtime
- •Building Dynamic Forms at Runtime
- •The Form.Controls Collection
- •VB.NET at Work: The DynamicForm Project
- •Creating Event Handlers at Runtime
- •Summary
- •The TextBox Control
- •Basic Properties
- •Text-Manipulation Properties
- •Text-Selection Properties
- •Text-Selection Methods
- •Undoing Edits
- •VB.NET at Work: The TextPad Project
- •Capturing Keystrokes
- •The ListBox, CheckedListBox, and ComboBox Controls
- •Basic Properties
- •The Items Collection
- •VB.NET at Work: The ListDemo Project
- •Searching
- •The ComboBox Control
- •The ScrollBar and TrackBar Controls
- •The ScrollBar Control
- •The TrackBar Control
- •Summary
- •The Common Dialog Controls
- •Using the Common Dialog Controls
- •The Color Dialog Box
- •The Font Dialog Box
- •The Open and Save As Dialog Boxes
- •The Print Dialog Box
- •The RichTextBox Control
- •The RTF Language
- •Methods
- •Advanced Editing Features
- •Cutting and Pasting
- •Searching in a RichTextBox Control
- •Formatting URLs
- •VB.NET at Work: The RTFPad Project
- •Summary
- •What Is a Class?
- •Building the Minimal Class
- •Adding Code to the Minimal Class
- •Property Procedures
- •Customizing Default Members
- •Custom Enumerations
- •Using the SimpleClass in Other Projects
- •Firing Events
- •Shared Properties
- •Parsing a Filename String
- •Reusing the StringTools Class
- •Encapsulation and Abstraction
- •Inheritance
- •Inheriting Existing Classes
- •Polymorphism
- •The Shape Class
- •Object Constructors and Destructors
- •Instance and Shared Methods
- •Who Can Inherit What?
- •Parent Class Keywords
- •Derived Class Keyword
- •Parent Class Member Keywords
- •Derived Class Member Keyword
- •MyBase and MyClass
- •Summary
- •On Designing Windows Controls
- •Enhancing Existing Controls
- •Building the FocusedTextBox Control
- •Building Compound Controls
- •VB.NET at Work: The ColorEdit Control
- •VB.NET at Work: The Label3D Control
- •Raising Events
- •Using the Custom Control in Other Projects
- •VB.NET at Work: The Alarm Control
- •Designing Irregularly Shaped Controls
- •Designing Owner-Drawn Menus
- •Designing Owner-Drawn ListBox Controls
- •Using ActiveX Controls
- •Summary
- •Programming Word
- •Objects That Represent Text
- •The Documents Collection and the Document Object
- •Spell-Checking Documents
- •Programming Excel
- •The Worksheets Collection and the Worksheet Object
- •The Range Object
- •Using Excel as a Math Parser
- •Programming Outlook
- •Retrieving Information
- •Recursive Scanning of the Contacts Folder
- •Summary
- •Advanced Array Topics
- •Sorting Arrays
- •Searching Arrays
- •Other Array Operations
- •Array Limitations
- •The ArrayList Collection
- •Creating an ArrayList
- •Adding and Removing Items
- •The HashTable Collection
- •VB.NET at Work: The WordFrequencies Project
- •The SortedList Class
- •The IEnumerator and IComparer Interfaces
- •Enumerating Collections
- •Custom Sorting
- •Custom Sorting of a SortedList
- •The Serialization Class
- •Serializing Individual Objects
- •Serializing a Collection
- •Deserializing Objects
- •Summary
- •Handling Strings and Characters
- •The Char Class
- •The String Class
- •The StringBuilder Class
- •VB.NET at Work: The StringReversal Project
- •VB.NET at Work: The CountWords Project
- •Handling Dates
- •The DateTime Class
- •The TimeSpan Class
- •VB.NET at Work: Timing Operations
- •Summary
- •Accessing Folders and Files
- •The Directory Class
- •The File Class
- •The DirectoryInfo Class
- •The FileInfo Class
- •The Path Class
- •VB.NET at Work: The CustomExplorer Project
- •Accessing Files
- •The FileStream Object
- •The StreamWriter Object
- •The StreamReader Object
- •Sending Data to a File
- •The BinaryWriter Object
- •The BinaryReader Object
- •VB.NET at Work: The RecordSave Project
- •The FileSystemWatcher Component
- •Properties
- •Events
- •VB.NET at Work: The FileSystemWatcher Project
- •Summary
- •Displaying Images
- •The Image Object
- •Exchanging Images through the Clipboard
- •Drawing with GDI+
- •The Basic Drawing Objects
- •Drawing Shapes
- •Drawing Methods
- •Gradients
- •Coordinate Transformations
- •Specifying Transformations
- •VB.NET at Work: Plotting Functions
- •Bitmaps
- •Specifying Colors
- •Defining Colors
- •Processing Bitmaps
- •Summary
- •The Printing Objects
- •PrintDocument
- •PrintDialog
- •PageSetupDialog
- •PrintPreviewDialog
- •PrintPreviewControl
- •Printer and Page Properties
- •Page Geometry
- •Printing Examples
- •Printing Tabular Data
- •Printing Plain Text
- •Printing Bitmaps
- •Using the PrintPreviewControl
- •Summary
- •Examining the Advanced Controls
- •How Tree Structures Work
- •The ImageList Control
- •The TreeView Control
- •Adding New Items at Design Time
- •Adding New Items at Runtime
- •Assigning Images to Nodes
- •Scanning the TreeView Control
- •The ListView Control
- •The Columns Collection
- •The ListItem Object
- •The Items Collection
- •The SubItems Collection
- •Summary
- •Types of Errors
- •Design-Time Errors
- •Runtime Errors
- •Logic Errors
- •Exceptions and Structured Exception Handling
- •Studying an Exception
- •Getting a Handle on this Exception
- •Finally (!)
- •Customizing Exception Handling
- •Throwing Your Own Exceptions
- •Debugging
- •Breakpoints
- •Stepping Through
- •The Local and Watch Windows
- •Summary
- •Basic Concepts
- •Recursion in Real Life
- •A Simple Example
- •Recursion by Mistake
- •Scanning Folders Recursively
- •Describing a Recursive Procedure
- •Translating the Description to Code
- •The Stack Mechanism
- •Stack Defined
- •Recursive Programming and the Stack
- •Passing Arguments through the Stack
- •Special Issues in Recursive Programming
- •Knowing When to Use Recursive Programming
- •Summary
- •MDI Applications: The Basics
- •Building an MDI Application
- •Built-In Capabilities of MDI Applications
- •Accessing Child Forms
- •Ending an MDI Application
- •A Scrollable PictureBox
- •Summary
- •What Is a Database?
- •Relational Databases
- •Exploring the Northwind Database
- •Exploring the Pubs Database
- •Understanding Relations
- •The Server Explorer
- •Working with Tables
- •Relationships, Indices, and Constraints
- •Structured Query Language
- •Executing SQL Statements
- •Selection Queries
- •Calculated Fields
- •SQL Joins
- •Action Queries
- •The Query Builder
- •The Query Builder Interface
- •SQL at Work: Calculating Sums
- •SQL at Work: Counting Rows
- •Limiting the Selection
- •Parameterized Queries
- •Calculated Columns
- •Specifying Left, Right, and Inner Joins
- •Stored Procedures
- •Summary
- •How About XML?
- •Creating a DataSet
- •The DataGrid Control
- •Data Binding
- •VB.NET at Work: The ViewEditCustomers Project
- •Binding Complex Controls
- •Programming the DataAdapter Object
- •The Command Objects
- •The Command and DataReader Objects
- •VB.NET at Work: The DataReader Project
- •VB.NET at Work: The StoredProcedure Project
- •Summary
- •The Structure of a DataSet
- •Navigating the Tables of a DataSet
- •Updating DataSets
- •The DataForm Wizard
- •Handling Identity Fields
- •Transactions
- •Performing Update Operations
- •Updating Tables Manually
- •Building and Using Custom DataSets
- •Summary
- •An HTML Primer
- •HTML Code Elements
- •Server-Client Interaction
- •The Structure of HTML Documents
- •URLs and Hyperlinks
- •The Basic HTML Tags
- •Inserting Graphics
- •Tables
- •Forms and Controls
- •Processing Requests on the Server
- •Building a Web Application
- •Interacting with a Web Application
- •Maintaining State
- •The Web Controls
- •The ASP.NET Objects
- •The Page Object
- •The Response Object
- •The Request Object
- •The Server Object
- •Using Cookies
- •Handling Multiple Forms in Web Applications
- •Summary
- •The Data-Bound Web Controls
- •Simple Data Binding
- •Binding to DataSets
- •Is It a Grid, or a Table?
- •Getting Orders on the Web
- •The Forms of the ProductSearch Application
- •Paging Large DataSets
- •Customizing the Appearance of the DataGrid Control
- •Programming the Select Button
- •Summary
- •How to Serve the Web
- •Building a Web Service
- •Consuming the Web Service
- •Maintaining State in Web Services
- •A Data-Driven Web Service
- •Consuming the Products Web Service in VB
- •Summary

BUILDING A WEB APPLICATION 1025
box. Because the application is not installed on your computer, you don’t have to worry about patches or updates. Every time you connect to the server that hosts the application, you’re executing the latest version of it. It doesn’t take up any space on the disk, and you don’t have to spend hundreds of dollars to buy it. You pay a small subscription, or you’re charged for the time you use it. There are already sites that charge you to use resources like encyclopedias, news services, and so on. In the future, we’ll see more online services, especially if Web services catch on as Microsoft hopes they will.
The VB code resides on the server and will be executed automatically when certain events are “fired.” In reality, no event is fired. When the user clicks a button on the form, the client submits the data entered by the user on the form to the client. This action is called postback: the client sends the data on the current form to the server, and the server executes the appropriate event handler. Your VB code in the event handler reads the values entered by the user on the form by reading the properties of the various Web controls, processes them, and updates the values of certain controls on the same page or prepares a new page to download to the client. The Web controls are replaced by the plain HTML controls and, in some cases, one or more scripts in JavaScript.
There’s a point I should stress here: the values of the various controls are not read directly off the controls. The controls reside on a page at the client. When a page is submitted to the server, the values of all the controls on the page are also uploaded to the server. Once the code on the server has prepared a new page (or updated the existing page) and sent it to the client, it forgets all about the interaction. That’s why the client submits all the data to the server with every postback.
This observation raises naturally the following question: how can we maintain some variables through a session? How do we know that we’re talking to the same client, for example, and how can we retrieve the customer’s basket and add new products to it? There many ways to maintain state among multiple pages of a Web application, or multiple invocations of the same page, and we’ll examine them in the following section.
Maintaining State
The second major difference between ASP applications and Windows applications is that HTML pages (and, therefore, Web forms) are totally independent from one another. If you want to persist some information between successive invocations of the same page, or multiple pages of the same application, you must do some extra work. The information you want to maintain is known as
the application’s state.
There are several methods to maintain state across the pages of a Web application. The simplest method is to create a few variables through the Session object. The Session object represents a specific session; it’s created when a new user connects to the server and released when the user leaves the site. The Session object is discussed later in this chapter, but here’s how you can add two variables named Items and UID to the Session object, and set their value to a number and a string respectively:
Session(“Items”) = 3
Session(“UID”) = “anonymous”
If a variable of the same name exists already, its value is overwritten. Session variables should be used to store relatively small pieces of information that apply to all the pages of the application, such as the user’s name, ID, or preferences.
Copyright ©2002 SYBEX, Inc., Alameda, CA |
www.sybex.com |

1026 Chapter 23 INTRODUCTION TO WEB PROGRAMMING
Another method of maintaining state is to use an ID that uniquely identifies a session. This ID is generated by the SessionID property of the Session object. Once you obtain an ID for the current session, you can store it in a Session variable and use it in your code to identify the session. This ID is passed back and forth between the client and the server and maintains its value for the duration of the session. You can use this value as a key to a table in a database that contains information such as the items ordered by a user—or any other data you want to access from within multiple pages or multiple invocations of the same page.
In the past, Web developers used to pass cookies and store them on the client computer. Many users are disabling cookies on their computers, so you can’t rely on this technique for all clients. If the client computer doesn’t accept cookies, your application should be prepared to maintain its state with a different method. If the client accepts cookies, use them to store information you want to maintain between sessions, like the basket’s contents. The clients that accept cookies can place items in their basket and terminate the application without placing an order. The next time they will connect to your site, the items will still be in their basket. Cookies are discussed in detail later in this chapter.
A last, and very reliable, method of maintaining state among multiple pages and requests is to embed hidden fields in your pages and read them when the pages are submitted back to the client. This technique is equivalent to maintaining global variables, only the variables don’t reside on the server. They travel back and forth and are always available when you want to process a page. This technique is used heavily by ASP.NET applications. If you open the source file of any page on the client, you will find statements like the following:
<INPUT TYPE=”hidden” NAME=”__VIEWSTATE” VALUE=”dDwtMTMzNTkzMTE2Mjs7Pg==” />
This is a hidden field. Its name attribute is the name of the variable, and its value attribute is the variable’s value. This variable is used on the server to maintain the state of the controls on the form throughout the session. The Hidden field is an HTML control, and there’s no equivalent Web control. Normally, you need not add your own Hidden fields, but you can do so by adding one or more instances of the Hidden HTML control on a page.
The Web Controls
As you saw in the previous section, when you design a Web form, the Toolbox displays by default the tab with the Web controls. Many of these controls—the simple Web controls—have equivalent HTML controls. The Web controls provide more properties, and you have more control over their appearance. Of course, they’re not real controls; when the page is sent to the client, they’re rendered as HTML controls.
You’re probably wondering when and how the Web controls are converted to HTML controls. When the page is executed (that is, when the client requests the page for the first time), the Common Language Runtime (CLR) creates a class behind the scenes and compiles it. You never see this class, but a DLL is created in the Debug or Bin folder of the application. This DLL, which is named after the application, handles the request and emits the proper HTML code to the client. Using the simple Web controls, like the TextBox and CheckBox controls, is straightforward—it’s like using the equivalent Windows controls, only they don’t have as many members. I will not discuss the trivial controls in this chapter; you already know how to use them.
Copyright ©2002 SYBEX, Inc., Alameda, CA |
www.sybex.com |

BUILDING A WEB APPLICATION 1027
In addition to the simple Web controls, the Web Controls tab of the Toolbox contains some advanced controls, which are known as rich Web controls. Among these are the validation controls (a group of controls for various types of data validation), the Calendar control, and the TreeView control. In the following sections, you’ll find an overview of the most useful rich Web controls.
The Validation Controls
If there’s a universal task in programming Web applications, it’s the validation of the values of the various controls. Most sites validate the controls on the server, and if there’s a problem with the user-supplied data, they display the same page along with a message describing the error. Many programmers will also deploy client-side scripts to save the trip to the server. To simplify the validation of the data submitted to the server, ASP.NET provides five controls, collectively known as validation controls, and another control that displays the errors detected by the five validation controls:
RequiredFieldValidator This validator ensures that all required fields have a value.
CompareValidator This validator compares a control’s value to a constant value, a property of another control, or even a database field. If the comparison fails, the control is in error and the user must supply a different value.
RangeValidator This validator ensures that the value entered by the user in a control falls within a lower and upper bound. If not, the control is in error.
RegularExpressionValidator This validator compares the value of a control against a regular expression. If the comparison fails, the control is in error.
CustomValidator This control allows you to supply your own validation logic, and it’s the most flexible validator. However, you must supply your own code.
ValidationSummary This control can automatically display all the errors caught by the other validation controls on the form. Normally, we prefer to display the messages next to the control in error.
A regular expression is a string that determines the structure of the user-supplied value. The string
...\d\d means three characters followed by two digits. A string like ABC99 will pass the test, while a string like 9AA99 will fail the test. The period (.) stands for a character, the asterisk stands for any number of characters, and \d stands for a digit. The expression [A-Z] means any uppercase character between A and Z, and the expression [a-e] means any lowercase character between a and e. If
a specific pattern is repeated a number of times, specify a numeric value in braces. The expression [0-9]{5} means five digits (use this regular expression to validate ZIP codes).
Each of the validation controls performs a specific type of validation on a specific control, which is specified with the validation control’s ControlToValidate property. You can set this property in the Properties window, where all the names of the controls on the form will be displayed in a dropdown list and you can select the control to be validated. If a control must undergo multiple validations, you can have multiple validation controls for the same control (that is, multiple validation controls with their ControlToValidate property set to the same control ID). Each of the validation controls will perform a single validation.
Copyright ©2002 SYBEX, Inc., Alameda, CA |
www.sybex.com |
1028 Chapter 23 INTRODUCTION TO WEB PROGRAMMING
Each validation control has a Text property, which is displayed on the validation control when a control on the form fails the validation test. To make sure that a TextBox control isn’t left blank, place a RequiredFieldValidator control next to it and set its Text property to a string “This is a required field” or “You cannot submit a page without a user ID.” Normally, the validation control remains blank. If the user attempts to submit the form without entering something in this field, the string will appear on the validation control (and the Submit button will not send anything to the server). Each validation control also has an ErrorMessage property, which you can read from within your code. The ErrorMessage property is displayed on the ValidationSummary control, if the form contains one.
Some of the validation controls have additional properties. The RangeValidator control, for example, has MinimumValue and MaximumValue properties, which are the valid minimum and maximum for the validated control. The CompareValidator control has ControlToCompare and ValueToCompare properties. If you want to compare a control’s value to a constant, set the ValueToCompare property to this constant. If you want to compare the control to value of another control, set the CompareValidator control’s ControlToCompare property to the ID of another control on the form. To specify the type of comparison, set the CompareValidator control’s Operator property to a comparison operator (Equal, Greater Than, Less Than, and so on). The valid settings of this property appear in a drop-down list in the Properties window. The CompareValidator control will compare the value of the control specified by the CompareTo property to the setting of the ValueToCompare or ControlToCompare property using the specified operator. If the comparison fails, an error message will appear on the validator control.
The last control in this family doesn’t perform any validation. Instead, it displays all the errors on the form. In effect, it’s a Label control on which the ErrorMessage properties of all validation controls is displayed. The validation control’s Text property is displayed on the validation control, which is usually placed next to the control to be validated. The ErrorMessage property is the string that appears in the ValidationSummary control. You can set both the Text and ErrorMessage properties to the same string. Let’s see some of the validation controls in action.
In Chapter 2, you developed a Web application that calculates the monthly payment of a loan. Let’s add the appropriate validation controls to the WebLoanCalculator application. First, make a copy of the existing application. The new application is called WebLoanCalculator1, and you will find it on the CD. I’ve chosen this name because both applications must reside in the Web server’s root folder—you can copy them to different subfolders of the root folder and name the project WebLoanCalculator. Or, instead of copying the original project application, you can open the WebLoanCalculator1 project on the CD and edit it.
Add three RequiredFieldValidator controls on the form, and place them next to each TextBox control, as shown in Figure 23.7. Set each validation control’s ControlToValidate property to the ID of the Textbox next to it. Then place three RangeValidator controls on the form, place them on top of the three RequiredFieldValidator controls, so that their messages will also appear next to the control in error. Placing one control on top of another with the mouse can be tricky; use the commands of the Format menu instead.
Copyright ©2002 SYBEX, Inc., Alameda, CA |
www.sybex.com |

BUILDING A WEB APPLICATION 1029
Figure 23.7
The WebFormCalculator page validates the form before submitting it to the server.
Property |
Setting |
RangeValidator1 |
|
ControlToValidate |
txtAmount |
MinimumValue |
5000 |
MaximumValue |
500000 |
Text |
“Amount must be between $5,000 and $500,000” |
ErrorMessage |
“Amount must be between $5,000 and $500,000” |
RangeValidator2 |
|
ControlToValidate |
txtDuration |
MinimumValue |
6 |
MaximumValue |
96 |
Text |
“Duration must be from 6 to 96 months” |
ErrorMessage |
“Duration must be from 6 to 96 months” |
RangeValidator3 |
|
ControlToValidate |
txtInterest |
MinimumValue |
0.05 |
MaximumValue |
0.2 |
Text |
“Interest rate must be a value from 0.05 to 0.2” |
ErrorMessage |
“Interest rate must be a value from 0.05 to 0.2” |
Copyright ©2002 SYBEX, Inc., Alameda, CA |
www.sybex.com |

1030 Chapter 23 INTRODUCTION TO WEB PROGRAMMING
If you run the application now and experiment with invalid values, you’ll realize that the RangeValidator controls on the form will be ignored, if the controls are empty. The RequiredFieldValidator controls take precedence over the RangeValidator controls, for obvious reasons, so the overlapping controls aren’t going to interfere with one another—in other words, you’ll never see two error messages one on top of the other.
You can open the WebLoanCalculator1 project and examine the settings of the various controls. No code is required to make the validation controls work. Just set some properties, and they’ll validate the form.
You probably want to know where the validation code is running, right? Open the WebFormCalculator with Internet Explorer and examine its source code. Toward the end of the document, you’ll find the following script:
<SCRIPT LANGUAGE=”javascript”> <!--
var Page_ValidationActive = false;
if (typeof(clientInformation) != “undefined” && clientInformation.appName.indexOf(“Explorer”) != -1) {
if (typeof(Page_ValidationVer) == “undefined”) alert(“Unable to find script library
‘/aspnet_client/system_web/1_0_2914_16/WebUIValidation.js’. Try placing this file manually, or reinstall by running ‘aspnet_regiis -c’.”);
else if (Page_ValidationVer != “121”)
alert(“This page uses an incorrect version of WebUIValidation.js. The page expects version 121. The script library is “ + Page_ValidationVer + “.”);
else ValidatorOnLoad();
}
function ValidatorOnSubmit() { if (Page_ValidationActive) {
ValidatorCommonOnSubmit();
}
}
// --> </SCRIPT>
This is JavaScript, and I will not explain how it works, because most readers aren’t familiar with JavaScript. If you examine each line, you’ll realize that it is very similar to VBScript, except for the semicolons and curly brackets. The ASP application on the server emits code that will validate the controls on the client. Of course, the code examines the type of browser running on the client, and if it’s Internet Explorer, it will perform the validation on the client. In Microsoft’s terminology, Internet Explorer is a so-called “up-level” browser. All other browsers are “down-level” browsers, and they won’t perform the validation on the client. This will probably change in the near future, but there will always be browsers that will not be able to validate the form on the client. With downlevel browsers, the form must be submitted to the server as usual, where the controls will be validated and the page with the error messages (if any) will be sent back to the client. No matter where
Copyright ©2002 SYBEX, Inc., Alameda, CA |
www.sybex.com |
BUILDING A WEB APPLICATION 1031
the validation takes place, you don’t have to do anything special. Just place the validation controls on the Web form, set their properties, and let ASP.NET handle the validation.
The Calendar Control
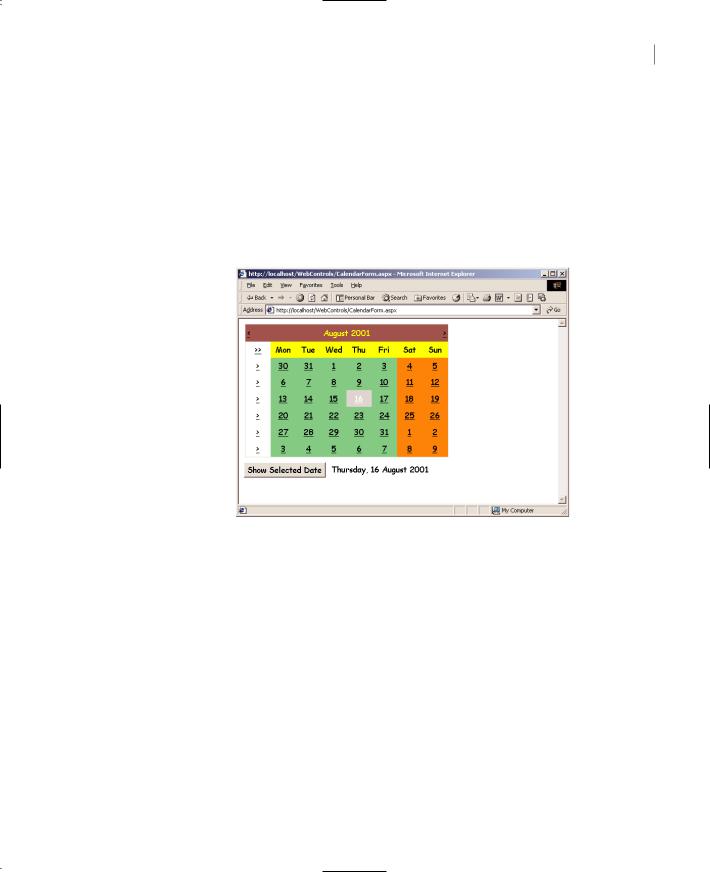
The Calendar control (Figure 23.8) provides similar functionality to the MonthCalendar Windows control. It displays the current month’s calendar, and the user can select one or more days or weeks with the mouse. Your code on the server can detect the selected date(s) and act accordingly: display meetings, events, set reminders, and so on. While the Calendar you see on your Web form at design time looks like a separate control, at runtime it’s rendered on the browser as a table.
Figure 23.8
Using the Calendar Web control on your Web pages
The Calendar control’s SelectionMode property determines whether users can select a single day or a range of days, and it can be set to one of the following values: None, Day, DayWeek, DayWeekMonth. When a new date is selected on the controls, the SelectionChanged event is fired. You can pro-
gram this event to respond to a date selection, and the event’s definition is shown next:
Public Sub Calendar1_SelectionChanged(ByVal sender As Object, _
ByVal e As System.EventArgs) Handles Calendar1.SelectionChanged
The SelectionChanged event is fired when the user selects another date (or range of dates), but not when the selected date is changed from within your code. To retrieve information about the selected dates, use the following properties:
SelectedDate This property is a date value that represents the date selected by the user on the control. If multiple dates were selected on the control, this property contains the first date in the range.
Copyright ©2002 SYBEX, Inc., Alameda, CA |
www.sybex.com |

1032 Chapter 23 INTRODUCTION TO WEB PROGRAMMING
SelectedDates This property is a collection containing all the dates selected on the control. The dates in this collection are sequential, as the control doesn’t allow the selection of multiple individual dates. The number of selected dates is given by the following expression Calendar1
.SelectedDates.Count. To iterate through the selected dates, set up a control like the following:
Dim dt As Date
For Each dt In Calendar1.SelectedDates
Response.Write(dt.ToShortDateString)
Response.Write(“<BR>”)
Next
You can also access the selected dates by index, with the Item property of the SelectedDates collection:
firstDate = Calendar1.SelectedDates.Item(0).Date lastDate = Calendar1.SelectedDates.Item(Count - 1).Date
To control the appearance of the calendar, you can set the properties of the control shown in Table 23.2, all of which are TableItemStyle objects.
Table 23.2: Style Properties of the Calendar Control
Property |
Represents |
DayStyle |
The days of the current month |
DayHeaderStyle |
The row with the names of the days |
NextPrevStyle |
The links to the previous and next months on the upper section of the |
|
control |
OtherMonthDayStyle |
The days from the previous and next months that happen to appear on the cur- |
|
rent month’s calendar |
SelectedDayStyle |
The day selected by the user |
SelectorStyle |
The left column that contains the links for selecting an entire week or month |
TitleStyle |
The calendar’s title bar |
TodayDayStyle |
The style of the current date |
WeekendDayStyle |
The style of the weekend dates |
|
|
All of the previous properties expose in turn their own properties, which are listed in Table 23.3. All the items of the previous table are cells of a table (because this is what the calendar is), and you can customize them by setting any of these properties in Table 23.3.
Copyright ©2002 SYBEX, Inc., Alameda, CA |
www.sybex.com |

BUILDING A WEB APPLICATION 1033
Table 23.3: Appearance Properties of the TableItemStyle Objects
Property |
Represents |
BackColor |
The background color |
BorderColor |
The border color |
BorderStyle |
The border |
BorderWidth |
The border’s width |
Font |
The text’s font |
ForeColor |
The foreground color |
Height |
The cell’s height |
HorizontalAlign |
The cell’s horizontal alignment |
VerticalAlign |
The cell’s vertical alignment |
Width |
The cell’s width |
Wrap |
A True/False value that indicates whether the text wraps within the cell |
|
|
The TreeView Control
This is one of the more advanced Web controls, and I’m sure many of you would like to include the functionality of this control to your pages. As you realize, the Web TreeView control (Figure 23.9) isn’t comparable to the equivalent Windows control, but it’s as close to a TreeView as you can get on a Web page. The first thing you must learn about this control is that, by default, every time its state changes (you expand or collapse a branch of the tree, or make a selection), the change is posted back to the server. The application running on the server raises the SelectedIndexChanged event. This may introduce a substantial delay. To change the default behavior of the control, you must set the AutoPostBack property to False (and you must then provide a button that will submit the data to the server).
Figure 23.9
Using the TreeView control on a Web page
Copyright ©2002 SYBEX, Inc., Alameda, CA |
www.sybex.com |

1034 Chapter 23 INTRODUCTION TO WEB PROGRAMMING
To populate a TreeView control, locate its Nodes property in the Properties window and click the button with the ellipsis next to it. The TreeNodeEditor dialog box will appear, where you can add nodes to the control, just as you add nodes to the TreeView Windows control. Each node has a Text property, which is the string displayed on the control for that node; an ID property, which uniquely identifies a node; and a NodeData property, where you can store additional data. The NavigateUrl property of each node allows you to specify a URL, which will be activated when the user clicks a node.
On the server, you can intercept the SelectedIndexChanged event to monitor the changes on the client. Every time the user selects another item on the control, the SelectedIndexChanged event is fired. You can also place a button on the form and ignore the action of selecting individual controls.
There are several properties you can use to retrieve the selected item. The SelectedNodeIndex returns a unique index value, which takes into consideration the hierarchy of the items on the control. The first root item’s index is 0, the index of the first child node under the root is 0.0, the next child node’s index is 0.1, and so on. You can use this indexing scheme to retrieve all the nodes in the path of the selected node.
There is no property that returns the text of the selected node. Instead, you can use the GetNodeFromIndex method to retrieve a Node object by index. Since the selected node’s index is SelectedNodeIndex, you can retrieve the selected node’s text with the following expression:
TreeView1.GetNodeFromIndex(TreeView1.SelectedNodeIndex).Text
The GetNodeFromIndex method returns a Node object, and you can use this access all the properties of the selected node. It’s fairly easy to program the Web TreeView control. Keep in mind that it’s not quite equivalent to the Windows TreeView control.
On up-level browsers (that is, Internet Explorer), the following script is executed to handle the expansion and collapsing of nodes. This script saves the client a trip to the server every time a node is expanded or collapsed. On down-level browsers, every time you change the status of the TreeView control, the form is submitted to the server, where the application generates the code that will render the new state of the control on the browser.
<tvns:treeview id=”TreeView1” selectedNodeIndex=”0” HelperID=”__TreeView1_State__” systemImagesPath=”/aspnet_client/webctrl/0_6/treeimages/” onexpand=”javascript:
if (this.clickedNodeIndex != null) this.queueEvent(‘onexpand’, this.clickedNodeIndex)”
oncollapse=”javascript:
if (this.clickedNodeIndex != null) this.queueEvent(‘oncollapse’, this.clickedNodeIndex)”
oncheck=”javascript:
if (this.clickedNodeIndex != null) this.queueEvent(‘oncheck’, this.clickedNodeIndex)”
onselectedindexchanged=”javascript:
if (event.oldnodeIndex != event.newnodeIndex) this.queueEvent(‘onselectedindexchanged’, _
event.oldnodeIndex + ‘,’ + event.newnodeIndex)” style=”height:236px; width:187px; z-index: 101; left: 8px;
position: absolute; top: 8px”>
Copyright ©2002 SYBEX, Inc., Alameda, CA |
www.sybex.com |
BUILDING A WEB APPLICATION 1035
The typical use of the TreeView control on a Web page is to act as an expandable table of contents. Every time the user selects an end node on the tree (a node that doesn’t lead to another branch), a different document is displayed on a TextBox or Label control. You can use the control’s SelectedNodeIndex property to find out which node was clicked and then update the page accordingly.
The File HTML Control
The control we’ll explore in this section is a plain HTML control, but it can be converted to a server control by setting its runat property to Server. Actually, every HTML control can be turned into a server control, but it’s simpler to start with a Web control, which is by definition a server control. The File control allows you to upload files to the server from within your browser. Using this control, you can prompt the users of your site to select one or more files to upload to the server and then click a Submit button to send the selected files to the server.
Once uploaded, you can access these files from within your Web application’s code through the control’s FilePosted property. Each instance of the File control on the form can upload a single file, and you can place as many of them on a form as you need.
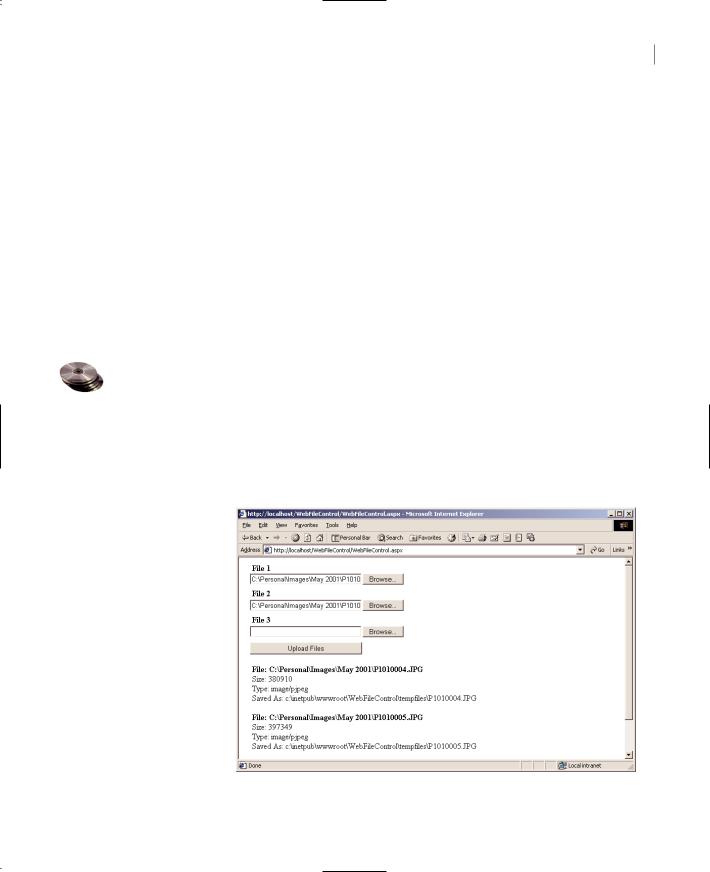
The File control consists of a TextBox and a Button. Yet, it’s a single control; the button appears next to the TextBox and you can’t move it to another location. You can’t even change the caption of the button, which is always “Browse,” as shown in the WebFileControl sample program, illustrated in Figure 23.10. When the Browse button is clicked, the user is prompted to select a file on the client computer’s file system through the Open dialog box. The selected file’s path appears in the TextBox control, and no further action is taken. To upload the select file, the user must click a Submit button on the form. This event must be processed on the server, and it’s the responsibility of the program that runs on the server to save the file to a disk file.
Figure 23.10
The WebFileControl application lets you upload files to a Web server from your browser.
Copyright ©2002 SYBEX, Inc., Alameda, CA |
www.sybex.com |

1036 Chapter 23 INTRODUCTION TO WEB PROGRAMMING
VB.NET at Work: The WebFileControl Project
To successfully upload data to the server, you must add the following attribute to the <FORM> tag:
ENCTYPE=”multipart/form-data”
This attribute tells the form that it should upload all types of files, and you must insert it in the <FORM> tag manually. This is what the <FORM> tag of the WebFileControl project looks like:
<FORM ID=”Form1” ENCTYPE=”multipart/form-data” RUNAT=”server”>
This attribute will not be inserted automatically to the <FORM> tag when you place a File control on the page; you must switch to the HTML view of the ASPX page and edit the <FORM> tag manually. Then place an instance of the File control on the form. Notice that this is an HTML control, and you’ll find it in the HTML Controls tab of the Toolbox. Place two more File controls on the form as shown in Figure 23.10, an Upload Files button below the controls and a Label control at the bottom of the page. Double-click the button at the bottom of the form and enter the code from Listing 23.5 in its Click event handler. The WebFileControl project contains more code, but I’m only showing the code that handles the first file. The code for handling the other two files is almost identical.
Listing 23.5: Processing the Uploaded Files on the Server
Private Sub UploadFiles_ServerClick(ByVal sender As System.Object, _
ByVal e As System.EventArgs) Handles UploadFiles.ServerClick Dim fileName As String
Dim filePath As String
Dim UploadFolder As String = Server.MapPath(“tempfiles”) If File1.PostedFile.FileName <> “” Then
fileName = System.IO.Path.GetFileName(File1.PostedFile.FileName) filePath = UploadFolder & “\” & fileName File1.PostedFile.SaveAs(filePath)
Label4.Text = “<B>File: “ & File1.PostedFile.FileName & “</B>” Label4.Text = Label4.Text & “<BR>Size: “ & File1.PostedFile.ContentLength Label4.Text = Label4.Text & “<BR>Type: “ & File1.PostedFile.ContentType Label4.Text = Label4.Text & “<BR>Saved As: “ & filePath
End If End Sub
The Server object’s MapPath method returns the path name of the specified folder—in the
case of the example, the tempfiles folder. This is where the uploaded files will be stored. Later, you can copy them, or open them and process their data. tempfiles is a folder name under the application’s folder, and the MapPath method will return a string like the ones shown at the bottom of Figure 23.10. Each instance of the File control exposes a PostedFile property. This property contains information about the posted file, such as its name, size, and content type. The files are uploaded to the server when you click the Upload Files button. They’re automatically saved to temporary files,
Copyright ©2002 SYBEX, Inc., Alameda, CA |
www.sybex.com |