BUILDING THE MINIMAL CLASS 331
you must make it part of the project by adding its icon to the Toolbox, if it’s not already there. To use a class in your code, you must import the file that implements the class (this is a DLL file). To manipulate a control from within your code, you call its properties and methods. You do the same with classes. Finally, you program the various events raised by the controls to interact with the users of your applications. Most classes don’t expose any events, since the user can’t interact with them, but some classes do raise events, which you can program just as you program the events of a Windows control. Using classes is not new to you, and many of the concepts presented in this chapter are not new to you either.
In Chapter 3, I mentioned briefly that a class combines code and data. You have probably noticed this already in the last couple of chapters. The System.Integer class, for example, stores an integer value and knows how to process it. Variables in VB.NET are not just areas in memory you can access by name; they’re instances of the corresponding classes. The array is a better example. The role of the array is to store sets of data. In addition to holding the data, the Array class also knows how to process them—how to retrieve an element, how to extract a segment of the array, even how to sort its elements. All these operations require a substantial amount of code. The data stored in the array and the code that implements the properties and the methods of the array are hidden from you, the developer. You can instruct the array to perform certain tasks. When you call the Sort method, you’re telling the array to execute some code that will sort the elements of the array. The developer doesn’t know how the data are stored in the array, or how the Sort method works. In the following section, you’ll see how data and code coexist in a class and how you can manipulate the data through the properties and methods exposed by the class. Let’s start by building a custom class and then using it in our code.
Building the Minimal Class
Our first example is the Minimal class; we’ll start with the minimum functionality and keep adding features to it. The name of the class can be anything—just make sure it’s suggestive of the class’s functionality.
A Class may reside in the same file as a Form, but it’s customary to implement custom classes in a separate module, a Class module. You can also create a Class project, which contains just a class. However, a class doesn’t run on its own, and you can’t test it without a form. You can create a Windows application, add the class to it, and then test it by adding the appropriate code to the form. After debugging the class, you can remove the test form and use the class with any project. Since the class is pretty useless outside the context of an application, in this chapter I will use Windows applications and add a class to them.
Start a new project and name it SimpleClass (or open the project by that name on the CD). Then create a new class by adding a Class item to your project. Right-click the project’s name in the Solution Explorer window and, from the context menu, select Add Add Class. In the dialog box that pops up, select the Class icon and enter a name for the class. Set the class’s name to Minimal, as shown in Figure 8.1.
The code that implements the class will reside in the Minimal.vb file, and we’ll use the existing form to test our class. After you have tested and finalized the class’s code, you no longer need the form and you can remove it from the project.
Copyright ©2002 SYBEX, Inc., Alameda, CA |
www.sybex.com |

332 Chapter 8 BUILDING CUSTOM CLASSES
Figure 8.1
Adding a Class item to a project
When you open the class by double-clicking its icon in the Project Explorer window, you will see the following lines in the code window:
Public Class Minimal
End Class
You can also create a class in the same file as the application’s form. To do so, enter the Class keyword followed by the name of the class, after the existing End Class. The editor will insert the matching End Class for you. At this point, you already have a class, even though it doesn’t do anything. Switch back to the Form Designer, add a button to the test form, and insert the following code in its Click event handler:
Dim obj1 As Minimal()
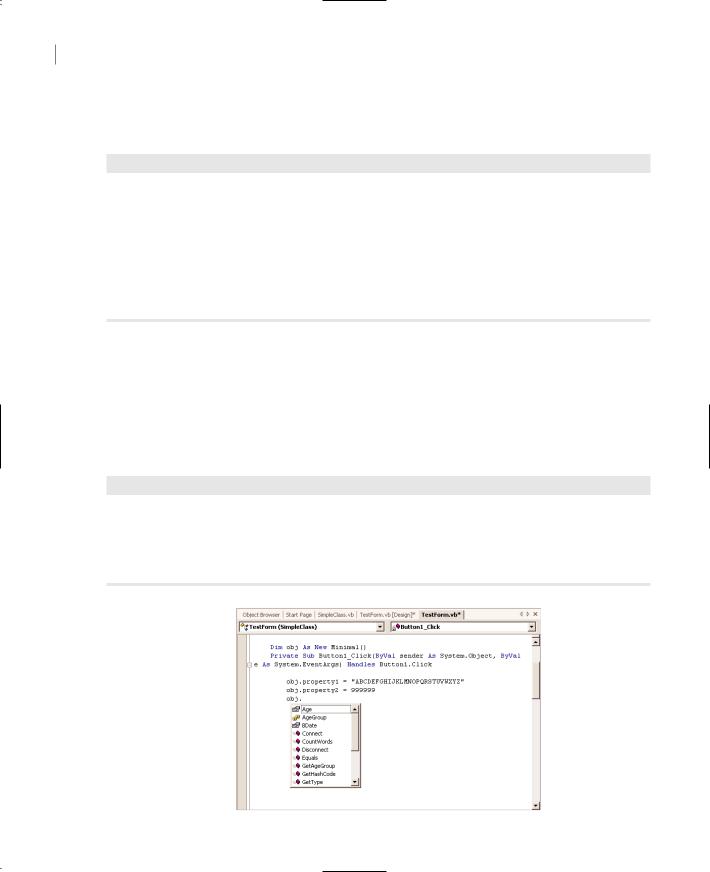
Press Enter and, on the following line, type the name of the variable, obj1, followed by a period. You will see a list of the methods your class exposes already:
Equals
GetHashCode
GetType
ReferenceEqual
ToString
These methods are provided by the Common Language Runtime (CLR). You don’t have to supply any code for these methods. They don’t expose any real functionality; they simply reflect how VB handles all classes. To see the kind of functionality these methods expose, enter the following lines in the Button’s Click event handler and then run the application:
Dim obj1 As New Minimal()
Console.WriteLine(obj1.ToString)
Console.WriteLine(obj1.GetType)
Console.WriteLine(obj1.GetHashCode)
Dim obj2 As New Minimal()
Console.WriteLine(obj1.Equals(obj2))
Console.WriteLine(Minimal.ReferenceEquals(obj1, obj2))
Copyright ©2002 SYBEX, Inc., Alameda, CA |
www.sybex.com |

BUILDING THE MINIMAL CLASS 333
The following lines will be printed on the Output window:
SimpleClass.Minimal
SimpleClass.Minimal
18 False False
As you can see, the name of the object is the same as its type. This is all the information about your new class that’s available to the CLR. Shortly you’ll see how you can implement your own ToString method and return another value. The hash value of the obj1 variable happens to be 18, but this is of no consequence.
The next line tells you that two variables of the same type are not equal. But why aren’t they equal? We haven’t differentiated them at all, yet they’re different because they point to two different objects and the compiler doesn’t know how to compare them. All it can do is figure out whether they point to the same object. To understand how objects are compared, add the following statement after the line that declares obj2:
obj2 = obj1
If you run the application again, the last statement will print True on the Output window. The Equals method checks for reference equality; that is, it returns True if both variables point to the same object (same instance of the class). If you change obj1, then obj2 will point to the new object. OK, we can’t change the object because it exposes no members that we can set to differentiate it from another object of the same type. We’ll get to that shortly.
Most classes expose a custom Equals method, which knows how to compare two objects of the same class. The custom Equals method usually compares the properties of the two instances of the class and returns True if all properties are the same. You’ll learn how to customize the default members of any class later in this chapter.
Notice the name of the class: SimpleClass.Minimal. Within the current project, you can access it as Minimal. Other projects can either import the Minimal class and access it as Minimal, or specify the complete name of the class.
Adding Code to the Minimal Class
Let’s add some functionality to our class. We’ll begin by adding a few properties and methods to perform simple text-manipulation tasks. The two properties are called property1 (a String) and property2 (a Double). To expose these two members as properties, you can simply declare them as public variables. This isn’t the best method of implementing properties, but it really doesn’t take more than declaring something as Public to make it available to code outside the class. The following line exposes the two properties of the class:
Public property1 As String, property2 As Double
The two methods are the ReverseString and NegateNumber methods. The first method reverses the order of the characters in property1 and returns the new string. The NegateNumber method returns the negative of property2. These are the simplest type of methods that don’t accept any arguments; they simply operate on the values of the properties. In just the way that properties are exposed as Public variables, methods are exposed as Public procedures (functions or subroutines).
Copyright ©2002 SYBEX, Inc., Alameda, CA |
www.sybex.com |