


250 Chapter 6 BASIC WINDOWS CONTROLS
HideSelection
The selected text on the TextBox will not remain highlighted when the user moves to another control or form. To change this default behavior, use the HideSelection property. You will use this property to keep text highlighted in a TextBox control while another form or a dialog box has the focus, such as a Find and Replace dialog box. Its default value is True, which means that the text doesn’t remain highlighted when the text box loses the focus. If you set the HideSelection property to False, the selected text will remain highlighted even when the TextBox control loses the focus. The default value of this property in VB6 was False, something you must take into consideration when you convert old applications into VB.NET.
Text-Selection Methods
In addition to properties, the TextBox control exposes two methods for selecting text. You can select some text with the Select method, whose syntax is shown next:
TextBox1.Select(start, length)
The Select method is new to VB.NET and is equivalent to setting the SelectionStart and SelectionLength properties. To select the characters 100 through 105 on the control, call the Select method, passing the values 99 and 6 as arguments:
TextBox1.Select(99, 6)
If the range of characters you select contains hard line breaks, you must take them into consideration as well. Each hard line break counts for two characters (carriage return and line feed). If the TextBox control contains the string “ABCDEFGHI,” then the following statement will select the range “DEFG”:
TextBox1.Select(3, 4)
If you insert a line break every third character and the text becomes:
ABC
DEF
GHI
then the same statement will select the characters “DE” only. In reality, it has also selected the two characters that separate the first two lines, but special characters aren’t displayed and can’t be highlighted. The length of the selection, however, will be 4.
As far as the appearance of the selected text goes, it doesn’t make any difference whether it was selected by the user or by the application; it appears in reverse color, as is common with all text editors. The following two statements select the text on a TextBox control with the SelectionStart and
SelectionLength properties:
TextBox1.SelectionStart = selStart – 1
TextBox1.SelectionLength = word.Length
These two lines can be replaced with a single call to the Select method:
TextBox1.Select(selStart – 1, word.Length)
where word is a string variable holding the selection.
A variation of the Select method is the SelectAll method, which selects all the text on the control.
Copyright ©2002 SYBEX, Inc., Alameda, CA |
www.sybex.com |

THE TEXTBOX CONTROL 251
Undoing Edits
An interesting feature of the TextBox control is that it can automatically undo the most recent edit operation. To undo an operation from within your code, you must first examine the value of the CanUndo property. If it’s True, it means that the control can undo the operation; then you can call the Undo method to undo the most recent edit.
An edit operation is the insertion or deletion of characters. Entering text without deleting any is considered a single operation and will be undone in a single step. A user may have spent an hour entering text (without making any corrections), and you can make all the text disappear with a single call to the Undo method. Fortunately, the deletion of the text has become the most recent operation, which can be undone with another call to the Undo method. In effect, the Undo method is a toggle. When you call it for the first time, it undoes the last edit operation. If you call it again, it redoes the operation it previously undid. The deletion of text can be undone only if no other editing operation has taken place in the meantime.
Let’s say you have typed 1,000 characters on a TextBox control. If you call the Undo method, it will clear the control. If you call it again, it will restore the deleted text. Then you enter another 1,000 characters, and delete the last 3 characters. Now the operation that will be undone by the Undo method is the deletion of the last 3 characters. Then if you call the Undo method again, it will re-remove the 3 characters.
In the TextPad application we’ll build in the following section, we’ll implement an Undo/Redo command. It will be the first command in the Edit menu and will be a toggle. If its caption is Undo, we’ll call the Undo method and then change its name to Redo. Likewise, if its caption is Redo, we’ll call the Undo method (which this time is going to undo the last undo and restore the text to the state it was before the call to the Undo method) and then change the command’s name to Undo. Of course, the caption of the command will be Redo only between undoing an edit operation and the editing of the text. As soon as the user enters or deletes a single character on the TextBox control, the caption of the command must become Undo again.
The Undo method would be much more useful if we could set the beginning of an undo action. For example, we could mark the Enter keypress (the beginning of a new line) as the beginning of an undoable operation—or the saving of the text to a file, the paste operation, and so on. In its current implementation, the Undo method undoes everything up to the most recent deletion. If no text has been deleted, then all the text will be removed from the control. However, you will see an interesting method of using the Undo method to undo selected operations.
You can disable the redo operation by calling the ClearUndo method. This method clears the undo buffer of the control, and you should call it from within an Undo command’s event handler, to prevent an operation from being redone. In most cases you should give users the option to redo an operation, especially since the Undo method may delete an enormous amount of text from the control.
VB.NET at Work: The TextPad Project
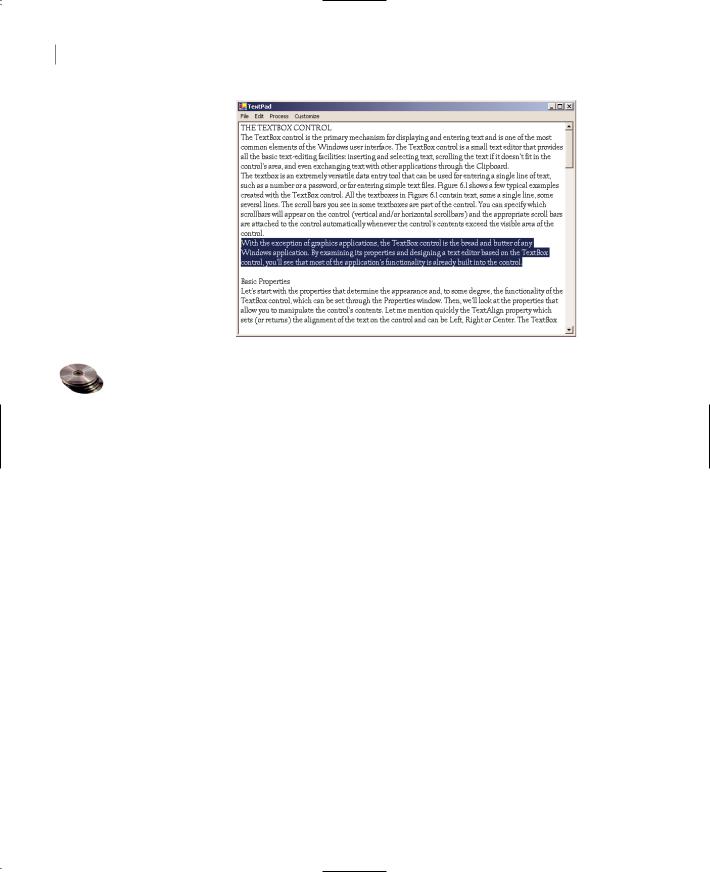
The TextPad application, shown in Figure 6.3, demonstrates most of the TextBox control’s properties and methods described so far. TextPad is a basic text editor that you can incorporate in your programs and customize for special applications. The TextPad’s form is covered by a TextBox control. Every time the user changes the size of the form, the application adjusts the size of the TextBox control accordingly. This feature doesn’t require any programming—just set the Dock property of the TextBox control to Fill.
Copyright ©2002 SYBEX, Inc., Alameda, CA |
www.sybex.com |
252 Chapter 6 BASIC WINDOWS CONTROLS
Figure 6.3
TextPad demonstrates the most useful properties and methods of the TextBox control.
The name of the application’s main form is TXTPADForm and the name of the Find and Replace dialog box is FindForm. You can design the two forms as shown in the figures of this chapter, or open the TextPad project on the CD and examine its code as well.
The menu bar of the form contains all the commands you’d expect to find in text-editing applications; they’re listed in Table 6.1.
Table 6.1: The Menu of the TextPad Form |
|
|
Menu |
Command |
Description |
File |
New |
Clears the text |
|
Open |
Loads a new text file from disk |
|
Save |
Saves the text to its file on disk |
|
Save As |
Saves the text with a new filename on disk |
|
Exit |
Terminates the application |
Edit |
Undo/Redo |
Undoes/redoes the last edit operation |
|
Copy |
Copies selected text to the Clipboard |
|
Cut |
Cuts selected text |
|
Paste |
Pastes the Clipboard’s contents to the text |
|
Select All |
Selects all the text in the control |
|
Find |
Displays a dialog box with Find and Replace options |
|
Word Wrap |
Toggle menu item that turns text wrapping on and off |
Continued on next page
Copyright ©2002 SYBEX, Inc., Alameda, CA |
www.sybex.com |

THE TEXTBOX CONTROL 253
Table 6.1: The Menu of the TextPad Form (continued)
Menu |
Command |
Description |
Process |
Upper Case |
Converts selected text to uppercase |
|
Lower Case |
Converts selected text to lowercase |
|
Number Lines |
Numbers the text lines |
Customize |
Font |
Sets the text’s font, size, and attributes |
|
Page Color |
Sets the control’s background color |
|
Text Color |
Sets the color of the text |
|
|
|
Design this menu bar using the techniques explained in Chapter 5. The File menu commands are implemented with the Open File and Save File dialog boxes, the Font command with the Font dialog box, and the Color command with the Color dialog box. These dialog boxes are discussed in the following chapters, and as you’ll see, you don’t have to design them yourself. All you have to do is place a control on the form and set a few properties; the CLR takes it from there. The application will display the standard Open File/Save File/Font/Color dialog boxes on which the user can select or specify a filename or select a font or color.
The Edit Menu
The options on the Edit menu move the selected text to and from the Clipboard. For the TextPad application, all you need to know about the Clipboard are the SetDataObject method, which places the current selection (text, image, or any other information that can be exchanged between Windows applications) on the Clipboard, and the GetDataObject method, which retrieves information from the Clipboard (see Figure 6.4).
The Copy command, for example, is implemented with a single line of code (Editor is the name of the TextBox control). The Cut command does the same, and it also clears the selected text. The code for these and for the Paste command, which assigns the contents of the Clipboard to the current selection, is presented in Listing 6.2.
Listing 6.2: The Cut, Copy, and Paste Commands
Protected Sub EditCopy_Click(ByVal Sender As Object, _
ByVal e As System.EventArgs)
Clipboard.SetDataObject(Editor.SelectedText)
End Sub
Protected Sub EditCut_Click(ByVal Sender As Object, _
ByVal e As System.EventArgs)
Clipboard.SetDataObject(Editor.SelectedText)
Editor.SelectedText = “”
End Sub
Copyright ©2002 SYBEX, Inc., Alameda, CA |
www.sybex.com |

254 Chapter 6 BASIC WINDOWS CONTROLS
Protected Sub EditPaste_Click(ByVal Sender As Object, _
ByVal e As System.EventArgs)
If Clipboard.GetDataObject.GetDataPresent(DataFormats.Text) Then
Editor.SelectedText = Clipboard.GetDataObject.GetData(DataFormats.Text)
End If
End Sub
Figure 6.4
The Copy, Cut, and Paste operations can be used to exchange text with any other application.
If no text is currently selected, the Clipboard’s text is pasted at the pointer’s current location. The SelectedText property allows you to paste text at the current location of the pointer, even if no text is currently selected. If the Clipboard contains a bitmap (placed there by another application), or any other type of data that the TextBox control can’t handle, the paste operation will fail; that’s why we handle the Paste operation with an If statement. If the Clipboard contains text, the program goes ahead and pastes the text on the control; if not, it does nothing. You could provide some hint to the user by including an Else clause that informs them that the data on the clipboard can’t be used with a text-editing application.
The GetDataPresent property returns a True or False value, depending on whether the data on the Clipboard is of the same type as specified by the argument (text in our case). If you want to experiment with the Clipboard and the various formats it recognizes, check out the members of DataFormats, an enumeration that exposes a member for each different format it recognizes.
If you repeatedly paste chunks of text on the control, they’re considered a single operation and will be undone with a single call to the Undo method.
Copyright ©2002 SYBEX, Inc., Alameda, CA |
www.sybex.com |

THE TEXTBOX CONTROL 255
The Process and Customize Menus
The commands of the Process and Customize menus are straightforward. The Customize menu commands open the Font or Color dialog box and change the control’s Font, ForeColor, and BackColor properties. The Upper Case and Lower Case commands of the Process menu are also trivial: they select all the text, convert it to uppercase or lowercase respectively, and assign the converted text to the control’s Text property. Listing 6.3 is the code behind these two commands.
Listing 6.3: The Upper Case and Lower Case Commands
Private Sub ProcessUpper_Click(ByVal sender As System.Object, _
ByVal e As System.EventArgs) Handles ProcessUpper.Click Editor.SelectedText = Editor.SelectedText.ToUpper
End Sub
Private Sub ProcessLower_Click(ByVal sender As System.Object, _
ByVal e As System.EventArgs) Handles ProcessLower.Click Editor.SelectedText = Editor.SelectedText.ToLower
End Sub
The Number Lines command demonstrates how to process the individual lines of text on the control. This command inserts a number in front of each text line. However, it doesn’t remove the line numbers, and there’s no mechanism to prevent the user from editing the line numbers or inserting/deleting lines after they have been numbered. Use this feature to create a numbered listing, or to number the lines of a file just before saving it or sharing with another user. Listing 6.4 shows the Number Lines command’s code and demonstrates how to iterate through the Lines array.
Listing 6.4: The Number Lines Command
Private Sub ProcessNumber_Click(ByVal sender As System.Object, _
ByVal e As System.EventArgs) Handles ProcessNumber.Click Dim iLine As Integer
Dim newText As New System.Text.StringBuilder() For iLine = 0 To Editor.Lines.Length - 1
newText.Append((iLine + 1).ToString & vbTab & _ Editor.Lines(iLine) & vbCrLf)
Next
Editor.Text = newText.ToString End Sub
This event handler uses a StringBuilder variable. The StringBuilder class is equivalent to the String class: it exposes similar methods and properties, but it’s much faster in manipulating strings than the String class. The StringBuilder class is discussed in detail in Chapter 12.
Copyright ©2002 SYBEX, Inc., Alameda, CA |
www.sybex.com |

256 Chapter 6 BASIC WINDOWS CONTROLS
Undoing Selected Operations
The numbering of the text lines is an operation you’d expect to be able to undo, but this isn’t the case. If you paste a listing on the text box control and then number the lines with the Process Number Lines command, the numbered lines will appear as expected. If you attempt to undo the operation with the Edit Undo method, nothing will happen. The numbered lines weren’t typed (or pasted) on the control, and they don’t constitute an operation that can be undone.
One way to mark the numbering of the lines as an undoable operation is to copy the control’s text to the Clipboard, clear the control and then paste the text onto the text box. The paste operation can be undone and the Undo command will restore the text to its status before the insertion of the line numbers. In effect, it will remove the numbers in front of each line.
The trick is to replace the line that assigns the text stored in the newText variable to the Text property of the text box with the following statements:
Editor.SelectAll()
Clipboard.SetDataObject(newText.ToString())
Editor.Paste()
The Click event handler of the Process Number Lines command of the TextPad project on the CD includes these statements. You can copy a few lines of VB code from the IDE and paste them onto the text box. Then number them with the Process Number Lines command and, finally, remove the numbers by undoing the operation. If you redo the last operation, the line numbers will be inserted in front of each code line. If you type something between the two operations, however, you will no longer be able to remove the line numbers with the Undo command.
Implementing an intelligent Undo/Redo feature requires quite a bit of code, and it’s not among the features of simple text-editing applications. If you need this type of functionality, you’re better off buying an off-the-shelf component. Not that it can’t be implemented with VB.NET, but the time you’ll spend on this project will be far more expensive.
Search and Replace Operations
The last option in the Edit menu—and the most interesting—displays a Find & Replace dialog box (shown in Figure 6.5). This dialog box works like the similarly named dialog box of Microsoft Word and many other Windows applications.
Figure 6.5
TextPad’s Find &
Replace dialog box
Before we look at the implementation of the Find & Replace dialog box, let me recap the techniques for manipulating a control from within another form’s code, because this is what the Find & Replace dialog box does. Normally, the controls on a form are private and can’t be accessed from code outside the form. To make a control available to other forms, you can either declare it as Public by setting the Modifiers property to Public, or create a Public variable on the form that represents
Copyright ©2002 SYBEX, Inc., Alameda, CA |
www.sybex.com |

THE TEXTBOX CONTROL 257
the control to be shared. In our case, the control to be shared is the Editor TextBox control on the main form of the application, and we’ll make it available to the code of the Find & Replace form through the txtBox variable. First, you must declare the txtBox variable in the main form with the following statement:
Public Shared txtBox As TextBox
This statement must appear outside any procedure. Then, in the main form’s Load event, set the txtBox variable to the Editor TextBox control with the following statement:
txtBox = Editor
That’s all it takes. If TXTPADForm is the main form’s name, you can now access the properties of the Editor control on the main form with an expression like
TXTPADForm.txtBox.Text
It would have been simpler to make the Editor control public, and that is how you should make your controls available to other forms. I’ve chosen a technique that’s slightly more complicated for demonstration purposes. This technique allows you to make public not the control itself, but some of its properties (like the Text property). If you wanted to expose only the Text property to other forms, then you’d have to declare a string variable as Public and set it to the control’s Text property:
Public editText As String editText = Editor.Text
The buttons in the Find & Replace dialog box are relatively self-explanatory:
Find Locates the first instance of the specified string in the text. In other words, Find starts searching from the beginning of the text, not from the current location of the pointer. If a match is found, the Find Next, Replace, and Replace All buttons are enabled.
Find Next Locates the next instance of the string in the text. Initially, this button is disabled; it’s enabled only after a successful Find operation.
Replace Replaces the current instance of the found string with the replacement string and then locates the next instance of the same string. Like the Find Next button, it’s disabled until a successful Find operation.
Replace All Replaces all instances of the string specified in the Search For box with the string in the Replace With box.
Whether the search is case-sensitive depends on the status of the Case Sensitive CheckBox control. The Find and Find Next commands check the status of this check box and set the srchMode variable accordingly. This variable is then used with the InStr() function to specify the type of search. We’re using the InStr() function instead of the IndexOf method because the latter doesn’t perform case-insensitive searches, while the InStr() does—so, there’s good reason for using the good old VB functions after all.
If the string is found in the control’s text, the program highlights it by selecting it. In addition, the program calls the TextBox control’s ScrollToCaret method to bring the selection into view. If you omit to call the ScrollToCaret method and the selection is not in the currently visible text, users
Copyright ©2002 SYBEX, Inc., Alameda, CA |
www.sybex.com |

258 Chapter 6 BASIC WINDOWS CONTROLS
won’t see it. The Find Next button takes into consideration the location of the pointer and searches for a match after the current location. If the user moves the pointer somewhere else and then clicks the Find Again button, the program will locate the first instance of the string after the current location of the pointer, and not after the last match. If you want to locate the next match regardless of where the pointer is, you should store the location of the match to a variable and use it with the InStr() function for subsequent searches.
TextPad handles search operations like all typical Windows applications. Let’s start with the implementation of the Find button, shown in Listing 6.5.
Listing 6.5: The Find Button
Private Sub bttnFind_Click(ByVal sender As System.Object, _
ByVal e As System.EventArgs) Handles bttnFind.Click Dim selStart As Integer
Dim srchMode As CompareMethod If chkCase.Checked = True Then
srchMode = CompareMethod.Binary Else
srchMode = CompareMethod.Text End If
selStart = InStr(TXTPADForm.txtBox.Text, searchWord.Text, srchMode) If selStart = 0 Then
MsgBox(“Can’t find word”) Exit Sub
End If
TXTPADForm.txtBox.Select(selStart - 1, searchWord.Text.Length) bttnFindNext.Enabled = True
bttnReplace.Enabled = True bttnReplaceAll.Enabled = True TXTPADForm.txtBox.ScrollToCaret()
End Sub
The Find button examines the value of the chkCase CheckBox control, which specifies whether the search will be case-sensitive and sets the value of the srchMode variable accordingly. The srchMode variable is passed to the InStr() function and tells it how to search for the desired string. The variable’s value can be one of the two constants, Binary (for case-sensitive, or exact, matches) and Text (for case-insensitive matches). If the InStr() function locates the string, the program selects it by calling the control’s Select method with the appropriate arguments. If not, it displays a message. Notice that after a successful Find operation, the Find Next, Replace, and Replace All buttons on the form are enabled.
Tip You may have noticed that the first selected character is at the location of the match minus 1 (selStart – 1). This is odd indeed, and the explanation is that for the InStr() function, the index of the first character is 1. The Select method, however, however, uses the index zero for the first character in the string. The same is true for all the methods of the String class, so you should be very careful not to mix the usual string functions of Visual Basic and the methods of the new String class.
Copyright ©2002 SYBEX, Inc., Alameda, CA |
www.sybex.com |
THE TEXTBOX CONTROL 259
The code of the Find Again button is the same, but it starts searching at the character following the current selection. This way, the InStr() function locates the next instance of the same string. Here’s the statement that locates the next instance of the search argument:
selStart = InStr(TXTPADForm.txtBox.SelStart + 2, TXTPADForm.txtBox.Text, _ SearchWord.Text, srchMode)
The Replace button replaces the current selection with the replacement string and then locates the next instance of the find string. The Replace All button does the same thing as the Replace button, but it continues to replace the found string until no more instances can be located in the text. Listing 6.6 presents the code behind the Replace and Replace All buttons.
Listing 6.6: The Replace and Replace All Operations
Private Sub bttnReplace_Click(ByVal sender As System.Object, _
ByVal e As System.EventArgs) Handles bttnReplace.Click If TXTPADForm.txtBox.SelectedText <> “” Then
TXTPADForm.txtBox.SelectedText = replaceWord.Text End If
bttnFindNext_Click(sender, e) End Sub
Private Sub bttnReplaceAll_Click(ByVal sender As System.Object, _
ByVal e As System.EventArgs) Handles bttnReplaceAll.Click Dim curPos, curSel As Integer
curPos = TXTPADForm.txtBox.SelectionStart curSel = TXTPADForm.txtBox.SelectionLength
Form1.txtBox.Text = Replace(TXTPADForm.txtBox.Text, Trim(searchWord.Text), _ Trim(replaceWord.Text))
TXTPADForm.txtBox.SelectionStart = curPos TXTPADForm.txtBox.SelectionLength = curSel
End Sub
You might also want to limit the search operation to the selected text only. To do so, pass the location of the first selected character to the InStr() function as before. In addition, you must make sure that the located string falls within the selected range, which is from
TXTPADForm.Editor.SelectionStart
to
TXTPADForm.Editor.SelectionStart + TXTPADForm.Editor.SelectionLength
You must create two variables, the curPos and curSel variables, and store the values of the SelectionStart and SelectionLength properties when the Find command is clicked, and then ignore any matches outside this range.
Copyright ©2002 SYBEX, Inc., Alameda, CA |
www.sybex.com |