

Professional VSTO 2005 - Visual Studio 2005 Tools For Office (2006) [eng]
.pdfChapter 2
myDataColumn.Caption = “Item”;
//Add the column to the table. myDataTable.Columns.Add(myDataColumn);
//Create three new DataRow objects and add them to the DataTable for (int i = 0; i <= 2; i++)
{
myDataRow = myDataTable.NewRow(); myDataRow[“Count”] = i.ToString(); myDataRow[“Item”] = i.ToString(); myDataTable.Rows.Add(myDataRow);
}
return ds;
}
Listing 2-6 Dataset creation routine
The dataset is an object that holds data and schema information from an underlying data source. The dataset is disconnected in nature; that is, once it retrieves the data, it is no longer attached to the data source. To some, the ADO.NET dataset presented in Listing 2-6 is the best thing since sliced bread. To others, it may be awkward and unforgiving. Thankfully, VSTO caters to both camps. VSTO controls can easily consume data from a dataset or the controls can bypass the dataset and bind directly to a database.
Listing 2-7 provides some bare-bones code to load data from a dataset.
Visual Basic
Private Sub Sheet1_Startup(ByVal sender As Object, ByVal e As System.EventArgs) Handles Me.Startup
Dim count As Integer count = 0
ds = GetDataSet()
For Each dt In ds.Tables(0).Rows count = count + 1
rng = Me.Application.Range(“A” & count) rng.Value = dt.ItemArray
Next
End Sub
C#
private void Sheet1_Startup(object sender, System.EventArgs e)
{
DataSet ds = GetDataSet();
int count = 1;
foreach (DataRow dt in ds.Tables[0].Rows)
{
28

Excel Automation
Excel.Range rng = this.Application.get_Range(“A” + count++,
missing);
rng.Value2 = dt.ItemArray;
}
}
Listing 2-7 Dataset assignment to Range object
A few comments are in order. The itemarray method actually retrieves an entire row and assigns it directly to the range. The assignment is handled internal, since the Range object can load an array.
It is rather unfortunate that VSTO controls do not contain internal support for binding directly to the ADO.NET dataset. Having to write bind code to accomplish the data load is not only cheesy, but it is less efficient due to the expense of the executing loop and the assignment statements inside the loop. In some circumstances,
.NET may perform certain optimizations to make the loop more efficient such as loop unrolling. However, an internal implementation would remove the burden of implementation from the developer.
If you are not particularly pleased with the code approach, you may opt to use the dataset’s writeXML method to convert the data to an XML-formatted file on disk. Then, you may load the XML file into the spreadsheet using any one of the approaches presented thus far. You may find this approach tempting because VSTO offers deep support for XML data sources. Listing 2-8 has the code to accomplish this.
Visual Basic
If (ds IsNot Nothing AndAlso ds.Tables.Count > 0 AndAlso ds.Tables(0).Rows.Count > 0) Then
Dim tempFilePath As String = “C:\download\temp.xml” ds.WriteXml(tempFilePath) Application.Workbooks.Open(tempFilePath, Delimiter:=”,”,
Editable:=True, AddToMru:=True) End If
C#
if (ds != null && ds.Tables.Count > 0 && ds.Tables[0].Rows.Count > 0)
{
string tempFilePath = @”C:\download\temp.xml”; ds.WriteXml(tempFilePath); Application.Workbooks.Open(tempFilePath, System.Type.Missing,
false, System.Type.Missing, System.Type.Missing, System.Type.Missing, System.Type.Missing, System.Type.Missing, “,”, true, System.Type.Missing, System.Type.Missing, true, System.Type.Missing, System.Type.Missing);
}
Listing 2-8 Dataset writeXML method
Temporary files such as those written by datasets can accumulate on disk to cause resource issues. A well-behaved, scalable cleanup routine is certainly not a trivial task. To prevent these resource hogs from running rampant, some sort of cleanup routine must be implemented by the developer. The lesson here is that a tempting choice may not be worth it in terms of total cost. When choosing an approach, be mindful of trading elegance for performance.
29

Chapter 2
As noted previously, without internal support for the ADO dataset, the code to perform the binding is much slower. Still, the actually performance cost is not that noticeable for small to medium-sized datasets in real-world software. Large dataset loads should simply not be attempted.
Large datasets on the order of several thousand rows of data present serious memory challenges to the
.NET Framework that, to date, have not been satisfactorily addressed either in 1.x or 2.0, not to mention the inherent limitations of the spreadsheet beyond 65,536 rows.
But perhaps the most serious drawback is not a technical limitation at all. Presenting large amounts of data to the end user has a tendency to overwhelm and intimidate. Users who are not comfortable with software often lay the blame in all the wrong places, and it really isn’t their fault. A well-designed application presents data in controlled portions to prevent data overload.
Finally, if you are less than impressed with the ADO.NET dataset or have your own reasons for avoiding its use in your application, you can certainly benefit both in terms of performance and code readability by connecting your application directly to the data source. The QueryTable object presented previously can make this a reality. You may also consider loading data directly from the database with the help of the Workbooks’ opendatabase method of the Application object. We’ll also explore some new VSTO controls in Chapter 3 that present additional alternatives to retrieving data from a data source.
Application Object Manipulation
The Application object is a top-level container for VSTO. The Application object provides a global hook for all the objects and containers in the Excel environment. In fact, the Application object is the Microsoft Excel application instance.
The code snippet in Listing 2-9 shows how to manipulate the Application object.
Visual Basic
Application.DisplayAlerts = false
Me.Application.ActiveWorkbook.Sheets(2).Delete()
Application.DisplayAlerts = true
Application.Quit()
C#
Application.DisplayAlerts = false; ((Excel.Worksheet)this.Application.ActiveWorkbook.Sheets[2]).Delete();
Application.DisplayAlerts = true;
Application.Quit();
Listing 2-9 Application object manipulation
By default, when macro code is being executed, Excel may automatically generate dialog boxes and prompts. In instances where there is no end user, such as in server-side automation or remoting scenarios, this may cause the application to hang or fail. The code shows how to gracefully override the prompting mechanism. Finally, the application terminates. Termination in this case means that the application is gracefully shut down and removed from memory. Even that type of behavior can be difficult to achieve outside of Visual Studio Tools for Office. Excel application instances can demonstrate a stubborn resistance to being terminated
30

Excel Automation
Workbook Manipulation
Microsoft Excel 2000 introduced the concept of a workbook object. A workbook object is implemented as a collection. Each workbook contains a few worksheets that are available for use. In essence, the workbook functions as a housing container for internal objects. Because it is a top-level document, a large majority of the methods are geared toward housekeeping tasks.
Listing 2-10 shows some code to open a text file on disk using the workbook object’s Open method call.
Visual Basic
Dim nWorkbook As Excel.Workbook
nWorkbook = Me.Application.Workbooks.Add()
Me.Application.Workbooks.Open(“C:\Download\CSVData.txt”,Delimiter:=”,”,
Editable:=True, AddToMru:=True)
Me.Application.Workbooks(1).Activate()
If (Not nWorkbook.Saved) Then
nWorkbook.SaveAs(“CSVData.txt”, Excel.XlFileFormat.xlXMLSpreadsheet)
Else
nWorkbook.Close()
End If
C#
Excel.Workbook nWorkbook = this.Application.Workbooks.Add(missing); this.Application.Workbooks.Open(@”C:\Download\CSVData.txt”,
System.Type.Missing, false, System.Type.Missing, System.Type.Missing, System.Type.Missing, System.Type.Missing, System.Type.Missing, “,”, true, System.Type.Missing, System.Type.Missing, true, System.Type.Missing, System.Type.Missing);
((Microsoft.Office.Interop.Excel._Workbook)this.Application.Workbooks[1]).Activate(
);
if (!nWorkbook.Saved) nWorkbook.SaveAs(@”CSVData.txt”,
Excel.XlFileFormat.xlXMLSpreadsheet, missing, missing, missing, missing, Excel.XlSaveAsAccessMode.xlNoChange, missing, missing, missing,missing,missing);
else
nWorkbook.Close(false, missing, missing);
Listing 2-10 Workbook manipulation example
The code presented in Listing 2-10 creates a new workbook. A reference to the new workbook is stored in the variable nWorkBook. Using the application object’s workbook object, the workbook is opened. If the workbook has been modified, it is saved. Otherwise, the workbook is simply closed without being saved. The Boolean false parameter takes care of this internal plumbing.
There are also several ways to access the workbook from code. For instance, this.SaveAs, Globals
.ThisWorkbook, Application.Workbooks are all valid methods for accessing the workbook and its gamut of methods. The flexibility is important when dealing with code outside the hosting container or in a different module such as an Excel add-in. Even with this flexibility, it is important to adopt a consistent approach to accessing workbooks. You may expect this consistency to pay back dividends in the maintenance phase of software development.
31

Chapter 2
Worksheet Manipulation
The Workbook object in VSTO contains three worksheets by default. Sheet 1, 2, and 3 contain support for 65,536 rows and 256 columns per sheet. Excel also supports the ability to add or remove worksheets from the collection of sheet objects. You should note that this limitation on rows and columns is imposed by VSTO and not the Excel API. In fact, other methods of accessing the API (such as the Office Web Components) support a larger number of columns than VSTO. Listing 2-11 shows some code that removes sheet 2.
Visual Basic me.Application.ActiveWorkbook.Sheets(2).Delete()
C#
((Excel.Worksheet)this.Application.ActiveWorkbook.Sheets[2]).Delete();
Listing 2-11 Worksheet manipulation
Experienced programmers should realize that there are a number of things that could go wrong with this line of code. For instance, the code makes no guarantee that the specified sheet actually exists in the workbook before attempting to delete it. Code attempting to delete a worksheet should first examine the count property of the Sheets object before blindly deleting. An attempt to delete an invalid worksheet will result in a runtime exception. The code can be modified to simply examine the count property of the Sheets object to make sure it is greater than 2 before calling the Delete method.
Another serious issue has to do with the availability of the sheet tagged for deletion. If the sheet is in use or locked by another process or thread, the deletion will fail with an exception. Exception handling is, therefore, a very strong recommendation when attempting to remove sheets from the collection.
Finally, the delete triggers a security dialog prompting the user for confirmation before the deletion occurs. This security message serves as a safeguard against malicious code or ill-conceived software. If the code can successfully navigate these pitfalls, the sheet is removed from the collection and the names of the remaining sheets are adjusted as necessary to maintain a consistent count in the user interface. For instance, deleting sheet 2 in the default collection causes sheet 3 to be renamed sheet 2.
By the same token, it is easy to add a new worksheet to the collection. Examine the code in Listing 2-12.
Visual Basic
Dim newWorksheet As Excel.Worksheet
newWorksheet = DirectCast(Globals.ThisWorkbook.Worksheets.Add(), Excel.Worksheet)
C#
Excel.Worksheet newWorksheet;
newWorksheet = (Excel.Worksheet)Globals.ThisWorkbook.Worksheets.Add( missing, missing, missing, missing);
Listing 2-12 Adding a new worksheet
The code is simple but, as is often the case, there are evil devices just out of reach that can cause nasty surprises. Let us take a closer look. If you open the Visual Studio Tools for Office designer and click on the Excel spreadsheet, the properties window reveals that the sheet is of type Microsoft.Office
.Tools.Excel.Worksheet. However, if you inspect the Add method by using Visual Studio IntelliSense
32

Excel Automation
or the help documentation, you will find that the Add method creates a worksheet of type Microsoft
.Office.Interop.Excel.Worksheet. In essence, you are adding a worksheet of a different type.
In case you missed the sleight of hand, the API is actually creating a worksheet of a lesser type; that is, a type that is not exactly equal to what existed before. This newly created worksheet type is an imposter. It has inferior functionality to a Microsoft.Office.Tools.Excel.Worksheet object because it is not able to handle events, respond to code, or bind to data at runtime or design time. Consequently, if you ever have the need to add a worksheet at runtime, you should be aware of the fact that you are creating an object with a significant handicap.
How can calling code overcome this shortfall? One bright idea is to try to copy or clone an existing worksheet of the correct type Microsoft.Office.Tools.Excel.Worksheet. Then, this new copy can be used. It seems that this approach would get around the limitation described above, because the code would copy an existing worksheet of the correct type. However, the Copy method is not a true deep copy. It does not actually clone the worksheet. It simply calls the Add method internally to create a new worksheet of type Microsoft.Office.Interop.Excel.Worksheet. Once the new worksheet is created, a member-wise assignment to populate the properties of the new worksheet from the source worksheet is performed. This puts us right back where we started. It simply isn’t possible to add or create a worksheet of type Micrsoft.Office.Tools.Excel.Worksheet by calling code.
In any event, here is the code to copy a spreadsheet. You should note that the copy process does not solve the problem presented previously. Later, we will examine one approach to resolving this issue. For now, we focus on some more functionality that allows us to manipulate Excel worksheets, as shown in Listing 2-13.
Visual Basic
Me.Copy(After:=Globals.ThisWorkbook.Sheets(1))
C#
this.Copy(missing, Globals.ThisWorkbook.Sheets[1]);
Listing 2-13 Worksheet copy functionality
As pointed out previously, attempting to copy an invalid worksheet results in an exception. The worksheets object isn’t particularly interesting and does not offer a rich feature set because it acts mostly as a container for Range objects and a design surface for hosting other controls.
One particularly intriguing property deserves some attention. Consider the snippet of code in Listing 2-14.
Visual Basic
DirectCast(Globals.ThisWorkbook.Sheets(1), Excel.Worksheet) _
.Visible = Excel.XlSheetVisibility.xlSheetHidden
C#
((Excel.Worksheet) Globals.ThisWorkbook.Sheets[1]).Visible =
Excel.XlSheetVisibility.xlSheetHidden;
Listing 2-14 Worksheet visibility example
The XlSheetVisibility enumeration contains three choices. The code shown in Listing 2-15 hides the selected worksheet, but the user still has the ability to make the worksheet visible from the Excel menu. Another option in the Excel.XlSheetVisibility enumeration, xlSheetVeryHidden, prevents the user from making the hidden worksheet visible. The final option in the enumeration makes the worksheet visible.
33

Chapter 2
And, quite by accident, we have also stumbled upon a solution to the problem presented in the previous section. You may recall that a dynamically created worksheet is technically challenged because it is created from a type (Microsoft.Office.Interop.Excel.Worksheet) that is unable to handle events, respond to code, or bind to data at runtime or design time. The fix is simply to create as many worksheets as required by the application at design time and hide them as appropriate in the startup code using the code in Listing 2-14. Because the worksheets are being created in the Visual Studio designer, they will be created with the correct type: Microsoft.Office.Tools.Excel.Worksheet. When needed, these sheets can be brought into view by toggling the visibility through the enumeration shown in Listing 2-14. Since they are bona fide hosting containers, the sheets will respond to code changes, events, and data binding.
Excel Range Manipulation
In some cases, end-user interaction may require that data displayed in the Excel spreadsheet be saved to a data source. In order to store the data, the values in the Excel spreadsheet need to be extracted, parsed, and prepared for serialization. Serialization is the process of storing objects in such a way that they can be reconstructed later when needed. For instance, an application object such as the Excel Range object may be serialized into a file on disk. The Framework disassembles the object into sequential bytes and then writes these bytes to a file on disk. Later, the file can be read to obtain the series of bytes in order to reconstruct the object for use. This is normally handled internally by the Framework and requires no input from the developer. The Excel object facilitates this extraction primarily through the Range object. The next section examines data extraction at the range level.
The Excel range is an integral part of the Excel machinery. A range may represent a logical or physical relationship between cells. The group of cells can be manipulated and formatted through the reference contained inside the Range variable. Listing 2-15 shows some code to demonstrate range manipulation.
Visual Basic
Dim rng As Excel.Range = Globals.Sheet1.Range(“a1”, “g12”) rng.AutoFormat(Excel.XlRangeAutoFormat.xlRangeAutoFormat3DEffects2, True,
False, True, False, True, True)
C#
Excel.Range rng = Globals.Sheet1.Range[“a1”, “g12”] as Excel.Range; rng.AutoFormat(Excel.XlRangeAutoFormat.xlRangeAutoFormat3DEffects2,
true, false, true, false, true, true);
Listing 2-15 Autoformatting a range
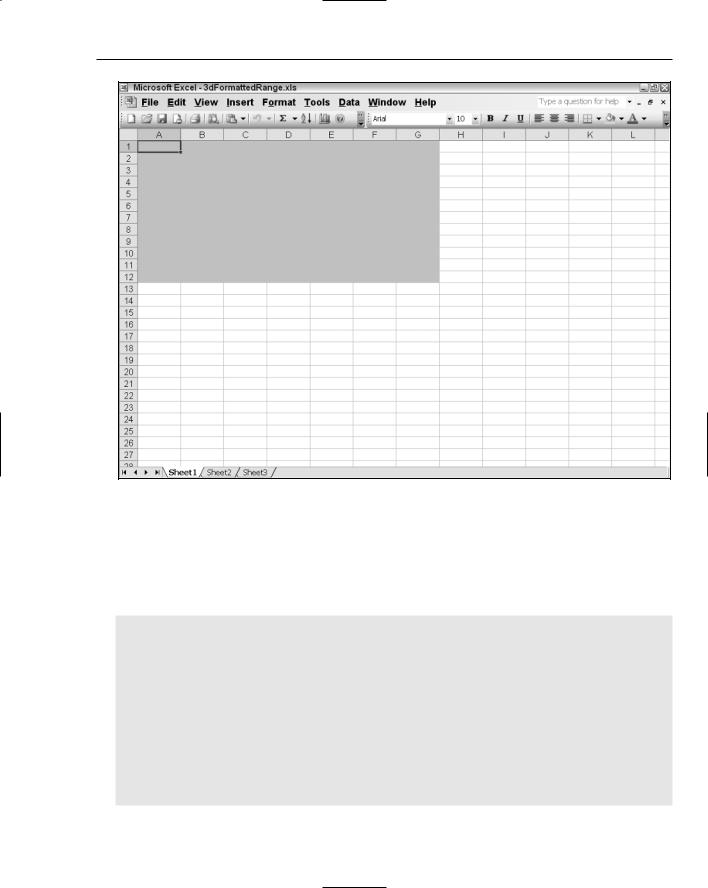
A reference to a Range is obtained from the spreadsheet representing a contiguous block of cells stretching from A1 to G12, as shown in Figure 2-2.
Using the reference to this contiguous block, some autoformatting is applied to the entire range using the AutoFormat method. Notice that the Excel.XlRangeAutoFormat enumeration applies a 3-D formatting effect. The enumeration contains about 30 members. The large number of options represents common functionality in spreadsheet applications.
34
Excel Automation
Figure 2-2
Working with Named Ranges
Microsoft Excel allows ranges to be tagged with name identifiers. The functionality is strictly a convenience and does not affect runtime performance or resource utilization. Consider the example in Listing 2-16.
Visual Basic
Private Sub Sheet1_Startup(ByVal sender As Object, ByVal e As System.EventArgs) Dim namedRange1, namedRange2 As Microsoft.Office.Tools.Excel.NamedRange namedRange1 = Controls.AddNamedRange(Me.Range(“A1”, “A10”), “namedRange1”)
namedRange2 = Controls.AddNamedRange(Me.Range(“A8”, “B12”), “namedRange2”)
namedRange1.Merge()
namedRange2.Merge()
namedRange1.BorderAround(, Excel.XlBorderWeight.xlThin, Excel.XlColorIndex.xlColorIndexAutomatic, )
namedRange1.AutoFormat(Excel.XlRangeAutoFormat.xlRangeAutoFormat3DEffects1, True, False, True, False, True, True)
End Sub
35
Chapter 2
C#
private void Sheet1_Startup(object sender, System.EventArgs e)
{
Microsoft.Office.Tools.Excel.NamedRange namedRange1 = Controls.AddNamedRange(this.Range[“A1”, “A10”],”namedRange1”);
Microsoft.Office.Tools.Excel.NamedRange namedRange2 = Controls.AddNamedRange(this.Range[“A1”, missing],”namedRange2”);
namedRange1.Merge(false);
namedRange2.Merge(false);
namedRange1.BorderAround(missing, Excel.XlBorderWeight.xlThin, Excel.XlColorIndex.xlColorIndexAutomatic, missing);
namedRange1.AutoFormat(Excel.XlRangeAutoFormat.xlRangeAutoFormat3DEffects1, true, false, true, false, true, true);
}
Listing 2-16 Named range usage
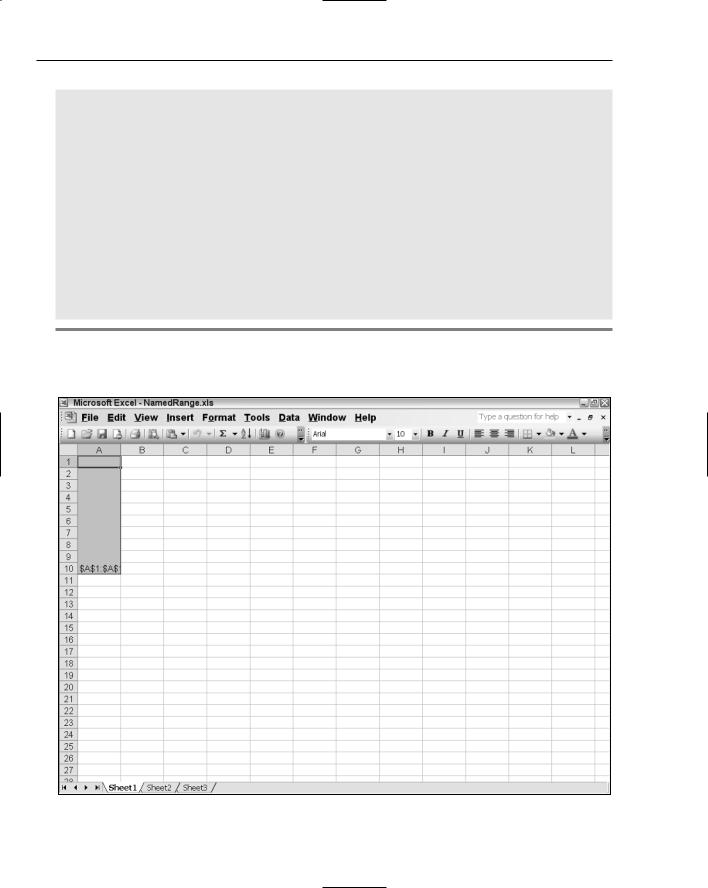
Listing 2-16 produces the image shown in Figure 2-3.
Figure 2-3
36

Excel Automation
Listing 2-17 shows that two namedrange objects are created. A merge is performed using the namedrange reference for each region. The merge parameter defaults to false in Visual Basic, but in C# it must be explicitly passed in. The parameter instructs VSTO how to treat the merge. In Listing 2-17, each row of the specified range is merged as separate cells. Once the merge is completed, some formatting is applied to the border and to the range for the namedRange1 area. You can see that the merge is successful since the range A1 now extends to row A10 in Figure 2-3.
Working with Cells
The Range provides a great deal of functionality and is a good solution for managing data manipulation. However, you can exercise more control on the spreadsheet by working with the cell object. The cell represents an individual cell on the spreadsheet. The code snippets in Listing 2-17 show how to assign a value to an individual cell.
Visual Basic
Private Sub Sheet1_Startup(ByVal sender As Object, ByVal e As System.EventArgs) Dim row As Object = 1,column As Object = 2
Dim rng As Excel.Range = Globals.Sheet1.Cells(row,column)
rng.Value |
= “123456” |
rng.NumberFormat = “$#,###.0” End Sub
C#
private void Sheet1_Startup(object sender, System.EventArgs e)
{
object row = 1, column = 2;
Excel.Range rng |
= |
Globals.Sheet1.Cells[row, column] as Excel.Range; |
rng.Value2 |
= |
“123456”; |
rng.NumberFormat = “$#,###.0”;
}
Listing 2-17 Cell manipulation
Consider the code presented in Listing 2-17. A reference to a specific cell [1,2] is obtained and stored inside a Range variable. The value 123456 is added to the cell and formatted. The string 123456 should then be displayed as $123,456.0. NumberFormatting will be probed in greater detail in the next section.
The syntax of this effort is probably confusing to say the least because a Cell reference actually returns a variable to a Range (notice the cast to Excel.Range). In Listing 2-17, the range represents the particular cell. However, you should note that the returned value or reference can sometimes refer to a group of cells as opposed to a single cell. The decision to expose cells as ranges necessarily sacrifices clarity for flexibility. References to cells can be obtained through the Application, Worksheet, and Range objects, as shown in Listing 2-18.
Visual Basic
Private Sub Sheet1_Startup(ByVal sender As Object, ByVal e As System.EventArgs) Dim rng As Excel.Range = Globals.Sheet1.Range(“B3”,”B3”)
rng.Value = “123456” rng.NumberFormat = “$#,###.0”
rng = rng.Cells(3, 3) as Excel.Range rng.Value = “new”
End Sub
37