

Professional VSTO 2005 - Visual Studio 2005 Tools For Office (2006) [eng]
.pdfChapter 2
C#
private void Sheet1_Startup(object sender, System.EventArgs e)
{
Excel.Range rng = Globals.Sheet1.Range[“B3”,”B3”] as Excel.Range; rng.Value2 = “123456”;
rng.NumberFormat = “$#,###.0”;
rng = rng.Cells[3, 3] as Excel.Range; rng.Value2 = “new”;
}
Listing 2-18 Cell manipulation using relative positioning
In Listing 2-18, the C# code rng = rng.Cells(3, 3) as Excel.Range does not refer to the third row of the third column. Instead it refers to the third row of the third column starting from cell B3, B3 — the new reference point. The same holds true for the Visual Basic. These subtle differences can always cause major headaches.
The parameters passed to the cell object in Listing 2-18 Globals.Sheet1.Cells[row,column] as Excel.Range is always a relative coordinate and never an absolute value. The starting point of this relative address is the upper-left corner of the Range object in question. When the returned value is an absolute value (not a relative coordinate), the reference point is always the upper-left corner of the Excel spreadsheet. It is important to understand this fundamental difference.
Working with Unions
In some situations, it may be convenient to treat two groups of cells with the same code. Instead of manipulating these areas individually, Excel offers access to these two different regions through the Union object. Listing 2-19 is a code example to target a union region.
Visual Basic
Private Sub Sheet1_Startup(ByVal sender As Object, ByVal e As System.EventArgs) Dim rngA, rngB, unionRange As Excel.Range
rngA = Range(“a2”, “B3”) rngA.Value = “Mortgage” rngB = Range(“a5”, “B6”)
rngB.Value = “Interest”
unionRange = Application.Union(rngA, rngB) unionRange.Font.Color =
System.Drawing.ColorTranslator.ToOle(System.Drawing.Color.Red) End Sub
C#
private void Sheet1_Startup(object sender, System.EventArgs e)
{
Excel.Range rngA = Globals.Sheet1.Range[“a2”, “B3”] as Excel.Range; rngA.Value2 = “Mortgage”;
Excel.Range rngB = Globals.Sheet1.Range[“a5”, “B6”] as Excel.Range; rngB.Value2 = “Interest”;
Excel.Range unionRange = Application.Union(rngA, rngB, missing, missing, missing, missing, missing, missing, missing, missing, missing, missing, missing, missing, missing, missing, missing, missing, missing, missing, missing, missing, missing, missing, missing, missing, missing, missing, missing, missing) as Excel.Range;
38

Excel Automation
unionRange.Font.Color = System.Drawing.ColorTranslator.ToOle(System.Drawing.Color.Red);
}
Listing 2-19 Excel unions
At first glance, the union functionality does not seem awe-inspiring. However, upon closer inspection, it is really convenient to address multiple ranges through a single point of entry as the code in Listing 2-20 demonstrates. The ease of use adds up to reduced code and also acts to restrict the surface area for bugs because there is less chance of using an incorrect range reference.
There are some issues regarding unions that should concern you. Unions are exposed as Range objects. However, unions do not support all of the methods that are listed in intellisense for Range objects. For instance, the AddComment method used to add a comment to a cell will actually compile without issue, but throw an exception at runtime. Instead, you should use the namedRange’s AddComment method to add a comment to a cell. There are other idiosyncrasies, too numerous to mention here, that need to be worked out with a dose of aspirin and patience. A large majority of these idiosyncrasies are not explained in the help documentation.
Working with Intersections
VSTO exposes the intersection range object, which may be used to find the intersection of cells. There are several reasons why intersections can be helpful. For instance, you may want to apply some formatting to the common areas between two ranges. Listing 2-20 provides an example.
Visual Basic
Private Sub Sheet1_Startup(ByVal sender As Object, ByVal e As System.EventArgs) Dim rngA, rngB, intersection As Excel.Range
rngA = Globals.Sheet1.Range(“a2”, “B3”) rngB = Globals.Sheet1.Range(“a5”, “B6”)
intersection = Application.Intersect(rngA, rngB) If intersection IsNot Nothing Then
‘add code here End If
End Sub
C#
private void Sheet1_Startup(object sender, System.EventArgs e)
{
Excel.Range rngA = Globals.Sheet1.Range[“a2”,”B3”] as Excel.Range; Excel.Range rngB = Globals.Sheet1.Range[“a5”, “B6”] as Excel.Range;
Excel.Range intersection = Application.Intersect(rngA, rngB, missing, missing, missing, missing, missing, missing, missing, missing, missing, missing, missing, missing, missing, missing, missing, missing, missing, missing, missing, missing, missing, missing, missing, missing, missing, missing, missing, missing) as Excel.Range;
39

Chapter 2
if (intersection != null)
{
//add code here
}
}
Listing 2-20 Excel intersections
Listing 2-20 obtains two references to two ranges. The references are stored in rngA and rngB. Then, the application’s intersection method is used to find the ranges that intersect. The if block in the code in Listing 2-20 tests for common regions in the ranges. If there are no intersecting cells, a null value is returned.
Working with Offsets
You may recall from the “Working with Cells” section that the cell address may be a relative address instead of an absolute one. Offsets embody this concept but provide a cleaner way to implement relative addressing. The offset may be applied to the row or the column object and indicates the cell distance that must be traveled from the reference point.
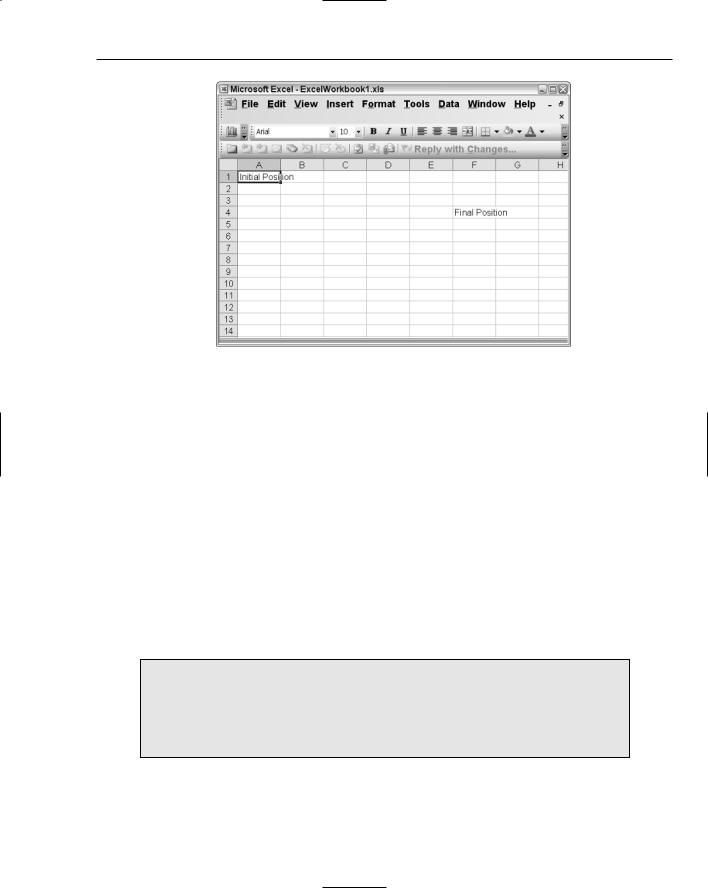
Consider cell A1, which resides in the upper-left corner of the Excel spreadsheet. An offset of [3,5] indicates that the new reference point is exactly three rows down and five columns to the right of the reference cell A1. The new cell reference is now E3, as the code in Listing 2-21 demonstrates.
Visual Basic
Private Sub Sheet1_Startup(ByVal sender As Object, ByVal e As System.EventArgs) Dim row As Object = 3, column As Object = 5
Dim off As Excel.Range
off = Globals.Sheet1.Range(“a1”, “a1”)
off.Value = “Initial Position” off = off.Offset(row, column) off.Value = “Final Position”
End Sub
C#
private void Sheet1_Startup(object sender, System.EventArgs e)
{
object row = 3, column = 5;
Excel.Range off = Globals.Sheet1.Range[“a1”, “a1”] as Excel.Range;
Off.Value2 = “Initial Position”;
off = off.get_Offset(row, column) as Excel.Range; off.Value2 = “Final Position”;
}
Listing 2-21 Excel offsets
The code example in Listing 2-21 shows that a reference to a range “a1”, “a1” is first obtained, followed by a reference to an offset. Then, a value is written to the cell at that position. Cell a1,a1 now contains the value “Initial Position”. From position 1,1 — a1,a1 — count three rows down and then five rows to the right. Do not include cell A1, since it is the reference point. If you care to run the code, the string “Final Position” will appear in the column F4. Figure 2-4 shows the result of the code.
40
Excel Automation
Figure 2-4
The preceding examples have shown the Range object to be a key player in building Excel applications. The Range object allows easy access to areas on the Excel spreadsheet and a convenient way to apply formatting and functionality to these areas. These areas may represent an individual cell or a group of cells, or these areas may form part of another worksheet. In the case where these groups of cells reside in the same worksheet, the cells may be referenced as contiguous blocks, unions, or intersections. For other cases, the Range object still affords the flexibility to apply formatting and functionality to groups of cells that reside on another sheet.
The Range object even allows you to target noncontiguous blocks of cells. This feature may prove handywhen coding functionality based on complex range interaction.
So far, the few examples presented run the gamut of functionality that is used in a typical real-world application. Remember, most of the feature set of a real-world Excel application is already internally implemented by the spreadsheet and needs no further customization from a team of programmers.
Developers are strongly advised to resist the urge to modify the internally implemented functionality, since end users have grown accustomed to these features. Instead, if additional features must be implemented, you may add customized buttons to the toolbar to incorporate the new feature set.
Although the Value2 property of the Range object is exposed in Visual Basic, you should not use it. The implementation is provided for C# applications and does carry some additional overhead. Use the Value property of the Range object for
Visual Basic. The value property is read-only for C# and cannot be the target of an assignment.
41
Chapter 2
Data Formatting and Presentation
Excel is bred for formatting and presenting data to the user. Formatting data can make data analysis for accounting scenarios easier and less prone to interpretation errors. For instance, numbers that line up neatly against the decimal point — accounting format — tend to be easier to understand and analyze when compared to numbers that aren’t lined up in that manner. That sort of format can be easily applied by the end user.
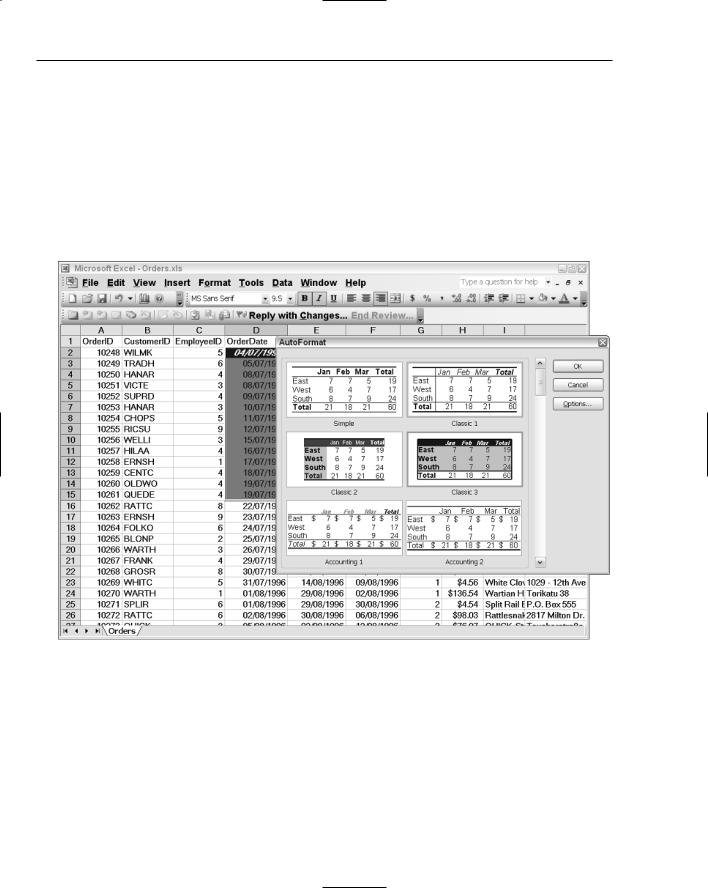
Excel is capable of applying formatting effects at design time as well as runtime. The design-time formatting can be accessed by selecting Format Autoformat. Figure 2-5 shows the Excel spreadsheet with the AutoFormat dialog box that was used to create the customized background.
Figure 2-5
That type of design-time functionality in Visual Studio Tools for Office was simply not possible before. For instance, you may choose to add a corporate watermarked image to spiff up your spreadsheet for a professional appearance or you may choose to use a default background. At least, now you have choices. At design time, backgrounds are available by selecting Format Sheets Backgrounds. At runtime, the option is available by calling the SetBackgroundPicture method of the Worksheet object. An example is provided on the next page.
42

Excel Automation
Excel also allows conditional formatting from the designer. For instance, a particular style may be applied to a cell based on the content of the data in that cell. The option is available by selecting Conditional Formatting from the Format menu in the designer.
It bears repeating that all of these design-time options may be accomplished at runtime. For instance, conditional formatting may be applied through the Range object. Other functionality, such as attaching a bitmap to the Excel spreadsheet, is simply a matter of calling the appropriate function on the worksheets object as the next snippet of code demonstrates.
Application.Rows.Worksheet.SetBackgroundPicture(@”C:\Documents and
Settings\All Users\Documents\My Pictures\Sample Pictures\blue hills.jpg”);
The SetBackgroundPicture method supports most image formats, and the overhead of the image load is negligible if the file resides locally. If the file resides remotely, on an image server for instance, there is added overhead in loading the image. However, the extra expense is experienced only at startup. The Excel spreadsheet is smart enough to cache the image locally. As always, the executing process needs read access to the image file on disk. Chapter 3 discusses permissions access and configuration for Excel applications.
Excel also supports runtime formatting. The benefits are the same as with design-time formatting, except that some runtime overhead is incurred. The functionality is supported through the NumberFormat property. Consider the example in Listing 2-22.
Visual Basic
Dim valueRange as Microsoft.Office.Tools.Excel.NamedRange = this.Controls.AddNamedRange(Me.Range(“B2”, “F6”), “ValueRange”); valueRange.NumberFormat = “#,###.00”
C#
Microsoft.Office.Tools.Excel.NamedRange valueRange = this.Controls.AddNamedRange(this.Range[“B2”, “F6”], “ValueRange”); valueRange.NumberFormat = “#,###.00”;
Listing 2-22 NumberFormat property
If the user were to enter 1234 in the cell, the Excel formatter would convert the output to 1,234.00. This output mask is sometimes called a picture format for obvious reasons.
VSTO does not support keywords with NumberFormats. However, there is one exception. The “General” format may be used to reset the NumberFormat property. As an example, consider the code in Listing 2-23.
Visual Basic
Dim valueRange As Microsoft.Office.Tools.Excel.NamedRange
valueRange = Me.Controls.AddNamedRange(Me.Range(“B2”, “F6”), “ValueRange”) valueRange.NumberFormat = “#,###.00”
‘add some processing code here
‘reset the range B2, F6 to its default format
43

Chapter 2
valueRange.NumberFormat = “General”
‘This line throws an exception because the currency keyword is not supported ‘valueRange.NumberFormat = “Currency”
C#
Microsoft.Office.Tools.Excel.NamedRange valueRange = this.Controls.AddNamedRange(this.Range[“B2”, “F6”], “ValueRange”); valueRange.NumberFormat = “#,###.00”;
//add some processing code here
//reset the range B2, F6 to its default format valueRange.NumberFormat = “General”;
//This line throws an exception because the currency keyword is not supported //valueRange.NumberFormat = “Currency”;
Listing 2-23
It bears repeating that, except for the General keyword, NumberFormats do not support any keywords. In some cases, exceptions will be thrown to indicate this. An example of code that produces an exception is listed in the previous code snippet. However, in other cases, garbage results will be produced in the cell. As an example, consider the snippet of code that assigns a keyword “Date” to a range as in:
valueRange.NumberFormat = “Date”
This may seem like a very useful assignment and may actually succeed in VBA. However, the results that are produced in VSTO are not correct. In essence, the garbage is produced because Excel does not know how to handle the letter “a” and the letter “e” in the NumberFormat string. Excel does know how to handle the letter “D” and the letter “t,” so the call appears to half-succeed with a mixture of valid data and junk. From the results, it is not immediately clear whether the input caused the incorrect results or the call itself produced the rubbish. Instead of spending fruitless time on figuring out the cause, just avoid keyword assignments in the NumberFormat property in VSTO.
VSTO does not support letters or special characters with NumberFormats either. If you have been accustomed to formatting data using a combination of character codes and letters, you may be disappointed with the VSTO offering. For instance, a format mask such as this:
“#,###;-#.###.00;[#.##];”;
in Visual Basic for Applications code is not directly portable to VSTO. Although the code will compile, the results will be incorrect. There is also no support for padding characters and cell coloring through number formats, as is available in VBA and Excel Interop. A workaround for this type of formatting is to build it in code using the Range object formatting. Needless to say, the lack of advanced support for number formatting is a serious hindrance to development efforts especially when the project at hand involves porting code with a heavy implementation of NumberFormats.
Considerations for Excel Automation
Idiosyncrasies abound with Office automation. Knowing where these monsters hide can save time, effort, and Tylenol. Help documentation is available and considerably better than previous versions. However, the help documentation often does not contain example code. This can be problematic,
44

Excel Automation
especially when time is of the essence. Trial and error will get you through. Alternatively, you may try searching the Internet or accessing the VSTO forums at http://forums.microsoft.com/msdn/ showforum.aspx?forumid=16&siteid=1.
Another consideration is avoiding the use of macros entirely. While VSTO supports macro processing, it should not be used because the engine can perform the exact functionality as macros without the security risks. For a review on macro issues, see the “Disadvantages” section in Chapter 1.
Realize that Excel controls created at runtime cannot respond to events and data binding. The only current workaround is to add the items at design time. In the case of workbooks, there is no workaround, since the designer does not allow workbook addition. However, worksheets can benefit from this approach, and an example has been provided in the chapter.
When working with the spreadsheet using relative cell positioning, ensure that the code references cells that are actually on the worksheet. Attempting to reference cells that are not valid will result in a runtime exception being thrown.
Concerning data file loads, using the right method to load data into the spreadsheet goes a long way toward performing the job efficiently. In order to determine the right method to use, consider the type of data being loaded and whether or not any processing is required during the file load. As the code has shown, some methods offer more functionality for processing than others.
You should also be aware that VSTO contains internal support for data loads. Several examples have been presented in the chapter and the wide surface area for loading data is impressive. It’s also important to note that you should first consider using internally implemented functionality before considering
.NET approaches. The internally supported functionality is optimized for VSTO-based usage, whereas the .NET functionality is optimized for usage in general. One example of an internally supported feature is query tables. As pointed out in the examples earlier in this chapter, the query table implements a web query method that provides the same functionality as a web service, albeit with a much more feature rich offering.
Finally, Microsoft Excel is an end-user system. Not all applications should be built around Excel. However, Excel lends itself particularly well to applications that require some sort of numerical analysis and data presentation. You may be able to take advantage of the internally supported functions to help with your analysis. Charts and reports are also an added bonus and are easy to use and incorporate into a VSTO-based application.
Excel Case Study — Time Sheet Software
So far, you have learned bits and pieces through snippets. This section shows you how to put an application together based on the venerable time sheet application. The code that follows is a bare-bones application that provides a worksheet to track hours worked. At a high level, consultants open the spreadsheet and enter billable hours. Once data entry is done, the application sends the time sheet via email to a predetermined email address.
45

Chapter 2
This type of application is very common among small companies that have neither the resources nor the budget to purchase expensive off-the-shelf time management software. These companies usually keep track of employee hours in a spreadsheet that is updated at the end of the pay period. The code presented in Listing 2-24 will simulate that functionality.
Visual Basic
Private Sub FormatSheet()
‘take care of some aesthetic issues
Application.DisplayFormulaBar = False
Application.DisplayFunctionToolTips = False
Application.DisplayScrollBars = False
Application.DisplayStatusBar = False
‘make some customizations Application.Rows.Worksheet.SetBackgroundPicture(“C:\Documents and
Settings\All Users\Documents\My Pictures\Sample Pictures\blue hills.jpg”)
‘remove worksheet 2 and worksheet 3 Application.DisplayAlerts = False
CType(Me.Application.ActiveWorkbook.Sheets(2), Excel.Worksheet).Delete() CType(Me.Application.ActiveWorkbook.Sheets(2), Excel.Worksheet).Delete() CType(Me.Application.ActiveWorkbook.Sheets(1), Excel.Worksheet).Name =
“Bare Bones Time” Application.DisplayAlerts = True
‘hide column and row headers Application.ActiveWindow.DisplayGridlines = False Application.ActiveWindow.DisplayHeadings = False
End Sub
Private Sub CustomizedData() ‘set a namedrange
Dim formattedRange As Microsoft.Office.Tools.Excel.NamedRange = _ Me.Controls.AddNamedRange(Me.Range(“A1”, “D10”), “formattedRange”)
‘note range names
Dim preFilledRange As Microsoft.Office.Tools.Excel.NamedRange = _ Me.Controls.AddNamedRange(Me.Range(“A2”, “A9”), “PreFilledRange”)
‘formattedRange.ShrinkToFit = true; formattedRange.ShowErrors()
‘auto fill days of the week
Dim firstCell As Microsoft.Office.Tools.Excel.NamedRange = _ Me.Controls.AddNamedRange(Me.Range(“A2”), “FirstCell”)
‘note must seed the value firstCell.Select() firstCell.Value2 = “Monday”
‘note must use the firstcell range that points to A1 for the autofill to
work
firstCell.AutoFill(Application.Range(“A2:A6”),
Excel.XlAutoFillType.xlFillWeekdays)
preFilledRange.BorderAround(, Excel.XlBorderWeight.xlThin, Excel.XlColorIndex.xlColorIndexAutomatic, )
46

Excel Automation
preFilledRange.AutoFormat(Excel.XlRangeAutoFormat.xlRangeAutoFormat3DEffects1, True, False, True, False, True, True)
‘get a reference to the header cell
Dim MergeRange As Microsoft.Office.Tools.Excel.NamedRange = Me.Controls.AddNamedRange(Me.Range(“A1”, “D1”), “MergeRange”)
‘format the header cell MergeRange.EntireRow.Font.Bold = True MergeRange.Value2 = “Time Sheet [Week - “ +
DateTime.Now.ToString(“hh/MM/yyyy”) + “]” MergeRange.EntireRow.Font.Background =
Excel.XlBackground.xlBackgroundTransparent
‘turn off merged prompt dialog and then merge Application.DisplayAlerts = False MergeRange.Merge(True) Application.DisplayAlerts = True
‘setup the range for data entry
Dim valueRange As Microsoft.Office.Tools.Excel.NamedRange = _ Me.Controls.AddNamedRange(Me.Range(“B2”, “B6”), “ValueRange”) valueRange.NumberFormat = “#,###.00”
valueRange.Font.Bold = True
valueRange.BorderAround(, Excel.XlBorderWeight.xlHairline, Excel.XlColorIndex.xlColorIndexAutomatic)
valueRange.AutoFormat(Excel.XlRangeAutoFormat.xlRangeAutoFormatColor2, True, False, True, False, True, True)
Dim commentRange As Microsoft.Office.Tools.Excel.NamedRange = Me.Controls.AddNamedRange(Me.Range(“B2”), “CommentRange”)
‘add the comment
commentRange.AddComment(“Enter your hours worked here.”)
End Sub
Private Sub Sheet1_Startup1(ByVal sender As Object, ByVal e As System.EventArgs) Handles Me.Startup
‘customize the worksheet during start up FormatSheet()
‘add the customized data CustomizedData()
End Sub
Private Sub CalculateTotal()
Dim totalRange As Microsoft.Office.Tools.Excel.NamedRange = _ Me.Controls.AddNamedRange(Me.Range(“B2”, “B6”), “TotalRange”)
Dim fields() As Integer = New Integer() {1, 2, 3, 4, 5}
totalRange.Subtotal(1, Excel.XlConsolidationFunction.xlSum, fields, , , Excel.XlSummaryRow.xlSummaryBelow)
End Sub
Private Sub EmailDocument() ‘calculate the hours worked
47