

Professional VSTO 2005 - Visual Studio 2005 Tools For Office (2006) [eng]
.pdfChapter 3
After the code in Listing 3-2 has been executed, the contents of sheet1 are now in a protected state. Any attempt to change the contents of sheet 1 results in an error dialog shown in Figure 3-1. If you care to examine the parameters to this method, you will notice that the protect method is flexible enough to protect the contents of the data on the worksheet yet allow the end user to manipulate the cells. For instance, parameter 7 allows columns to be formatted on the worksheet while it is protected. This allows a user to increase the width of a particular column so that its contents can be displayed completely. You may use the IntelliSense engine in concert with the help documentation to find information about each parameter.
Figure 3-1
If the password is correct, the range is protected, otherwise it is not. The protect method accepts 16 parameters. We consider each in turn since the sum of these parameters adds up to varying levels of protection on the worksheet.
Parameter |
Definition |
|
|
Password |
All passwords are case sensitive. An empty string may be passed |
|
in that signifies that no password is associated with the work- |
|
sheet. As mentioned previously, the Excel password mechanism |
|
is not adequate for applications that run in the public domain. |
DrawingObjects |
It is possible to protect only the embedded objects in the spread- |
|
sheet. These objects include, but are not limited to, images, icons, |
|
controls, and documents. For instance, you may choose to protect |
|
an embedded Word document inside the Excel spreadsheet to |
|
prevent it from being copied. |
Contents |
Locking the contents of the spreadsheet prevents manipulation |
|
of the cells. However, this may be overridden by the Allow |
|
FormattingCells property so that locked cells can be adjusted |
|
for readability purposes. |
Scenarios |
Scenarios or modeling can be protected by setting this value to |
|
true. Although most modeling is interactive, some scenarios are |
|
best left out of the user’s control. |
UserInterfaceOnly |
This property essentially protects the user interface section but |
|
not embedded code running in the user interface section. A value |
|
of true insulates the user interface from tampering by the user, |
|
but the user is able to modify macros or embedded code and |
|
functions in the document proper. |
|
|
58

|
|
Advanced Excel Automation |
|
|
|
|
Parameter |
Definition |
|
|
|
|
AllowFormattingCells |
This property allows the user to format any cell on a protected |
|
|
worksheet. One benefit of this approach is that certain content |
|
|
may not be cropped by the cell. A protected spreadsheet does not |
|
|
allow the users to view cropped content. By setting this property |
|
|
to true, the user can adjust the cell content through the cell |
|
|
adjuster, while the contents of the cell remain in read-only mode. |
|
AllowFormattingColumns |
This property provides the same functionality as the Allow |
|
|
FormattingCells property, except that it targets columns |
|
|
instead of cells. |
|
AllowFormattingRows |
This property provides the same functionality as the Allow |
|
|
FormattingCells property, except that it targets rows instead |
|
|
of cells. |
|
AllowInsertingColumns |
The property allows the user to insert columns on a protected |
|
|
worksheet. |
|
AllowInsertingRows |
The property allows the user to insert rows on a protected work- |
|
|
sheet. |
|
AllowInsertingHyperlinks |
The property allows the user to insert hyperlinks on the |
|
|
worksheet. |
|
AllowDeletingColumns |
The property allows the user to delete columns on the protected |
|
|
worksheet if every cell in that column is unprotected. The |
|
|
method throws an exception otherwise. |
|
AllowDeletingRows |
The property allows the user to delete rows on the protected |
|
|
worksheet if every cell in that row is unprotected. The method |
|
|
throws an exception otherwise. |
|
AllowSorting |
The property allows the user to sort the contents of the range if |
|
|
every cell is unprotected. |
|
AllowFiltering |
The property allows the user to set filters on the protected work- |
|
|
sheet. There are some restrictions on filtering. For instance, users |
|
|
can not enable or disable an autofilter. |
|
AllowUsingPivotTables |
The property allows the user to use pivot table reports on the |
|
|
protected worksheet. |
|
|
|
You must understand that Excel allows the end user to override the protection mechanism that has been applied in code. For instance, the code in Listing 3-2 used to protect the worksheet may be removed quite easily by selecting Tools Protection Unprotect Sheet. The reason for this easy breach is that the code in Listing 3-2 passes in a default value as the first parameter. The first parameter accepts password values. If this value is empty, the protection mechanism may be overridden by the end user. The workaround is to pass a nonempty string. When the end user tries to remove the protection, Excel will prompt the end user to enter a password. If the password matches the value that you have provided in the protection function, the worksheet is unprotected; otherwise, it is not.
59

Chapter 3
You should note also that passwords should never be hard-coded in the code. There are several reasons for this, but perhaps the most important is that the code may be decompiled to expose the password. There are many free utilities that decompile .NET code. In fact, the .NET Framework ships with a free decompiler utility. The better approach is to encrypt the password and store it in a secure place such as a database. You retrieve this encrypted key from the database, decrypt it, and pass it to the Protect method to protect the worksheet. MSDN provides further resources on encryption/decryption and security best practices related to software development.
Protection through Hidden Worksheets
The ability to use hidden worksheets as a protection mechanism can work well in certain circumstances. For instance, a worksheet may contain proprietary formulas that are required for worksheet calculations. However these formulas may need to be hidden from the end user. For such scenarios, the code in Listing 3-3 can serve as a protection mechanism.
Visual Basic
‘retrieve end user values
Dim userRange As Excel.Range = DirectCast(Globals.ThisWorkbook.Application.Range(“Sheet1!A1:A3), Excel.Range) userRange.Copy()
Dim calcRange As Excel.Range = DirectCast (Globals.ThisWorkbook.ThisApplication.Range(“Sheet2!A1”), Excel.Range)
calcRange.PasteSpecial(Excel.XlPasteType.xlPasteAll, Excel.XlPasteSpecialOperation.xlPasteSpecialOperationAdd, False, False) Dim formulaRange As Excel.Range = DirectCast (Globals.ThisWorkbook.Application.Range(“Sheet2!A4”), Excel.Range) formulaRange.Formula = “=AVERAGE(A1:A3)”
Globals.Sheet2.Visible = Excel.XlSheetVisibility.xlSheetHidden
C#
//retrieve end user values Excel.Range userRange =
(Excel.Range)Globals.ThisWorkbook.Application.get_Range(“Sheet1!A1:A3”, missing); userRange.Copy(missing);
Excel.Range calcRange = (Excel.Range)Globals.ThisWorkbook.ThisApplication.get_Range(“Sheet2!A1”, missing);
calcRange.PasteSpecial(Excel.XlPasteType.xlPasteAll, Excel.XlPasteSpecialOperation.xlPasteSpecialOperationAdd, false, false); Excel.Range formulaRange = (Excel.Range)Globals.ThisWorkbook.Application.get_Range(“Sheet2!A4”, missing); formulaRange.Formula = “=AVERAGE(A1:A3)”;
Globals.Sheet2.Visible = Excel.XlSheetVisibility.xlSheetHidden;
Listing 3-3: Hiding spreadsheets
In Listing 3-3, the data entered by an end user is collected using userRange. The contents of the range are copied to the system clipboard. Then the paste operation is applied to the hidden sheet using the reference calcrange. In this example, the code assumes that formulaRange contains some information — a proprietary company formula for instance — and that information must be hidden from the end user. For illustrative purposes, a simple Average formula is used to average the values contained in rows 1 through 3 of column A on sheet 1, and the results are stored in cell A4 of sheet 2.
60

Advanced Excel Automation
Interestingly, if the code is executed with no data on sheet 1, a #DIV/0 is written to cell 4 on sheet 2. We spend time later on in the chapter examining the reason for error messages in cells on the spreadsheet. For now, we note that Excel assumes that empty cells contain undefined values. When the average is performed on the cell, the sum of the cells should be divided by the number of occurrences of the data. In Listing 3-3, that should translate roughly to the addition of 3 undefined values followed by a division of 3. Since the number of cells is clearly a finite answer (3), the actual error message generated by Excel is incorrect. It is not a divide-by-zero error. However, it is most likely an undefined result.
Another major assumption here is that assembly permissions have been correctly configured. Development environments are automatically configured to work correctly at the time of installation. However, this convenience does not extend to deployed applications. These applications need to have permissions configured appropriately; otherwise, the application will not run.
Worksheet protection and the line of reasoning that supports its use may be extended to spreadsheet cells as well. Instead of merely hiding the worksheet, it is possible to hide just the cells that contain sensitive information. For instance, the calcRange.Cells.Hidden property is also a good approach. However, you should note that the cells can be made visible again by the end user.
Protecting Ranges
Protection at the workbook and worksheet level is convenient, but it is a coarse solution since it allows protection for the entire workbook or worksheet. For more flexibility, Excel allows worksheet ranges in the workbook to be protected. For instance, you may be interested in preventing a particular column in the worksheet from being edited. Since the column is effectively a range of cells, you may apply protection to the column by locking the range. This is certainly more appealing than locking the entire worksheet. The code to perform this protection is relatively simple and may be used to lock a range where the range may consist of a group of cells or a single cell. Borrowing from the range example in Listing 2-4, consider the example in Listing 3-4.
Visual Basic
Dim formattedRange As Microsoft.Office.Tools.Excel.NamedRange = Globals.Sheet1.Controls.AddNamedRange(Me.Application.Range(“A1”, “D10”), “formattedRange”)
formattedRange.Locked = True
Dim userPassword As String = “My Password” Globals.Sheet1.Protect(userPassword, AllowSorting:=True
C#
Microsoft.Office.Tools.Excel.NamedRange formattedRange = Globals.Sheet1.Controls.AddNamedRange(this.Application.get_Range(“A1”, “D10”), “formattedRange”);
formattedRange.Locked = true;
string userPassword = “My Password”;
Globals.Sheet1.Protect(userPassword, missing, missing, missing, missing, missing, missing, missing, missing, missing, missing, missing, missing, missing, missing, missing);
Listing 3-4: Range protection
61

Chapter 3
The code first obtains a reference to a named range and then applies a lock on the range. Finally, the Protect method is called. After the code is run, only the specific range “A1, D10” is protected. The end user is free to manipulate other parts of the worksheet.
There is a quirk hidden in the code that has been taken for granted so far. While it may be second nature to Office developers, it is less well known to outsiders. Consider Listing 3-5, which has been modified from Listing 3-4.
Visual Basic
Dim formattedRange As Microsoft.Office.Tools.Excel.NamedRange = Globals.Sheet1.Controls.AddNamedRange(Globals.Sheet1.Range(“A1”, “D10”), “formattedRange”)
formattedRange.Locked = True
MessageBox.Show(formattedRange.AllowEdit.ToString())
Dim userPassword As String = Password
Globals.Sheet1.Protect(userPassword)
MessageBox.Show(formattedRange.AllowEdit.ToString())
C#
Microsoft.Office.Tools.Excel.NamedRange formattedRange = Globals.Sheet1.Controls.AddNamedRange(Globals.Sheet1.Range[“A1”, “D10”], “formattedRange”);
formattedRange.Locked = true; MessageBox.Show(formattedRange.AllowEdit.ToString());
String userPassword = Password; Globals.Sheet1.Protect(userPassword, missing, missing, missing,
missing, missing, missing, missing, missing, missing, missing, missing, missing, true, missing, missing);
MessageBox.Show(formattedRange.AllowEdit.ToString());
Listing 3-5: Range protection recommendation
If you run this code, the first message box displays a dialog with true, followed by another message box with the value false. The behavior underscores the importance of calling the worksheet Protect method to actually implement worksheet protection. You may think of the actual call as a recommendation that is implemented after the protection method is called. Failing to call the Protect method results in the VSTO runtime simply ignoring the Locked recommendation resulting in an unprotected range.
It’s also possible to simply store sensitive data in an external module or assembly. For instance, a library containing sensitive company information may be exposed through a managed add-in and stored on a secure web application server. The calling code in the client piece will then need to make requests to this external library to retrieve data. We consider one such example later in the chapter. For now, we note that there is a performance overhead associated with making remote requests.
VSTO Security through the .NET Framework
The security implementation in the .NET Framework is impressive. This is the reason why the VSTO uses it for security. Here, we stop to consider the practical implementations of security that allow developers to
62

Advanced Excel Automation
build VSTO applications that are secure and fall within the bounds of implicit end-user expectations on application software.
Configuring Secure Applications
A VSTO-based application consists of a document and a .NET assembly. For the application to work correctly, the .NET assembly must be granted full trust. By default, applications that are developed on a local machine are automatically granted full trust so that the development environment and the other associated tools such as the debugger can execute correctly. However, there is no automatic configuration for a deployed application. In fact, by default, the .NET assembly is not trusted and will not be loaded by the Framework.
The .NET Framework can configure assemblies to run with full trust, with partial trust, or untrusted. Untrusted assemblies will not load. Partially trusted assemblies can only perform specific tasks on a user machine. Full trust has unbounded access to the end-user system. You should note that VSTO applications can only function under full trust. Partially trusted and untrusted assemblies will not run.
The .NET Framework departs from the VBA approach because the Common Language Runtime determines the level of trust to grant assemblies. VBA automatically extends trust to all executing code. The Framework examines a number of criteria before applying a trust level. The criteria, or evidence, are the publisher of the document, the site it is being executed from, and the authenticity of the executing assembly among other things. If adjustments are made to these parameters in anyway, such as changing the location of the executing assembly, the assembly evidence will be invalidated and the assembly will not load.
Strongly Named Assemblies
There are a number of options that may be used to deploy applications to ensure that they are secure. One option is to provide a strongly named assembly so that it is automatically granted full trust by the Framework. To create a strongly named assembly, use the strong name utility that ships free with the
.NET Framework. Here is an example of its use:
C:\program files\Microsoft Visual Studio .NET 2005\SDK\v2.0\Bin\Sn.exe –k
mynewkey.snk
Listing 3-9 creates a new, random key pair and stores the value in mynewkey.snk. The generated key is a private key and should be stored in a secure place. A secure place is typically a solid steel bank vault located underground in the middle of a desert. However, if you cannot afford such drastic measures, you should store this key in a secure location that is typically located off-site. For obvious reasons, if the private key is stolen, it is possible to create a malicious assembly and sign it so that it appears to come from you. This sort of masquerading malfeasance is a nightmare to detect.
Next, you include this assembly directive in the assemblyinfo manifest file. Place the line of code in Listing 3-10 at the end of the assemblyinfo file. If you are not familiar with the assemblyinfo file, it is automatically created for every Visual Studio .NET project and contains assembly specific information. The assemblyinfo file is preloaded by default so the new key is automatically loaded and prepared for use. Here is an example usage:
Visual Basic
<Assembly: AssemblyKeyFile(“mynewkey.snk”)>
63

Chapter 3
C#
[Assembly: AssemblyKeyFile(“mynewkey.snk”)]
A strong name assembly provides a globally unique identifier that guarantees, at the time of use, that the assembly is authentic and has not been tampered with. It does not guarantee that the assembly is free from bugs or that the assembly will respect your privacy. For more help with these topics, consult the MSDN documentation.
Security Certificates
Digital certificates also guarantee the authenticity of the publisher of the assembly. Although a certificate cannot authenticate the code, it can ensure that the assembly comes from the publisher and that it has not been tampered with in any way since it was digitally signed. Digital certificates may be obtained from third-party certification authorities for a fee. One example of a certification authority is VeriSign.
If you just need to test certificate implementation locally, consider creating a test certificate using the makecert.exe utility that ships free with the .NET Framework. Consider an example of its usage:
C:\program files\Microsoft Visual Studio .NET 2005\SDK\v2.0\Bin\makecert
testCert.cer
To create a software publisher certificate from the generated x.508 cert, use this command:
C:\program files\Microsoft Visual Studio .NET 2005\SDK\v2.0\Bin\cert2spc
testCert.cer testCert.spc
To sign the certificate, use this command:
C:\program files\Microsoft Visual Studio .NET 2005\SDK\v2.0\Bin\signcode –spc
testCert.spc –k testKey “C:\testAssembly.dll”
Software publisher certificates (SPCs) are available from a certification authority. Part of the process involves generating a key pair. The certification authority will need to verify your identity. A legal agreement must be signed by you as well before a certificate will be issued on your behalf.
The SPC that you receive is an industry-standard x.509 certificate format with Version 3 extensions. The certificate contains your public key and identifies you as the responsible party.
The test certificate should not be deployed in a production environment. Among the more important reasons to avoid this penny-skimping behavior is that it compromises the security of the application.
Deploying Secure Applications
Recall from the previous section that a VSTO-based application has two parts — the .NET assembly and the Microsoft Office document. These two parts are loosely coupled so that there is no obligation for them
64
Advanced Excel Automation
to exist on the same physical system. In fact, they may be deployed separately. In any case, two conditions must be satisfied. The Common Language Runtime executing the code must be able to find the Office customization assemblies. Once the assemblies have been found, the calling code must have the appropriate permissions in order for the CLR to load the customization assembly. An Office customization assembly is produced when the code in the Office code-behind file is compiled into a .NET binary.
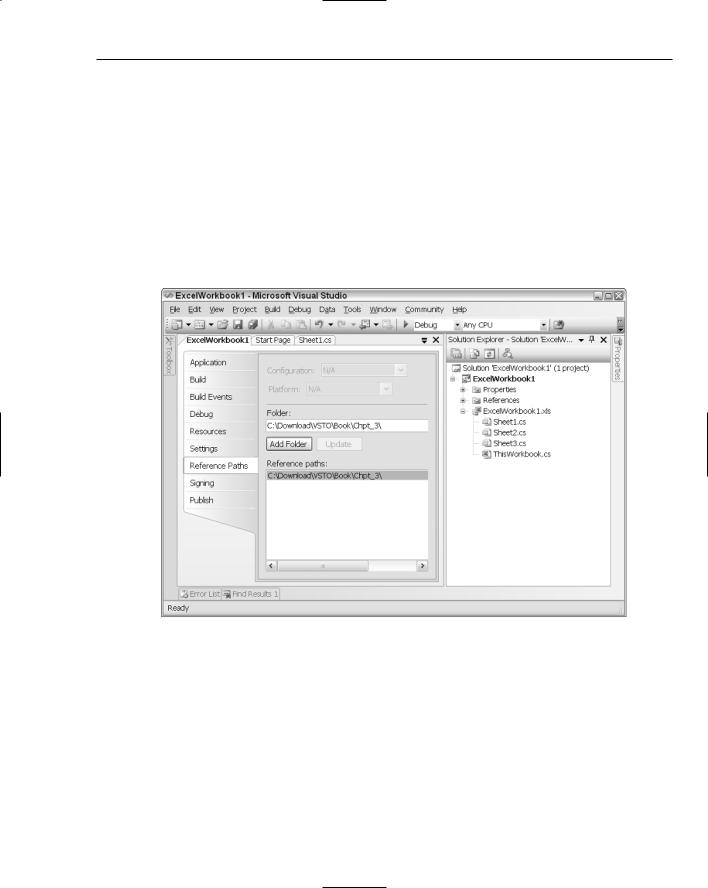
If the VSTO assembly is located in the Global Assembly Cache or in the application folder, no extra work is required. Otherwise, the CLR searches for the assembly following a specific pattern determined by the application project settings. If your assembly is not located in one of these known areas such as the application folder, you will need to explicitly tell the CLR where to look for the assembly. Open the Visual Studio
.NET project and navigate to the property pages. Select the “Reference paths.” Add the appropriate path to the folder text box, and select Add Folder. The path will then be added to the “Reference Path list box, as shown in Figure 3-2.
Figure 3-2
The previous steps work well for applications that are not designed to use the web. However, you will need to add some extra configuration if you are developing an Office application that uses the web and is required to continue working in offline mode. The extra step involves configuration of the web server. Once the web server has been configured, the extra steps allow Internet Explorer to download and cache the assemblies on the end-user system. To configure your Office customization assembly for offline usage, open Internet Information Services (IIS) administration tool and make the following changes as shown in Figure 3-3.
65

Chapter 3
Figure 3-3
Updating applications is as easy as copying the new .NET assembly to the existing location. The .NET Framework will automatically use the new assembly the next time the application is run. For offline scenarios, VSTO caches the data required into cache storage on the end-user system. The application works with the offline cache as needed and synchronizes access when a connection is established. This is all handled automatically, and no code is required.
Working with Excel Formulas
Excel has always allowed the user to apply mathematical formulas to logical groups of cells. In fact, formulas have grown to include the Database, Date and Time, External, Engineering, Financial, Information, Logical, Look up References, Trigonometry, Statistical, and Text and Data logical groups. Visual Studio Tools for Microsoft Office exposes this functionality through several objects, including the Worksheet and Range objects. The formula machinery applies the specified formula to the target and returns a reference to the result of the operation.
Using Formulas at Design Time
.NET developers who are not familiar with Office technology may not be aware that Excel is able to respond to formula manipulation at design time. In fact, entering formulas in design mode offers a performance boost when compared to assigning formulas at runtime. The approach is especially
66
Advanced Excel Automation
recommended if the range that is being used for computation isn’t going to change significantly. For real-world applications, this is quite common. For instance, a spreadsheet application that computes auto loans usually contains static input and calculation ranges that are good candidates likely to benefit from design-time formula addition.
To enter a formula at design time, first create a project and navigate to the design view of the spreadsheet. Enter the formula “=SUM(A1:A3)” in the spreadsheet and press Ctrl+Enter. If the range contains data, the calculation is performed. At runtime, the calculations are automatically performed as well. Since the formula is assigned as a string variable, the quotes around the expression are required. However, an incorrect expression will not be immediately flagged at a compile time. Instead, the application will throw an exception at runtime when the calculation is performed.
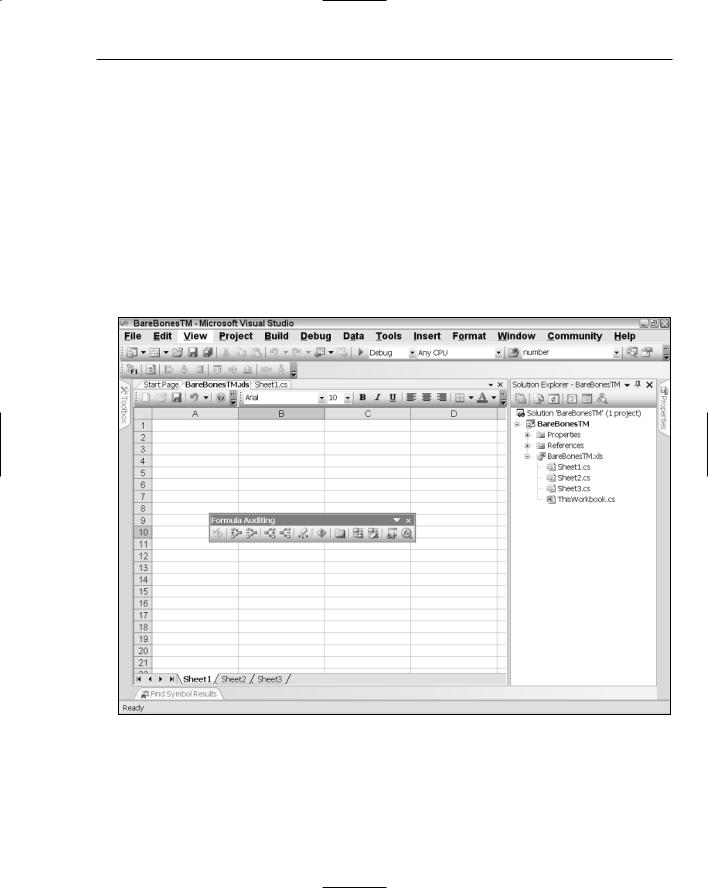
Formulas that are added to a spreadsheet may be made visible by pressing Ctrl + ` (grave accent) in a cell. The sequence of keystrokes brings up the Formula Auditing toolbar shown in Figure 3-4. The Formula Auditing toolbar can be used to customize formulas to the target range.
Figure 3-4
67