

Visual CSharp .NET Programming (2002) [eng]
.pdfIf you run the project, you'll see that the ReverseString method has been added to the Web service.
If you click the ReverseString link, you can enter text and verify that is returned reversed, as shown in Figure 1.19-that is, as long as you don't enter a palindrome (which is the same backward and forward)!
Figure 1.19: The ReverseString method has been added to the web service.
To wrap this all up, you'll find the complete code for the web service module in Listing 1.5, and the code for the class in module in Listing 1.6.
Listing 1.5: The Complete Web Service Code Module
using System.Web.Services;
namespace SybexC2
{
[WebService (Description="Chapter 1 demo program", Name="SybexC2Service", Namespace="http://www.bearhome.com/webservices")]
///<summary>
///Service1 contains demo methods!
///</summary>
public class Service1 : System.Web.Services.WebService
{
[WebMethod]
public string HelloWebService()
{
return "Hello, Web Service!";

}
[WebMethod]
public string HelloWS2()
{
return ServiceSupport.ReturnText;
}
[WebMethod]
public bool IsPrime (long NumToCheck) { return ServiceSupport.IsPrime(NumToCheck);
}
StringManipulation SM = new StringManipulation(); [WebMethod]
public string ReverseString (string inString) { SM.Text = inString;
SM.ReverseString(); return SM.Text;
}
}
}
Listing 1.6: The Complete Class Module using System;
namespace SybexC2
{
public class ServiceSupport { static public string ReturnText {
get {
return "Web services are cool!";
}
}
static public bool IsPrime (long NumToCheck) {
for (long i =2; i <= Math.Sqrt(NumToCheck); i++) { if (NumToCheck%i == 0 ) {
return false;
}
}
return true;
}
}
public class StringManipulation { private string m_text = "";
public string Text { get {
return m_text;
}
set {
m_text = value;
}
}
public void ReverseString() { string strNew = "";
for (int i = 0; i < this.Text.Length; i++) { strNew = this.Text.Substring(i,1) + strNew;
}
this.Text = strNew;
}
}
}
XML Comments
I mentioned earlier in this chapter that a special kind of comment is indicated with C# code by three forward slashes at the beginning of the line (///). These comments can be used to automatically generate XML documentation for a program, provided the XML used in the tags is well-formed.
This is the answer to a common problem: no one ever has time to document code until it is too late. If you insert some simple XML documentation tags as you go along, you won't have to worry about this.
Two of the most commonly used tags are <summary></summary> and <remarks> </remarks>. For a complete list, see "Tags for Documentation Comments" in online help.
For example, you could comment the ReverseString method discussed in the preceding section as follows:
///<summary>
///The ReverseString Method of the StringManipulation class
///reads the class instance Text property value, reverses it,
///and writes it back to the Text property
///</summary>
This summary will then appear in the generated documentation file, along with listings of classes and members.
To generate an XML documentation file from these tags, select the project in Solution Explorer, right-click, and choose Properties from the context menu. With the property pages for the project open, select Configuration Properties. On the Build page, provide a value for the XML Documentation File property (Figure 1.20). The next time the project is built, an XML documentation file with the name specified will be created.

Figure 1.20: You can easily auto-generate an XML documentation file in the location specified.
You can also easily generate a Code Comment Web Report based on the XML tags in your project. To do this, select Tools → Build Comment Web Pages. The result is a set of HTML files viewable from within Visual Studio or from a browser (Figure 1.21).
Figure 1.21: You can generate a Code Comment Web Report based on the XML tags.
Conclusion
As you've seen in this chapter, it's fun-and very easy-to create ASP.NET web services using C#. Along the way, I've introduced you to some important concepts involved with class-based programming in C#.
But the web services in this chapter haven't been used-consumed-in any way. The only thing done with them has been to verify that they work using the test pages generated on the fly by the .NET Framework. Let's move on to web service consumption-both synchronous and asynchronous-in the context of ASP.NET web applications.
Chapter 2: Consuming the Service on the Web
Overview
•Understanding ASP.NET
•Creating ASP.NET applications
•Consuming web methods
•Synchronous consumption
•Asynchronous consumption
•Finding services
This chapter is a tale of two themes. The first theme is using Visual Studio and C# to create ASP.NET web applications (sometimes called 'web forms' projects). The chapter introduces you to the key concepts you need to create an ASP.NET web application.
The second theme picks up where Chapter 1 left off: How do you consume a web service in a web application? Specifically, how are the web services that were created in Chapter 1- reversing a string and determining whether a number is a prime-consumed? Since these web services are implemented as methods, this boils down to the question of how to remotely invoke a web service method.
Along the way, we'll examine the difference between synchronous and asynchronous calls to the service method IsPrime developed in Chapter 1, which checks to see if a number is prime. A synchronous call to this method waits for the response back before the calling program
can do anything else. In contrast, an asynchronous call to the web service method allows other programming tasks to be performed while waiting for the response.
The final part of the chapter is concerned with discovering and using web services created by others.
Understanding ASP.NET
Let's start with the basic question of how server-side web applications work. When anything beyond static HTML is required, the typical web scenario uses custom tags and script commands embedded in server-side HTML pages. (There are many examples of this approach, such as Cold Fusion, JSP, and earlier versions of ASP [Active Server Pages].) A web browser uses HTTP, normally via a form POST or GET, to request the server-side 'page' that includes the custom tags.
These custom tags and server-side scripts perform many functions. For example, they may allow database connectivity or invoke a server-side code module such as a control. Softwaresometimes called an application server-that is connected with (or part of) the web server expands these custom tags on the server side, reads and writes to the database, and returns straight HTML via HTTP to the web browser. The general arrangement is shown in Figure 2.1.
Processing of the server-side 'page' generally occurs in a top-down linear fashion. When it is complete, a new set of 'straight' HTML-probably including client-side programs written in a scripting language such as JavaScript-is sent back to the browser. This means that if you look at the source code in a browser, you will not see the server-side scripting tags or language, although you will probably see form POSTs and GETs to server-side pages.
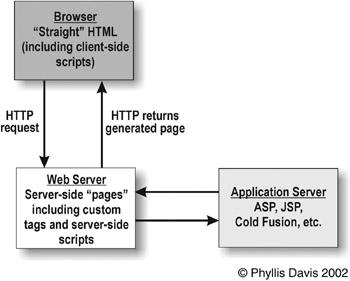
Figure 2.1: Generically, a server-side page that includes custom tags and programmatic commands is invoked using an HTTP request and returns straight HTML over HTTP to the browser.
The ASP.NET approach is, in some respects, radically different from this traditional approach. In other respects, nothing has changed.
It's still the case that all the real action happens on the server side and that plain, old HTML that gets sent to the browser. You can verify this by viewing the sources in a browser such as Internet Explorer or Netscape Navigator.
An ASP.NET application is invoked by opening an ASP.NET web form page-which has an
.aspx file extension-over HTTP. Internally, the ASP.NET page interacts programmatically with the server-Internet Information Services (IIS)-by using an HTTP form GET or POST to request an .aspx page (which might be itself). This is all, mutatis mutandi, the same as it ever was.
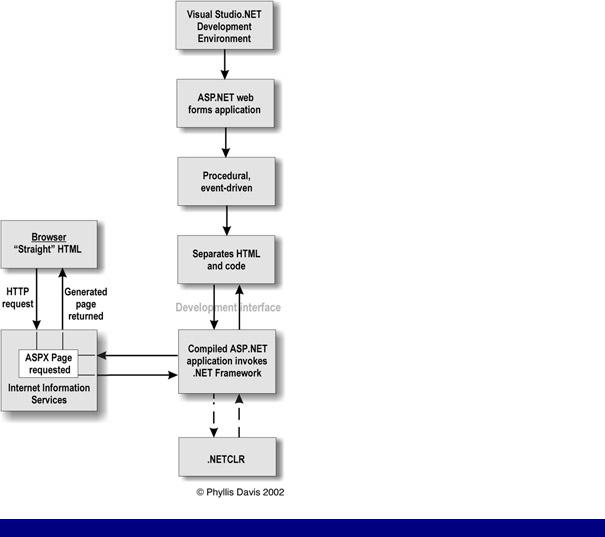
The radical difference is in the way ASP.NET programs are created using Visual Studio .NET and the .NET Framework:
•A compiled program is created, which is actually an executable that outputs HTML to the client. Essentially, what happens is that by invoking an .aspx file, the HTML form commands in the original project are processed on the server by a custom application.
•Within the compiled program, flow control is organized around an event model, and not limited to top-down page processing.
•A complete separation of the HTML (and other client-side) content from the serverside programming has been effected, with the HTML placed in the ASPX file and the serverside code in the related code-behind module, as I'll explain later in this chapter.
The last point is extremely important to creating applications that are maintainable. In the past, the client-side interface has been mixed up with the server-side programming logic in a way that made maintenance a nightmare.
ASP.NET web applications are built around web forms in the same way that Windows applications are built around Windows forms. A web form represents a web page in the
browser in the same way that a Windows form represents an application window on the Desktop. (If you don't already know, I'll show you how to use Visual Studio to build a Windows application in Chapter 3, 'Windows Uses Web Services, Too!')
Just like Windows forms, web forms have properties, methods, and events that can be used to modify the appearance and behavior of the page in the browser. By default, an ASP.NET Web Application project has one web form, which becomes a web page in the Internet Explorer browser when the compiled project is run-although you can add as many pages as you'd like to a project.
The development of an ASP.NET web application can be represented as shown in Figure 2.2.
Figure 2.2: AS P.NET applications are compiled programs that return straight HTML.
Requirements for Running an ASP.NET Application
In order to run web forms (ASP.NET) applications, you'll need to have Internet Information Services (IIS) version 5 (or later) and the FrontPage Server Extensions. (In order to install Visual Studio .NET, you should be running Windows 2000 Server or Professional, or Windows XP Professional.) The Windows 2000 and Windows XP software ship with current versions of IIS, and your installation of Visual Studio .NET should have automatically configured it correctly to work with ASP.NET applications. You should have no problems
running web forms applications from the Visual Studio .NET development environment (the default web server is designated using the URL http://localhost/.)
Note that if your web forms application is deployed on an external server running IIS-in other words, is not running locally-the server needs to have the .NET Framework installed and the FrontPage Server Extensions configured.
As you'll see later in this chapter, you don't have to use Visual Studio to create an ASP.NET application. While it is a great development environment, there are sometimes reasons to hand-craft ASP.NET applications. Just as with the web service created in Notepad shown in Chapter 1, which was saved in a file with an .asmx extension, a properly formed file that is named using the .aspx suffix will be compiled when it is first opened in a browser, and the resulting ASP.NET application will generate HTML to be rendered in the browser.
Creating an ASP.NET Web Application
To start a new web application, open the New Project dialog either by selecting File →?New?→?Project or by clicking the New Project button on the Visual Studio Start Page. If you don't see the Start page, you can always open it by choosing Help?→ Show Start Page.
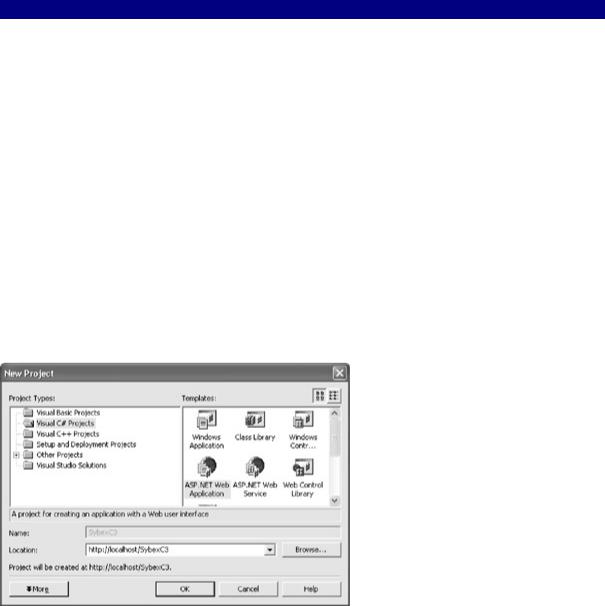
With Visual C# Projects selected in the left pane as the Project Type, choose ASP.NET Web Application from the right pane as the project template, as shown in Figure 2.3.
Figure 2.3: To create a web application, choose ASP.NET Web Application in the New Project dialog.
In the New Project dialog, name the project using the Location box. As you'll notice in Figure 2.3, the Name box is disabled. The part of the location entry following the server name (which is typically http://localhost/) becomes the project name. In Figure 2.3, the location is shown as http://localhost/SybexC3, and the project name becomes SybexC3.
When you click OK, your new Web Application project will be created in a folder named SybexC3 located in the virtual root folder for the localhost web server, which is normally
\Inetpub\wwwroot. The project can be run through the development environment-by selecting Debug → Start, or F5 on the keyboard-or by invoking a web form (ASPX page) using the project's virtual URL in a browser: for example,?http://localhost/SybexC3/WebForm1.aspx.
Note Note that if you rename WebForm1.aspx to Default.aspx, it can be opened using the URL http://localhost/SybexC3/ (without mentioning the page name explicitly). The Default Document feature is set using the Documents tab of the website properties dialog in the Internet Information Services administrative utility.
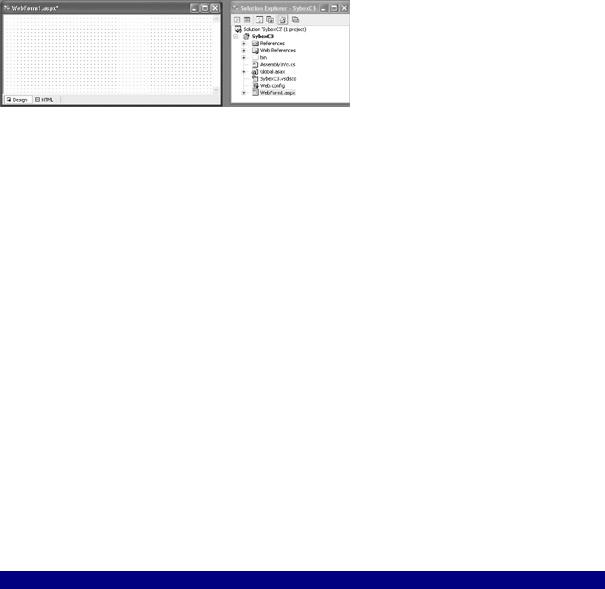
Depending on how you have set your development environment preferences, it will look more or less like Figure 2.4, which shows both a web form and the project files in Solution Explorer. (If Solution Explorer does not appear, you can open it by selecting View → Solution Explorer.)
Figure 2.4: The new Web Application project features a web form.
Web Forms
What has happened so far? First, a Visual Studio project containing a web form has been created. By default, this is named WebForm1 and is saved with an .aspx suffix (WebForm1.aspx). This web form provides a precise layout grid that can be used to host controls (as you'll see in the "Adding Controls to a Web Form" section later in this chapter) as well as an integrated HTML editor (click the HTML tab shown in the lower-left of the designer in Figure 2.4 to open the HTML editor).
In addition, you can place C# code related to the form in the connected code module, which is a file with the same name as the web form and an additional .cs suffix (WebForm1.aspx.cs). The connected code file, for reasons you'll see shortly, is also called the code-behind file.
Note By default, a web form's code-behind file does not appear in the Solution Explorer. To display the code-behind file in the Solution Explorer, click the Show All Files button in the Solution Explorer's Toolbar and expand the .aspx file node. The code-behind files then appear "under" the ASPX file in the hierarchal view in the Solution Explorer.
Listing 2.1 shows what you get 'out of the box' in the code-behind module for a C# web form. (Note that the hidden code in the Web Form Designer-generated region has been expanded and included in the listing.)
Listing 2.1: 'Out of the Box' Web Form Code-Behind Module
using System;
using System.Collections; using System.ComponentModel; using System.Data;
using System.Drawing;

using System.Web;
using System.Web.SessionState; using System.Web.UI;
using System.Web.UI.WebControls; using System.Web.UI.HtmlControls;
namespace SybexC3
{
///<summary>
///Summary description for WebForm1.
///</summary>
public class WebForm1 : System.Web.UI.Page
{
private void Page_Load(object sender, System.EventArgs e)
{
// Put user code to initialize the page here
}
#region Web Form Designer generated code override protected void OnInit(EventArgs e)
{
//
// CODEGEN: This call is required by the ASP.NET Web Form Designer.
//
InitializeComponent();
base.OnInit(e);
}
///<summary>
///Required method for Designer support - do not modify
///the contents of this method with the code editor.
///</summary>
private void InitializeComponent()
{
this.Load += new System.EventHandler(this.Page_Load);
}
#endregion
}
}
Once again, we are not going to go through this in detail, although you may find it instructive to compare this 'out of the box' web form with the equivalent default web service (Listing 1.2) and default Windows form module (Listing 3.1).
The SybexC3 project is intended to demonstrate invoking the string-reversal web method created in Chapter 1. It will provide a web interface that will reverse a string entered by the user. To start setting this up, let's first click the HTML tab of the WebForm1 designer and have a look at the server-side HTML (Figure 2.5). You can use this tab of the designer to add a custom title to the web page that will be created:
<title>Reverse those strings today!</title>
and a header in the body of the HTML:
<h1>Reverse your strings today!><br> </h1>