

Visual CSharp .NET Programming (2002) [eng]
.pdfFigure 3.6: You can use the Events tab of the Properties window to name event procedures and have their scaffolding auto-generated.
Using the Events tab of the Properties window, you can select an object event from the list in the left column and type in a name on the right (you do not have to name it conforming to the object_event convention). The IDE will generate a new procedure with the proper arguments and register it as an event handler. You can now put code within the event procedure.
It's really useful to know that if you double-click an event in the left column, an event procedure, named in the standard way (e.g., Form1_Click), will be created.
Besides typing in the same of an event procedure, you can select an existing event handler from the drop-down list (Figure 3.7). In this case, a new event procedure will not be created, only the code wiring the event to the existing procedure:
this.Closed += new System.EventHandler(this.OneForAll);
Figure 3.7: You can also use the dropdown list on the Events tab to assign an event to an existing handler, provided it has the right number of arguments.
You'll often find that you want to wire multiple events to one handler, possibly generated by more than one object, perhaps determining within the handler which object invoked the event. I'll show you an example, in a little while, of how this works.
I've shown in this section how to write the code that adds event handlers to form events, and how to use the Properties window to do the same thing. Choose whichever way you like better!
Monitoring Form Events
It can be helpful to know which events are fired by an object, and in precisely what order. It's easy to monitor events being fired by placing a command in each event that uses the WriteLine method of the Debug object to display a notification in the Output window that the event has been fired.
To monitor the form event sequence, you first should add a using directive to the top of the form code so that you can access the System.Diagnostics namespace easily:
using System.Diagnostics;
Next, in each event you'd like to monitor, add a call to the Debug.WriteLine method. For example:
private void Form1_Load(object sender, System.EventArgs e) { Debug.WriteLine("Form Load Event Fired");
}
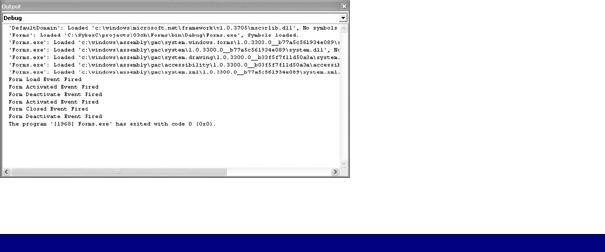
Run the project in debug mode in the development environment (Debug →?Start, or F5 on the keyboard). With the project running, open the Output window?(View →?Other Windows → Output). You can now watch the progress of events being fired (Figure 3.8). Listing 3.2 shows several form events being monitored.
Figure 3.8: You can use the WriteLine method of the Debug object to follow the progress of form events in the Output window.
Listing 3.2: Monitoring Form Events
...
using System.Diagnostics;
namespace SybexC5
{
public class Form1 : System.Windows.Forms.Form

{
...
#region Windows Form Designer generated code
private void InitializeComponent()
{
...
this.Load += new System.EventHandler(this.Form1_Load); this.Closed += new System.EventHandler(this.Form1_Closed); this.Activated += new system.EventHandler(this.Form1_Activated); this.Enter += new
System.EventHandler(this.All_Hail_Form1_Was_Entered); this.Deactivate += new System.EventHandler(this.Form1_Deactivate);
...
}
#endregion
...
private void Form1_Load(object sender, System.EventArgs e) { Debug.WriteLine("Form Load Event Fired");
}
private void Form1_Activated(object sender, System.EventArgs e) { Debug.WriteLine("Form Activated Event Fired");
}
private void All_Hail_Form1_Was_Entered(object sender, System.EventArgs e) {
Debug.WriteLine
("Form Enter Event a/k/a All_Hail_Form1_Was_Entered Fired");
}
private void Form1_Closed(object sender, System.EventArgs e) { Debug.WriteLine("Form Closed Event Fired");
}
private void Form1_Deactivate(object sender, System.EventArgs e)
{
Debug.WriteLine("Form Deactivate Event Fired");
}
}
}
Determining Which Object Fired an Event
As I mentioned earlier, a common pattern is to have one handler that handles events for multiple objects-likely, but not necessarily, the same event, for example, Click. The code in the handler then uses the Sender parameter to determine which object's Click event fired-and provides different code accordingly.
To see how this might work, I'll show you a single handler for a Click event that determines whether a Button or Form fired it.
First, assign the handler, named EventHandler, to both the Form and Button click events either in code or using the Events tab of the Properties window:

this.button1.Click += new System.EventHandler(this.which_object);
...
this.Click += new System.EventHandler(this.which_object);
Next, explicitly cast the sender parameter, declared simply as object, to an object of type Control:
System.Windows.Forms.Control ctrl = (System.Windows.Forms.Control) sender;
Let's examine this statement carefully, because it is very important. The part before the equal sign declares a variable ctrl of type System.Windows.Forms.Control, or more simply, Control.
Control means System.Windows.Forms.Control
I could have simply used the Control object without the qualifying namespaces in the statement. This abbreviated statement
Control ctrl = (Control) sender;
is the equivalent of the longer version because the System.Windows.Forms namespace is included with a using directive at the beginning of the auto-generated form code (see Listing3.1). In order to keep things really clear, I used the long form of the statement.
The part of the statement to the right of the equal sign,
(System.Windows.Forms.Control) sender
casts, or converts, the sender object to an object of the type within the parentheses, namely a control. If you didn't cast sender to a control, you'd get a syntax error due to strong typing when you tried to use sender.Name to determine the kind of control that fired the event. I chose Control as the type to cast into because it is a common ancestor of all controls, and almost certainly an ancestor of anything that can fire a click event.
Tip By way of comparison, in Visual Basic, you'd use a function such as CType() to explicitly cast, or convert, from one type to another. Note that C# is always strongly typed; it's as if Option Strict could not be turned off in VB.
With the event's sender now stored in a variable of type Control, it's easy to access it to determine which object it is. The information can be displayed in the Output window, as shown in Figure 3.9 and Listing 3.3, or used in a more practical way.
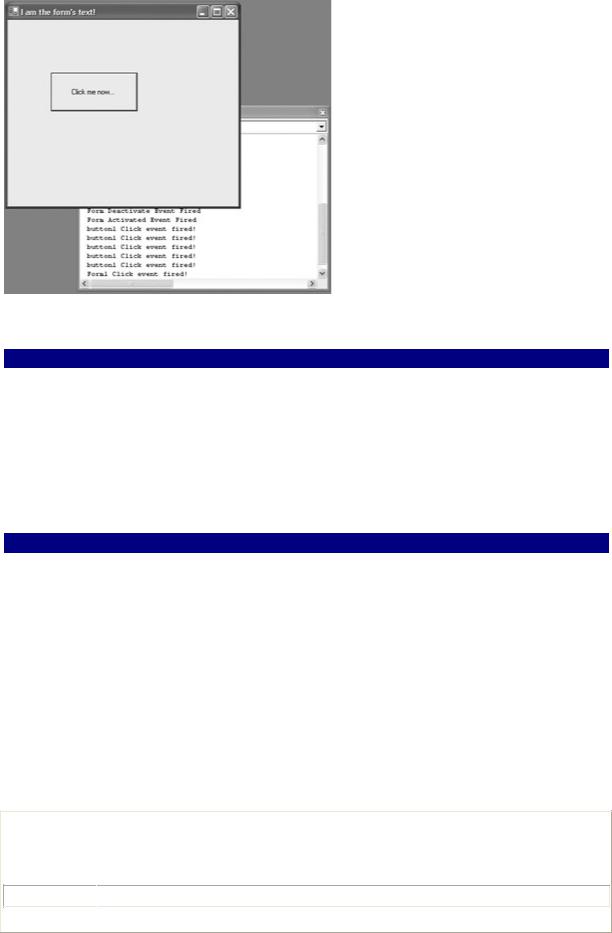
Figure 3.9: The generalized click event handler can determine which object invoked it. Listing 3.3: Casting the sender Parameter to Determine Which Object Invoked the Click Event
...
this.button1.Click += new System.EventHandler(this.which_object);
...
this.Click += new System.EventHandler(this.which_object);
...
private void which_object(object sender, System.EventArgs e) {
System.Windows.Forms.Control ctrl = (System.Windows.Forms.Control)
sender;
Debug.WriteLine(ctrl.Name + " Click event fired!");
}
...
Form Methods
Methods are a way to tell an object to do something. In just the way that a property is a variable tied to an object, a method is a procedure or function tied to an object.
Methods are implemented using functions, and invoked by calling an object instance followed by the dot operator followed by the method:
Object.Method;
Table 3.2 shows some of the most frequently used form methods and describes what they do.
|
|
Table 3.2: Commonly Used Form Methods |
Method |
|
Purpose |
|
|
|
Activate |
|
Moves the focus to the form and makes it active. |
BringToFront
 Moves the form on top of all other forms. See also SendToBack.
Close |
|
Unloads the form. |
|
|
Table 3.2: Commonly Used Form Methods |
|
|
|
Method |
|
Purpose |
|
|
|
Hide |
|
Makes a form invisible, or hides it, without unloading the form. |
|
|
|
Refresh |
|
Updates the appearance of a form by repainting the form. |
|
|
|
SendToBack |
|
Moves the form beneath all other forms. See also BringToFront. |
|
|
|
SetBounds |
|
Used to position a form. |
|
|
|
Show |
|
Loads and displays a modeless form (a normal window). |
|
|
|
ShowDialog |
|
Loads and displays a modal form, such as a dialog box. |
|
|
|
Let's have a look at how the Form Closing event works, which is interesting, because it allows the programmer to build in an escape hatch. Maybe the user really didn't want to close that window…
To see how this works, add a Button to a form, and name it btnClose. In the Click event for the Button, invoke the form's Close method:
private void btnClose_Click(object sender, System.EventArgs e) { this.Close();
}
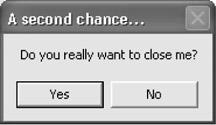
Next, in the form's Closing event, display a message box that asks whether the user is sure (message boxes are discussed in considerable detail in the next section):
DialogResult answer = MessageBox.Show("Do you really want to close me?", "A second chance...", MessageBoxButtons.YesNo);
If the user answers 'No,' then set the Cancel property of the passed System.EventArgs property to true:
if (answer == DialogResult.No) { e.Cancel = true;
}
The window will now stay open.
Note You can use the Form Closing event for cleanup code of various kinds-not just to query whether the user really wants to close the window.
Listing 3.4 shows a Close method and the related Closing event procedure with an included query about whether to close.
Listing 3.4: Closing, and Querying Whether to Close, a Form

private void btnClose_Click(object sender, System.EventArgs e) { this.Close();
}
private void Form1_Closing(object sender, System.ComponentModel.CancelEventArgs e) {
DialogResult answer = MessageBox.Show("Do you really want to close me?", "A second chance...", MessageBoxButtons.YesNo);
if (answer == DialogResult.No) { // Cancel the closure e.Cancel = true;
}
}
The Lowly Message Box
We just used a message box in the previous example to query the user (did she really want to close the form?). You've undoubtedly seen hundreds, if not thousands, of message boxes in your time. This lowly dialog window gets no respect but is always ready to shoulder the burden and do more work!
Message boxes are displayed using the Show method of the MessageBox object, which is part of the System.Windows.Forms namespace. Show is a static method, meaning that you do not have to instantiate an object based on the MessageBox class to use the method. It's also overloaded-meaning that there are various versions of Show you can use with different argument lists. Essentially, you have to include a string to be the text of the message box displayed, but additional arguments after that are optional.
I'm going to spend a little time going over the message box syntax, because it is so useful and easy. Then I'm going to use the message box as a jumping-off place for some variations on a theme: If you allow the user to create their own message box, and enter their own text, and display a set of radio buttons that allow them to choose the buttons for the message box, how do you know which radio button is selected-and how can the information easily be used?
MessageBox.Show Syntax
MessageBox.Show has the following format:
DialogResult = MessageBox.Show(text, caption, buttons, icon, defaultbutton, options)
Here are the meanings of the arguments, which must be entered in the order shown above:
text
Contains the text that will be displayed in the message box. The contents of a variable in the text position must evaluate to a string, meaning that it must be alphanumeric. One way to do this is with string literals. To create a string literal, enclose an alphanumeric sequence in quotation marks, as in, "I am a string!".
caption Optional; contains the text that will go in the message box caption bar. Like the text argument, the caption argument must be of string type.
buttons Optional; tells C# .NET which buttons will be displayed.
icon Optional; tells C# .NET which icon will be displayed.
defaultbutton Optional; tells C# .NET which button is activated by default (when the user presses the Enter key).
options Optional; allows you to select some special options for the message box. These include things like making the text right-aligned, specifying a right-to-left reading order, or writing an entry in the system logs (see example below).
To use MessageBox.Show to display a message box without returning a value, just use it in a statement without an equal sign:
MessageBox.Show(text, caption, buttons, icon);
The following sections describe how to use the MessageBox.Show arguments.
So where do you find the values to use for buttons and icons? The Code Editor's IntelliSense feature will generally supply this information, called member information. In other words, when you type MessageBoxButtons and enter the dot operator that follows it, IntelliSense will automatically pop up a list of the members, or enumeration constants, that you can use as a MessageBoxButton value. I've also included these values here for your easy reference.
Table 3.3 shows the MessageBoxButtons members, and Table 3.4 shows the MessageBoxIcon set of values.
|
|
Table 3.3: The MessageBoxButtons Enumeration |
Constant |
|
Description |
AbortRetryIgnore
 Displays Abort, Retry, and Ignore buttons
OK |
|
Displays an OK button only |
|
|
|
OKCancel |
|
Displays OK and Cancel buttons |
|
|
|
RetryCancel |
|
Displays Retry and Cancel buttons |
|
|
|
YesNo |
|
Displays Yes and No buttons |
|
|
|
YesNoCancel |
|
Displays Yes, No, and Cancel buttons |
|
|
Table 3.4: The MessageBoxIcon Enumeration |
Constant |
|
Description |
|
|
|
Asterisk |
|
Displays an information icon |
|
|
|
Error |
|
Displays an error icon |
|
|
|
Exclamation |
|
Displays an exclamation icon |
|
|
|
Hand |
|
Displays an error icon |
|
|
|
Information |
|
Displays an information icon |


 Continued on next page
You also need to know what the possible return values are for MessageBox.Show. These values are the members of System.Windows.Forms.DialogResult, or DialogResult for short, shown in Table 3.5.
|
|
Table 3.5: The MessageBoxIcon Enumeration |
|
|
|
Constant |
|
Description |
|
|
|
None |
|
Does not display an icon |
|
||
Question |
|
Displays a question icon |
|
|
|
Stop |
|
Displays an error icon |
|
|
|
Warning |
|
Displays an exclamation icon |
|
|
|
Writing an Event Log Entry
As an example of how MessageBox.Show works, let's use it to write an entry to the system logs.
First, add a Button named btnService to a form. The Click event of btnService will be used to display the message box. The elements of the message box will be placed in variables and then displayed using the MessageBox.Show method. Here are the subject and caption,
string subject = "Service Notification by SybexC6"; string caption = "MessageBox Demo";
followed by the buttons, icon, and a parameter designating the default button:
MessageBoxButtons mbb = MessageBoxButtons.OK; MessageBoxIcon mbi = MessageBoxIcon.Exclamation;
MessageBoxDefaultButton mbdb = MessageBoxDefaultButton.Button1;
Finally, a MessageBoxOptions variable is declared and set:
MessageBoxOptions mbo = MessageBoxOptions.ServiceNotification;
and the message box can be displayed:
MessageBox.Show(subject, caption, mbb, mbi, mbdb, mbo);
The full click event code is shown in Listing 3.5. If the project is run and the button is clicked, a message box like this one will be displayed:

Listing 3.5: Using MessageBox.Show to Write an Event Log Entry
private void btnService_Click(object sender, System.EventArgs e) { string subject = "Service Notification by SybexC6";
string caption = "MessageBox Demo"; MessageBoxButtons mbb = MessageBoxButtons.OK; MessageBoxIcon mbi = MessageBoxIcon.Exclamation;
MessageBoxDefaultButton mbdb = MessageBoxDefaultButton.Button1; MessageBoxOptions mbo = MessageBoxOptions.ServiceNotification; MessageBox.Show(subject, caption, mbb, mbi, mbdb, mbo);
}
To see the entry that was created, open Server Explorer (View →?Server Explorer). Expand it until you see the System Event Logs (Figure 3.10). The message box should have made the most recent addition under the Application Popup category.
Figure 3.10: The new entry can be viewed using Server Explorer (shown here) or using the operating system's administration facilities.
You can right-click the notification and select Properties from the context menu to view the full text of the log entry (Figure 3.11).