

Visual CSharp .NET Programming (2002) [eng]
.pdfIf you are not familiar with C# at all, you should know that lines beginning with two forward slash marks (//) are comments (this is sometimes known as C++ comment style).
Lines beginning with three forward slash marks (///) are also comments-but of a special sort. They are designed to contain XML documentation of the code, which can be automatically rendered into documentation for programs. I'll provide an overview of how this works towards the end of this chapter.
C# also supports so-called C-style comments, not shown in Listing 1.2, which begin with /* and end with */. Everything between the begin and end marks is a comment, which can span multiple lines. For example:
/* I am a comment! */
You should also know that the code between #region and #endregion directives does not display in the Code Editor (unless the region is expanded by clicking on the plus icon at the left side). As you can see in Figure 1.11, the code on the line of the #region directive,
#region Component Designer generated code
is displayed, but any subsequent code up to #endregion is hidden in the collapsed block.
Figure 1.11: The Code Editor doesn't display code within a #region / #endregion block unless it is expanded.
Let's go ahead and replace the commented-out 'Hello World' web service shown in Listing 1.2 with our own 'Hello, Web Service!' The replacement boilerplate web service looks like this:
[WebMethod]
public string HelloWebService()
{
return "Hello, Web Service!";
}
Now let's view the test pages for the web service we've created. To do this, start the project in the development environment by choosing Debug → Start (you can, alternatively, choose F5 on the keyboard).

Note If you're not planning on doing any debugging, you can select Debug → Start Without Debugging (Ctrl+F5 is the keyboard shortcut) and the page will load faster than in debug mode.
The project will be built, and the ASMX file opened in Internet Explorer, as shown in Figure 1.12.
Figure 1.12: T he test page for the web service is displayed in Internet Explorer.
Note You can also build the project by selecting Build ? Build Solution. The test page can then be opened by URL-in this case, http://localhost/SybexC2/SybexC2.asmx-in your browser.
As you can see in Figure 1.12, the name of the service is defaulted to Service1. It would be nice to give it a custom name. We can also add a description of the web service, and we should also change http://tempuri.org/ to a URI under our control. To do this, add a WebService directive within the namespace and before the class declaration:
...
namespace SybexC2
{
[WebService (Description="Chapter 1 demo program", Name="SybexC2Service", Namespace="http://www.bearhome.com/webservices")]
...
public class Service1 : System.Web.Services.WebService
{
...
[WebMethod]
public string HelloWebService()
{
return "Hello, Web Service!";
}
...
}
}
While we're having a look at this, you should make note of the declaration for Service1:

public class Service1 : System.Web.Services.WebService
The colon in the middle of the statement says that Service1 inherits from the System
.Web.Services.WebService class.
Tip The Visual Basic equivalent of the C# colon operator (:) is the Inherits keyword.
As you'll see shortly, you can add multiple methods to a single web service. Each method is denoted using a WebMethod directive.
OK. Let's run the revised web service and view its test page (shown in Figure 1.13). You'll see that it now displays a custom service name and description, and that annoying message about http://tempuri.org/ is gone.
Figure 1.13: The test page now shows the service name and description.
As a clean-up step, let's get rid of the auto-generated code added by Visual Studio that we don't really need, and delete the references to namespaces-which were also automatically added-that we don't really need. There's no overwhelming reason to do this, other than for clarity-although, of course, the unneeded code and references do consume some resources. Listing 1.3 shows the complete web service code module.
Listing 1.3: The Cleaned-Up 'Hello, Web Service!' Code Module
using System.Web.Services;
namespace SybexC2
{
[WebService (Description="Chapter 1 demo program", Name="SybexC2Service", Namespace="http://www.bearhome.com/webservices")]
///<summary>
///Service1 contains demo methods!
///</summary>
public class Service1 : System.Web.Services.WebService
{
[WebMethod]
public string HelloWebService()
{
return "Hello, Web Service!";
}
}
}
Adding a Class Module
A single web service can, of course, have more than one method-each web method being represented by a method that is a member of the web service class. In addition, you can add whatever classes you'd like to the web service code module to support its web methods.
We're going to add three new web methods to our demonstration web service, but we'll take a slightly different tack in constructing them. The web service code module and class will be used only for the actual web method calls-the supporting code will be placed in classes in a separate class module that has been added to the project.
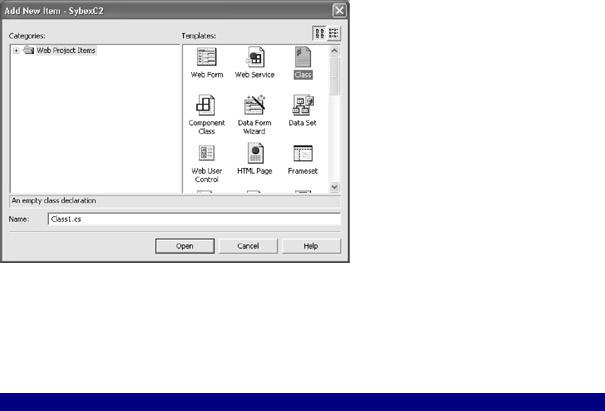
To add a class module to the project, open the Add New Item dialog by selecting Project → Add Class. (You can also right-click in Solution Explorer, and select Add → Add Class from the context menu.)
In the dialog (shown in Figure 1.14), make sure that Class is selected as the kind of object to add in the Templates pane. You can accept the default name for the class module, Class1.cs, or change it if you'd like.
Figure 1.14: The Add New Item dialog isused to add a class module.
When the new class module is added to the project, it will come 'out of the box' with the code shown in Listing 1.4. Specifically, note that the namespace used in the web service code module has been carried across to the class code module.
Listing 1.4: A Boilerplate Class Code Module
using System;
namespace SybexC2
{
///<summary>
///Summary description for Class1.
///</summary>
public class Class1
{
public Class1()

{
//
// TODO: Add constructor logic here
//
}
}
}
To start with, we'll replace the nominal Class1 in this module with a class designed to support the web service, named-logically enough-ServiceSupport:
using System;
namespace SybexC2
{
/// <summary>
///Service Support supports the web services module
/// </summary>
public class ServiceSupport {
}
}
Next, let's add a method that uses a get property accessor to return the string "Web services are cool!":
...
public class ServiceSupport { static public string ReturnText {
get {
return "Web services are cool!";
}
}
...
There's no earthly reason you'd want to do this in the real world, in two respects:
•A straight method that returns the string makes just as much sense as returning it as a property.
•You don't need a support class to return a string-why not just return it in the web method as in the earlier example?
We've done it this way to easily demonstrate using the get property accessor. Note that the property as it appears here is read-only; there is no way to set it.
It's also important to know that you can invoke the members of another class from a web method class. In this regard, you should note the use of the static keyword-which means that the member is shared so that an object based on the class doesn't have to be instantiated to use the member.
Tip The Visual Basic equivalent to C#'s static is the Shared keyword.
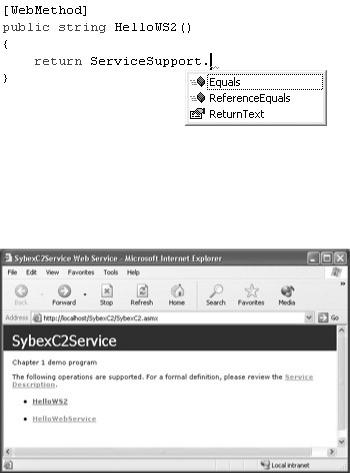
Let's go back to the web service module, and invoke the ServiceSupport ReturnText property in a new web method named HelloWS2:
[WebMethod]
public string HelloWS2()
{
return ServiceSupport.ReturnText;
}
You know you are on the right track when you type the class name in the Code Editor, and the IntelliSense auto-completion facility supplies the name of the member you'd like to use.
Running and Testing the Service
To test the new service method, run the project in the development environment. As you can see in Figure 1.15, the new test page that is generated has both web service methods listed.
Figure 1.15: The new test page that is generated has two web service methods.
Click the HelloWS2 link. You can now invoke the method and verify that the specified text string is returned, as seen in Figure 1.16.
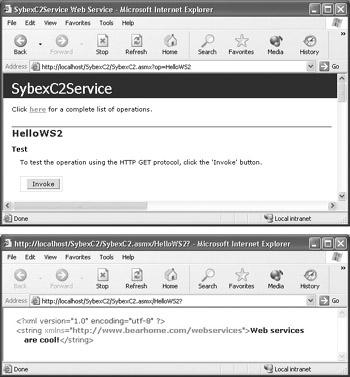
Figure 1.16: Clicking the Invoke button (top) produces the appropriate string return (bottom).
Doing the Math
Let's add a method to the ServiceSupport class that does something a little more complicated (we can then expose the method as a web service). This method uses the mod operator (%) and the square root method of the System.Math object (Math.Sqrt) to determine whether an input is a prime number, something that is potentially useful in cryptography and encryption.
Note Note that you can leave the System namespace off when referencing its members: Math.Sqrt is the equivalent of System.Math.Sqrt.
Here's the method:
static public bool IsPrime (long NumToCheck) {
for (long i = 2; i <= Math.Sqrt(NumToCheck); i++) { if (NumToCheck%i == 0) {
return false;
}
}
return true;
}
Unlike the previous example, this method takes an input-the number to check-which is typed as a long integer. (You'll see in a minute where the input shows up on the test page.) The method returns a Boolean value of true or false, as indicated using the bool keyword, depending upon whether the input is a prime number or not.
Tip The Boolean values True and False are always lowercase within C# code: true and false. The capped versions appear in the Visual Studio Properties window and are acceptable in Visual Basic, since VB is case insensitive; but attempting to use "True" or "False" in C#
code will cause the compiler to generate a syntax error.
A for loop is used to check the potential divisors of the input number up to the square root of the number. If any potential divisor goes into the number evenly (as tested by the mod 0 result), then it is not a prime, and the method returns false. Otherwise, if there are no even divisors, it returns true.
Turning to the web service module, here's the web method wrapper that invokes the ServiceSupport.IsPrime method:
[WebMethod]
public bool IsPrime (long NumToCheck) { return ServiceSupport.IsPrime(NumToCheck);
}
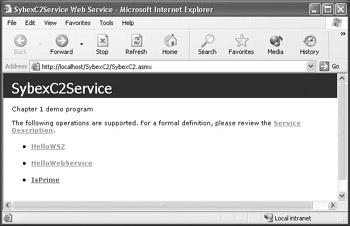
If you run the project, you'll see that the IsPrime web method has been added to the list of methods available in the service (Figure 1.17).
Figure 1.17: The IsPrime web method has been added to the web service.
If you click the IsPrime link shown in Figure 1.17, the test page for the method opens (Figure 1.18). This is a little different from the previous test pages because it allows you to input a value.

Figure 1.18: The IsPrime test page lets you input a value to be checked and then displays the value returned by the method.
In Figure 1.18, a relatively large prime number is shown input for testing. When the Invoke button is clicked, the return value of true indicates that it is a prime and that the method is working.
Reversal of Fortune
We'll implement a final web method in the service, one that reverses a string that is input. The implementation of this in the class module will be a bit different from the previous two examples. First, it will be implemented in a class of its own named StringManipulation, rather than as part of the ServiceSupport class. Next, the StringManipulation class members will not be declared using the static keyword, meaning that they won't be shared, so an object based on the class will have to be instantiated to use the class members in the web service module.
The StringManipulation class implements a read-write property, Text, and a method, ReverseString. To use these members, the Text property must first be set with the value to be reversed. The Text property is then operated on by the ReverseString method, which takes no arguments. The changed string value is then retrieved from the Text property.
Here's the class declaration and the implementation of the Text property:
public class StringManipulation { private string m_text = "";
public string Text { get {
return m_text;
}
set {
m_text = value;
}
}
...
}
The value of the property is stored internally in a private variable, m_text, which is read and written with the get and set accessors associated with the public Text property.
The ReverseString method doesn't return a value; this is indicated by the void key-word. The method starts by declaring, and initializing, a new string variable, strNew. The keyword this is used to refer to the current instance of the object, so that this.Text is the value of the Text property.
Tip The Visual Basic equivalent of the C# keyword this is the Me keyword.
Some built-in methods of the string class, Length and Substring, are used within a for loop that is iterated as many times as there are characters in the Text property. As each character at the front of the string is peeled off, it is added to the end of strNew using the concatenation operator (+). (For more on string manipulation in C#, see Chapter 9, "Everything Is String Manipulation.")
Finally, after the loop is complete, strNew is assigned as the new value of the Text property:
public void ReverseString() { string strNew = "";
for (int i = 0; i < this.Text.Length; i++) { strNew = this.Text.Substring(i,1) + strNew;
}
this.Text = strNew;
}
Let's use the StringManipulation class within the web service module to create a new web method. The first step is to declare and instantiate a StringManipulation object using the new keyword, stored in the variable SM:
StringManipulation SM = new StringManipulation();
The rest is straightforward. Following the [WebMethod] directive, declare a method ReverseString that takes a string as input and returns a string. Within ReverseString, using the string input, set SM.Text and invoke the parameter-less SM.ReverseString method. Finally, return the value of SM.Text:
[WebMethod]
public string ReverseString (string inString) { SM.Text = inString;
SM.ReverseString(); return SM.Text;
}