

Visual CSharp .NET Programming (2002) [eng]
.pdfFigure 2.18: The Ws are written one after another to the screen, then the asynchronous call completes.
Note You may have to fiddle with the numbers in the loop depending on the speed of your system. One might think that one could loop to 100 using modulo 10 and have the same impact as the code in the listing-namely writing ten Ws to the screen-but it worked better for me with the larger numbers.
Finding Services to Consume
Doing it by oneself may be satisfying and useful, but it is ultimately much more fun to do it with others. If you could only consume services you yourself had written, it might be an interesting, novel, and handy way to extend the architectures of your applications across the web-but hardly revolutionary. The real point of web services is the ability to remotely use code methods provided by others on the basis of the WSDL interface description provided (or to provide web methods that other people can access).
So how do you find web services to consume? Here are a few places to start...
Passport
Passport is probably the premier and best-known of the Microsoft .NET My Services. It's used as a one-stop authentication and sign-in mechanism by a great many websites (and it can also be used as a digital wallet to store credit card information for e-commerce purchases).
As web services go, Passport is non-trivial to implement. You'll find a software development kit (SDK) available for download and much information at www.passport.com.
UDDI
The Universal Description, Discovery, and Integration (UDDI) directory service, conceptually introduced in Chapter 1, is not intended to be easily readable by humans. While you could write your own UDDI client to browse UDDI repositories, there's no need to go to this kind of trouble. Visual Studio .NET provides a UDDI interface that allows you to register your

web services and to search for web services you can use by category. To open this interface, shown in Figure 2.19, choose XML Web Services from the Start page (you can also display the Start page by selecting Help →?Show Start Page).
Figure 2.19: The XML Web Services tab of the Visual Studio Start page allows you to register web services and to search for web services by category.
Directories
Several websites have extensive directories of web services you can use. Some of the best of these include:
|
|
|
Got Dot Net |
|
www.gotdotnet.com |
|
|
|
Salcentral |
|
www.salcentral.com |
|
|
|
XMethods |
|
www.xmethods.com |
|
|
|
Conclusion
This chapter has been fun! In it, I showed you how to create ASP.NET web applications and how to consume the web service methods created in Chapter 1. Along the way, you've seen how to work with web server controls, learned how to put a thread to sleep, and explored the difference between calling a web method synchronously and asynchronously.
Let's move on to Chapter 3, which explores the creation of Windows applications using C#
.NET-and revisits invoking our web service asynchronously in the context of a generalized asynchronous design pattern.
Part II: Allemande: Striding Forward
Chapter 3: Windows Uses Web Services, Too! Chapter 4: Building a Better Windows Interface Chapter 5: Reflecting on Classes
Chapter 3: Windows Uses Web
Services, Too!
Overview
•Windows application projects
•Forms
•Form properties, events, and methods
•The MessageBox.Show method
•Changing the shape of a window
•Asynchronous design pattern (used in web service consumption)
For all the fun and glory of web services and web applications, the roots of Visual Studio are deeply entwined with Windows application development. (You could say that Windows development is Visual Studio 'classic.')
No tool is better suited to Windows development than Visual Studio .NET-and no language more appropriate than C#. In addition, even considering web services and the Web, Windows application development is likely to be where the vast bulk of programmers spend their time for the foreseeable future-particularly considering .NET's no-touch deployment, which allows a .NET Windows executable program to be opened and run from within Internet Explorer.
This chapter begins the exploration of Windows application projects with information about forms, message boxes, and more. It concludes with an asynchronous invocation of the web service developed in Part I, and shows the preferred general design pattern to use when making asynchronous calls in .NET.
Creating a Windows Application Project
To create a new Windows application project, open the New Project dialog (File →?New →?Project). In the New Project dialog, select Visual C# Projects in the Project Types pane, Windows Application in the Templates pane, and give the project a name and
location?→ Figure 3.1).
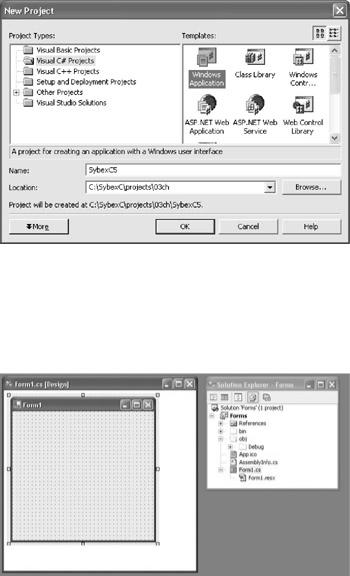
Figure 3.1: To create a Windows application project, select Visual C# Projects and Windows Application, and provide a name and location for the project files.
Visual Studio will create a new project based around a Windows form named Form1. The Windows form will be displayed in its designer, and the project files will appear in Solution Explorer, as shown in Figure 3.2.
Figure 3.2: A form is created in its designer, along with the various other files required to run a Windows project (shown in Solution Explorer).
Note Depending on your Visual Studio configuration, to see the form's designer, you may have to select View →?Designer. If Solution Explorer is not displayed, select View?→?Solution Explorer. To view all the project's files (as shown in Figure 3.2), click the Show All Files button on the Solution Explorer toolbar.
The basic project shown in Solution Explorer contains one form. You can add new forms, class modules, and other objects to it using the Add New Item dialog (Project →?Add New Item). You can add existing items using the Add Existing Item dialog?(Project?→?Add Existing Item). For that matter, if you want, you can remove Form1 from the project (although in that case, you will have to supply an entry point for the project if you want it to run as an executable).
Forms

The project module named by default Form1.cs contains the code required to instantiate the form object as well as a Main() procedure that serves as the entry point, or starting place, for the application.
To view the code for the form module in the Code Editor, right-click the form in its designer or Solution Explorer and select View Code from the context menu. Alternatively, doubleclick the form in its designer.
Listing 3.1 shows the auto-generated 'out of the box' form code. You may be interested in comparing this with Listing 1.2 (a default web service) and Listing 2.1 (a default ASP.NET web forms application).
Listing 3.1: 'Out of the Box' Windows Form Code, with Hidden Region Expanded
using System;
using System.Drawing; using System.Collections;
using System.ComponentModel; using System.Windows.Forms; using System.Data;
namespace SybexC5
{
public class Form1 : System.Windows.Forms.Form
{
private System.ComponentModel.Container components = null;
public Form1()
{
//
// Required for Windows Form Designer support
//
InitializeComponent();
//
//TODO: Add any constructor code after
//InitializeComponent call
}
protected override void Dispose(bool disposing)
{
if (disposing)
{
if (components != null)
{
components.Dispose();
}
}
base.Dispose(disposing);
}
#region Windows Form Designer generated code
///<summary>
///Required method for Designer support - do not modify
///the contents of this method with the code editor.
///</summary>
private void InitializeComponent()

{
this.components = new System.ComponentModel.Container(); this.Size = new System.Drawing.Size(300,300);
this.Text = "Form1";
}
#endregion
///<summary>
///The main entry point for the application.
///</summary>
[STAThread] static void Main()
{
Application.Run(new Form1());
}
}
}
As you can see in the class declaration in the form code, the newly minted Form1 object inherits from System.Windows.Forms.Form. The form class itself represents a window or dialog box that is part of an application's user interface and inherits from Component by way of Control, which is the base class for all controls. Form's immediate parent is ContainerControl, a class that provides functionality for controls that can function as a container for other controls.
Note A control is a component with visual representation. Controls (and components) in the Toolbox are instantiated without additional code when added to a form and run.
We're going to quickly waltz through some Form properties, events, and methods. After having a look at them, I'm sure you'll agree that forms are powerful objects with a great deal of functionality-even before you do anything to them.
Form Properties
A property is a setting that describes something about an object such as a form. Properties can be set at design time using the Properties window and at run time in a code assignment.
Note Some form properties, such as Region (explained later in this chapter), can only be set in code.
In other words, using the Properties window to set the form's Text property to "I am the form's text!" (Figure 3.3) has the same consequences-namely, setting the Text property to the designated string when the form is displayed-as executing
this.Text = "I am the form's text!";

Figure 3.3: The form's Text property is set in the Properties window. (Here, the Properties window is set to categorize rather than alphabetize properties.)
in the form constructor (the procedure that creates the instance of the form object; see the 'Constructors' sidebar later in this chapter) or the form load event.
Note Using the first two buttons on the Properties window toolbar, the window can be set to display properties alphabetically or by category.
A great many form properties can be set in the Properties window, ranging from setting the form icon, its background color, its behavior, appearance, and more. You need to play
with form properties in the Properties window to get to know them and understand what they do. In this section we'll just have a look at a few properties.
Note When you select a property in the Properties window, you'll find a brief description of what it does in the pane at the bottom of the Properties window.
The FormBorderStyle Property
Windows forms come in various styles, which are set using the FormBorderStyle property. Styles change the basic appearance of the window when the form is run, and also its behavior in significant ways. For example, depending on the FormBorderStyle setting, an icon will (or will not) be displayed in the Windows Taskbar. This setting also determines whether a running window is resizable. We tend to take these things for granted, but the reality is that a Windows form buys one a great deal of "scaffolding" in terms of behaving as users expect windows to behave. The good news for the programmer is that you don't need to do any work to get this scaffolding-just select a FormBorderStyle setting.
To select a FormBorderStyle, open a form in its designer. In the Properties window, highlight FormBorderStyle and click the arrow in the right column to display a drop-down list
of possible settings (Figure 3.4). Table 3.1 describes the windows that result from the seven different FormBorderStyle choices.
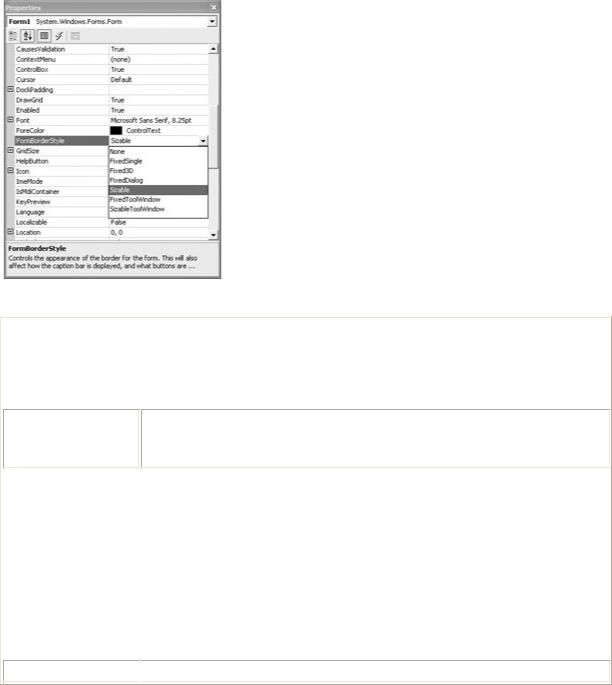
Figure 3.4: The Properties window can be used to set form properties such as FormBorderStyle.
|
Table 3.1: Members of the FormBorderStyle Enumeration |
||
Constant |
|
|
Resulting Window |
|
|
|
|
None |
|
|
A window without a border or border-related elements. This is the |
|
|
|
setting to use for introductory 'splash' screens. |
FixedSingle
A nearly normal window with a single-line border that is only resizable using its Minimize and Maximize buttons. You cannot drag the window's borders to resize it while it is running.
Fixed3D |
|
Like FixedSingle, except that the borders are created with a raised, 3D |
|
|
effect. |
|
|
|
FixedDialog |
|
Like FixedSingle, except that the borders appear recessed. This setting |
|
|
is commonly used for dialog boxes. |
|
|
|
Sizable |
|
A normal, resizable window, with Minimize and Maximize buttons if |
|
|
desired. This is the default and most commonly used setting. |
|
|
|
FixedToolWindow |
|
A non-resizable window with a Close button and small-size text in the |
|
|
title bar. Unlike the preceding settings, this kind of window does not |
|
|
display an icon in the Windows Taskbar. |
SizableToolWindow
 Like FixedToolWindow, but sizable.
You can set the FormBorderStyle property dynamically at run time in code by assigning a member of the FormBorderStyle enumeration constants (shown in Table 3.1) to the property. For example,
this.FormBorderStyle = FormBorderStyle.None;
turns the form into a borderless window when it is executed (although it is unusual to execute this code, since most programs do not change window styles at run time).
The Anchor and Dock Properties
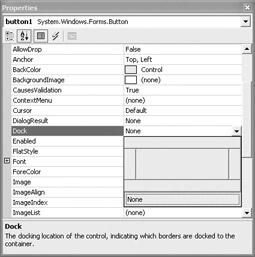
Anchor and Dock are two properties that greatly help with positioning controls on a form and save us from writing code to take care of things when the user resizes a running form.
The Dock property "docks" the border of a control to its container (such as a form). Dock can be set visually (Figure 3.5) or by assigning a value of DockStyle.Left, DockStyle.Right, DockStyle.Top, DockStyle.Bottom, or DockStyle.Fill to the Dock property.
Figure 3.5: The Dock property simplifies managing the run-time position of controls.
DockStyle.Fill means that the control takes up all unused space in the center of the form, and DockStyle.None means that the control is not docked.
The Anchor property describes which edge of the container, such as a form, the control is bound to. The distance between the form edge and the closest edge of the control will remain constant no matter how the form is resized.
Form Events
Event methods are placeholders for code that is only processed when the event is fired- triggered-by a user action, program code, or the system.
An event is a procedure with a name, such as button1_Click, followed by parameters (also called arguments) within parentheses. The event method must also be hooked up as a delegate to handle the event using the += operator (you'll find this in the hidden region of the form code). One event method can be used by many events (each event can be assigned the same delegate).
Here's the general form:
this.Click += new System.EventHandler(this.Form1_Click);
...
private void Form1_Click(object sender, System.EventArgs e) {
}
You probably know that it is easy to call an event procedure in code. You must be sure to pass to the event procedure the number and type of arguments it expects. For example, to call a Button named button1's Click event in code from a Form click event:
private void Form1_Click(object sender, System.EventArgs e) { button1_Click(sender, e);
}
Now, when Form1's click event is fired, button1's will be, as well.
If you're not already within an event, you can create your own System.EventArgs to invoke an event:
System.EventArgs g = new System.EventArgs();
Form1_Click(this, g);
So far in this discussion, I've introduced one way to create an event handler, which is strictly in code. The steps are:
1.Create a new System.EventHandler.
2.Assign it to an event and provide a delegate (the name of the method that will handle it) to register the new event handler.
3.Create the framework for the event procedure.
You can find out more about creating your own custom events in Chapter 8, 'The Life of the Object in C#.' For now, let's have a look at the support that the Visual Studio interface provides for auto-generating events.
Events in the Properties Window
In most ways, the development tools for Visual Basic .NET and C# .NET are the same, but they differ greatly when it comes to events. In VB, the auto-generation of event scaffolding is done using the Objects and Procedures drop-down lists in the Code Editor.
In contrast, C# has its own interface for auto-generating event scaffolding, which is accessed via the Properties window. To open this interface, click the lightning bolt icon (the lightning bolt means an event, get it?) on the Properties window toolbar (Figure 3.6).