

Visual CSharp .NET Programming (2002) [eng]
.pdfFigure 2.5: You can add HTML to your ASP.NET web form using the HTML tab of the designer.
You should also note the @Page directive at the top of the designer. The attributes of this directive have important implications to the ASP.NET page parser and compiler-designating, for example, the language used and the name of the code-behind module.
Going back to the Design tab, you'll see that the HTML header appears.
Adding Controls
Now it's time to add the user interface, which we'll create using five controls. As you likely know, the Toolbox, shown in Figure 2.6, is used to add controls to a form (if the Toolbox is not displayed, you can open it by selecting View →?Toolbox).

Figure 2.6: The Toolbox is used to add controls to a web form.
Use the Web Forms tab of the Toolbox to add the controls shown in Table 2.1 with their intended purpose.
Table 2-1: Controls on the SybexC3 Web Form and Their Purpose
Control Type |
|
ID |
|
Purpose |
|
|
|
|
|
Label |
|
Label1 |
|
Displays static text (no functional |
|
|
|
|
purpose). |
|
|
|
|
|
Label |
|
lblResult |
|
Displays the results of the string |
|
|
|
|
reversal. |
|
|
|
|
|
TextBox |
|
txtInString |
|
Area to input the string to be |
|
|
|
|
reversed. |
|
|
|
|
|
Button |
|
btnRev |
|
Starts the reversal process when the |
|
|
|
|
user clicks. |
|
|
|
|
|
RequiredFieldValidator |
|
RequiredFieldValidator1 |
|
Makes sure that the user inputs |
|
|
|
|
something. |
As you most likely know, the Properties window is used to set the properties of objects such as controls (and forms). Open the Properties window (by selecting View →?Properties
window), shown in Figure 2.7, and set the Text property of Label1 (the default ID for the first Label) to "Enter text to reverse:".
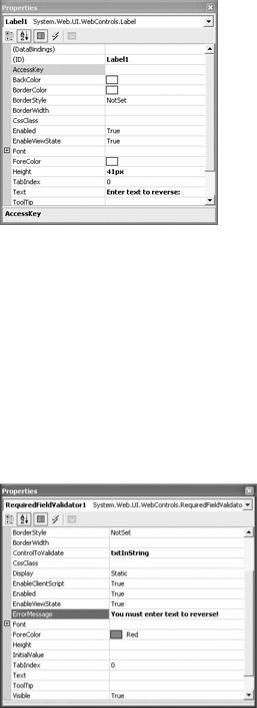
Figure 2.7: Set the Text property of the Label control.
Note Web form controls are identified by their ID property, rather than the Name property used with Windows form controls.
Using the Properties window, set the ID of the remaining controls as indicated in Table 2.1. Clear the Text properties of lblResult and txtInString. Change the Text property of btnRev to "Click to reverse!".
The RequiredFieldValidator is one of several controls that can easily be used to validate user input, meaning that you don't have to write client-side scripts to do this. With RequiredFieldValidator1 selected in the Properties window, use the drop-down list to set the ControlToValidate property to txtInString and supply some text for the ErrorMessage property (Figure 2.8).
Figure 2.8: The RequiredFieldValidator control makes it a snap to make sure that the user has entered something in the TextBox.
Your web form should now look pretty much like the one shown in Figure 2.9.

Figure 2.9: The finished web form
Adding a Proxy to the Web Method
A proxy is a program that does something on behalf of another program. In order for our ASP.NET web application to consume the ReverseString web method, we need to create a proxy program that handles the job of communicating with the web service containing the web method (Figure 2.10).
Figure 2.10: The Visual Studio program invokes a proxy, which communicates with the web service.
There are several ways of auto-generating this proxy, including using the Web Services Description Language (WSDL) command-line utility and adding a web reference to a project (you could also write one from scratch-not necessarily a huge job once you've looked at a few of them).
Whichever one of the auto-generation techniques you choose, a code module will be created by parsing the WSDL file that describes the interface provided by the web service. The code module provides classes that enable both synchronous and asynchronous calls to the methods exposed by the web service. Calling the web method synchronously is more straightforward, so that's what we'll do with the string-reversal web method. (Later in this chapter, I'll show you how to call the IsPrime web method both synchronously and asynchronously. Additionally, in Chapter 3, I'll show you the general design pattern favored by Visual Studio
.NET for asynchronous invocations.)
You should know about wsdl.exe (you'll certainly see it described, rather confusingly, in books about web services). But both techniques accomplish the same thing, and adding web references is somewhat easier, so that's what we'll be using in the remainder of this book when it's necessary to auto-generate a web service proxy.
Using the WSDL Utility

To invoke the WSDL utility, wsdl.exe, first open the Visual Studio .NET Command Prompt window. (You'll find it on your Windows Start menu under Microsoft Visual Studio .NET →?Visual Studio .NET Tools.)
To see all the command-line switches available with the utility, at the prompt type wsdl /? and press Enter.
To create a proxy, enter wsdl, followed by the language choice (CS for C# and VB for Visual Basic), and then the URL of the web service with ?WSDL appended. For example:
wsdl /language:CS http://localhost/Sybexc2/SybexC2.asmx?WSDL
Note If you don't specify a file name and location, the file name is created based on the web service at the current location.
If the proxy has been successfully created, a banner is returned by the WSDL utility containing the name of the file.
One step remains if you want to use this auto-generated proxy code module with a Visual Studio project: you must add it to the project. Select Project →?Add Existing Item, choose the proxy file from the file system, and click Open. The code module will now appear in Solution Explorer. Since the contents of the proxy module are the same whether it is created this way or by adding a web reference to a project, we'll wait until a little later to have a look at its contents.
Adding a Web Reference
The other way of adding a proxy to a project is to select Add Web Reference from the Project menu. The Add Web Reference dialog will open (note that the Add Reference button is disabled). In the Address box at the top of the dialog, you can enter the URL for a remote web service-or, in our case, the local web service created in Chapter 1,
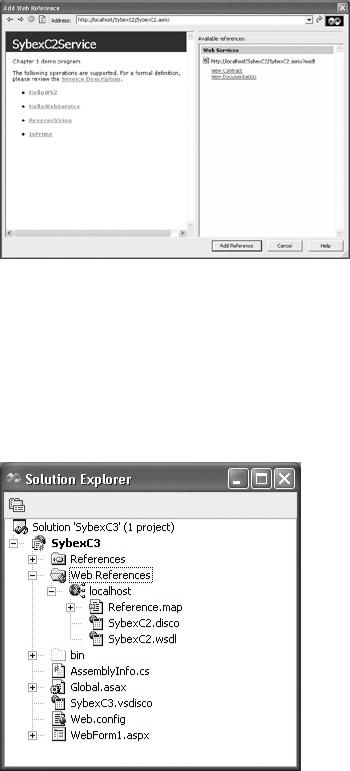
http://localhost/SybexC2/SybexC2.asmx
With the URL entered, the Visual Studio-generated documentation for the service appears in the dialog, and the Add Reference button is enabled (Figure 2.11).
Figure 2.11: To add a web reference, enter the URL for the web service in the Address box at the top of the Add Web Reference dialog.
Click the Add Reference button to add the auto-generated proxy code module to the current project. If you look in Solution Explorer, you'll see that a new Web References section has been added to the project. (There was no need to specify a language to use-Visual Studio used the language of the current project by default.)
You'll have to expand the Web References section to really see what's going on. The web reference that was just added has been named localhost by default.
It's easy to change the name of the web reference to something that might be more to one's taste (or more specific) than localhost. Go ahead and change its name to the ever-popular
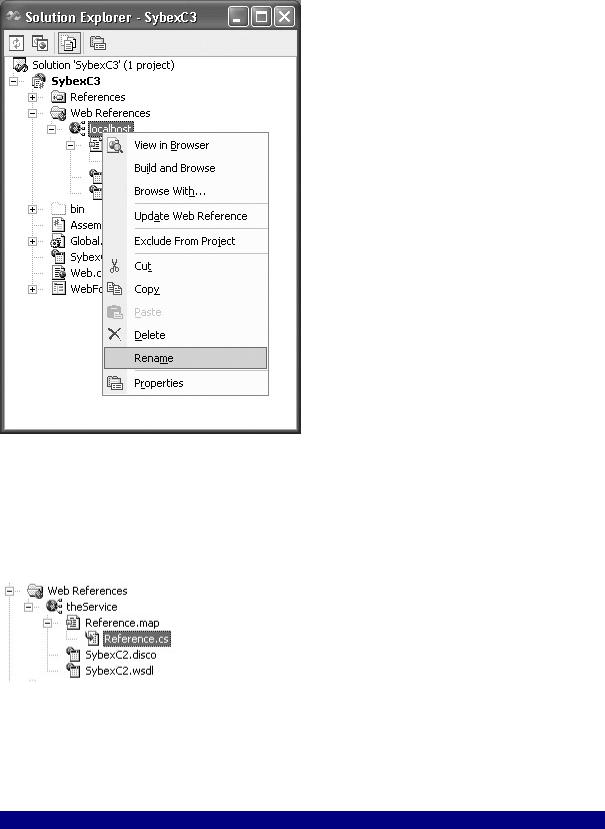
sobriquet theService by right-clicking the localhost reference and selecting Rename from the context menu.
Note It's important to know about the Update Web Reference choice, which is also available on the context menu for the reference. Use this when the web service has changed and you want to update the proxy.
The proxy code module itself is kind of buried, but if you expand a level below the reference now named theService you'll see a module named Reference.map. One node below Reference.Map is Reference.cs, the proxy code module file.
Listing 2.2 shows the portions of this proxy code module that are relevant to the ReverseString web method. Primarily, note that in addition to the ReverseString method, which we'll be using in this example, there are BeginReverseString and EndReverseString methods designed for asynchronous calls.
Listing 2.2: Selected Portions of the Auto-Generated Proxy Code Module
//---------------------------------------------------------------------
//<autogenerated>
//This code was generated by a tool.
//Runtime Version: 1.0.3705.0
//Changes to this file may cause incorrect behavior and will be
//lost if the code is regenerated.
//</autogenerated>
//---------------------------------------------------------------------
//
//This source code was auto-generated by Microsoft.VSDesigner,
//Version 1.0.3705.0.
namespace SybexC3.theService { using System.Diagnostics; using System.Xml.Serialization; using System;
using System.Web.Services.Protocols; using System.ComponentModel;
using System.Web.Services;
/// <remarks/> [System.Diagnostics.DebuggerStepThroughAttribute()] [System.ComponentModel.DesignerCategoryAttribute("code")]
[System.Web.Services.WebServiceBindingAttribute(Name="SybexC2ServiceSoap",
Namespace="http://www.bearhome.com/webservices")]
public class SybexC2Service : System.Web.Services.Protocols.SoapHttpClientProtocol {
/// <remarks/>
public SybexC2Service() {
this.Url = "http://localhost/SybexC2/SybexC2.asmx";
}
/// <remarks/> [System.Web.Services.Protocols.SoapDocumentMethodAttribute
("http://www.bearhome.com/webservices/HelloWebService",
RequestNamespace="http://www.bearhome.com/webservices",
ResponseNamespace="http://www.bearhome.com/webservices",
Use=System.Web.Services.Description.SoapBindingUse.Literal, ParameterStyle =
System.Web.Services.Protocols.SoapParameterStyle.Wrapped)]
...
[System.Web.Services.Protocols.SoapDocumentMethodAttribute
("http://www.bearhome.com/webservices/ReverseString",
RequestNamespace="http://www.bearhome.com/webservices",
ResponseNamespace="http://www.bearhome.com/webservices",
Use=System.Web.Services.Description.SoapBindingUse.Literal, ParameterStyle =
System.Web.Services.Protocols.SoapParameterStyle.Wrapped)] public string ReverseString(string inString) {
object[] results = this.Invoke("ReverseString", new object[] { inString});
return ((string)(results[0]));
}
/// <remarks/>
public System.IAsyncResult BeginReverseString(string inString, System.AsyncCallback callback, object asyncState) {
return this.BeginInvoke("ReverseString", new object[]

{inString}, callback, asyncState);
}
/// <remarks/>
public string EndReverseString(System.IAsyncResult asyncResult) { object[] results = this.EndInvoke(asyncResult);
return ((string)(results[0]));
}
}
}
The Code Behind
t always comes down to the code behind-at least in this book, since this is a book about programming. In other words, let's get on with it and wire up that form already! To do so, we need to open the code-behind module in the Code Editor and create the method that handles the click event for the Button control-because the code in the application will respond to the user's click to process the string that is to be reversed.
The easiest way to do this is to double-click the Button in the Web Form Designer. Not only does this open the code-behind module in the Code Editor, it also creates the scaffolding for the method that handles the Button's click event. (Of course, if you prefer, you can open the code-behind module in the Code Editor in other ways, and manually create the event handler.)
Note If the web form is named WebForm1.aspx, the default name for the code-behind module is WebForm1.aspx.cs. You can change the related code-behind module by changing the value of the Codebehind attribute in the <%@ Page ... %> directive on the HTML tab of the Web Form Designer.
When you double-click the Button control, the following method is created, and you are taken to it in the Code Editor:
private void btnRev_Click(object sender, System.EventArgs e) {
}
By the way, you'll also find a line of code added to the hidden region of the module that registers the event handler:
private void InitializeComponent()
{
this.btnRev.Click += new System.EventHandler(this.btnRev_Click); this.Load += new System.EventHandler(this.Page_Load);
}
Note The += operator allows new event handlers to be added to the Button's click event without destroying methods that have already subscribed to an event.
Within the event handler, create an instance of the web service stored in the variable theService by referring to the class contained in the proxy code module:
private void btnRev_Click(object sender, System.EventArgs e) { theService.SybexC2Service theService = new theService.SybexC2Service();
}
Next, return the reversed value of the string entered by the user in a new string variable, result:
string result = theService.ReverseString(txtInString.Text);
Just to make things a little more interesting, in case some user wants to make fun of this application, we're going to check to see whether a palindrome-an expression that is the same backward and forward-has been entered. Here's the function that checks whether the input is a palindrome:
public bool Palindrome(string String1, string String2) { if (!(String1.ToUpper() == String2.ToUpper())) {
return false;
}
if (String1.Length == 1) { return false;
}
return true;
}
As you can see, this Palindrome function is pretty basic stuff-it compares the two strings input, both converted to uppercase to side-step differences between uppercase and lowercase letters, and returns false if they are not equal. It also returns false if the first string is only one character long. It's possible that a true palindrome check might want to get more elaboratefor example, stripping out punctuation and white space from consideration. You'll find more information on relevant techniques in Chapter 9, "Everything Is String Manipulation!"
If you check Listing 2.3, you'll note that the Palindrome function is placed within the same class (WebForm1) as the click event handler.
Back in the click handler, the Palindrome function is called with the return value from the web service and the input text as the arguments. If it is a palindrome, an admonition is displayed, and if it's not a palindrome, the reversed text is displayed using lblResult's Text property:
if (Palindrome(result,txtInString.Text)) {
lblResult.Text = "Don't even think of giving me a palindrome!";
}
else {
lblResult.Text = result;
}
That's it! It's time to build and run the project by selecting Debug →?Start or by building it?(Build?→?Solution) and opening it by URL in your browser?(http://localhost/ SybexC3 /WebForm1.aspx).
With the web application running, you can enter a string, as shown in Figure 2.12, and verify that it gets reversed.