

ASP.NET 2.0 Everyday Apps For Dummies (2006)
.pdfChapter 6: Building a Shopping Cart Application 147
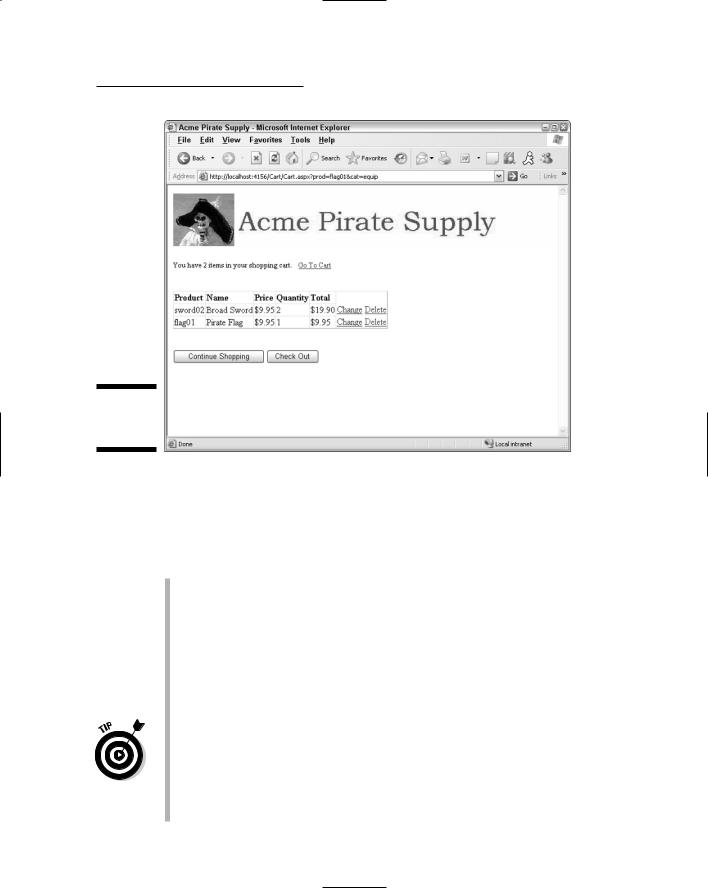
Figure 6-2:
The Product
List page.
Figure 6-3:
The Product
Detail page.
148 Part III: Building E-Commerce Applications
Following are some of the salient points to notice about this page:
The shopping cart shown here contains two items. Notice that the message in the Master Page indicates the number of items in the cart.
When the user clicks the Add to Cart button in the Product Detail page, the item is added to the cart and the quantity field is set to 1. If the user has previously added the same item to the cart, the quantity for that item is increased by one. (In other words, if the user were to click the Continue Shopping button to return to the Product Detail page for the Pirate Flag, then click the Add to Cart button again, the quantity field for the Pirate Flag line in the shopping cart would be changed to 2.)
The user can click the Delete link to remove an item from the cart.
The user can click the Change link to change the quantity for an item in the cart. Then the Quantity field for that item changes from a label to a text box, and the Change and Delete links are replaced by Update and Cancel links. The user can then change the quantity and click Update, or click Cancel to keep the existing quantity unchanged.
If the shopping cart is empty, the following message is displayed in place of the cart:
Your shopping cart is empty.
In addition, the Check Out button is disabled.
The user can click the Continue Shopping button to return to the product pages. If the user came to the Cart page by clicking Add to Cart from the page for a specific product, the user is returned to that page. Otherwise, the user is returned to the Product List page.
When the user is ready to purchase the items in the cart, he or she can click the Check Out button. This redirects the user to the Check Out page, which is described in the next section.
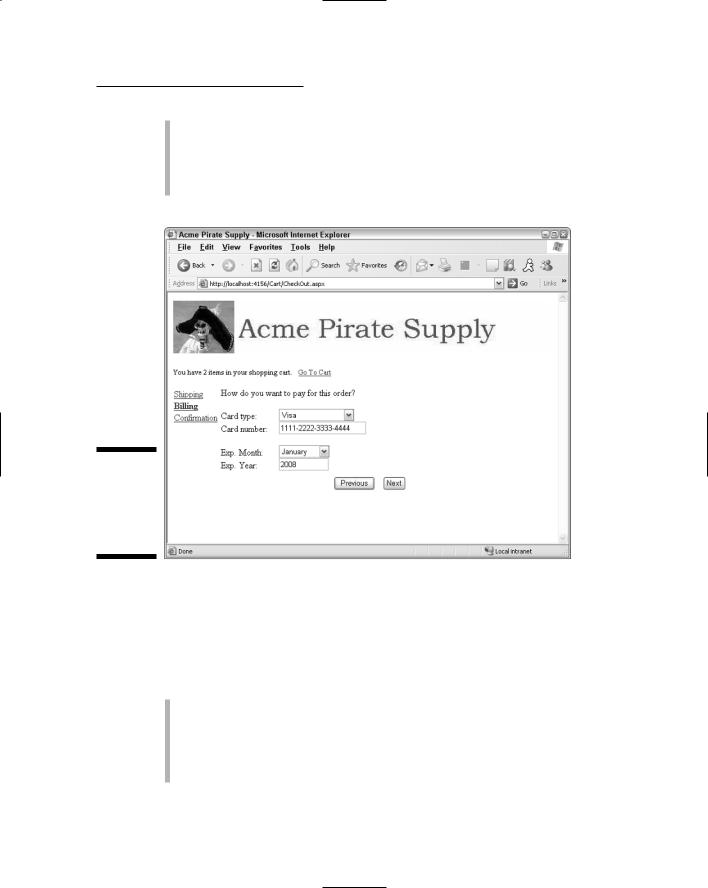
The Check Out page
The Check Out page uses the new ASP.NET 2.0 Wizard control to walk the user through the process of completing an order. The Wizard control does this by displaying separate steps that the user can navigate through using Next and Previous buttons that appear at the bottom of the wizard. The user can also go directly to one of the steps by using navigation links to the left of the wizard.
The three steps for the Check Out process are: Shipping, Billing, and Confirmation. The pages displayed for each of these steps are described in the following sections.
Chapter 6: Building a Shopping Cart Application 149
Figure 6-4:
The Cart
page.
The Shipping step
Figure 6-5 shows the page displayed for the first step of the check-out wizard, which gathers the customer’s contact information.
The following paragraphs describe the operation of this page:
The links at the left side of the page let the user go directly to any of the three steps of the Wizard.
The text boxes let the user enter his or her name, address, zip code, phone number, and email address.
The drop-down list is filled with the names of all 50 states in the United States. If you want to accept orders from outside of the U.S., you’ll need to modify this step, perhaps by adding a drop-down list or text box for the country.
All of the text boxes have validators that require the user to enter data. However, any data is accepted. You may want to modify this step to provide more comprehensive validation. For example, you may want to use a Regular Expression validator to validate the phone number and e-mail address. (I’ll leave it to you to figure out how to do that.)
When the user clicks the Next button, the Payment step of the wizard is displayed, as described in the next section.

150 Part III: Building E-Commerce Applications
Figure 6-5:
The Shipping
Step of the
Check Out
page.
The Payment step
Figure 6-6 shows the Payment step of the check-out wizard, which lets the user enter credit card information to pay for the order.
Here are the important details:
Again, the links at the left side of the page let the user go directly to any of the three wizard steps.
The first drop-down list lets the user select which type of credit card to use. The options are Visa, MasterCard, and American Express. You can easily modify the application to accept other types of cards.
The first text box accepts the credit card number. A required-field validator forces the user to enter a value, but other than requiring an entry, no further validation is done. The validation requirements for credit card numbers are different for each type of card, and the validation checks can get pretty complicated. I’ll leave it to you to add validation checking for this field once you determine what credit cards you want to accept.
The second drop-down list lets the user indicate the credit card’s expiration month. This drop-down list is filled with the names of the months of the year.
Chapter 6: Building a Shopping Cart Application 151
The second text box lets the user enter the expiration year for the credit card. Validators are used to ensure the user enters an integer that’s between 2005 and 2099.
The user can click the Next button to go to the Confirmation step or the Previous button to return to the Shipping step.
Figure 6-6:
The Payment step of the Check Out page.
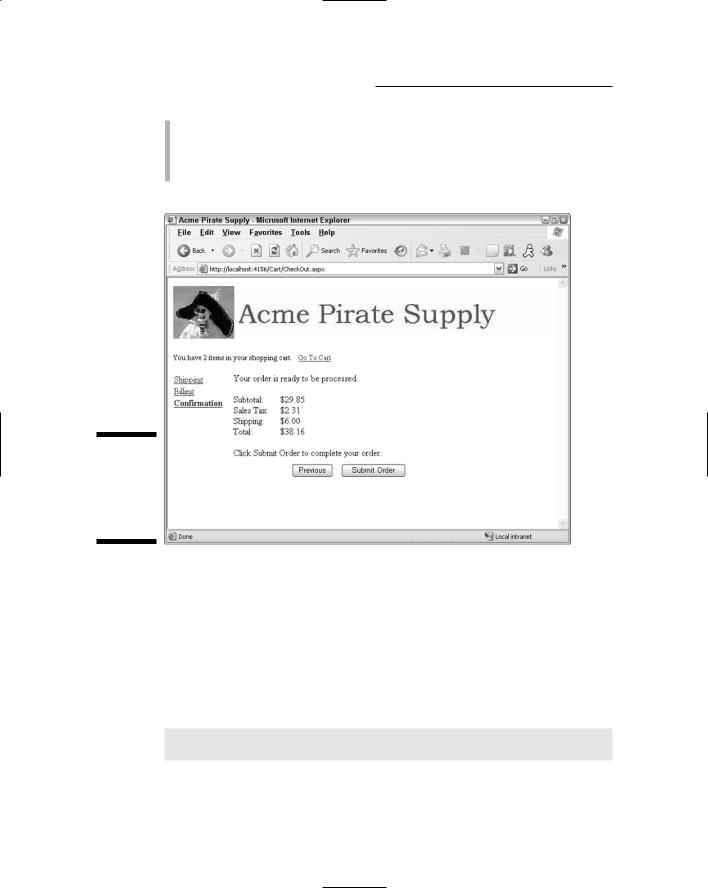
The Confirmation step
Figure 6-7 shows the Confirmation step of the check-out wizard, which displays the final total for the order (including sales tax and shipping) and allows the user to submit the order for processing.
Here are the details of how this page works:
As with the other two steps, the links to the left of the wizard let the user go directly to either of the other two steps.
The labels display the subtotal calculated by adding up prices of the items ordered, the sales tax, the shipping charges, and the order total.
Sales tax is calculated at 7.75 percent for California orders only.
152 Part III: Building E-Commerce Applications
Shipping charges are $2.00 per item.
The user can click the Submit Order button to submit the order or the Previous button to return to the Payment step. If the user submits the order, the Completed page is displayed, as described in the next section.
Figure 6-7:
The
Confirmation
step of the
Check Out
page.
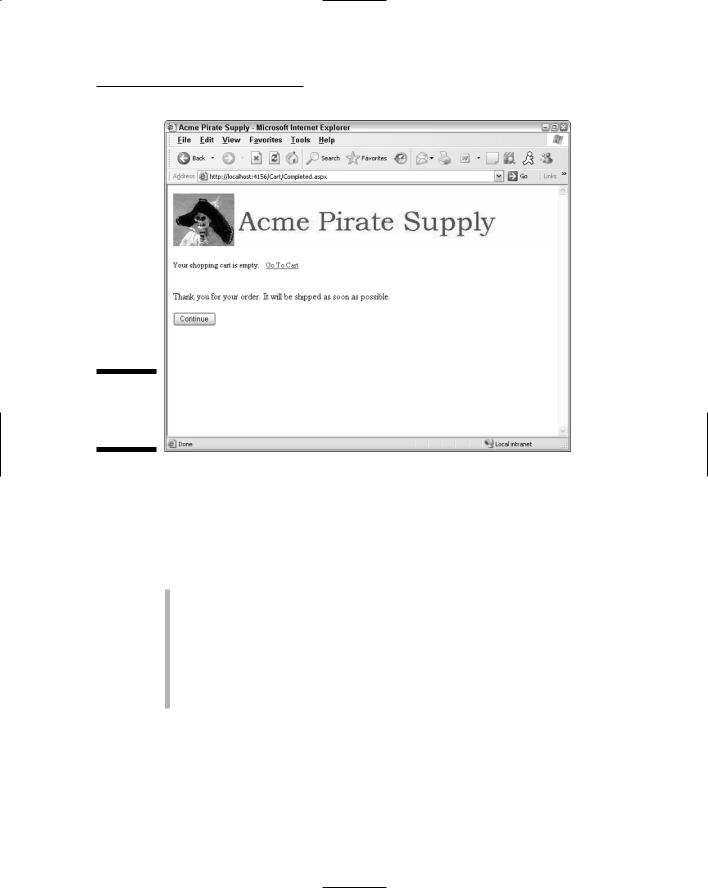
The Completed page
Figure 6-8 shows the Completed page, which is displayed when the user submits the order. As you can see, this page simply displays a message indicating that the order has been processed. The user can then click the Continue button to return to the Default.aspx page.
Note that if an error occurs while processing the order, the following message is displayed instead of the one shown in Figure 6-8:
There was a problem with your order. Please try again
later.
Chapter 6: Building a Shopping Cart Application 153
Figure 6-8:
The
Completion
page.
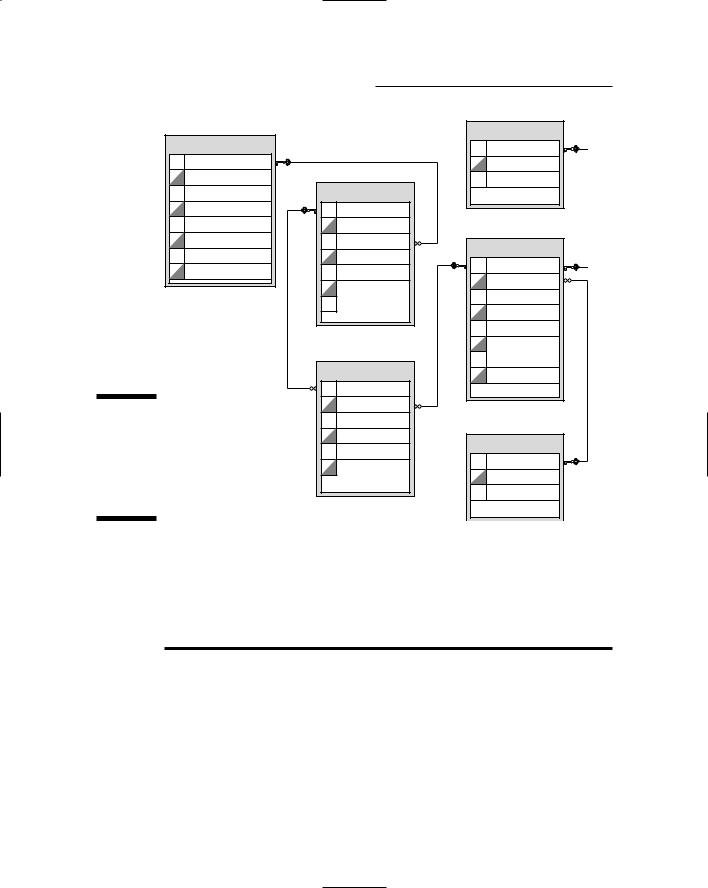
Designing the Cart Database
The Shopping Cart application uses a SQL Server database to store information about the products, customers, and orders. Figure 6-9 shows an EntityRelationship Diagram of the database. As you can see, it consists of six tables:
Categories
Products
FeaturedProducts
Customers
Orders
OrderItems
The first three of these tables are the same as in the Products database used for the application that was presented in Chapter 5. So I refer you to that chapter for more information about those tables. The following sections describe the three new tables.
154 Part III: Building E-Commerce Applications
Customers
 email
email  lastname
 firstname
  address
 city
city  state
state
 zipcode
  phone
phone
Figure 6-9:
A diagram of the Shopping Cart application’s database.
Order
 ordernum
  orderdate
 custemail
  subtotal
 salestax
  shipping
 total
total
OrderItems
 ordernum
  productid
 name
name  price
price
 quantity
  total
total
The Customers table
FeaturedProducts
 productid
  featuretext
 saleprice
Products
 productid
  catid
catid
 name
name  shorttext
 longtext
  price
price
 thumbnail
  image
image
Categories
 catid
catid  name
name
 [desc]
The Customers table contains one row for each customer who has purchased a product. Table 6-1 lists the columns defined for this table.
Table 6-1 |
|
The Customers Table |
Column name |
Type |
Description |
VARCHAR(50) |
The customer’s e-mail address. This column also |
|
|
|
serves as the table’s primary key. |
|
|
|
lastname |
VARCHAR(50) |
The customer’s last name. |
|
|
|
firstname |
VARCHAR(50) |
The customer’s first name. |
|
|
|
Chapter 6: Building a Shopping Cart Application 155
Column name |
Type |
Description |
address |
VARCHAR(50) |
The customer’s street address. |
|
|
|
city |
VARCHAR(50) |
The customer’s city. |
|
|
|
state |
VARCHAR(2) |
The customer’s two-character state code. |
|
|
|
zipcode |
VARCHAR(9) |
The customer’s Zip code, up to nine characters. |
|
|
|
phone |
VARCHAR(20) |
The customer’s phone number. |
|
|
|
The Orders table
The Orders table contains one row for each order that has been submitted. Table 6-2 lists the columns used by the Orders table.
Table 6-2 |
|
The Orders Table |
Column name |
Type |
Description |
ordernum |
INT |
An identity column that uniquely identifies |
|
|
each order. This column is the primary key |
|
|
for the table. |
orderdate |
SMALLDATETIME |
The date the order was placed. |
|
|
|
custemail |
VARCHAR(50) |
The customer’s e-mail address. This serves |
|
|
as a foreign key that relates the order to a |
|
|
particular row in the Customers table. |
|
|
|
subtotal |
MONEY |
The sum of the totals for each item associ- |
|
|
ated with the order. |
salestax |
MONEY |
The sales tax for the order. |
|
|
|
shipping |
MONEY |
The shipping charges for the order. |
|
|
|
total |
n/a |
The order total. This field is calculated by |
|
|
adding the subtotal, salestax, and shipping |
|
|
fields. |
|
|
|
Note that the total column doesn’t actually store the order total. Instead, it’s a calculated field that adds the subtotal, sales tax, and shipping charges to determine the total for the order.
156 Part III: Building E-Commerce Applications
The OrderItems table
The OrderItems table contains one row for each line item associated with an order. Table 6-3 lists the columns used by the OrderItems table.
Table 6-3 |
|
The OrderItems Table |
Column name |
Type |
Description |
ordernum |
INT |
The order number for the order this item is asso- |
|
|
ciated with. |
|
|
|
productid |
VARCHAR(10) |
The ID for the product represented by this item. |
|
|
Note that this column and the ordernum column |
|
|
comprise the primary key for this table. |
|
|
|
name |
VARCHAR(50) |
The product’s name. |
|
|
|
price |
MONEY |
The product’s price. |
|
|
|
quantity |
SMALLINT |
The quantity ordered. |
|
|
|
total |
n/a |
The total for the item, calculated by multiplying |
|
|
the price by the quantity. |
|
|
|
Note that this table uses a primary key composed of the ordernum and productid columns. As a result, although there can be duplicate order numbers and product IDs in the table, each combination of order number and product ID must be unique. That makes sense when you think about it: Each order can have more than one order item, and each product can appear on many different orders, but a particular order can have only one line item for each product.
Note also that the name column is included in the OrderItems table as a convenience so the application doesn’t have to retrieve it from the Products table. You could omit the name from the OrderItems table, but that would complicate the database access required to display the line items for an order. This is an example of denormalization (as described in Chapter 1).
You might suspect that the price could also be omitted, but the price is a bit different than the name. Product prices are likely to change. Suppose a customer places an order for a product that’s priced at $9.95 at the time the order is submitted, but within moments of when the user submits the order, the price is increased to $11.95. If you then charge the customer $11.95 for the product, the customer will be justifiably upset. To prevent that from happening, the price at the time of the order should be stored in the OrderItems table when the order is submitted.