

ASP.NET 2.0 Everyday Apps For Dummies (2006)
.pdfChapter 5: Building a Product Catalog Application 137
ShowHeader=”False” > |
|
<ItemStyle Font-Size=”Small” /> |
|
</asp:BoundField> |
|
<asp:BoundField DataField=”price” |
7 |
DataFormatString=”<br />{0:c}” |
|
ShowHeader=”False” > |
|
<ItemStyle Font-Size=”Large” /> |
|
</asp:BoundField> |
|
<asp:BoundField DataField=”SalePrice” |
8 |
DataFormatString=”<br />Sale Price {0:c}!” |
|
ShowHeader=”False” > |
|
<ItemStyle Font-Size=”Large” /> |
|
</asp:BoundField> |
|
<asp:BoundField DataField=”productid” |
9 |
DataFormatString= |
|
“<br />Product code: {0}” |
|
ReadOnly=”True” |
|
ShowHeader=”False” /> |
|
</Fields> |
|
</asp:DetailsView> |
|
<asp:SqlDataSource ID=”SqlDataSource1” |
10 |
runat=”server” |
|
ConnectionString= |
|
“<%$ ConnectionStrings:ConnectionString %>” |
|
SelectCommand=”SELECT Products.productid, |
|
Products.catid, |
|
Products.name, |
|
Products.shorttext, |
|
Products.longtext, |
|
Products.price, |
|
Products.image, |
|
FeaturedProducts.saleprice, |
|
FeaturedProducts.featuretext |
|
FROM Products |
|
LEFT OUTER JOIN FeaturedProducts |
|
ON Products.productid = |
|
FeaturedProducts.productid |
|
WHERE (Products.productid = @productid)”> |
|
<SelectParameters> |
11 |
<asp:QueryStringParameter |
|
Name=”productid” |
|
QueryStringField=”prod” |
|
Type=”String” /> |
|
</SelectParameters> |
|
</asp:SqlDataSource> |
|
<br /> |
|
<asp:Button ID=”btnAdd” runat=”server” |
12 |
OnClick=”btnAdd_Click” |
|
Text=”Add to Cart” /> |
|
<asp:Button ID=”btnBack” runat=”server” |
13 |
OnClick=”btnBack_Click” |
|
Text=”Back to List” /> |
|
</asp:Content> |
|

138 Part III: Building E-Commerce Applications
The DetailsView Control
The DetailsView control is a new data control introduced with ASP.NET 2.0. It’s designed to display one row from a data source at a time. The DetailsView control is rendered as an HTML table, with one table row for each field in the data source.
Here are the attributes you’ll use most often on the DetailsView control:
ID: Provides a name used to identify the
DetailsView control.
Runat: As with all ASP.NET controls, you must specify runat=server.
DataSourceID: The ID of the data source.
DataKeyNames: The names of the key fields. If the data source has more than one key field, the names should be separated by commas.
AutoGenerateRows: You’ll usually specify False for this attribute to prevent the DetailsView control from automatically generating a row for each field in the data source. Then you can use a <Fields> child element to manually define the fields displayed by the DetailsView control.
AllowPaging: Specify True to enable paging for the DetailsView control.
Next, to define the fields displayed by a
DetailsView control, you add a <Fields> child element. Add one following child element for each field you want to create:
BoundField: Creates a field that’s bound to a field in the data source.
ButtonField: Creates a field that contains a button.
CheckBoxField: Creates a field with a check box that’s bound to a Boolean value.
CommandField: Creates a field with one or more command buttons (command buttons include Select, Edit, and Delete).
HyperLinkField: Creates a field that displays a field from the data source as a hyperlink.
ImageField: Creates a field that displays an image. The URL for the image is obtained from a field in the data source.
TemplateField: Creates a field that uses a template to specify the field’s contents.
The following paragraphs describe the key points of this listing:
1 The Page directive specifies that the page will use MasterPage. master as its Master Page.
2 The DetailsView control displays the details for a single row in its data source, identified by the DataSourceID field as
SqlDataSource1. The AutoGenerateRows attribute is set to
False so the control won’t automatically generate a row for each field in the data source. Instead, this DetailsView control uses a <Fields> element to define the data to be displayed.
Chapter 5: Building a Product Catalog Application 139
3 The first field displayed by the DetailsView control displays the name field from the data source.
4 The second field displays the full-size image, identified by the image field. Note that the DataImageUrlFormatString attribute adds ~\Images\ to the URL. Thus, if the image field specifies that the image file is named sword01.jpg, the complete URL for the image will be ~\Images\sword01.jpg.
5 This field displays the shorttext field. The <ItemStyle> element specifies that the font size should be medium.
6 This field displays the longtext field. The DataFormatString attribute adds a line break (<br />) before the text. The
<ItemStyle> element specifies that the font size should be small.
7 This field displays the price field. The DataFormatString attribute formats the price as currency, and the <ItemStyle> element specifies that the font size should be Large.
8 The sales price is displayed with a format string that display the words Sale Price and formats the sales price as currency.
9 The last field in the DetailsView control displays the product ID. A format string adds the text Product code: before the product ID.
10 This SqlDataSource control defines the data source used by the DetailsView control. The connection string is retrieved from the web.config file, and the SELECT statement retrieves the product data for the product selected by the user. A join is used because data must be retrieved from both the Products and the FeaturedProducts tables, and the WHERE clause uses a parameter named productid.
11 The <SelectParameters> element defines the parameter used by the SELECT statement in the data source. The parameter is defined by the <QueryStringParameter> element, which retrieves the parameter value from a query string. In this case, the parameter is named productid and the value is retrieved from a query string named prod.
12 The Add button lets the user add the current product to the shopping cart.
13 The Back button lets the user return to the Product List page to continue shopping.

140 Part III: Building E-Commerce Applications
The code-behind file for the Product.aspx page (C# version)
Listing 5-7 shows the C# version of the code-behind file for the Product.aspx page. If you’re working in Visual Basic, you may want to skip this section and go instead to the VB version of the code-behind file (presented in the next section).
Listing 5-7: The code-behind file for the Product.aspx page (C#)
using System; using System.Data;
using System.Configuration; using System.Collections; using System.Web;
using System.Web.Security; using System.Web.UI;
using System.Web.UI.WebControls;
using System.Web.UI.WebControls.WebParts; using System.Web.UI.HtmlControls;
public partial class Product : System.Web.UI.Page |
|
{ |
|
protected void btnAdd_Click(object sender, |
1 |
EventArgs e) |
|
{ |
|
string ProductID = Request.QueryString[“prod”]; string CatID = Request.QueryString[“cat”]; Response.Redirect(“Cart.aspx?prod=”
+ ProductID + “&cat=” + CatID);
}
protected void btnBack_Click(object sender, 2 EventArgs e)
{
string CatID = Request.QueryString[“cat”]; Response.Redirect(“Default.aspx?cat=” + CatID);
}
}
The following paragraphs describe the two methods in this code-behind file:
1
2
btnAdd_Click: This method is called when the user clicks the Add to Cart button. It simply redirects to the Cart.aspx page, passing the product and category information via query-string fields.
btnBack_Click: This method is called when the user clicks the Back to List button. It redirects to the Default.aspx page. The category ID is passed via a query string.
Chapter 5: Building a Product Catalog Application 141
The code-behind file for the Product.aspx page (Visual Basic version)
The Visual Basic version of the Product.aspx code-behind file is shown in Listing 5-8. To use this code-behind file, you must change the Language
specification in the Page directive of the Product.aspx file from C# to VB.
If you’re working in C#, you should use the C# version of the code-behind file (presented in the previous section) instead of the version in Listing 5-8.
Listing 5-8: The code-behind file for the Default.aspx page (VB)
Partial Class |
Product |
|
Inherits System.Web.UI.Page |
|
|
Protected Sub btnAdd_Click( _ |
1 |
|
ByVal sender As Object, _ |
|
|
ByVal e As System.EventArgs) _ |
|
|
Handles btnAdd.Click |
|
|
Dim ProductID As String |
|
|
Dim CatID As String |
|
|
ProductID = Request.QueryString(“prod”) |
|
|
CatID = Request.QueryString(“cat”) |
|
|
Response.Redirect(“Cart.aspx?prod=” _ |
|
|
+ ProductID + “&cat=” + CatID) |
|
|
End Sub |
|
|
Protected Sub btnBack_Click( _ |
2 |
|
ByVal sender As Object, _ |
|
|
ByVal e As System.EventArgs) _ |
|
|
Handles btnBack.Click |
|
|
Dim CatID As String
CatID = Request.QueryString(“cat”)
Response.Redirect(“Default.aspx?cat=” + CatID)
End Sub
End Class
The following paragraphs describe the two methods in this code-behind file:
1 btnAdd_Click: This method is called when the user clicks the Add to Cart button. It simply redirects to the Cart.aspx page, passing the product and category information via query-string fields.
2 btnBack_Click: This method is called when the user clicks the Back to List button. It redirects to the Default.aspx page. The category ID is passed via a query string.
142 Part III: Building E-Commerce Applications
Building the Cart Page
This application doesn’t support a shopping cart. However, to make this application compatible with the Shopping Cart application presented in the next chapter, the Product.aspx page includes an Add to Cart button that redirects to a page named Cart.aspx. Listing 5-9 shows a dummy version of the Cart page that simply displays a message indicating that the shopping cart function isn’t implemented. For a working version of this page, refer to Chapter 6.
Listing 5-9: The Cart page (Cart.aspx)
<%@ Page Language=”C#” MasterPageFile=”~/MasterPage.master” AutoEventWireup=”true” CodeFile=”Cart.aspx.cs” Inherits=”Cart”
Title=”Acme Pirate Supply” %> <asp:Content ID=”Content1” Runat=”Server”
ContentPlaceHolderID=”ContentPlaceHolder1” > <br />
Sorry, that function hasn’t been implemented yet. </asp:Content>
Chapter 6
Building a Shopping
Cart Application
In This Chapter
Designing the Shopping Cart application
Creating the database for the Shopping Cart application
Looking at the new Generics feature and the Wizard control
Building the Shopping Cart application’s Web pages and classes
This chapter presents a simple online Shopping Cart application that lets your customer purchase products directly from your Web site by adding products to a list for purchase. It’s integrated with the Product Catalog appli-
cation shown in Chapter 5. When the user is ready to purchase the items, a Check Out page gathers the user’s shipping and payment information so the order can be processed.
Of all the applications in this book, this one is the most code-intensive. That’s because it doesn’t use ASP.NET data binding or data sources for the Shopping Cart and Check Out pages. Instead, they use code to directly manage the data displayed for the shopping cart and to write the order data to the database.
It’s common for large applications to use separate classes to handle database access so that the database access code can be separated from the presentation and business logic code. As with the other applications in this book, you’ll find both C# and Visual Basic versions of this code in this chapter.
Because the application is an extension of the Product Catalog application shown in Chapter 5, you may want to refer to that chapter to remind yourself how the Product List and Product Detail pages work.
144 Part III: Building E-Commerce Applications
Considering Some Basic Decisions
Before we get into the specifics of the Shopping Cart application’s design, consider some basic decisions that will affect both the application and its design:
Will customers be required to log in? One of the first decisions you’ll need to make is whether you want to require users to log in before they can purchase items. Requiring users to log in has several advantages. For example, you can store the customer information in a database and retrieve it when the user logs in, eliminating the need for the user to reenter his or her name and address. On the other hand, some users avoid sites where they have to register precisely for that reason: They don’t like the idea that you’re keeping their information on file.
ASP.NET makes it easy to require customers to log in to a Web site before they can access certain pages, and Chapter 4 presents a basic user registration and login application that uses those features. The Shopping Cart application in this chapter doesn’t require the user to log in, but you can easily incorporate the features from the User Authentication application (see Chapter 4) with this Shopping Cart application.
How will you handle international shipments? For simplicity, the application in this figure accepts orders only within the 50 states of the United States. You’ll have to modify it somewhat to accept orders from outside of the U.S.
How will you store the shopping cart data? There are two common options for how you will store the contents of the user’s shopping cart. One is to keep the shopping cart in a database table. Then the shopping cart data will continue to exist apart from the application. The other is to use one of ASP.NET’s temporary state features — most likely session state — to hold the shopping cart.
The advantage of putting the shopping cart in a database is that the user can leave the application and come back later and find the items still in his or her shopping cart. But there are several disadvantages. One is that you’ll have to devise a way to associate the data for a particular user’s shopping cart with that user. The easiest way to do that is to require the user to register and log in. Another disadvantage is that the Shopping Cart table can quickly become filled with abandoned data. You’ll need to clean up the table periodically, removing the data from old shopping carts that users have abandoned.
The main advantage of using a feature such as session state to store shopping cart data is the ease of programming. ASP.NET takes care of associating the data with the user and deleting the cart when the user ends the session.

Chapter 6: Building a Shopping Cart Application 145
An alternative to session state is the new ASP.NET 2.0 Profile feature. Profile is similar to session state but automatically saves data to a database when the session ends. Then, if the user visits the Web site again later, that user’s profile data is automatically retrieved.
The application shown in this chapter uses session state to store the shopping cart.
How will you handle credit cards? Most Web sites allow the user to pay for the purchase with a credit card. Then the application must be careful to provide adequate security to protect the customer’s credit card information. At the least, the application should use SSL (Secure Socket Layers) to secure the connection so the user’s credit card information is transmitted securely (although you must also take precautions to store it securely if you save it in your database).
The application in this chapter accepts the user’s credit card information, but doesn’t save it in the database. In addition, the credit card information isn’t properly validated and the credit card account isn’t charged for the purchase. The exact procedures for doing that vary depending on the credit card processing company you use. As a result, the application presented in this chapter doesn’t actually charge the customer’s credit card for the order. You’ll have to develop the code to do that yourself.
As an alternative to credit cards, you may want to let your customers pay for their orders using PayPal. See www.paypal.com for information about how to incorporate PayPal into your Web site.
How will you calculate shipping charges? The easiest way to charge customers for shipping is to charge a simple flat rate for each item sold. Alternatively, you can calculate the order’s exact shipping costs by using a combination of the order’s total weight and the destination Zip code. The application presented in this chapter simply charges $2.00 for each item ordered. You may want to develop a routine that calculates the shipping charges more accurately.
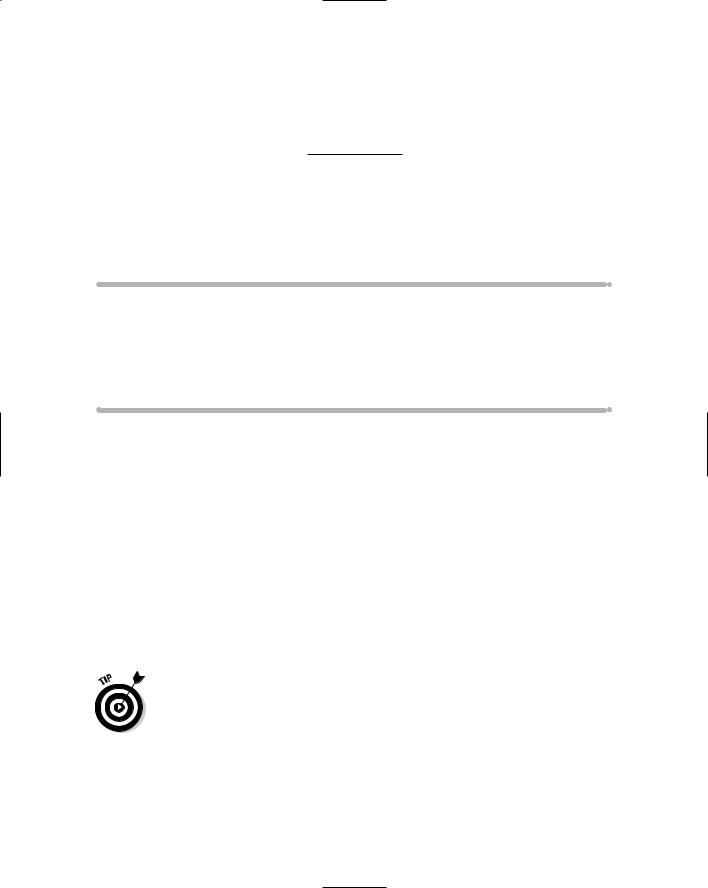
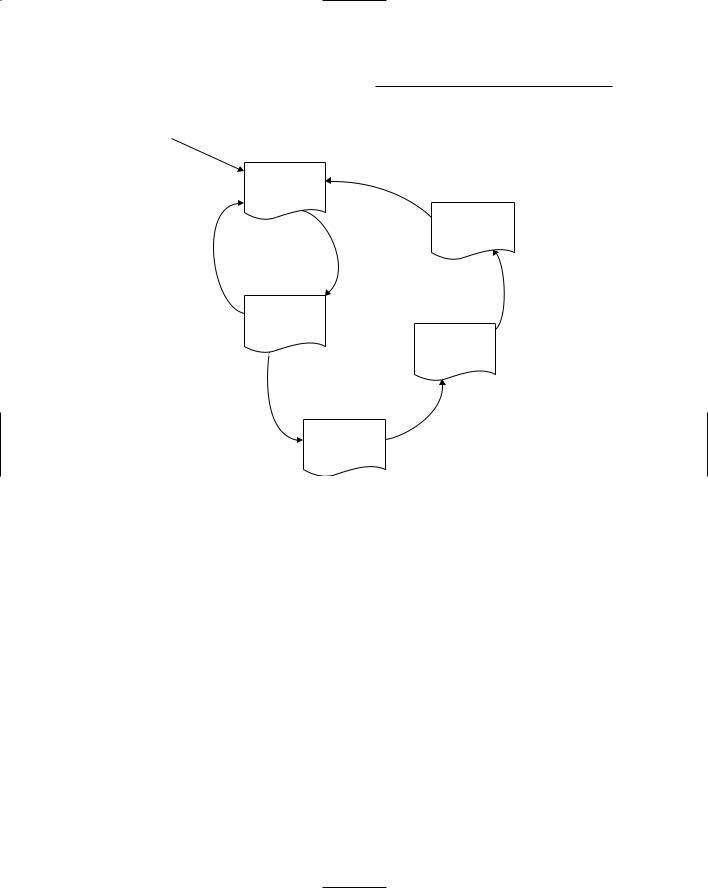
The User Interface
Figure 6-1 shows the user interface flow for the Shopping Cart application. This application’s user interface has just five pages. The first two, default. aspx and product.aspx, are almost identical to the pages of the Product Catalog application presented in Chapter 5. The cart.aspx page displays the user’s shopping cart, and the CheckOut.aspx page lets the user enter the information required to complete the order, including the shipping and credit card information. Finally, when the user submits the order, the completed. aspx page is displayed to confirm that the order has been submitted.
146 Part III: Building E-Commerce Applications
User requests page
|
Default.aspx |
|
|
|
|
Product |
Continue |
|
|
|
List page |
|
Completed.aspx |
|
|
|
|
|
|
|
|
|
Order |
|
|
|
|
Completed |
|
|
Continue |
View |
page |
|
|
|
|
||
|
shopping |
detail |
|
|
|
Product.aspx |
|
|
|
|
Product |
|
Checkout.aspx |
Submit |
|
Detail |
|
||
|
|
Check out |
order |
|
|
page |
|
||
|
|
|
||
|
|
|
page |
|
|
|
|
|
|
Figure 6-1: |
|
|
|
|
The user |
Add to |
|
|
|
interface |
|
|
|
|
cart |
Cart.aspx |
|
|
|
for the |
|
|
||
|
|
|
||
Shopping |
|
Cart page |
|
|
Cart |
|
|
Check out |
|
application. |
|
|
|
|
|
|
|
|
|
|
|
|
|
|
|
|
|
|
|
The Product List page
Figure 6-2 shows the Product List page (default.aspx). It’s almost identical to the default.aspx page from Chapter 5, with one subtle difference: there’s a line just beneath the banner that displays information about the user’s shopping cart as well as a link that goes to the cart page. This line is part of the Master Page, so it’s displayed on every page of the application.
The Product Detail page
Figure 6-3 shows the Product Detail page (product.aspx), which displays the details for the product selected by the user. The Add to Cart button at the bottom of the page adds the item to the user’s shopping cart, and then takes the user to the Shopping Cart page.
The Cart page
Figure 6-4 shows the Shopping Cart page, which displays the contents of the user’s shopping cart.