


Chapter 4: DHCP |
DHCP Configuration 36 |
|
|
|
|
Creating a Static Mapping
There are situations where it makes sense to map a specific IP address to a specific host rather than dynamically assign an IP address from a pool of addresses. This is known as a “static mapping”.
Static mappings are defined using the static-mapping option of the service dhcp-server configuration node. This example adds a static mapping to ETH0_POOL created in Example 4-2 . Example 4-3 does the following:
•Maps IP address 172.16.0.101 to the device with a MAC address of 00:15:c5:b3:2e:65.
Example 4 3 Creating a static mapping
Step |
Command |
|
|
Create a static mapping called |
vyatta@R1# set service dhcp server shared network name |
“lab” and specify the static IP |
ETH0_POOL subnet 172.16.0.0/24 static mapping lab ip address |
address within the ETH0_POOL |
172.16.0.101 |
pool. |
|
Specify the associated MAC address within the static mapping called “lab” in the ETH0_POOL pool.
vyatta@R1# set service dhcp server shared network name
ETH0_POOL subnet 172.16.0.0/24 static mapping lab mac address 00:15:c5:b3:2e:65
Commit the information. |
vyatta@R1# commit |
Show the configuration. vyatta@R1# show service dhcp server shared network name
ETH0_POOL
shared network name ETH0_POOL { subnet 172.16.0.0/24 {
default router 172.16.0.65 dns server 172.16.0.34 start 172.16.0.100 {
stop 172.16.0.199
}
static mapping lab { ip address 172.16.0.101
mac address 00:15:c5:b3:2e:65
}
}
}
Services |
R6.3 v01 |
Vyatta |

Chapter 4: DHCP |
DHCP Configuration 37 |
|
|
|
|
Setting up DHCP Servers for Failover
The Vyatta system also provides a failover feature to allow for DHCP redundancy on a given subnet.
In a failover configuration, two DHCP servers act as failover peers, with one of the peers designated as the primary and the other as the secondary. For DHCP failover to work:
•Both peers must be Vyatta systems, and must be running the same version of Vyatta software.
•Each server must be configured to point to the other as the failover peer.
•The time on the servers must be exactly synchronized.
•There must be at least one IP address in the start-stop range for each subnet that has not been either excluded (using service dhcp-server shared-network-name <name> subnet <ipv4net> exclude <ipv4>) or statically mapped (using service dhcp-server shared-network-name <name> subnet <ipv4net> static-mapping <mapname>).
The system times should be synchronized before configuring DHCP failover. Use of NTP time synchronization is highly recommended. However, if difficulties arise due to incorrect system times, disable NTP, reset the times correctly, and then re-enable NTP.
Note that DHCP leases are only assigned in failover configurations if proper communication is established between the two failover peers. If the configuration is incorrect (if, for example, one failover peer is configured but the other is not), DHCP leases will not be dispersed.
Also note that statically mapped addresses will not be renewed by a failover server unless they are explicitly defined on that server using service dhcp-server shared-network-name <name> subnet <ipv4net> static-mapping <mapname> command.
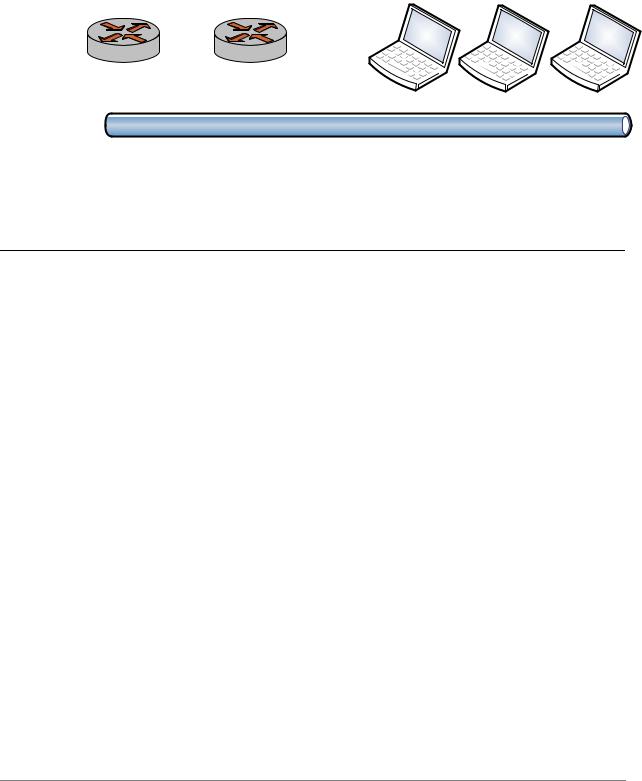
Figure 4-2 shows the sample DHCP server failover configuration.
Services |
R6.3 v01 |
Vyatta |
Chapter 4: DHCP |
DHCP Configuration 38 |
|
|
|
|
Figure 4 2 DHCP server failover configuration
DHCP servers |
DHCP clients |
Primary Secondary
R1 |
|
.1 |
R2 |
|
.2 |
|
|
|
|
|
|
|
|
|
|
|
|
|
|
|
|
|
|
|
|
|
|
|
|
|
|
|
|
|
|||||
|
|
|
|
|
|
|
|
|
|
|
|
|
|
|
|||||
|
|
|
|
|
|
|
|
|
|
|
|
|
|
|
|||||
|
|
|
|
|
|
|
|
|
|
|
|
|
|
|
|||||
|
|
|
|
|
|
|
|
|
|
|
|
|
|
|
|||||
|
|
|
|
|
|
|
|
|
|
|
|
|
|
|
|||||
|
|
|
|
|
|
|
|
|
|
|
|
|
|
|
|
|
|
|
|
|
|
|
|
|
|
|
|
|
|
|
|
|
|
|
|
|
|
|
|
192.168.42.0/24
To configure R1 as the Primary DHCP server in this failover scenario, perform the following steps in configuration mode on R1:
Example 4 4 Setting up DHCP failover on R1
Step |
Command |
|
|
Create the configuration node for |
vyatta@R1# set service dhcp server shared network name DHCP1 |
DHCP1 on subnet |
subnet 192.168.42.0/24 start 192.168.42.100 stop |
192.168.42.0/24. Specify the |
192.168.42.199 |
start and stop IP addresses for |
|
the pool. |
|
|
|
Specify the default router for |
vyatta@R1# set service dhcp server shared network name DHCP1 |
DHCP1 . |
subnet 192.168.42.0/24 default router 192.168.42.254 |
|
|
Specify a DNS server for DHCP1. |
vyatta@R1# set service dhcp server shared network name DHCP1 |
|
subnet 192.168.42.0/24 dns server 192.168.42.253 |
|
|
Specify the local IP address for |
vyatta@R1# set service dhcp server shared network name DHCP1 |
the DHCP server for failover. |
subnet 192.168.42.0/24 failover local address 192.168.42.1 |
|
|
Specify the IP address of the peer |
vyatta@R1# set service dhcp server shared network name DHCP1 |
DHCP server for failover. |
subnet 192.168.42.0/24 failover peer address 192.168.42.2 |
|
|
Specify the role that the DHCP |
vyatta@R1# set service dhcp server shared network name DHCP1 |
server will play in the failover |
subnet 192.168.42.0/24 failover status primary |
group. |
|
|
|
Specify the name of the failover |
vyatta@R1# set service dhcp server shared network name DHCP1 |
group. |
subnet 192.168.42.0/24 failover name FAILOVER |
|
|
Commit the change |
vyatta@R1# commit |
|
|
Services |
R6.3 v01 |
Vyatta |

Chapter 4: DHCP |
DHCP Configuration 39 |
|
|
|
|
Example 4 4 Setting up DHCP failover on R1
Show the configuration. vyatta@R1# show service dhcp server shared network name DHCP1 shared network name DHCP1 {
subnet 192.168.42.0/24 { default router 192.168.42.254 dns server 192.168.42.253 failover {
local address 192.168.42.1 name FAILOVER
peer address 192.168.42.2 status primary
}
start 192.168.42.100 { stop 192.168.42.199
}
}
}
To configure R2 as the Secondary DHCP server in this failover scenario, perform the following steps in configuration mode on R2:
Example 4 5 Setting up DHCP failover on R2
Step |
Command |
|
|
Create the configuration node for |
vyatta@R2# set service dhcp server shared network name DHCP1 |
DHCP1 on subnet |
subnet 192.168.42.0/24 start 192.168.42.100 stop |
192.168.42.0/24. Specify the |
192.168.42.199 |
start and stop IP addresses for |
|
the pool. |
|
|
|
Specify the default router for |
vyatta@R2# set service dhcp server shared network name DHCP1 |
DHCP1. |
subnet 192.168.42.0/24 default router 192.168.42.254 |
|
|
Specify a DNS server for DHCP1. |
vyatta@R2# set service dhcp server shared network name DHCP1 |
|
subnet 192.168.42.0/24 dns server 192.168.42.253 |
|
|
Specify the local IP address for |
vyatta@R2# set service dhcp server shared network name DHCP1 |
the DHCP server for failover. |
subnet 192.168.42.0/24 failover local address 192.168.42.2 |
|
|
Specify the IP address of the peer |
vyatta@R2# set service dhcp server shared network name DHCP1 |
DHCP server for failover. |
subnet 192.168.42.0/24 failover peer address 192.168.42.1 |
|
|
Specify the role that the DHCP |
vyatta@R2# set service dhcp server shared network name DHCP1 |
server will play in the failover |
subnet 192.168.42.0/24 failover status secondary |
group. |
|
|
|
Services |
R6.3 v01 |
Vyatta |