


Chapter 5: DHCPv6 |
DHCPv6 Overview 151 |
|
|
|
|
DHCPv6 Overview
In general, the Dynamic Host Configuration Protocol (DHCP) allows dynamic assignment of reusable IP addresses and other configuration information to DHCP clients. DHCP is described in Chapter 4: DHCP. The Dynamic Host Configuration Protocol for IPv6 (DHCPv6) provides a stateful address auto-configuration service and a stateful auto-configuration protocol for the IPv6 suite of protocols.
Although it bears many features in common with DHCP and shares a common architectural model, DHCPv6 is a separate protocol and is configured independently of DHCP. It is defined in separate protocol specification documents and the functions it provides differ in significant ways from those provided by DHCP. For example, DHCP and DHCPv6 utilize different UDP port numbers and they provide different sets of configuration parameters.
The Vyatta system provides DHCPv6 server functionality, DHCPv6 client-side functionality (currently only available on Ethernet interfaces), and a DHCPv6 relay function.
There are two common usage scenarios for DHCPv6 server. The first is one where addresses are assigned using SLAAC and the DHCPv6 server is only used to assign parameters to the clients. The second is one where both addresses and parameters are supplied by the DHCPv6 server. In either case, default router discovery is provided by the Neighbor Discovery protocol and so the DHCPv6 server does not need to provide that parameter.
DHCPv6 Configuration
This section includes the following examples:
•Enabling the DHCPv6 Server
•Configuring DHCPv6 Address Pools
•Creating a Static Mapping
•Setting up DHCPv6 Relay
Enabling the DHCPv6 Server
To use the DHCPv6 server on the Vyatta System, you must enable the DHCPv6 service. To enable the DHCPv6 service, perform the following steps in configuration mode:
Services |
R6.3 v01 |
Vyatta |
Chapter 5: DHCPv6 |
DHCPv6 Configuration 152 |
|
|
|
|
Example 5 1 Enabling the DHCPv6 service
Step |
Command |
|
|
Enable DHCPv6 server. |
vyatta@R1# set service dhcpv6-server |
|
|
Commit the information. |
vyatta@R1# commit |
|
|
Show the configuration. |
vyatta@R1# show service |
|
dhcpv6 server { |
|
} |
|
|
Configuring DHCPv6 Address Pools
Configure DHCPv6 address pools if you want the system to act as a DHCPv6 server for the network.
Example 5-2 creates an address pool within the shared network LAB-NET:
•LAB-NET. This shared network serves subnet 2001:db8:100::/64, which is connected directly to interface eth1. The lease time will remain at the default, 24 hours (86,400 seconds). The address pool will use the DNS name server at 2001:db8:111::111, which is on a separate subnet (not shown). The range of addresses is configured for .100 through .199.
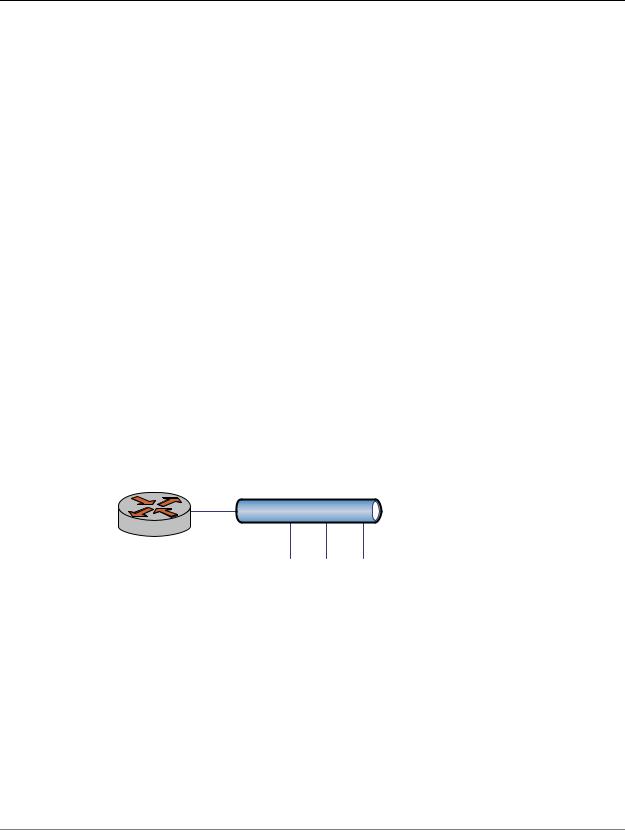
Figure 5-1 shows the sample address pool configuration.
Figure 5 1 DHCPv6 address pool configuration
eth1 |
|
Address Pool: LAB-NET |
.10 |
2001:db8:100::/64 |
Subnet: 2001:db8:100::/64 |
|
Start Address: 2001:db8:100::100 |
|
|
|
Stop Address: 2001:db8:100::199 |
R1 |
|
Lease (Seconds): 86,400 |
|
DNS Server: 2001:db8:111::111 |
To configure the DHCPv6 address pool, perform the following steps in configuration mode:
Services |
R6.3 v01 |
Vyatta |
Chapter 5: DHCPv6 |
DHCPv6 Configuration 153 |
|
|
|
|
Example 5 2 Configuring a DHCPv6 address pool
Step |
Command |
|
|
Create the configuration node for |
vyatta@R1# set service dhcpv6-server shared-network-name |
LAB NET on subnet |
LAB-NET subnet 2001:db8:100::/64 address-range start |
2001:db8:100::/64. Specify the |
2001:db8:100::100 stop 2001:db8:100::199 |
start and stop IPv6 addresses for |
|
the pool. |
|
|
|
Specify a DNS server for LAB NET. |
vyatta@R1# set service dhcp-server shared-network-name |
|
LAB-NET subnet 2001:db8:100::/64 name-server |
|
2001:db8:111::111 |
Commit the change. |
vyatta@R1# commit |
|
|
Show the configuration. |
vyatta@R1# show service dhcpv6-server |
|
shared network name LAB NET { |
|
subnet 2001:db8:100::/64 { |
|
address range { |
|
start 2001:db8:100::100 { |
|
stop 2001:db8:100::199 |
|
} |
|
} |
|
name server 2001:db8:111::111 |
|
} |
|
} |
|
|
Show the interface configuration. |
vyatta@R1# show interfaces |
|
ethernet eth1 { |
|
address 2001:db8:100::10/64 |
|
hw id 00:0c:29:42:05:35 |
|
} |
|
|
Creating a Static Mapping
There are situtations where it makes sense to map a specific IPv6 address to a specific host rather than dynamically assign an IPv6 address from a pool of addresses. This is known as a “static mapping”.
Static mappings are defined using the static-mapping option of the service dhcpv6-server configuration node. This example adds a static mapping to LAB-NET created in Example 5-2 . Example 5-3 does the following:
•Maps IP address 2001:db8:100::101 to the device with a MAC address of 00:15:c5:b3:2e:65.
Services |
R6.3 v01 |
Vyatta |

Chapter 5: DHCPv6 |
DHCPv6 Configuration 154 |
|
|
|
|
Example 5 3 Creating a static mapping
Step |
Command |
|
|
Create a static mapping called |
vyatta@R1# set service dhcpv6-server shared-network-name |
“lab” and specify the static IP |
LAB-NET subnet 2001:db8:100::/64 static-mapping lab |
address within the LAB NET pool. |
ipv6-address 2001:db8:100::101 |
Specify the host identifier string |
vyatta@R1# set service dhcpv6-server shared-network-name |
(c5b32e65 low order 4 bytes of |
LAB-NET subnet 2001:db8:100::/64 static-mapping lab |
MAC address) within the static |
identifier c5b32e65 |
mapping called “lab” in the |
|
LAB NET pool. |
|
|
|
Commit the information. |
vyatta@R1# commit |
|
|
Show the configuration. |
vyatta@R1# show service dhcp-server shared-network-name |
|
LAB-NET |
|
shared network name LAB NET { |
|
subnet 2001:db8:100::/64 { |
|
name server 2001:db8:111::111 |
|
address range { |
|
start 2001:db8:100::100 { |
|
stop 2001:db8:100::199 |
|
} |
|
} |
|
static mapping lab { |
|
ipv6 address 2001:db8:100::101 |
|
identifier c5b32e65 |
|
} |
|
} |
|
} |
|
|
Setting up DHCPv6 Relay
Configure DHCPv6 relay if you want the Vyatta system to forward DHCPv6 requests to another DHCPv6 server.
The DHCPv6 relay agent listens for requests sent by DHCPv6 clients and forwards them on to DHCPv6 servers. Since the client request packets and the relayed requests are often carried in IPv6 multicast packets, you must explicitly specify the interfaces that the relay agent is to listen for requests on, and the interfaces that it is to relay those requests on.
Example 5-4 does the following:
Services |
R6.3 v01 |
Vyatta |
Chapter 5: DHCPv6 |
DHCPv6 Configuration 155 |
|
|
|
|
•Configures both eth0 and eth1 for DHCPv6 relay. The system is expected to receive client requests for the DHCPv6 server through interface eth0. It will forward client-to-server DHCPv6 messages to the DHCPv6 server at 2001:db8:200::200 out through interface eth1. The DHCPv6 server refers to the interface on which client requests are received as the "listen interface", and refers to the interface out which requests are relayed as the "upstream interface."
•Other relay option parameters are left at default values. This means that R1 will use port 547 for DHCP messaging and will have a maximum hop count of 10 hops.
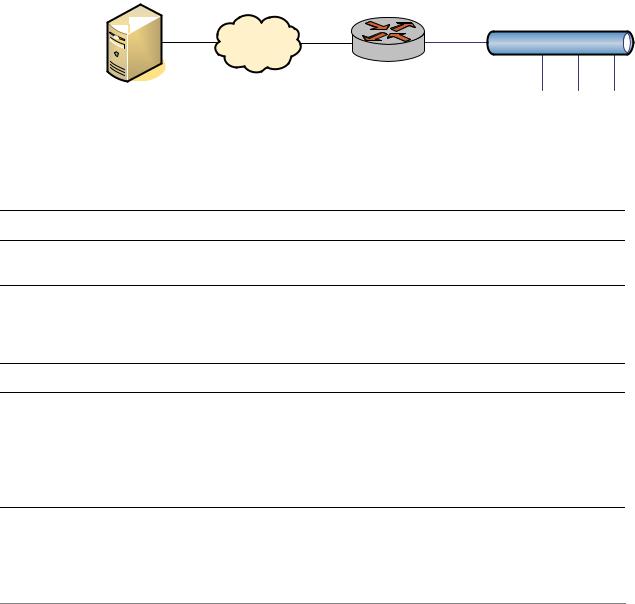
Figure 5-2 shows the sample DHCPv6 relay configuration.
Figure 5 2 DHCPv6 relay configuration
R1
eth1 |
eth0 |
|
|
DHCPv6 Server |
DHCPv6 Relay |
DHCPv6 clients |
|
2001:db8:200::200 |
|||
|
|
To configure DHCPv6 relay, perform the following steps in configuration mode:
Example 5 4 Setting up DHCPv6 relay
Step |
Command |
Enable DHCPv6 relay to listen on vyatta@R1# set service dhcpv6-relay listen-interface eth0 interface eth0.
Enable DHCPv6 relay to forward requests on interface eth1 specifying the DHCPv6 server address.
vyatta@R1# set service dhcpv6-relay upstream-interface eth1 address 2001:db8:200::200
Commit the change |
vyatta@R1# commit |
Show the configuration. vyatta@R1# show service dhcpv6-relay listen interface eth0 {
}
upstream interface eth1 { address 2001:db8:200::200
}
Services |
R6.3 v01 |
Vyatta |