

Professional Visual Studio 2005 (2006) [eng]
.pdfChapter 1
Getting Familiar with the IDE Structure
1.Start Visual Studio 2005. By default, the shortcut is installed in All Programs Microsoft Visual Studio 2005. After a moment you’ll be presented with the Choose Default Environment Settings dialog window. Select Visual Basic Development Settings and click the Start Visual Studio button.
2.When the main user interface is presented, create a dummy project so that the various menus, toolbars, and windows will be populated with usable information. To create a new project (don’t worry too much about how this works at the moment; you’ll come back to this in Part II of the book), click the New Project command in the File menu. When the New Project dialog appears, leave the default option of Windows Application as is, and click OK to have Visual Studio 2005 automatically create a new Windows application with a default form ready for editing.
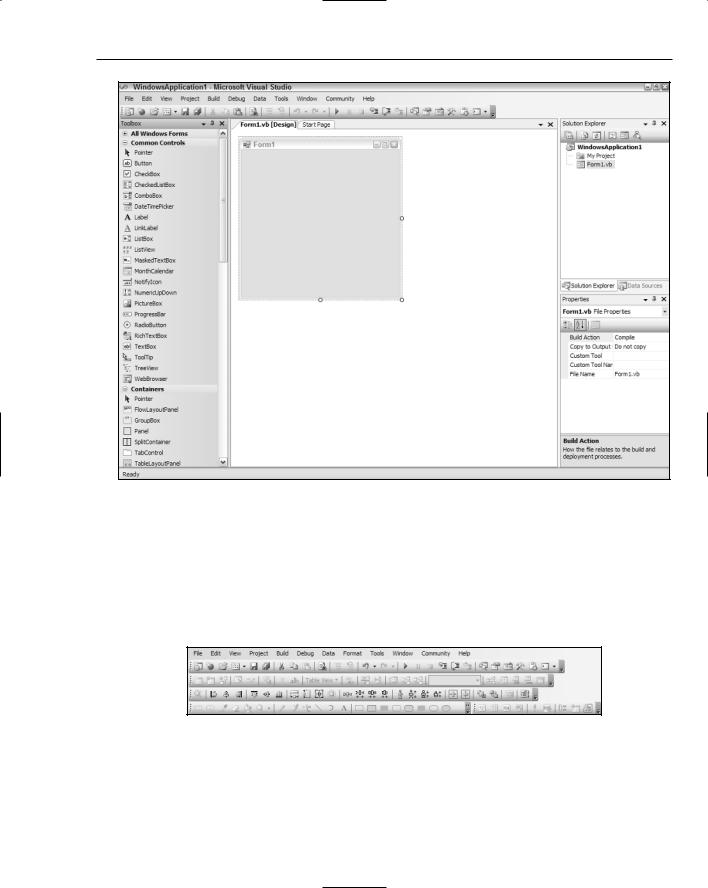
3.The last step you need to perform to have the IDE ready for explanation is to pin the Toolbox open. Locate the small buttonlike tab in the top-left area of the IDE labeled Toolbox and hover over it with your mouse. After a moment, it will slide open to reveal a series of components that can be added to your forms, but it would be nice to keep this open to more easily describe it, so locate the button strip at the top of the now visible Toolbox window (see Figure 1-5), and click the middle one, which looks like a horizontal pin.
Figure 1-5
The user interface of Visual Studio 2005 will now appear, as shown in Figure 1-6. Menus and toolbars are positioned along the top of the environment (much like most Windows applications), and a selection of subwindows, or panes, appear on the left and right of the main window area. In the center of the IDE is a graphical representation of the first form in the dummy application you created.
Basic Layout
Starting from the top and moving clockwise around the edges of the Visual Studio 2005 interface, you can see the main components that make up the IDE. The familiar menus and toolbars are in their regular position at the top of the screen. When you first start Visual Studio 2005, the menu bar will have seven entries (the number varies depending on which language you choose), but once you start creating a solution, the menu layout will change to include additional main menu entries.
This is typical behavior in Visual Studio 2005; the whole interface can change based on the context you are in at the time. Therefore, in Figure 1-6 you can see that four additional menus (Project, Build, Debug, and Data) have been added while editing the first form in the project. Various menus are added or removed depending on what you are doing; editing code, changing database structures, and modifying graphical elements all produce different sets of menus.
By default, you’ll see the Standard toolbar directly underneath the menu. This toolbar contains the most commonly used commands for your particular language of choice. In the case of Visual Basic, there are save functions along with debug and comment commands, the usual cut, copy, and paste buttons, and shortcuts to common windows such as the Solution Explorer and Properties window, which you’ll look at in a moment.
6
A Quick Tour of the IDE
Figure 1-6
Again, as the context changes, the toolbars will change, with more toolbars being shown when you are performing specific functions, and then being removed when you change to a different situation. Edit a database table and additional data-specific toolbars will be automatically added to your interface. Open an XML file and XML-related toolbars are shown. In every instance you can manually add (or remove) toolbars so you have your own preferred layout, just as you can in other applications such as Microsoft Outlook or Word. Visual Studio 2005 will remember your toolbar choices between sessions. Figure 1-7 shows a toolbar area with four additional toolbars in addition to the Standard toolbar.
Figure 1-7
7
Chapter 1
In addition, Visual Studio 2005 maintains two separate layouts: design time and runtime. Menus, toolbars, and various windows have a default layout for when you are editing a project, whereas a different setup is defined for when a project is being executed and debugged. You can modify each of these layouts to suit your own style and Visual Studio 2005 will remember them.
Moving to the right-hand side of the screen shown in Figure 1-6, you can see two smaller windows attached to the side of the main window. These are simply known in Visual Studio 2005 terminology as windows, and they are used to house self-contained subsections of the tools found in the IDE. Each of these windows can be resized, moved or removed, and even detached from the main IDE so they float above the form.
By default, the windows shown in this screenshot are attached to the main form. This is known as docking. You can undock any window by clicking and dragging its title bar away from the edge to which it is docked. More information on this, as well as customizing your toolbar layout and appearance, can be found in Chapter 5.
In step 3 of the previous task you pinned the Toolbox tab open. You’ll see that each of these windows (Solution Explorer, Properties, and so forth) also has the pin button at the top, which enables the window to automatically slide closed when docked to the side of the form. The default setup had the Toolbox automatically hidden, and the other windows pinned open.
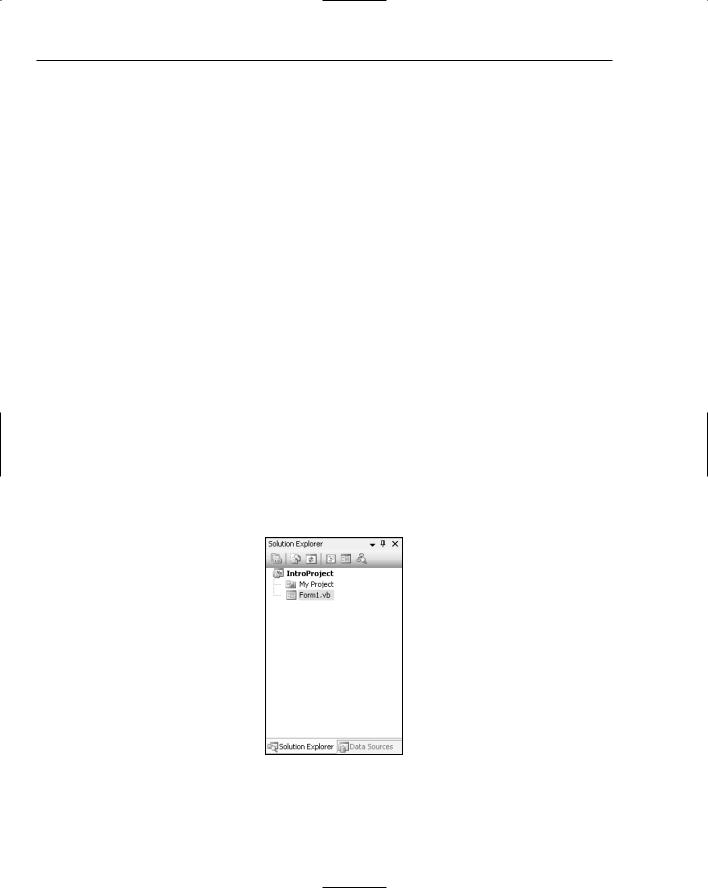
Figure 1-8 shows the first of the windows docked to the right-hand side of the IDE. This is the Solution Explorer, where you can manage your current solution, looking at individual projects and their associated files. The Solution Explorer displayed in this example shows a solution containing a single project called IntroProject, which has two files: My Project and Form1.vb. The My Project entry is actually a special section of the project that contains the various settings and projectwide elements, such as compilation and debug parameters.
The projects and files are presented in a hierarchical fashion similar to the folder list in Windows Explorer, with different icons displayed for the various file types, to more easily identify what each entry is.
Figure 1-8
8
A Quick Tour of the IDE
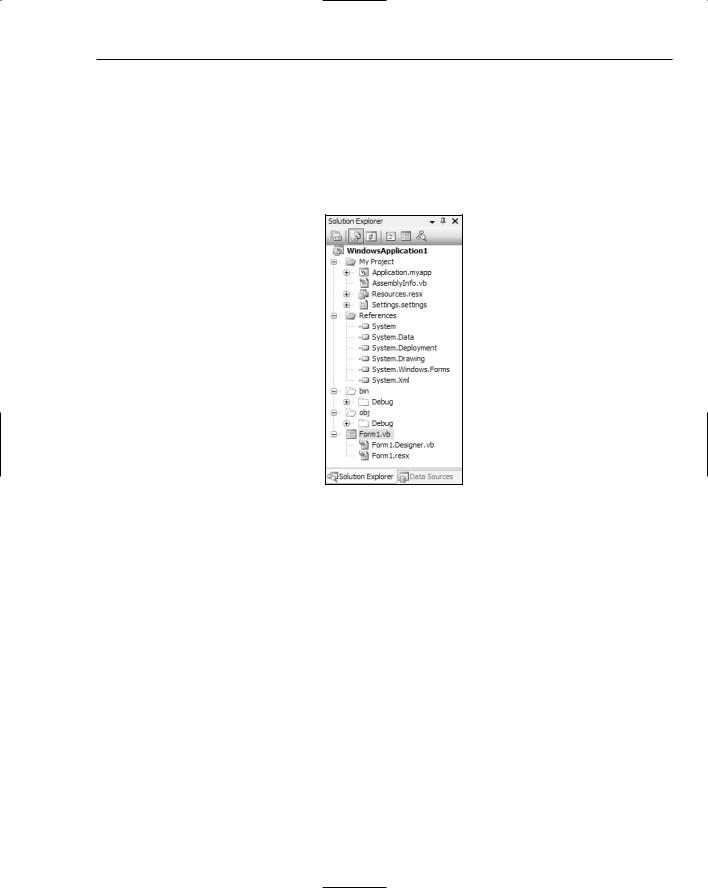
Along the top of the Solution Explorer window is its own toolbar containing six commands. The first is simply a shortcut to the Properties window so you can easily get to the properties for an individual file, rather than the properties for an element on a form. The second is labeled Show All Files. Clicking this for the sample project will reveal many more associated files for this project (see Figure 1-9).
The Show All Files button is a toggle button, so to hide the additional files that you don’t need most of the time, simply click the button again to deactivate the functionality. The structure and layout of projects and solutions is discussed at length in Chapter 8.
Figure 1-9
The Refresh button sits next to the Show All Files button, and repopulates the Solution Explorer window with the correct file structure. While Visual Studio 2005 will automatically keep the project structure current based on what you do within the IDE, sometimes additional files are created or added to the project via external means. These files may not be automatically shown without either using the Refresh button or closing and re-opening the project — which one do you think is easier?
The remaining three buttons on the toolbar provide quick access to different aspects to an individual file. From left to right, they display the code window, the graphical design of forms and such, and the Class Diagram.
Code view and Design view have been carried over from previous versions of Visual Studio, but the Class Diagram is a new addition to Visual Studio 2005. It offers a visual representation of the form or module and its associated classes, and is discussed in more detail in Chapter 14.
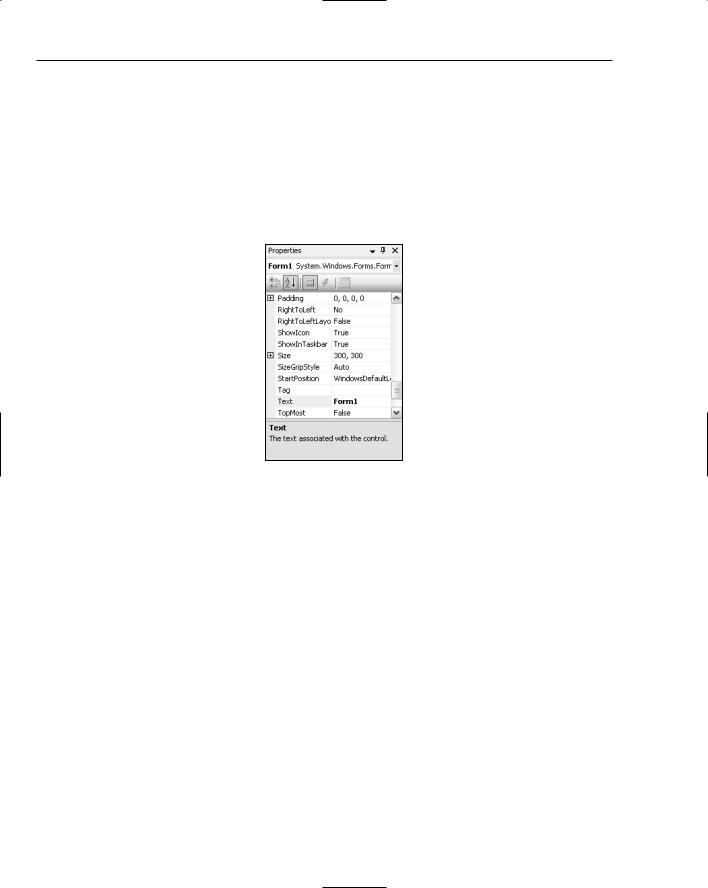
Docked to the right-hand side of the IDE directly underneath the Solution Explorer is the Properties window (see Figure 1-10). The Properties window gives you easy access to individual settings related to a specific form, file, or individual class or control.
9
Chapter 1
Figure 1-10 shows the Properties window displaying properties for the form called Form1 in a project. The properties are currently displayed in alphabetical order. This can be changed to logically group them into properties that deal with the same category; for example, form properties can be grouped into nine discrete groups, including Appearance (for color, fonts, and text-related properties) and Layout (which incorporates such properties as size and location settings). To toggle between alphabetical order and categorized view, use the first two buttons on the Properties window toolbar.
Active settings are highlighted with a colored background (by default orange) and black border. In Figure 1-10, the Properties window is currently sorted alphabetically as evidenced by the black border surrounding the second button.
Figure 1-10
The currently selected property (Text in this case) is highlighted and a small description pane at the bottom explains what the setting is. If you are space constrained and know what you’re doing, you can turn this description pane off by right-clicking anywhere in the Properties window and unchecking the Description setting.
There are many different types of properties, but each one can be changed by clicking on the actual value and overtyping the existing information with a new value. Some property types have additional editors to make it even easier to change the values. For instance, properties relating to fonts can display a font chooser dialog window similar to the one you might use in Microsoft Word to change the font settings for a paragraph.
The third and fourth buttons (the icons of a list and lightning bolt) on the toolbar toggle the view between properties and events. The Events view acts in a similar way to the Properties view, giving you access to the various events associated with the currently selected element. Again, like properties, events can be viewed alphabetically or in logical groupings and are only available for elements that have event processing, so if you choose an item that doesn’t have events (such as a file) the Events button will be hidden.
The last button on the toolbar displays the property pages associated with the currently selected item. If the item does not have property pages (such as the form in Figure 1-10), this button will be disabled.
10

A Quick Tour of the IDE
Moving over to the left-hand side of the IDE, you can see the Toolbox window, shown in Figure 1-11, that you pinned open (refer back to Figure 1-6 for a full shot of the IDE). This window is used to house all of the various elements you can add to your project. By default, it is populated with the standard windows and .NET components that Microsoft provides with Visual Studio 2005, but you can easily add additional third-party elements to the Toolbox, as well as reposition the existing items, change the view, and sort the lists. A discussion on all of this information can be found in Chapter 3.
Just like the various other components of the Visual Studio 2005 IDE, the Toolbox is contextual, changing its contents based on what you’re doing. The three main views of a typical form (Design, Code, and Class Diagram) will produce three completely different sets of items to use.
Figure 1-11 shows the default layout as shown for the sample project you created. There are entries for the commonly used elements such as buttons and TextBox controls, as well as Container elements such as Panels and GroupBox components (previously known as the Frame control). Other default groups of components include menus and toolbars, data-related elements, and system components.
Figure 1-11
11

Chapter 1
The remainder of the IDE is the actual working space in which you’ll design your forms and write your code. The top of the space contains a row of tabs describing the different files that are currently open. Figure 1-12 shows how this area appears after creating the sample project. Form1 is being displayed in Design view, and there is an additional tab for the Start page that is shown when you first start Visual Studio 2005.
The first button on the right-hand side of the tab row (the downward-pointing triangle beside the X in Figure 1-12) provides an alternative method for accessing the various files that are currently open by displaying them in a drop-down list. This is particularly useful when you have a large number of files active and you don’t want to navigate through the tab list. The other button closes the currently active file.
As soon as you make a change to a form, file, or class, the tab will be updated with an asterisk (*) after the text to indicate that there are unsaved changes to that particular component. This unsaved marker is also visible in the drop-down list described previously.
The rest of the working space contains the active file. In the case of Figure 1-12, this is the basic form design. Most of this book deals with using this area to maximize your productivity when creating applications, but for a few quick references, see Chapter 6 for basic form design, Chapter 14 for editing class diagrams, and Part V for code-related techniques.
Figure 1-12
12

A Quick Tour of the IDE
Additional Windows
While the default layout for Visual Basic projects only has three windows docked to various parts of the IDE, many additional windows can be shown at either design time or runtime. In fact, just like other parts of the IDE, when you are debugging a solution, additional windows will be shown be default, such as the Immediate window.
In Chapter 5 you’ll learn how to customize the appearance of the IDE to include additional windows in the layout. However, two important windows that do not show by default are the Error List window (see Figure 1-13) and the Output window (see Figure 1-14).
Figure 1-13
The Error List, as you might have surmised, contains a list of issues with your solution. When using Visual Basic as the language, this Error List is continually updated as you create your code, providing instant feedback about what kinds of problems you may be introducing into the application. Other languages may not populate the list until you attempt to build the solution and the code goes through an active compilation process.
You can filter the list by toggling the Errors, Warnings, and Messages buttons at the top of the window and double-clicking a particular error to go directly to that section of code.
By default, the Error List window is placed along the bottom of the main IDE space. This area is shared among many windows, and Figure 1-13 and Figure 1-14 show the tabs along the bottom, indicating that the Error List and Output windows are using the same space.
The Output window contains all the information about the compilation of your application as well as data relating to the debugging of code. Figure 1-14 shows the successful compilation of a simple program. Both the Output and Error List windows can be shown using the View menu.
Figure 1-14
13

Chapter 1
Summar y
You’ve now seen how the various components of Visual Studio 2005 form the complete package for creating solutions. Reviewing the default layout for Visual Basic programs, the following list outlines a typical process for creating a solution:
1.Use the File menu to create a solution.
2.Use the Solution Explorer to locate the form that needs editing and click the View Designer button to show it in the main workspace area.
3.Drag the necessary components onto the form from the Toolbox.
4.Select the form and each component in turn and edit the properties in the Properties window.
5.Use the Solution Explorer to locate the form and click the View Code button to access the code behind the form’s graphical interface.
6.Use the main workspace area to write code and design the graphical interface, switching between the two via the tabs at the top of the area.
7.Use the toolbars to start the program.
8.If errors occur, review them in the Error List window and Output window.
9.Save the project using either toolbar or menu commands and exit Visual Studio 2005.
While many of these actions can be performed in other ways (for instance, right-click on the design surface of a form and you’ll find the View Code command), this simplified process shows how the different sections of the IDE work in conjunction with each other to create a comprehensive application design environment.
In subsequent chapters you’ll learn how to customize the IDE to more closely fit your own working style, and how Visual Studio 2005 takes a lot of the guesswork out of form design.
14

Options
Have you ever looked at the Options section of Visual Studio and wondered what you can do to make your life as a Visual Studio developer more efficient? We did too, so we dove right into the depths of the options that Microsoft makes available to programmers and figured out what each one offers you.
Not all of the tips and settings discussed in this chapter may benefit you; all developers are different and prefer to work in their own unique way. The development team at Microsoft understood this, providing options to change the way Visual Studio 2005 works. In this chapter you’ll find out what each of the options and settings is for and how to customize them to best suit your own working style.
One with the Lot
By default, the Options screen of Visual Studio 2005 (accessed via Tools Options) displays in a simplified mode with only a small subset of the full set of configurable parameters available (see Figure 2-1). This may suit your most general needs, but if you’re serious about fine-tuning the system to work as efficiently as possible, you’re going to need access to various preference settings that are not available in the basic view.
Fortunately, it’s easy to gain access to all the hidden settings. In Figure 2-1, you’ll notice a Show All Settings checkbox in the bottom-left corner of the Options dialog window. Simply check the box and immediately Visual Studio 2005 will change the Options interface to accommodate the additional option groups, as shown in Figure 2-2.
In this advanced view of the Options screen, you’ll find many more sections and preferences that can be customized to fit in with the way you work. Rather than simply explain what each one does, the rest of this chapter will walk through some of the more relevant options that you may find useful.