

Professional Visual Studio 2005 (2006) [eng]
.pdfChapter 2
Figure 2-1
Figure 2-2
Environment Options
The main IDE can be altered to make it more familiar. The first of these alterations is the capability to change the window layout to multiple documents (refer to Figure 2-2). The tabbed interface described in Chapter 1 enables you to quickly navigate between currently active documents via a tab strip along the top of the workspace itself. However, several previous editors, such as Visual Basic 6 (as well as nonMicrosoft development environments) utilize a multiple-document interface (known as a MDI) whereby individual editor windows can be resized and repositioned independently of each other.
16
Options
In this mode, the editor windows can be treated much like similar applications that have Cascade and Tile commands available, replacing the subset of commands that deal with the tabbed view. Most important, this mode is especially useful if you’re used to easily placing Code and Design views on top of each other, or putting two code listings side-by-side for comparison purposes (note that you can still achieve this in tabbed mode, which you’ll see in Chapter 5, but it’s a little more difficult to achieve).
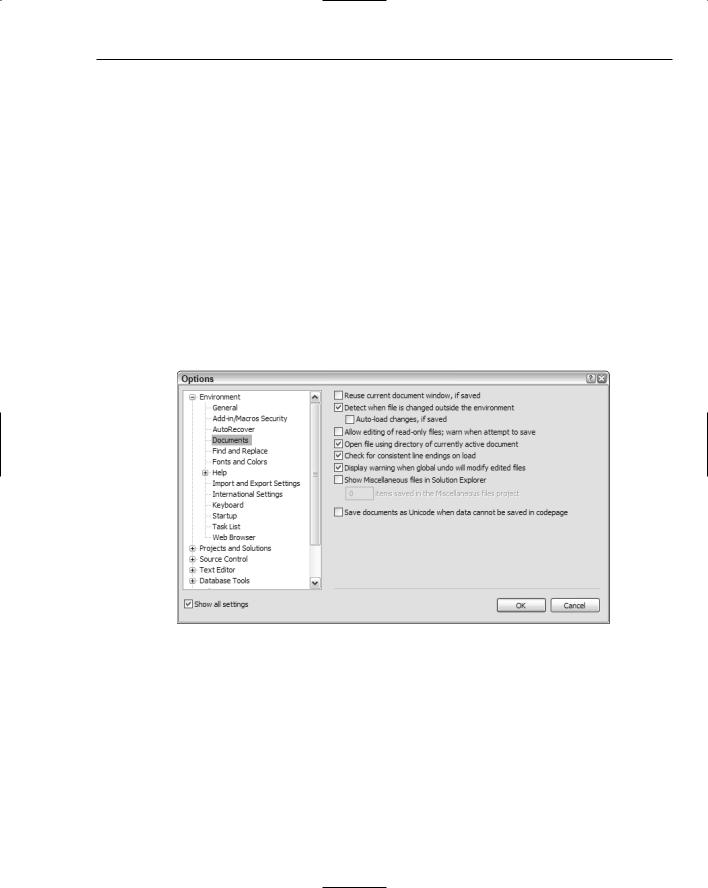
Chapter 1 mentioned that Visual Studio 2005 tries to detect when files are added to the solution outside the IDE and let you know that it has happened, but what happens if the files that already exist in the solution are edited externally and then saved? Visual Studio 2005 tries to detect this situation too, and prompts for the file to be reloaded in the IDE if it is a currently active document.
Document Settings
The Documents section of the Environment options (depicted in Figure 2-3) enables you to change the default behavior so that it automatically loads a saved document instead of prompting you for a response. Alternatively, you can switch off the whole detection process if it’s too distracting. Just remember if you change either of these settings, as you may be put off by active documents automatically reloading in response to outside changes, or, conversely, you may inadvertently overwrite changes made externally to the IDE.
Figure 2-3
As in previous versions of Microsoft development environments, Visual Studio 2005 uses the Courier New font for the code editor windows throughout the IDE. While this font is unarguably available on all machines, plenty of other fonts are available that are almost as universally popular.
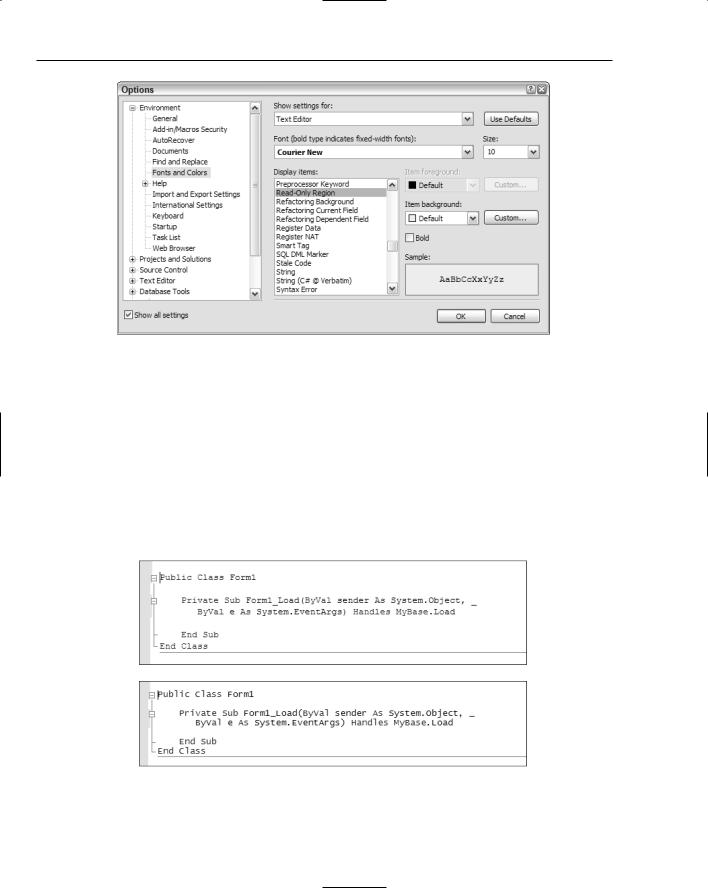
Fonts and Colors
The Fonts and Colors section of the Environment options is well worth a visit in your initial setup of the environment, as choosing an appropriate font, and other formatting options, will help you code more efficiently. As shown in Figure 2-4, many different styles can be individually formatted with font, color, and other options such as background color, bold, and so on.
17
Chapter 2
Figure 2-4
In Figure 2-4 you can see the settings displayed for the main Text Editor. However, what many people don’t realize is that you can also modify the font style of almost every aspect of the Visual Studio 2005 IDE at this point, including how the tooltips and various windows are displayed. In addition, this is where print settings can be changed so that printouts are output in the way that suits you or your organization.
When choosing a font, remember that proportional fonts are usually not as effective when writing code as nonproportional fonts (also known as fixed-width fonts). As indicated in Figure 2-4, fixed-width fonts are distinguished in the list from the variable-width types so they are easy to locate. One of the problems with Courier New is that it is less readable on the screen than other fixed-width fonts. A viable alternative as a readable screen font is Lucida Console. Figure 2-5 shows a comparison of the default Courier New (top) and the suggested alternative of Lucida Console (bottom).
Figure 2-5
18
Options
Even though proportional fonts may not be as usable when editing code, you may determine that for your own personal interface your eyes can better track variable-width fonts, such as Tahoma, which are used widely on the Internet. For the purposes of consistency, all of the screenshots in this book were taken with fixed-width fonts.
Keyboard Shortcuts
Visual Studio 2005 ships with many ways to perform the same action. Menus, toolbars, and various subwindows provide direct access to many commands, but despite the huge number available, many more are not accessible through the graphical interface. Instead, these commands are accessed (along with most of those in the menus and toolbars) via keyboard shortcuts.
These shortcuts range from the familiar Ctrl+Shift+S to save changes to the obscure Ctrl+Alt+E to display the Exceptions dialog window. As you might have guessed, you can set your own keyboard shortcuts and even change the existing ones. Even better, you can filter the shortcuts to only operate in certain contexts, meaning you can reuse the same shortcut depending on what you’re doing.
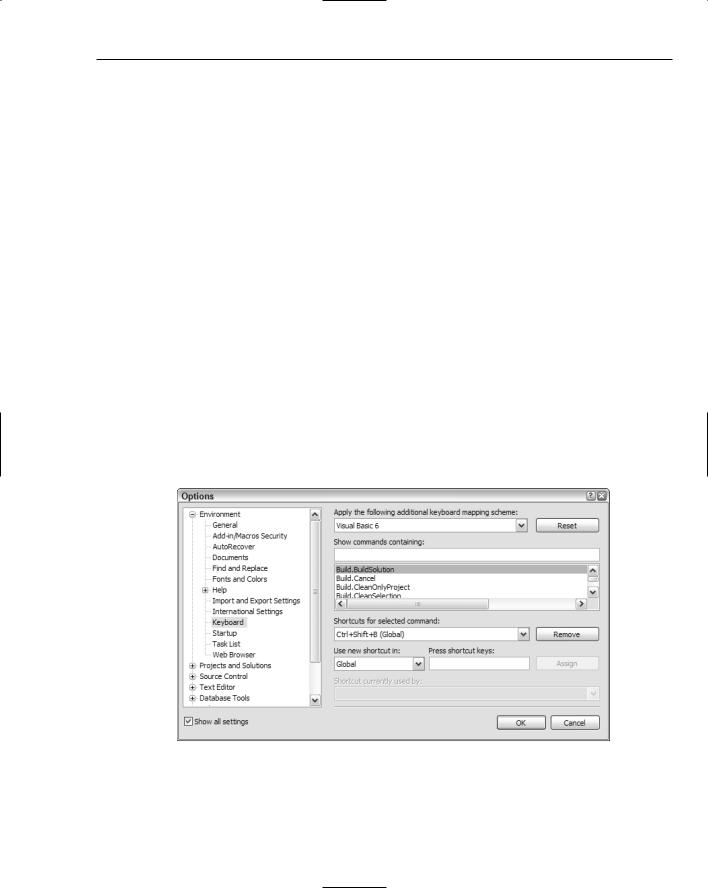
Figure 2-6 shows the Keyboard group in the Environment section of Options, with a preset keyboard shortcut displayed for the Build Solution command. Every command in Visual Studio 2005 is available for keyboard shortcut assignations, and you can set multiple shortcuts for the same command. This is especially useful if you want to keep a default shortcut but also add your own personal one. As there are hundreds of commands, you may want to filter them down to a selection by using the Show Commands Containing textbox.
To restrict a shortcut’s use to only one contextual area of Visual Studio 2005, select the context from the Use New Shortcut In drop-down list. The Global option indicates that the shortcut should be applied across the entire environment.
Figure 2-6
19

Chapter 2
Depending on which default environment you chose when you first started the IDE, an additional keyboard mapping scheme may be initially chosen for you. For instance, set yourself up as a Visual Basic user and the Visual Basic 6 scheme is added to the default keyboard shortcuts. Note that when there is a conflict between the default keyboard shortcut and one imported by these additional schemes, the default will be used. In the Visual Basic example, this means that the Visual Basic 6 default of F5 running the program without a full compile and Ctrl+F5 forcing a full compilation before execution is ignored in favor of Visual Studio 2005’s own shortcuts (which are actually the reverse).
You can change this additional scheme to suit you, so if you regularly use both Visual Basic and Visual C# you can modify your additional set of shortcuts to include Visual C#’s commands.
If a shortcut is already being used by another command, it will appear at the bottom of the dialog window so you don’t inadvertently overwrite existing settings.
Chapter 26 deals with macros that you can create and maintain to make your coding experience easier. These macros can also be assigned to keyboard shortcuts.
The Task List
The last section in the Environment options that is useful to look at now is the Task List options. A token is a piece of text that is automatically recognized by the IDE as needing to be flagged in the Task List window for later reference. By default, Visual Studio 2005 comes with several preset task list tokens.
You can add your own token, or change the existing ones, by accessing the Task List group in the Environment options. To add a new token, type the text that should be entered in the Name field and click Add. Each token can also be marked with a priority, with high-priority entries sorted to the top of the list so they’re more easily located.
Changing an existing token is just as easy. Select its entry in the list, overwrite the name and priority with the new values, and click the Change button. The Task List will be automatically updated as soon as you exit the Options dialog with your changes.
To show how easy it is to set up these automatic Task List entries, follow through this example of adding a new token and then using it to generate a new task:
1.Open the Options dialog by clicking Tools Options. Browse through the list until you locate Task List and select it to display the current Task List tokens and settings.
2.In the Name field, type WILEY and change the Priority value to High. To add this new token to the list, click the Add button. Then click OK to apply your changes and close the Options dialog.
3.Open the Task List window by selecting the View Other Windows Task List menu command, or by using the keyboard shortcut Ctrl+Alt+K. By default, the Task List will display User Tasks. Change this to Comments in the drop-down list at the top of the Task List window.
4.To use a token in your code, simply type the text in a commented area and Visual Studio 2005 will automatically add a corresponding entry in the Task List. Open a code window and type the following line to test your new token:
‘WILEY: This is important!
Figure 2-7 shows the Task List with the automatic entry displayed.
20

Options
Figure 2-7
Projects and Solutions
Several options related to projects and solutions are useful to set to your own preferred values. The first of these is perhaps the most helpful — the default locations of your projects. By default, Visual Studio 2005 uses the standard Documents and Settings path common to many applications (see Figure 2-8), but this is usually not where you’ll want to keep your development work.
Figure 2-8
21
Chapter 2
Choose a location that is a good base for your various projects. Usually the most common denominator works best, so if you work on multiple projects, then under your C:\Development folder choose that as your default projects folder. From there it’s easy to change the folder in any file save dialogs to the specific location for the particular project you’re working on.
You can also change the location of template files at this point. If your organization uses a common network location for corporate project templates, you can change the default location in Visual Studio 2005 to point to this remote address, rather than map the network drive.
On the same Options page you will find another useful option that is turned off by default. The Show Output Window When Build Starts setting, when checked, will display the Output window during a build. This is handy when you have a particularly large solution and need to know the state of the build process. It’s recommended that you turn it on.
Build and Run
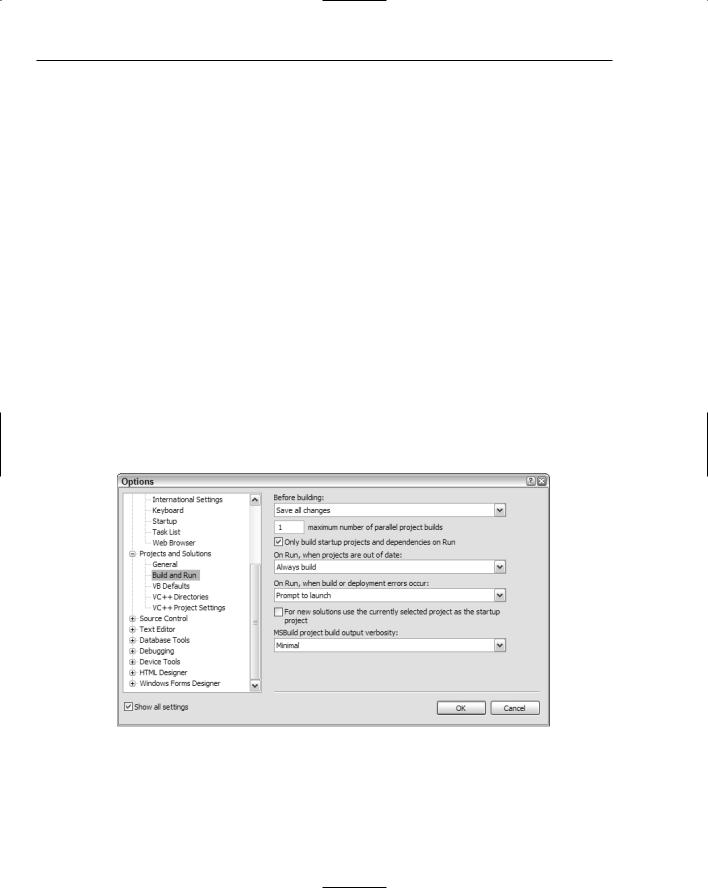
One particularly important section of the Options window is the Build and Run settings page (see Figure 2-9) found in the Projects and Solutions section. This is where Visual Studio 2005 determines how to process any build commands, and you can change its behavior.
The first option to check is the Before Building preference. With the default option of Save All Changes, Visual Studio will apply any changes made to the solution prior to compilation. In the event of a crash during the build process or while you’re debugging the compiled code, you can be assured that your code is safe. However, you may want to change this option to Prompt to Save All Changes. This setting will inform you of unsaved modifications made in your solution, enabling you to double-check what changes have been made prior to compilation.
Figure 2-9
Similarly, Visual Studio can prompt you to rebuild out-of-date projects, or automatically rebuild them regardless of their state. In Figure 2-9, the default setting of Always Build is shown, which will force Visual Studio to compile any projects that are deemed out of date. Sometimes you may want to test
22
Options
changes in one project against an older version of another. If you change this option to Prompt to Build, you can control which out-of-date projects will be recompiled prior to the execution of the solution.
Option Strict
One particularly important setting available to Visual Basic programmers is Option Strict, accessible in the VB Defaults page of the Projects and Solutions section. Previous versions of Visual Basic had an Option Explicit, which forced variables to be defined prior to their use in code. When it was introduced, many experts recommended that it be turned on permanently because it avoided many runtime problems in Visual Basic applications due to improper usage of variables.
Option Strict takes the process of enforcing good programming practices one step further by forcing developers to explicitly convert variables to their correct types, rather than let the compiler try to guess the proper conversion method. Again, this results in fewer runtime issues and better performance. We advise strongly that you use Option Strict to ensure that your code is not implicitly converting variables inadvertently.
Text Editor
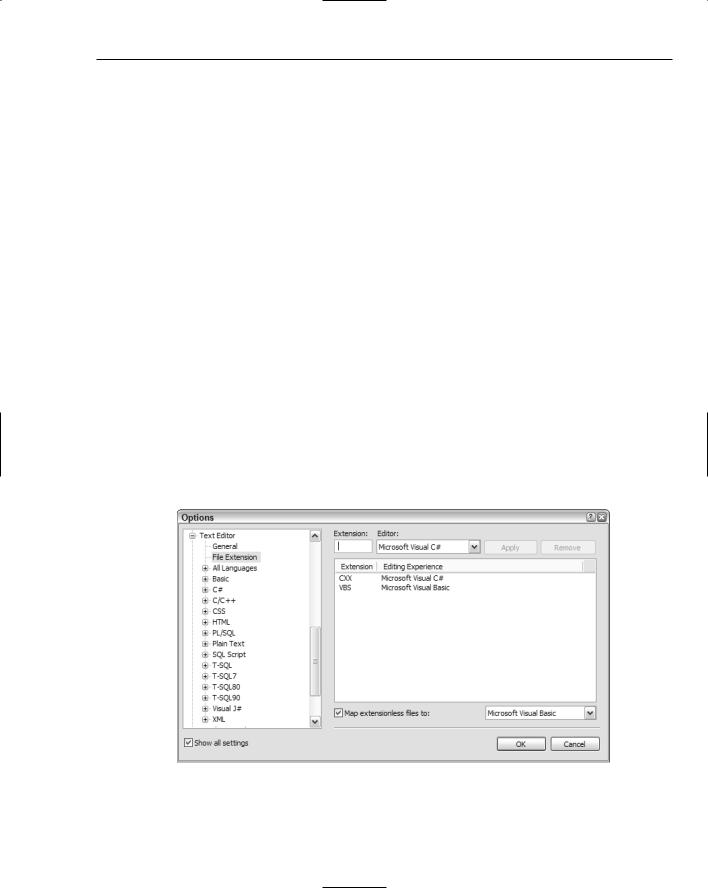
Visual Studio 2005 comes with many different text editors, with their own formatting styles. This enables you to edit HTML, Visual Basic, C# code, and even resource files, with unique editing options. The File Extension page of the Text Editor section in the Options dialog (see Figure 2-10) enables you to extend the default set of file types with your own file extensions.
To add your own extension mapping, type the extension (for example, VBS) in the textbox provided and choose the editor that should be used from the drop-down list. When you’ve picked the desired editor, click the Apply button to commit it to the list of processed extensions. If you want to set a default editor for files that don’t have any extensions, you can do that from this screen as well.
Figure 2-10
23
Chapter 2
All Languages
The Text Editor group of options is extensive, with the many editors all having their own collections of customizable settings. However, several settings can be applied globally across all editors, making it easy to get the environment ready for your way of doing things.
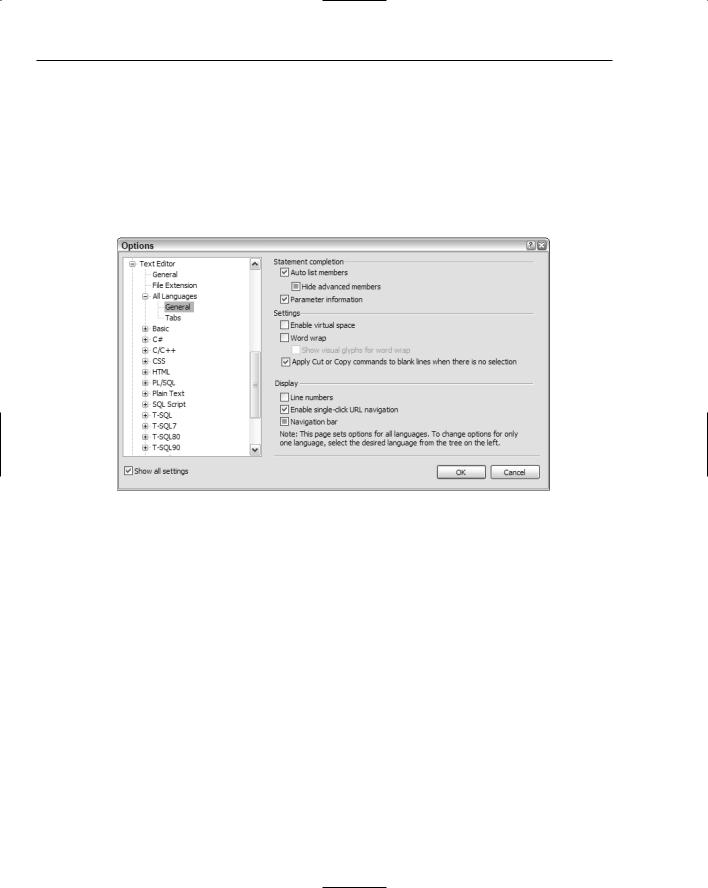
The first commonly used preference is to turn line numbers on. This can be useful for code checking, particularly when reviewing someone else’s code for which you need to refer to particular lines in a report. Line numbers can be turned on for all editors in the Display section (select All Languages General), as shown in Figure 2-11.
Figure 2-11
While you’re in the General section, you may want to also review other global editor options, such as the Auto List Members and Parameter Information options. The first of these options will use IntelliSense to show the members of a particular item when you type the appropriate character (for instance, in Visual Basic, when you type the name of an object immediately followed by a period, the list of properties, events, and methods will be shown).
The latter option uses a formatted tooltip to display the parameters in a method when you commence writing a call to the subroutine. This can be useful if you’re unfamiliar with the parameters required for the subroutine. However, it can also occlude your view of other parts of the code, so you can turn it off if you prefer.
Note that all of these options can be overridden for particular languages, so if you prefer to see the parameter information in Visual Basic but not in C#, you can set the environment up by setting a default in the All Languages section and then picking specific options for the languages that differ.
Advanced editing options are available for editing HTML, XML, CSS, and SQL script files.
24
Options
Debugging
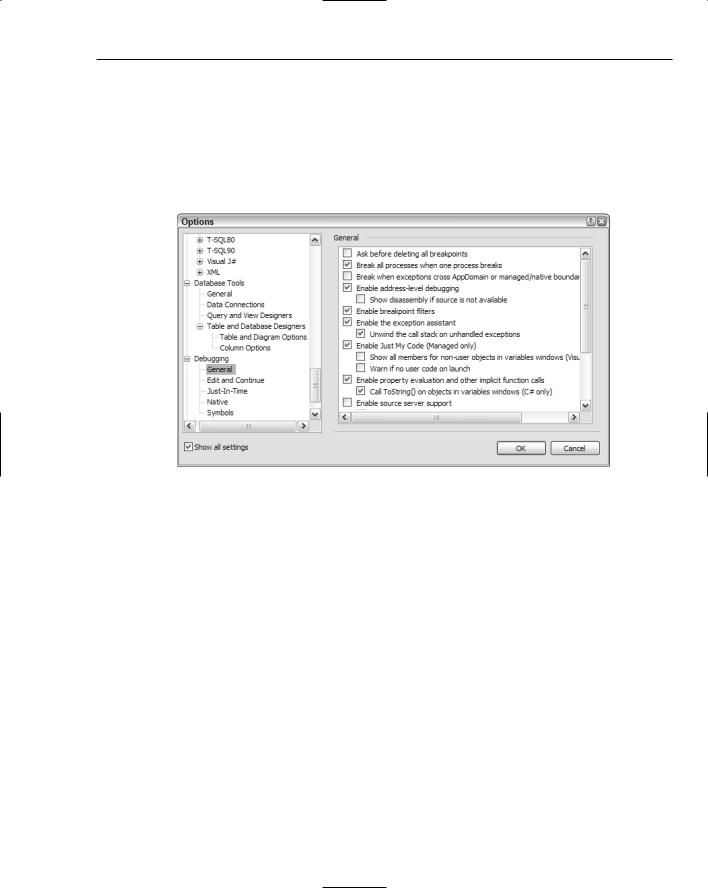
Of course, writing code and designing graphical interfaces is only one part of your programming experience when it comes to an advanced IDE such as Visual Studio 2005. Just as important is the interface you use for debugging your applications. Visual Studio offers options that can be set to enhance the way you interact with your executing programs. In the Debugging General options page (see Figure 2-12), you’ll find a list of preferences that you can toggle on or off to control the way Visual Studio responds to certain events during the execution of your programs.
Figure 2-12
The following list contains the options that are most likely to be useful to you in normal debugging situations:
Break all processes when one process breaks: Particularly important when multi-threading and running solutions with a number of projects, enabling this option forces the Visual Studio debugger to pause all processes when only one encounters an error. If you choose not to use this option, beware of processes that get out of step during debugged sessions.
Enable breakpoint filters: As you’ll see in Chapter 49, you can apply filters to breakpoints so that your code will only pause during a debugging session under certain conditions. Disabling this option will cause Visual Studio to ignore any filters applied and always pause execution on a breakpoint.
Enable Just My Code (Managed code only): An incredibly useful shortcut option, this setting allows you to ignore all code other than your own. Rather than having to step through low-level system code or external DLLs, the debugging session will step over them and continue to only code in your own projects.
Enable property evaluation and other implicit function calls: Without this option active, windows such as the QuickWatch dialog and the variables windows will not be able to evaluate the
25