

Visual CSharp .NET Programming (2002) [eng]
.pdfWeb Services Description Language (WSDL) describes the methods supported by a web service, the parameters the methods take, and what the web service returns. You can find the specification, sponsored by a cross-industry group that includes IBM and Microsoft, at www.w3.org/TR/wsdl.
A WSDL document is an XML schema that provides the required information about a web service-methods, data types, and response-so that a proxy can be created (you'll see how to create and use a proxy in Chapter 2, 'Consuming the Service on the Web').
Generally, creators of ASP.NET web services do not have to worry themselves about WSDL; a WSDL document is automatically generated at runtime on the fly by the ASP.NET runtime using a process called reflection. (Reflection is a mechanism that allows metadata about a program to be examined at runtime.)
Universal Description, Discovery, and Integration (UDDI)
How do you find a web service that you might want to consume? Conversely, how do you publish a web service so that others can find it?
One answer is word of mouth. I might tell you about a web service, or you might tell me. Similarly, it's no problem for us to find the web services that we'll create in the remainder of this chapter. When we want to consume them, we'll know what we named them, and what URL to use.
Universal Description, Discovery, and Integration (UDDI) is a more general, cross-industry effort at creating a repository for publishing and finding web services. The UDDI project (www.uddi.org) consists of a registry and a set of APIs for accessing the registry. IBM and Microsoft maintain cross-synchronized UDDI registries that can be browsed. The Microsoft registry can also be accessed from the Visual Studio Start page, as explained in Chapter 2.
In addition to UDDI, there are websites that provide directories of web services you can consume. You'll find more information about this in the 'UDDI' section of Chapter 2.
One If by Hand
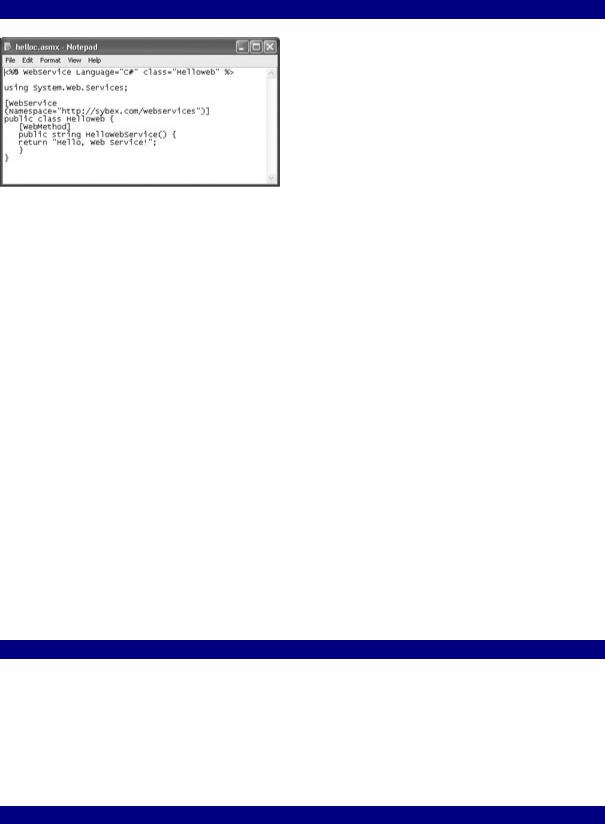
You have enough background about web services to get started with creating one. We'll start with a text editor and the simple 'Hello, Web Service!' program shown in Listing 1.1 and in Notepad in Figure 1.1.
Listing 1.1: 'Hello, Web Service!'
<%@ WebService Language="C#" class="Helloweb" %>
using System.Web.Services;
[WebService (Namespace="http://sybex.com/webservices")] public class Helloweb {
[WebMethod]
public string HelloWebService() { return "Hello, Web Service!";
}
}
Figure 1.1: A web service can be created using Notepad.
Let's have a look at this web service line by line. The directive at the top of the code
<%@ WebService Language="C#" class="Helloweb" %>
tells the compiler that this is a web service written in C# and implemented in the Helloweb class. The next line,
using System.Web.Services;
allows the program to use the types in the System.Web.Services namespace. (For more on the
.NET Framework and namespaces, see Chapter 5, "Reflecting on Classes".)
Tip The Visual Basic equivalent to using in C# is import.
The next line of code adds an optional attribute to the class that implements the service:
[WebService (Namespace="http://sybex.com/webservices")]
The WebService attribute allows you to set the default namespace for the web service. If you don't set this, ASP.NET will default the namespace to the URI http://tempuri.org and will display a message when you open the web service test page suggesting that you rename the default namespace.
URIs and URLs
You should know that the default namespace is a URI (Uniform Resource Identifier) rather than a URL (Uniform Resource Locator). There's no expectation that a user can click the URI and gain access to a resource (as opposed to a URL, which does work this way), but it should a unique string and-if it's a domain-be under your control. In other words, a URI is for identification, not navigation (although if the URI is a URL, it can also be navigated to).
Next comes the Helloweb class declaration. Everything within the curly braces will be part of the class:

public class Helloweb {
}
The [WebMethod] directive says that the method coming next is exposed as a web service. The C# method declaration names the method and says that its return is a string (once again, everything within the curly braces is part of the method):
public string HelloWebService() {
}
The string literal following the return keyword is, of course, the value returned by the method. Here's the complete Helloweb class:
public class Helloweb { [WebMethod]
public string HelloWebService() { return "Hello, Web Service!";
}
}
The Battle of the Curly Braces
As you probably know, although C# is case sensitive, it is not white-space sensitive, meaning you can lay your programming statements out any way you'd like, even across multiple lines. A statement of code is ended when you reach the delimiter, a semicolon (;), no matter how many physical lines it takes. Similarly, curly braces ({}) are used to mark the beginning and end of constructs such as namespaces, classes, and methods.
Since you are allowed to position these curly braces any way you'd like, you should aim to do so for readability. Which brings us to one of the greatest controversies of modern life: do you place the opening brace on the same line as the declaration, like so:
public class Class1 { // blah blah
}
or do you position it below the initial character of the declaration, like this:
public class Class1
{
// blah blah
}
Continued on next page
The two are syntactically equivalent, and you'll find both styles in the code examples in this book. My personal preference is to do it the first way, as I think it helps to make really clear what is inside the constructbut Visual Studio, and .NET auto-generated code, position the opening brace on a new line.
Deploying the Web Service
Deploying the web service is a simple matter of making sure that the file it is in has an extension of .asmx-the file extension for ASP.NET web services-and opening it in Internet Information Services (IIS). ASP.NET will automatically take care of compiling it.
Note As you may know, you can also use the C# command-line compiler to compile C# programs created in a text editor. The C# compiler, csc.exe, which ships as part of the
.NET Framework, can be found in a folder beneath \Windows\Microsoft.NET\Framework. C# command-line compiler options can be found by searching Visual Studio .NET's online help for C# Compiler Options.
With our sample text editor web service in a file named helloc.asmx, the next step is to use the IIS administrative tools to create a virtual directory that points to it.
It's pretty standard-but not required-to put ASP.NET (and ASP.NET web service) application files in directories below \Inetpub\wwwroot. In this example, I'll put helloc.asmx in C:\Inetput\wwwroot\SybexC1.
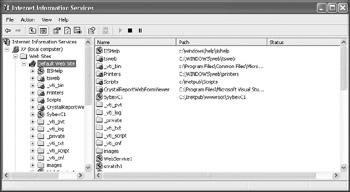
The next step is to configure IIS to provide a virtual directory to point to this location. To do this, open the IIS administrative application (which is shown in Figure 1.2) by using the Start menu to select Control Panel → Administrative Tools → Internet Information Services. Click to expand the local computer and Web Sites icons, shown in the left pane of Figure 1.2, and select Default Web Site.
Figure 1.2: The IIS administrative application is used to configure your local instance of IIS. Note Internet Information Services is called 'Internet Services Manager' in Windows 2000.
Choose Action → New → Virtual Directory, and the Virtual Directory Creation Wizard will open. You must designate the virtual directory with an alias (Figure 1.3)-for example, SybexC1. The alias is used as part of the URL to access the web application-for example, http://localhost/SybexC1/helloc.asmx.

Figure 1.3: A virtual directory is givenan alias.
The next panel of the wizard is used to point at the path to the actual content referenced by the virtual directory (Figure 1.4).
Figure 1.4: The directory that contains the contents is selected in the wizard.
When the wizard is complete, and the virtual directory has been created, you are ready to compile the web service and open it in your browser.
Testing the Web Service
Using the virtual directory you created, and the web service file name, as the URL-for example, http://localhost/SybexC1/helloc.asmx-open the web service in your browser. Opening the service automatically compiles it.
Note If you need to make changes to the code, simply edit the text file and save it. The next time you reopen it in your browser, it will be automatically recompiled.
You'll see a page like the one shown in Figure 1.5, displaying the web service class and the members that it exposes.
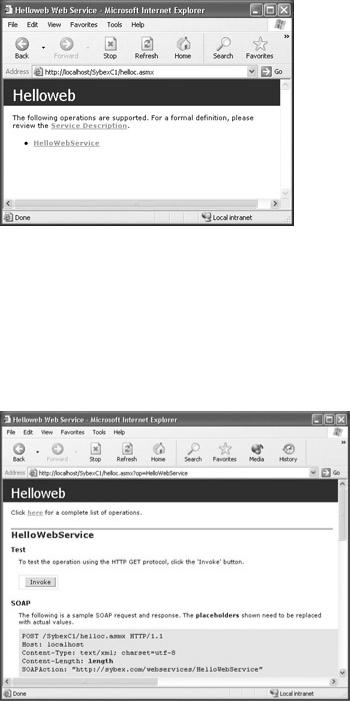
Figure 1.5: A page for the web service is displayed in the browser.
Note that the web service, itself, is just a class with members (here, the only member of class Helloweb is the HelloWebService method). The pages displayed in Figures 1.5 through 1.7 are created around this class on the fly by ASP.NET.
Click the HelloWebService link shown in Figure 1.5 (which, of course, corresponds to the HelloWebService method in the class). The next page (shown in Figure 1.6) allows you to test the web service method using HTTP GET by clicking Invoke.
Figure 1.6: You can test the web service method by clicking Invoke.
A new browser window will open that displays the XML response to the HTTP GET (Figure 1.7). You'll see that the appropriate string-'Hello, Web Service!'-has been returned.
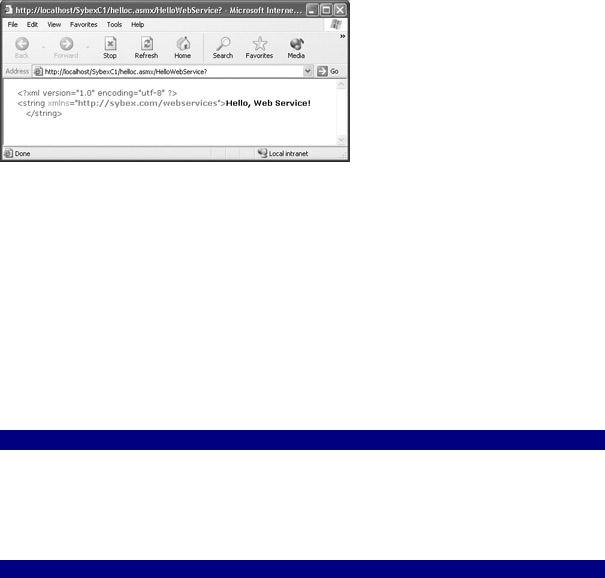
Figure 1.7: A new window displays the web service response to the HTTP GET.
Note Obviously, when the consumption of a web service is embedded in a web or Windows application (as explained in Chapter 2 and in Chapter 3, 'Windows Uses Web Services, Too!'), users don't get to see the raw XML returned from these test pages.
Creating an ASP.NET Web Service in Visual Studio
The example in the previous section is the one and only example you'll see in this book that creates code by hand in a text editor. It's so much easier to unleash the power of .NET using Visual Studio-so why not go for it?
To create a web services project in Visual Studio .NET using C#, open the New Project dialog.
Opening the New Project Dialog
To open the New Project dialog, select File → New → Project. Alternatively, click the New Project button on the Get Started tab of the Visual Studio Start page. If the Start page is not displayed, select Help → Show Start Page.
With the New Project dialog open, select Visual C# Projects in the Project Types pane. Next, in the Templates pane, select ASP.NET Web Service as the project type (see Figure 1.8).
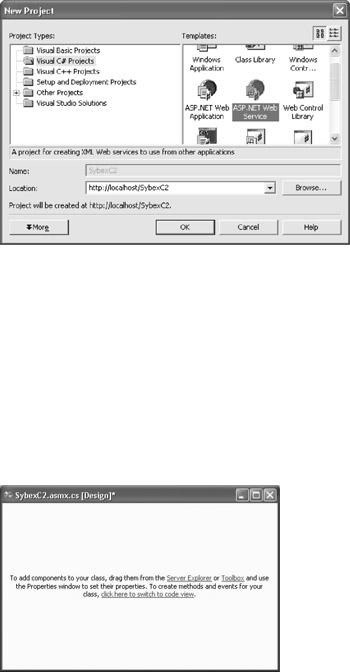
Figure 1.8: To start a new web services project, select ASP.NET Web Service as the project type.
Still in the New Project dialog, in the Location box, delete everything following the web server URL (which is most likely http://localhost/). Now add your own project name following the web server URL-for example, SybexC2. The Location box should now contain http://localhost/SybexC2, meaning that this is the virtual URL that will be used to open the service (with the .asmx file appended) and that Visual Studio .NET has created a folder for the project under the default website location, most likely \Inetpub\wwwroot.
Click OK to create the project. When the new project opens, the designer for the web service (ASMX) module will be displayed (Figure 1.9).
Figure 1.9: W hen the new project is opened, the designer for the web service module is displayed.
When you are building a Windows or web application, the designer for the Windows or web form is a very handy-dandy thing indeed, because you can visually drag and drop controls from the Toolbox onto the designer and have an instance of the control automatically instantiated. Web services, however, are not visual-they consist of class members created in code. It's true that you can drag a component, such as a Timer, onto the designer and have the code that instantiates it automatically generated (a component, as opposed to a control, not having a visual interface at runtime).
But this really doesn't buy you much bang for your buck. Most of the time the designer is not used with web services, because the act of creating a web service means the creation of

classes in code-which is one of the reasons why I started a book about programming C# with web services: it lets me focus on the coding.
So close the designer. We won't be needing it.
Solution Explorer
Visual Studio's Solution Explorer is used to view the different modules that are parts of projects and solutions, to navigate between these modules, and to open tools that interact with these modules.
If you don't see Solution Explorer, open it by selecting View → Solution Explorer. Many of the files that make up the web services project are now displayed in Solution Explorer. To see all the files in the project, click the Show All Files button in the Solution Explorer toolbar (Figure 1.10). You may also need to expand the nodes in Solution Explorer that are denoted with a plus icon.
Figure 1.10: The files that make up a project are displayed in Solution Explorer. Warning The buttons displayed on the Solution Explorer toolbar depend on the project
module selected.
We're primarily interested in the SybexC2.asmx.cs code module, which is the "out of the box" web service that this project will deploy. To view the code contained in this file, select it and click the View Code button in Solution Explorer. Alternatively, you can right-click the file and choose View Code from its context menu, or just hit the F7 key.
Listing 1.2 shows what you'll find in the ready-made web service code module.
Listing 1.2: An 'Out of the Box' ASP.NET Web Service Code Module
using System;
using System.Collections; using System.ComponentModel; using System.Data;
using System.Diagnostics; using System.Web;

using System.Web.Services;
namespace SybexC2
{
///<summary>
///Summary description for Service1.
///</summary>
public class Service1 : System.Web.Services.WebService
{
public Service1()
{
//CODEGEN: This call is required by the ASP.NET Web Services Designer InitializeComponent();
}
#region Component Designer generated code
//Required by the Web Services Designer private IContainer components = null;
///<summary>
///Required method for Designer support - do not modify
///the contents of this method with the code editor.
///</summary>
private void InitializeComponent()
{
}
///<summary>
///Clean up any resources being used.
///</summary>
protected override void Dispose( bool disposing )
{
if(disposing && components != null)
{
components.Dispose();
}
base.Dispose(disposing);
}
#endregion
//WEB SERVICE EXAMPLE
//The HelloWorld() example service returns the string Hello World
//To build, uncomment the following lines then save and build the
//project. To test this web service, press F5
//[WebMethod]
//public string HelloWorld()
//{
//return "Hello World";
//}
}
}
We're not going to go through this in detail, although you should have a general idea of what you are likely to find when you open one of these modules.