

- •Table of Contents
- •Preface
- •What is ASP.NET?
- •Installing the Required Software
- •Installing the Web Server
- •Installing Internet Information Services (IIS)
- •Installing Cassini
- •Installing the .NET Framework and the SDK
- •Installing the .NET Framework
- •Installing the SDK
- •Configuring the Web Server
- •Configuring IIS
- •Configuring Cassini
- •Where do I Put my Files?
- •Using localhost
- •Virtual Directories
- •Using Cassini
- •Installing SQL Server 2005 Express Edition
- •Installing SQL Server Management Studio Express
- •Installing Visual Web Developer 2005
- •Writing your First ASP.NET Page
- •Getting Help
- •Summary
- •ASP.NET Basics
- •ASP.NET Page Structure
- •Directives
- •Code Declaration Blocks
- •Comments in VB and C# Code
- •Code Render Blocks
- •ASP.NET Server Controls
- •Server-side Comments
- •Literal Text and HTML Tags
- •View State
- •Working with Directives
- •ASP.NET Languages
- •Visual Basic
- •Summary
- •VB and C# Programming Basics
- •Programming Basics
- •Control Events and Subroutines
- •Page Events
- •Variables and Variable Declaration
- •Arrays
- •Functions
- •Operators
- •Breaking Long Lines of Code
- •Conditional Logic
- •Loops
- •Object Oriented Programming Concepts
- •Objects and Classes
- •Properties
- •Methods
- •Classes
- •Constructors
- •Scope
- •Events
- •Understanding Inheritance
- •Objects In .NET
- •Namespaces
- •Using Code-behind Files
- •Summary
- •Constructing ASP.NET Web Pages
- •Web Forms
- •HTML Server Controls
- •Using the HTML Server Controls
- •Web Server Controls
- •Standard Web Server Controls
- •Label
- •Literal
- •TextBox
- •HiddenField
- •Button
- •ImageButton
- •LinkButton
- •HyperLink
- •CheckBox
- •RadioButton
- •Image
- •ImageMap
- •PlaceHolder
- •Panel
- •List Controls
- •DropDownList
- •ListBox
- •RadioButtonList
- •CheckBoxList
- •BulletedList
- •Advanced Controls
- •Calendar
- •AdRotator
- •TreeView
- •SiteMapPath
- •Menu
- •MultiView
- •Wizard
- •FileUpload
- •Web User Controls
- •Creating a Web User Control
- •Using the Web User Control
- •Master Pages
- •Using Cascading Style Sheets (CSS)
- •Types of Styles and Style Sheets
- •Style Properties
- •The CssClass Property
- •Summary
- •Building Web Applications
- •Introducing the Dorknozzle Project
- •Using Visual Web Developer
- •Meeting the Features
- •The Solution Explorer
- •The Web Forms Designer
- •The Code Editor
- •IntelliSense
- •The Toolbox
- •The Properties Window
- •Executing your Project
- •Using Visual Web Developer’s Built-in Web Server
- •Using IIS
- •Using IIS with Visual Web Developer
- •Core Web Application Features
- •Web.config
- •Global.asax
- •Using Application State
- •Working with User Sessions
- •Using the Cache Object
- •Using Cookies
- •Starting the Dorknozzle Project
- •Preparing the Sitemap
- •Using Themes, Skins, and Styles
- •Creating a New Theme Folder
- •Creating a New Style Sheet
- •Styling Web Server Controls
- •Adding a Skin
- •Applying the Theme
- •Building the Master Page
- •Using the Master Page
- •Extending Dorknozzle
- •Debugging and Error Handling
- •Debugging with Visual Web Developer
- •Other Kinds of Errors
- •Custom Errors
- •Handling Exceptions Locally
- •Summary
- •Using the Validation Controls
- •Enforcing Validation on the Server
- •Using Validation Controls
- •RequiredFieldValidator
- •CompareValidator
- •RangeValidator
- •ValidationSummary
- •RegularExpressionValidator
- •Some Useful Regular Expressions
- •CustomValidator
- •Validation Groups
- •Updating Dorknozzle
- •Summary
- •What is a Database?
- •Creating your First Database
- •Creating a New Database Using Visual Web Developer
- •Creating Database Tables
- •Data Types
- •Column Properties
- •Primary Keys
- •Creating the Employees Table
- •Creating the Remaining Tables
- •Executing SQL Scripts
- •Populating the Data Tables
- •Relational Database Design Concepts
- •Foreign Keys
- •Using Database Diagrams
- •Diagrams and Table Relationships
- •One-to-one Relationships
- •One-to-many Relationships
- •Many-to-many Relationships
- •Summary
- •Speaking SQL
- •Reading Data from a Single Table
- •Using the SELECT Statement
- •Selecting Certain Fields
- •Selecting Unique Data with DISTINCT
- •Row Filtering with WHERE
- •Selecting Ranges of Values with BETWEEN
- •Matching Patterns with LIKE
- •Using the IN Operator
- •Sorting Results Using ORDER BY
- •Limiting the Number of Results with TOP
- •Reading Data from Multiple Tables
- •Subqueries
- •Table Joins
- •Expressions and Operators
- •Transact-SQL Functions
- •Arithmetic Functions
- •String Functions
- •Date and Time Functions
- •Working with Groups of Values
- •The COUNT Function
- •Grouping Records Using GROUP BY
- •Filtering Groups Using HAVING
- •The SUM, AVG, MIN, and MAX Functions
- •Updating Existing Data
- •The INSERT Statement
- •The UPDATE Statement
- •The DELETE Statement
- •Stored Procedures
- •Summary
- •Introducing ADO.NET
- •Importing the SqlClient Namespace
- •Defining the Database Connection
- •Preparing the Command
- •Executing the Command
- •Setting up Database Authentication
- •Reading the Data
- •Using Parameters with Queries
- •Bulletproofing Data Access Code
- •Using the Repeater Control
- •More Data Binding
- •Inserting Records
- •Updating Records
- •Deleting Records
- •Using Stored Procedures
- •Summary
- •DataList Basics
- •Handling DataList Events
- •Editing DataList Items and Using Templates
- •DataList and Visual Web Developer
- •Styling the DataList
- •Summary
- •Using the GridView Control
- •Customizing the GridView Columns
- •Styling the GridView with Templates, Skins, and CSS
- •Selecting Grid Records
- •Using the DetailsView Control
- •Styling the DetailsView
- •GridView and DetailsView Events
- •Entering Edit Mode
- •Using Templates
- •Updating DetailsView Records
- •Summary
- •Advanced Data Access
- •Using Data Source Controls
- •Binding the GridView to a SqlDataSource
- •Binding the DetailsView to a SqlDataSource
- •Displaying Lists in DetailsView
- •More on SqlDataSource
- •Working with Data Sets and Data Tables
- •What is a Data Set Made From?
- •Binding DataSets to Controls
- •Implementing Paging
- •Storing Data Sets in View State
- •Implementing Sorting
- •Filtering Data
- •Updating a Database from a Modified DataSet
- •Summary
- •Security and User Authentication
- •Basic Security Guidelines
- •Securing ASP.NET 2.0 Applications
- •Working with Forms Authentication
- •Authenticating Users
- •Working with Hard-coded User Accounts
- •Configuring Forms Authentication
- •Configuring Forms Authorization
- •Storing Users in Web.config
- •Hashing Passwords
- •Logging Users Out
- •ASP.NET 2.0 Memberships and Roles
- •Creating the Membership Data Structures
- •Using your Database to Store Membership Data
- •Using the ASP.NET Web Site Configuration Tool
- •Creating Users and Roles
- •Changing Password Strength Requirements
- •Securing your Web Application
- •Using the ASP.NET Login Controls
- •Authenticating Users
- •Customizing User Display
- •Summary
- •Working with Files and Email
- •Writing and Reading Text Files
- •Setting Up Security
- •Writing Content to a Text File
- •Reading Content from a Text File
- •Accessing Directories and Directory Information
- •Working with Directory and File Paths
- •Uploading Files
- •Sending Email with ASP.NET
- •Configuring the SMTP Server
- •Sending a Test Email
- •Creating the Company Newsletter Page
- •Summary
- •The WebControl Class
- •Properties
- •Methods
- •Standard Web Controls
- •AdRotator
- •Properties
- •Events
- •BulletedList
- •Properties
- •Events
- •Button
- •Properties
- •Events
- •Calendar
- •Properties
- •Events
- •CheckBox
- •Properties
- •Events
- •CheckBoxList
- •Properties
- •Events
- •DropDownList
- •Properties
- •Events
- •FileUpload
- •Properties
- •Methods
- •HiddenField
- •Properties
- •HyperLink
- •Properties
- •Image
- •Properties
- •ImageButton
- •Properties
- •Events
- •ImageMap
- •Properties
- •Events
- •Label
- •Properties
- •LinkButton
- •Properties
- •Events
- •ListBox
- •Properties
- •Events
- •Literal
- •Properties
- •MultiView
- •Properties
- •Methods
- •Events
- •Panel
- •Properties
- •PlaceHolder
- •Properties
- •RadioButton
- •Properties
- •Events
- •RadioButtonList
- •Properties
- •Events
- •TextBox
- •Properties
- •Events
- •Properties
- •Validation Controls
- •CompareValidator
- •Properties
- •Methods
- •CustomValidator
- •Methods
- •Events
- •RangeValidator
- •Properties
- •Methods
- •RegularExpressionValidator
- •Properties
- •Methods
- •RequiredFieldValidator
- •Properties
- •Methods
- •ValidationSummary
- •Properties
- •Navigation Web Controls
- •SiteMapPath
- •Properties
- •Methods
- •Events
- •Menu
- •Properties
- •Methods
- •Events
- •TreeView
- •Properties
- •Methods
- •Events
- •HTML Server Controls
- •HtmlAnchor Control
- •Properties
- •Events
- •HtmlButton Control
- •Properties
- •Events
- •HtmlForm Control
- •Properties
- •HtmlGeneric Control
- •Properties
- •HtmlImage Control
- •Properties
- •HtmlInputButton Control
- •Properties
- •Events
- •HtmlInputCheckBox Control
- •Properties
- •Events
- •HtmlInputFile Control
- •Properties
- •HtmlInputHidden Control
- •Properties
- •HtmlInputImage Control
- •Properties
- •Events
- •HtmlInputRadioButton Control
- •Properties
- •Events
- •HtmlInputText Control
- •Properties
- •Events
- •HtmlSelect Control
- •Properties
- •Events
- •HtmlTable Control
- •Properties
- •HtmlTableCell Control
- •Properties
- •HtmlTableRow Control
- •Properties
- •HtmlTextArea Control
- •Properties
- •Events
- •Index

Chapter 13: Security and User Authentication
The method that lets you sign out current users is the FormsAuthentication class’s SignOut method. You could call this method in the Click event handler of a Sign Out button, like this:
Visual Basic
Sub Logout(s As Object, e As EventArgs)
FormsAuthentication.SignOut()
Response.Redirect("Default.aspx")
C#
void Logout(Object s, EventArgs e) { FormsAuthentication.SignOut(); Response.Redirect("Default.aspx");
}
As you can see, the SignOut method is used to clear the authentication cookie. The next line simply redirects the user to the home page.
ASP.NET 2.0 Memberships and Roles
The ASP.NET 2.0 team made a big step forward by implementing common functionality that previously needed to be coded from scratch for every new web application. This functionality includes a membership system, which supports the management of customer accounts, login forms, user registration forms, and so on, and is divided into several layers, which can each be extended or modified to suit your needs.
In particular, this new membership system offers a rich set of login controls, which you find in the Login tab of the Toolbox in Visual Web Developer. That’s right—you can add a form for the creation of new user accounts simply by dragging a CreateUserWizard control into a web form! ASP.NET 2.0 makes implementing many such features extremely easy, but in order to take full advantage of these controls, we’ll need to learn about the framework on which they’re built.
Creating the Membership Data Structures
ASP.NET 2.0’s membership system stores user profile data, including membership and personalization information, in a structured data store consisting of a set of tables, views, and stored procedures. We’ll call these membership data structures, although that name doesn’t take into account the complete range of data they contain.
544
Creating the Membership Data Structures
To manipulate this data, Visual Web Developer provides the ASP.NET Web Site Administration Tool, which lets you add and edit users and their roles, and perform other administrative tasks.
We can use two procedures to create the necessary data structures. The first option is simply to open the ASP.NET Web Site Administration Tool, and click the Security tab. When you do this for the first time, the Web Site Administration Tool will create a database called ASPNETDB in the App_Data folder of your Web Application. This database will consist of two files: ASPNETDB.MDF (the database file) and ASPNETDB_LOG. LDF (the database log file).
Let’s give this a try. With the Dorknozzle web site project loaded in Visual Web Developer, select Website > ASP.NET Configuration. This will load a page like that shown in Figure 13.3.
Figure 13.3. The ASP.NET Web Site Administration Tool
545

Chapter 13: Security and User Authentication
Figure 13.4. The Security tab
Click the Security tab to access the page shown in Figure 13.4.
At this point you can open the Dorknozzle\App_Data folder, where you’ll be able to see your new database files, as Figure 13.5 indicates.
The ASPNETDB database is what's called a User Instance database, whose files are stored locally inside your application’s folder. User instance databases are new to Microsoft SQL Server 2005; they allow you to access database files without attaching them to a SQL Server instance. These databases can easily be copied or transferred, and your application can connect to them as needed.
The new ASP.NET 2.0 login controls, the ASP.NET Web Site Administration Tool, and a number of related classes are able to access the ASPNETDB database
546

Using your Database to Store Membership Data
Figure 13.5. The ASPNETDB database files
automatically, without any configuration. Should you need to access this database through your own code (for example, to customize the data structures), you can do so using the special connection string LocalSqlServer.
There are two things you need to be aware of when using the ASPNETDB database:
Although User Instance databases were designed to be easy to move between systems, you can’t always easily upload them to a hosting server.
It will often result in your application having to work with two databases.
In our case, the Dorknozzle site would need to use both the ASPNETDB database and our old friend, the Dorknozzle database. Whether this is a wise choice or not depends on the specifics of your project, and whether your site’s other data structures need to relate to the membership data of your users.
Fortunately, you have the option to create the necessary data structures within your existing database.
Using your Database to Store Membership Data
In many cases, it’s more beneficial to store the membership data structures in your own database than in the default ASPNETDB database. Indeed, for the purposes of our application, it would be preferable to keep that data inside the existing Dorknozzle database. This way, when we launch the project, we’ll need to
547

Chapter 13: Security and User Authentication
transfer only one database to the production machine, rather than having to migrate two separate databases.
In order to use your database to store membership data, you need to complete two tasks:
Create the necessary data structures in Dorknozzle.
Edit Web.config to specify the new location of these structures, overriding the default configuration that uses the ASPNETDB database.
You can use a tool that ships with ASP.NET 2.0, aspnet_regsql.exe, to customize the data store and add the necessary structures to your own database. This tool can be executed at the Windows command prompt, where you can include various parameters to instantly configure it for your database; alternatively, it can be run in Wizard mode, allowing you to set those options one at a time. To execute the tool, first open a SDK Command Prompt window from the Start menu
(Start > All Programs > Microsoft .NET Framework SDK 2.0 > SDK Command Prompt). At the command prompt, type aspnet_regsql.exe and hit Enter.
The wizard should open with a Welcome screen, where you’ll just need to click
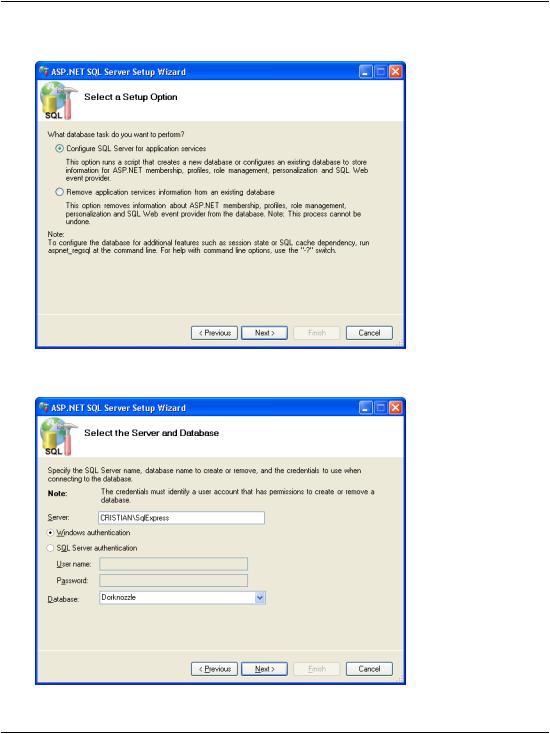
Next. In the next window, which is shown in Figure 13.6, you can choose between adding the data structures to an existing database (or to a new database that can be created for you), or removing the data structures.
Leave the first option selected and hit Next—you’ll see the dialog shown in Figure 13.7. Here, you’ll need to tell the wizard which server and database you want to connect to in order to create those structures. The Server should be LOCAL\SqlExpress (where LOCAL is the network name of your current machine), and the
Database should be Dorknozzle.
Using Remote Servers
You can enter any local or remote server into the Server field. You might use this tool to configure a remote server, for example, when choosing to move the application from your development machine to a remote production machine. In that case, you’d need to select SQL Server Authentication and supply the username and password provided by the server’s administrator.
548
Using your Database to Store Membership Data
Figure 13.6. The SQL Server Setup Wizard
Figure 13.7. Selecting the Server and Database
549

Chapter 13: Security and User Authentication
Click Next, and you’ll be asked to confirm the data you’ve entered. Hit Next again, and expect a delay while the tool finishes setting up the database for you.
When it’s done, click Finish to close the wizard; then, when aspnet_regsql.exe finishes executing and a new prompt is displayed, you can close the SDK Command Prompt window.
More on aspnet_regsql.exe
You can customize or automate this process by supplying parameters to the aspnet_regsql.exe program at the command prompt. For example, instead of running the wizard using the steps above, you could have executed this command at the SDK Command Prompt:
aspnet_regsql -S LOCAL\SqlExpress -E -A all -d Dorknozzle
To have the tool connect using SQL Server Authentication instead of the integrated Windows Authentication, you’d use a slightly different command:
aspnet_regsql -S LOCAL\SqlExpress -U username -P password –A all -d Dorknozzle
Keep in mind that you can also use this tool to configure a remote database, in which case you’d need to mention the remote server address and database instance name instead of the local machine name and local SQL Server instance name.
If you executed the commands shown above, the output would look like that shown in Figure 13.8.
Figure 13.8. Using aspnet_regsql.exe at the command prompt
550

Using your Database to Store Membership Data
Once your database is ready, you’ll need to modify Web.config to configure a new connection string named LocalSqlServer, which points to your database. As we mention earlier, this is the default connection string used by the built-in controls and tools that need access to the membership data.
LocalSqlServer definition in machine.config
Should you ever want to see or modify the default definition of the LocalSqlServer connection string, you can find it in the file \Windows\Microsoft.NET\Framework\version\CONFIG\machine.config.
The machine.config file contains default machine-wide settings, which can be customized by each application’s Web.config file. Here’s the default definition of LocalSqlServer; this snippet also shows you how to connect to a disconnected database, such as ASPNETDB:
<connectionStrings>
<add name="LocalSqlServer" connectionString=" data source=.\SQLEXPRESS;
Integrated Security=SSPI; AttachDBFilename=|DataDirectory|aspnetdb.mdf; User Instance=true"
providerName="System.Data.SqlClient"/>
</connectionStrings>
Modify Web.config so that it removes the default LocaSqlServer connection string, then redefines it with the same connection data as DorknozzleConnectionString:
File: Web.config (excerpt)
<connectionStrings>
<add name="Dorknozzle" connectionString="Server=localhost\SqlExpress;
Database=Dorknozzle;Integrated Security=True" providerName="System.Data.SqlClient"/>
<remove name="LocalSqlServer"/> <add name="LocalSqlServer"
connectionString="Server=localhost\SqlExpress; Database=Dorknozzle;Integrated Security=True"
providerName="System.Data.SqlClient" />
</connectionStrings>
551