- •Table of Contents
- •Preface
- •What is ASP.NET?
- •Installing the Required Software
- •Installing the Web Server
- •Installing Internet Information Services (IIS)
- •Installing Cassini
- •Installing the .NET Framework and the SDK
- •Installing the .NET Framework
- •Installing the SDK
- •Configuring the Web Server
- •Configuring IIS
- •Configuring Cassini
- •Where do I Put my Files?
- •Using localhost
- •Virtual Directories
- •Using Cassini
- •Installing SQL Server 2005 Express Edition
- •Installing SQL Server Management Studio Express
- •Installing Visual Web Developer 2005
- •Writing your First ASP.NET Page
- •Getting Help
- •Summary
- •ASP.NET Basics
- •ASP.NET Page Structure
- •Directives
- •Code Declaration Blocks
- •Comments in VB and C# Code
- •Code Render Blocks
- •ASP.NET Server Controls
- •Server-side Comments
- •Literal Text and HTML Tags
- •View State
- •Working with Directives
- •ASP.NET Languages
- •Visual Basic
- •Summary
- •VB and C# Programming Basics
- •Programming Basics
- •Control Events and Subroutines
- •Page Events
- •Variables and Variable Declaration
- •Arrays
- •Functions
- •Operators
- •Breaking Long Lines of Code
- •Conditional Logic
- •Loops
- •Object Oriented Programming Concepts
- •Objects and Classes
- •Properties
- •Methods
- •Classes
- •Constructors
- •Scope
- •Events
- •Understanding Inheritance
- •Objects In .NET
- •Namespaces
- •Using Code-behind Files
- •Summary
- •Constructing ASP.NET Web Pages
- •Web Forms
- •HTML Server Controls
- •Using the HTML Server Controls
- •Web Server Controls
- •Standard Web Server Controls
- •Label
- •Literal
- •TextBox
- •HiddenField
- •Button
- •ImageButton
- •LinkButton
- •HyperLink
- •CheckBox
- •RadioButton
- •Image
- •ImageMap
- •PlaceHolder
- •Panel
- •List Controls
- •DropDownList
- •ListBox
- •RadioButtonList
- •CheckBoxList
- •BulletedList
- •Advanced Controls
- •Calendar
- •AdRotator
- •TreeView
- •SiteMapPath
- •Menu
- •MultiView
- •Wizard
- •FileUpload
- •Web User Controls
- •Creating a Web User Control
- •Using the Web User Control
- •Master Pages
- •Using Cascading Style Sheets (CSS)
- •Types of Styles and Style Sheets
- •Style Properties
- •The CssClass Property
- •Summary
- •Building Web Applications
- •Introducing the Dorknozzle Project
- •Using Visual Web Developer
- •Meeting the Features
- •The Solution Explorer
- •The Web Forms Designer
- •The Code Editor
- •IntelliSense
- •The Toolbox
- •The Properties Window
- •Executing your Project
- •Using Visual Web Developer’s Built-in Web Server
- •Using IIS
- •Using IIS with Visual Web Developer
- •Core Web Application Features
- •Web.config
- •Global.asax
- •Using Application State
- •Working with User Sessions
- •Using the Cache Object
- •Using Cookies
- •Starting the Dorknozzle Project
- •Preparing the Sitemap
- •Using Themes, Skins, and Styles
- •Creating a New Theme Folder
- •Creating a New Style Sheet
- •Styling Web Server Controls
- •Adding a Skin
- •Applying the Theme
- •Building the Master Page
- •Using the Master Page
- •Extending Dorknozzle
- •Debugging and Error Handling
- •Debugging with Visual Web Developer
- •Other Kinds of Errors
- •Custom Errors
- •Handling Exceptions Locally
- •Summary
- •Using the Validation Controls
- •Enforcing Validation on the Server
- •Using Validation Controls
- •RequiredFieldValidator
- •CompareValidator
- •RangeValidator
- •ValidationSummary
- •RegularExpressionValidator
- •Some Useful Regular Expressions
- •CustomValidator
- •Validation Groups
- •Updating Dorknozzle
- •Summary
- •What is a Database?
- •Creating your First Database
- •Creating a New Database Using Visual Web Developer
- •Creating Database Tables
- •Data Types
- •Column Properties
- •Primary Keys
- •Creating the Employees Table
- •Creating the Remaining Tables
- •Executing SQL Scripts
- •Populating the Data Tables
- •Relational Database Design Concepts
- •Foreign Keys
- •Using Database Diagrams
- •Diagrams and Table Relationships
- •One-to-one Relationships
- •One-to-many Relationships
- •Many-to-many Relationships
- •Summary
- •Speaking SQL
- •Reading Data from a Single Table
- •Using the SELECT Statement
- •Selecting Certain Fields
- •Selecting Unique Data with DISTINCT
- •Row Filtering with WHERE
- •Selecting Ranges of Values with BETWEEN
- •Matching Patterns with LIKE
- •Using the IN Operator
- •Sorting Results Using ORDER BY
- •Limiting the Number of Results with TOP
- •Reading Data from Multiple Tables
- •Subqueries
- •Table Joins
- •Expressions and Operators
- •Transact-SQL Functions
- •Arithmetic Functions
- •String Functions
- •Date and Time Functions
- •Working with Groups of Values
- •The COUNT Function
- •Grouping Records Using GROUP BY
- •Filtering Groups Using HAVING
- •The SUM, AVG, MIN, and MAX Functions
- •Updating Existing Data
- •The INSERT Statement
- •The UPDATE Statement
- •The DELETE Statement
- •Stored Procedures
- •Summary
- •Introducing ADO.NET
- •Importing the SqlClient Namespace
- •Defining the Database Connection
- •Preparing the Command
- •Executing the Command
- •Setting up Database Authentication
- •Reading the Data
- •Using Parameters with Queries
- •Bulletproofing Data Access Code
- •Using the Repeater Control
- •More Data Binding
- •Inserting Records
- •Updating Records
- •Deleting Records
- •Using Stored Procedures
- •Summary
- •DataList Basics
- •Handling DataList Events
- •Editing DataList Items and Using Templates
- •DataList and Visual Web Developer
- •Styling the DataList
- •Summary
- •Using the GridView Control
- •Customizing the GridView Columns
- •Styling the GridView with Templates, Skins, and CSS
- •Selecting Grid Records
- •Using the DetailsView Control
- •Styling the DetailsView
- •GridView and DetailsView Events
- •Entering Edit Mode
- •Using Templates
- •Updating DetailsView Records
- •Summary
- •Advanced Data Access
- •Using Data Source Controls
- •Binding the GridView to a SqlDataSource
- •Binding the DetailsView to a SqlDataSource
- •Displaying Lists in DetailsView
- •More on SqlDataSource
- •Working with Data Sets and Data Tables
- •What is a Data Set Made From?
- •Binding DataSets to Controls
- •Implementing Paging
- •Storing Data Sets in View State
- •Implementing Sorting
- •Filtering Data
- •Updating a Database from a Modified DataSet
- •Summary
- •Security and User Authentication
- •Basic Security Guidelines
- •Securing ASP.NET 2.0 Applications
- •Working with Forms Authentication
- •Authenticating Users
- •Working with Hard-coded User Accounts
- •Configuring Forms Authentication
- •Configuring Forms Authorization
- •Storing Users in Web.config
- •Hashing Passwords
- •Logging Users Out
- •ASP.NET 2.0 Memberships and Roles
- •Creating the Membership Data Structures
- •Using your Database to Store Membership Data
- •Using the ASP.NET Web Site Configuration Tool
- •Creating Users and Roles
- •Changing Password Strength Requirements
- •Securing your Web Application
- •Using the ASP.NET Login Controls
- •Authenticating Users
- •Customizing User Display
- •Summary
- •Working with Files and Email
- •Writing and Reading Text Files
- •Setting Up Security
- •Writing Content to a Text File
- •Reading Content from a Text File
- •Accessing Directories and Directory Information
- •Working with Directory and File Paths
- •Uploading Files
- •Sending Email with ASP.NET
- •Configuring the SMTP Server
- •Sending a Test Email
- •Creating the Company Newsletter Page
- •Summary
- •The WebControl Class
- •Properties
- •Methods
- •Standard Web Controls
- •AdRotator
- •Properties
- •Events
- •BulletedList
- •Properties
- •Events
- •Button
- •Properties
- •Events
- •Calendar
- •Properties
- •Events
- •CheckBox
- •Properties
- •Events
- •CheckBoxList
- •Properties
- •Events
- •DropDownList
- •Properties
- •Events
- •FileUpload
- •Properties
- •Methods
- •HiddenField
- •Properties
- •HyperLink
- •Properties
- •Image
- •Properties
- •ImageButton
- •Properties
- •Events
- •ImageMap
- •Properties
- •Events
- •Label
- •Properties
- •LinkButton
- •Properties
- •Events
- •ListBox
- •Properties
- •Events
- •Literal
- •Properties
- •MultiView
- •Properties
- •Methods
- •Events
- •Panel
- •Properties
- •PlaceHolder
- •Properties
- •RadioButton
- •Properties
- •Events
- •RadioButtonList
- •Properties
- •Events
- •TextBox
- •Properties
- •Events
- •Properties
- •Validation Controls
- •CompareValidator
- •Properties
- •Methods
- •CustomValidator
- •Methods
- •Events
- •RangeValidator
- •Properties
- •Methods
- •RegularExpressionValidator
- •Properties
- •Methods
- •RequiredFieldValidator
- •Properties
- •Methods
- •ValidationSummary
- •Properties
- •Navigation Web Controls
- •SiteMapPath
- •Properties
- •Methods
- •Events
- •Menu
- •Properties
- •Methods
- •Events
- •TreeView
- •Properties
- •Methods
- •Events
- •HTML Server Controls
- •HtmlAnchor Control
- •Properties
- •Events
- •HtmlButton Control
- •Properties
- •Events
- •HtmlForm Control
- •Properties
- •HtmlGeneric Control
- •Properties
- •HtmlImage Control
- •Properties
- •HtmlInputButton Control
- •Properties
- •Events
- •HtmlInputCheckBox Control
- •Properties
- •Events
- •HtmlInputFile Control
- •Properties
- •HtmlInputHidden Control
- •Properties
- •HtmlInputImage Control
- •Properties
- •Events
- •HtmlInputRadioButton Control
- •Properties
- •Events
- •HtmlInputText Control
- •Properties
- •Events
- •HtmlSelect Control
- •Properties
- •Events
- •HtmlTable Control
- •Properties
- •HtmlTableCell Control
- •Properties
- •HtmlTableRow Control
- •Properties
- •HtmlTextArea Control
- •Properties
- •Events
- •Index
Chapter 7: Database Design and Development
Creating Database Tables
Let’s start to create the tables for our intranet application. Tables can be thought of as the drawers in a filing cabinet: just as we could separate different information into different drawers within our filing cabinet, we can break information about employees, departments, and help desk requests into different tables. Tables can also be compared to spreadsheets, as they have rows and columns, but they have many other powerful features. They know what kinds of data they’re allowed to store, they can relate to data contained in other tables, and they can be searched and manipulated with a very powerful language called SQL (which you’ll learn about in Chapter 8).
You can organize the tables in your database using either Visual Web Developer or SQL Server Management Studio, depending on your preference. While SQL Server Management Studio is more powerful, both tools can be used for basic tasks such as creating database tables.
In just a minute, we’ll dive in and create our first table. Before we do, it’s worth giving some thought to how many tables our application will need, and exactly what they’ll contain. We can think of tables as lists of entities. Entities are the rows or records in our table, and would include the employees Zak Ruvalcaba and Cristian Darie. Drawing our tables and their entities on paper is a great way to plan the logical design of the database. The logical design shows what kinds of data our database will need to store, and outlines the relationships that we want to exist between specific pieces of data.
However, unlike a typical spreadsheet file, the tables defined in the logical design do not usually represent the way we’ll store the data in the database. This is taken care of in the physical design phase, in which we create a practical blueprint that allows us to improve database speed, enable relationships between different tables, or implement other advanced features—basically, to optimize our database in various ways.
Your database’s design has important consequences in terms of the way your application works, and how easy it is to extend, so it’s important to take the logical and physical design phases seriously. Let’s take a look at an example, so you can see what I mean.
Let’s say that, in addition to a name, username, and telephone number, you wanted to keep track of the departments in which employees work at Dorknozzle.
258
Creating Database Tables
To achieve this, it might seem logical simply to add a column to the Employees table we discussed above; Figure 7.6 shows how this would look.
Figure 7.6. The Employees table
It looks pretty good, right? Well, it’s okay in theory. However, if you went ahead and implemented this structure in your database, you’d likely end up in trouble, because this approach presents a couple of potential problems:
Every time you insert a new employee record, you’ll have to provide the name of the department in which that employee works. If you make even the slightest spelling error, then, as far as the database is concerned, you have a new department. Now, I don’t know about you, but I’d be pretty upset if my employee record showed me as the only person working in a department called “Enineering.” And what if Dorknozzle Sr decides to rename one of the departments? You might try to update all the affected employee records with the new department name, but, even if you miss just one record, your database will contain inconsistent information. Database design experts refer to this sort of problem as an update anomaly.
It would be natural for you to rely on your database to provide a list of all the departments in the company, so you could, for example, choose to view a list of employees in a particular department. But if, for some reason, you deleted the records of all the employees in that department (don’t ask me why—your human resource issues aren’t my problem!), you’d remove any record that the department had ever existed (although, if you really did have to fire everyone, that might be a good thing…). Database design experts call this a delete anomaly.
These problems—and more—can be dealt with very easily. Instead of storing the information for the departments in the Employees table, let’s create an entirely new table for our list of departments. Similarly to the Employees table, the new
Departments table will include a column called Department ID, which will identify each of our departments with a unique number. We can use those de-
259
Chapter 7: Database Design and Development
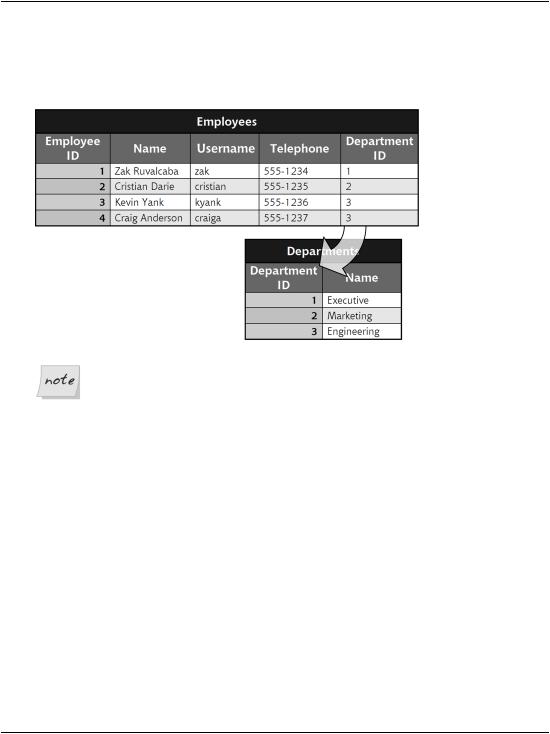
partment IDs in our Employees table to associate departments with employees. This new database layout is shown in Figure 7.7.
Figure 7.7. The Employees table with a new Department ID field
Database Design ... and Implementation
As this example has shown, the way you’d naturally draw your database design on paper, and the best way to implement the design in practice, can be two different things. However, keep in mind that there are no absolute rules in database design, and expert database designers sometimes bend or break rules to meet the requirements of particular circumstances.
What these tables show are four employees and three departments. The Department ID column of the Employees table provides a relationship between the two tables, indicating that Zak Ruvalcaba works in department 1, while Kevin Yank and Craig Anderson work in department 3. Notice also that, as each department appears only once in the database, and appears independently of the employees who work in it, we’ve avoided the problems outlined above.
However, the most important characteristic of this database design is that, since we’re storing information about two types of entities (employees and departments), we’re using two tables. This approach illustrates an important rule of thumb that we must keep in mind when designing databases:
Each type of entity about which we want to be able to store information should be given its own table.
260
Creating Database Tables
With this rule in mind, we can sit back and think about the Dorknozzle application we want to build, as described in Chapter 5. We need to think of the design in terms of the entities that we want to track, and come up with a preliminary list of tables. You’ll become more comfortable with this kind of task as you gain experience in database design, but it’s worth giving it a try on your own at this stage. When you’re done, compare your list to the one below, and see how you did!
Employees
This table keeps track of our company’s employees, each of which is associated with a department.
Departments
This table lists the departments in our company.
Help Desk Problem Reports
This table stores the problem reports that have been filed at Dorknozzle’s employee help desk. A category, subject, and status will be associated with each problem report.
Help Desk Categories
The categories that are available for help desk items (“Hardware,” “Software,” etc.) are stored in this table.
Help Desk Subjects
The subjects that are available for help desk items (“Computer crashes,” “My chair is broken,” etc.) are stored in this table.
Help Desk States
This table stores the various states in which a help desk item can exist (“open” or “closed”).
Breaking down and analyzing the items of information that need to be saved is the first step in determining the database’s design—this process represents the logical design phase that I mentioned earlier. Through this process, we work to build a high-level definition of the data that needs to be saved. This definition can then be transformed into a physical design structure, which contains the details required to implement the database.
As you analyze the data that needs to be stored, you may come across items that we overlooked when we designed the site in Chapter 5, such as help desk item categories, subjects, and states, which aren’t obvious entities in our application’s current design. However, remember that whenever you predict that your database
261