

ASP.NET 2.0 Everyday Apps For Dummies (2006)
.pdfChapter 4: Building a User Authentication Application |
97 |
Building the Register page
The Register page (Register.aspx) is displayed when the user clicks the Not Registered? link on the Login page. This page should be created in the Login directory.
Listing 4-6 shows the listing for the Register page. To see how this page looks in a browser window, you can refer back to Figure 4-5. Note that this page doesn’t require a code-behind file. That’s because the CreateUserWizard control handles all functions required to register a user — automatically — including the updating of the user-account database and reporting errors if someone enters a duplicate user name or other invalid data.
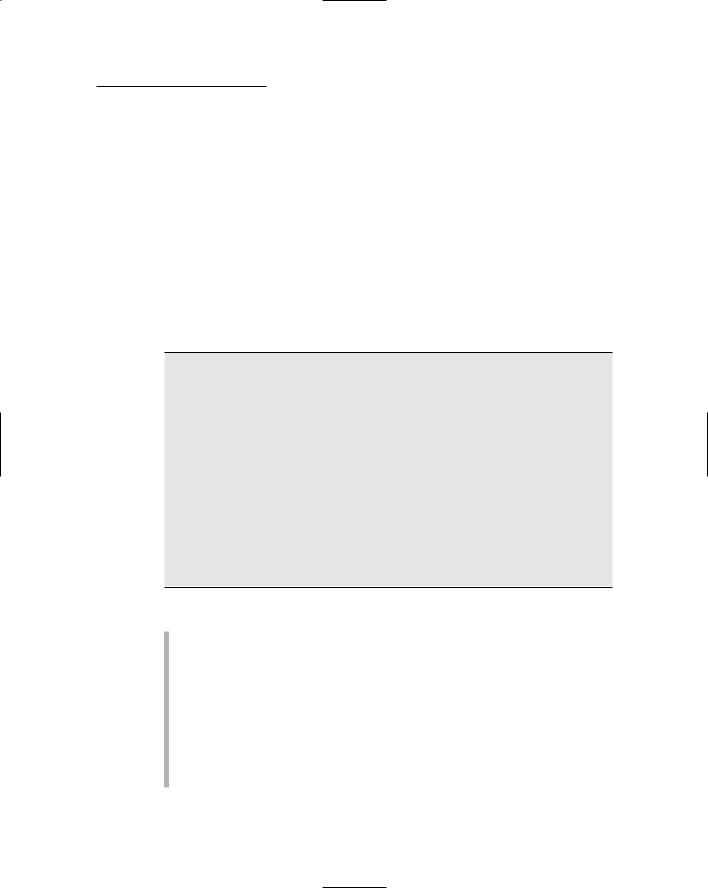
Listing 4-6: The Register Page (Register.aspx)
<%@ Page Language=”C#” AutoEventWireup=”true” |
1 |
MasterPageFile=”~/MasterPage.master” |
|
CodeFile=”Register.aspx.cs” |
|
Inherits=”Login_Register” |
|
Title=”User Registration” %> |
|
<asp:Content ID=”Content1” Runat=”Server” |
2 |
ContentPlaceHolderID=”ContentPlaceHolder1” > |
|
<asp:CreateUserWizard ID=”CreateUserWizard1” |
3 |
runat=”server” |
|
ContinueDestinationPageUrl=”~/Default.aspx” |
|
CreateUserButtonText=”Create Account”> |
|
<WizardSteps> |
4 |
<asp:CreateUserWizardStep |
|
ID=”CreateUserWizardStep1” runat=”server”> |
|
</asp:CreateUserWizardStep> |
|
<asp:CompleteWizardStep |
|
ID=”CompleteWizardStep1” runat=”server”> |
|
</asp:CompleteWizardStep> |
|
</WizardSteps> |
|
<MailDefinition |
5 |
From=”Admin@AcmePirate.com” |
|
Subject=”Your New Acme Pirate Account” BodyFileName=”~/Login/NewUser.txt” />
</asp:CreateUserWizard>
</asp:Content>
The following paragraphs elucidate the salient aspects of this listing:
1 The Page directive specifies that ~/MasterPage.master is the Master Page for this content page.
2 The <Content> element provides the content that’s displayed for the Register page.

98 |
Part II: Building Secure Applications |
3 The CreateUserWizard control lets the user create a new user account. It displays labels and text boxes that allow the user to enter the user’s account name, password (the password must be entered twice), e-mail address, a secret question, and the answer to the question.
The ContinueDestinationPageUrl attribute provides the name of the page displayed when the user successfully creates an account. In this case, the default page (~/Default.aspx) is specified. Note that the user is automatically logged in after the account is created, so the user is not redirected to the Login page.
The CreateUserButtonText attribute changes the text displayed on the Create User button from the default (Create User) to Create Account.
4 The <WizardSteps> element defines the two steps for the
CreateUserWizard control. This <WizardSteps> element
indicates that the default settings for the two steps of the Wizard (<CreateUserWizardStep> and <CompleteWizardStep>) will be used.
5 The <MailDefinition> element provides the information needed to e-mail a confirmation message when the user creates an account. As you can see, this element specifies that the From address for the message will be Admin@AcmePirate.com, the subject will be Your New Acme Pirate Account, and the body of the message will be taken from the text file named NewUser.txt.
The NewUser.txt file is a simple text file that contains the following:
Thank you for creating an account at the Acme Pirate
Supply Web site.
Your user name is: <%UserName%>
Your password is: <%Password%>
Here, the user’s name is substituted for the <%UserName%> variable and the password is substituted for the <%Password%> variable.
Building the Recover Password page
The Recover Password page (Recover.aspx) is displayed when the user clicks the Forgot Password? link on the Login page. This page lets the user
Chapter 4: Building a User Authentication Application |
99 |
recover a forgotten account password. For security’s sake, the user must first answer a question that was provided when the account was created. Then the password is e-mailed to the account on file for the user.
Note that the password is automatically changed when it is recovered. So the previous password on file for the account will no longer work once the password has been recovered.
This Recover Password page is stored in the Login folder so it can be accessed by users who have not successfully logged in.
Listing 4-7 shows the Recover Password page. To see how this page looks in a browser window, you can refer back to Figure 4-7.
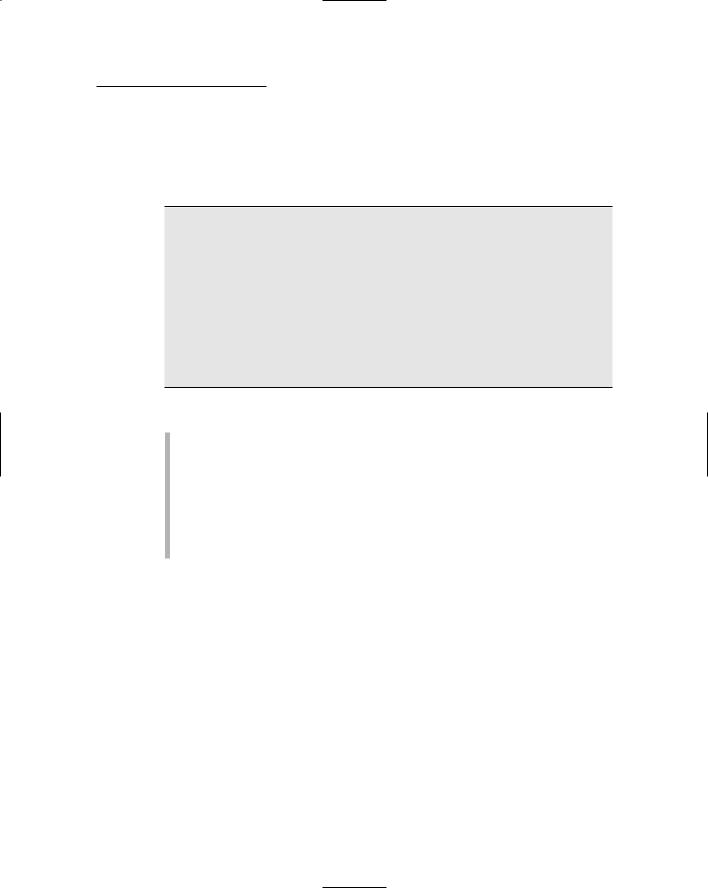
Listing 4-7: The Recover Password Page (Recover.aspx)
<%@ Page Language=”C#” AutoEventWireup=”true” |
1 |
MasterPageFile=”~/MasterPage.master” |
|
CodeFile=”Recover.aspx.cs” |
|
Inherits=”Login_Recover” |
|
Title=”Password Recovery” %> |
|
<asp:Content ID=”Content1” Runat=”Server” |
2 |
ContentPlaceHolderID=”ContentPlaceHolder1” > |
|
<asp:PasswordRecovery ID=”PasswordRecovery1” |
3 |
runat=”server” |
|
SuccessPageUrl=”~/Login/Recovered.aspx” > |
4 |
<MailDefinition |
5 |
From=”admin@LoweWriter.com”
Subject=”Password Recovery” BodyFileName=”~/Login/PasswordMessage.txt”>
</MailDefinition>
</asp:PasswordRecovery>
</asp:Content>
The following paragraphs elucidate the salient aspects of this listing:
1 The Page directive specifies that ~/MasterPage.master is the Master Page for this content page.
2 The <Content> element provides the content that’s displayed for the Recover Password page.
3 The PasswordRecover control lets the user recover a lost password. This control uses a wizard to walk the user through the steps necessary to recover the password. First, the user is prompted for the user name. If the user name is valid, the user is prompted with the secret question. Then, if the user answers the question correctly, the user’s password is changed to a random value, an e-mail

100 Part II: Building Secure Applications
revealing the new password is sent to the address on file for the user, and a success message is displayed. (Note, however, that this application overrides the success message as described in the next paragraph.)
4 The success message displayed by default when the user recovers a forgotten password doesn’t include a link or button that lets the user return to the login page. As a result, the user must use the browser’s Back button to return to the Login page. To avoid that inconvenience, the User Authentication application uses a separate page to confirm that the password e-mail has been sent. This page is identified by the SuccessPageUrl attribute. As a result, the PasswordRecovery control’s default success message is never displayed in this application.
5 The <MailDefinition> element for the PasswordRecover control works just like it does for the CreateUserWizard control. As you can see, the From address is set to Admin@AcmePirate.com, the subject is Password Recovery, and the body of the message is provided by the text file named PasswordMessage.txt.
The PasswordMessage.txt file contains the following:
Thank you for visiting the Acme Pirate Supply Web site.
Your user name is: <%UserName%>
Your password is: <%Password%>
Once again, the user’s name is substituted for the <%UserName%> variable and the password is substituted for the <%Password%> variable.
Building the Password Confirmation page
The Password Confirmation page displays a message that indicates that the user’s password has been e-mailed along with a button that lets the user return to the Login page. The only reason I included this page in the application is to get around a default behavior of the PasswordRecovery control: it displays a message indicating success but leaves the user stranded on the page, with no easy way to get back to the Login page. As a result, rather than display the default success message, the PasswordRecovery control displays the Password Confirmation page, which includes a link back to the Login page.
Chapter 4: Building a User Authentication Application 101
The code for the Password Confirmation page (Recovered.aspx) is shown in Listing 4-8. Refer back to Figure 4-8 to see this page displayed in a browser window.
Listing 4-8: The Password Confirmation Page (Recovered.aspx)
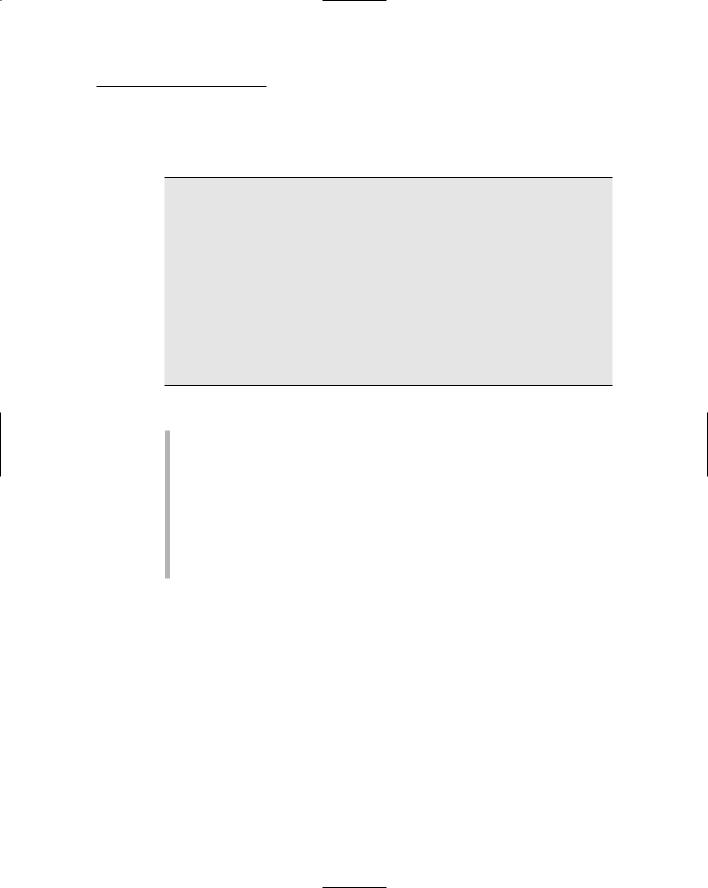
<%@ Page Language=”C#” AutoEventWireup=”true” MasterPageFile=”~/MasterPage.master” CodeFile=”Recovered.aspx.cs” Inherits=”Login_Recovered” Title=”Password Recovered” %>
<asp:Content ID=”Content1” Runat=”Server” ContentPlaceHolderID=”ContentPlaceHolder1” > Your password has been e-mailed to you. Please check your inbox.<br /><br /> <asp:Button ID=”Button1” runat=”server”
PostBackUrl=”~/Default.aspx” Text=”Continue” />
</asp:Content>
1
2
3
The following paragraphs describe the key lines in this listing:
1 The Page directive uses the MasterPageFile attribute to specify the name of the Master Page, ~/MasterPage.master.
2 The <Content> element displays a message that lets the user know that the password has been sent via e-mail.
3 The Button control that defines the “Continue” button uses the new PostBackUrl attribute to return to the main content page. Of course, the user hasn’t logged in; the user will automatically be redirected to the Login page instead.
Building the Change Password page
The Change Password page (ChangePW.aspx) is displayed when the user clicks the Change Password link that appears beneath the banner image on any of the application’s content pages. This link is displayed by a LoginView control in the Master Page, so it only appears when the user is logged in.
Listing 4-9 shows the Change Password page. To see how this page appears when it’s displayed in a browser window, you can refer back to Figure 4-10.

102 Part II: Building Secure Applications
Listing 4-9: The Change Password Page (ChangePW.aspx)
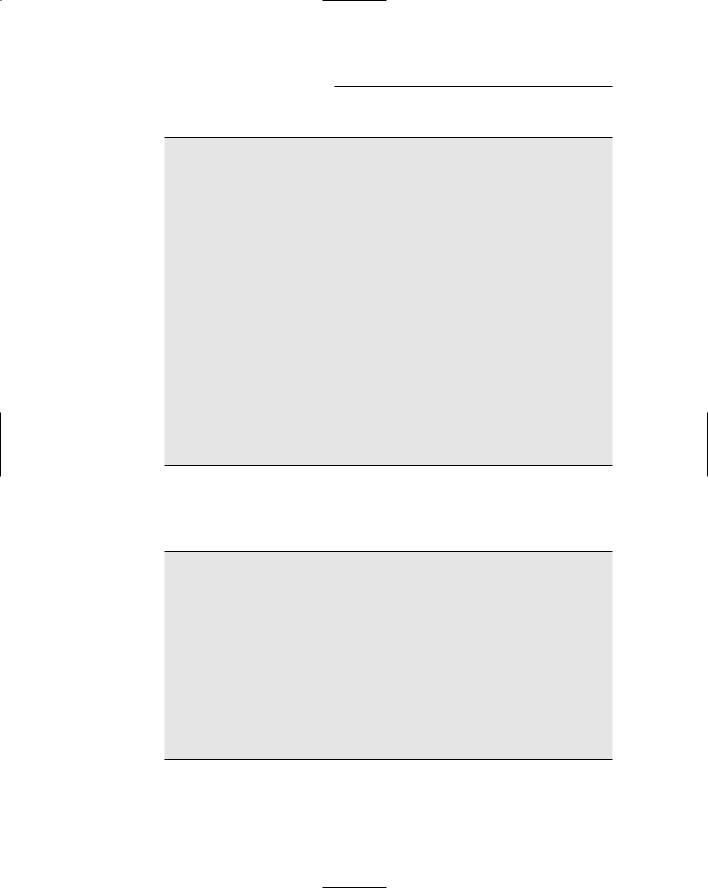
<%@ Page Language=”C#” AutoEventWireup=”true” |
1 |
MasterPageFile=”~/MasterPage.master” |
|
CodeFile=”ChangePW.aspx.cs” |
|
Inherits=”ChangePW” |
|
Title=”Change Password” %> |
|
<asp:Content ID=”Content1” |
2 |
ContentPlaceHolderID=”ContentPlaceHolder1” |
|
Runat=”Server”> |
|
<asp:ChangePassword ID=”ChangePassword1” |
3 |
runat=”server” |
|
ChangePasswordTitleText=
“Change Your Password<br /><br />” PasswordLabelText=”Enter your current password:” NewPasswordLabelText=”Enter the new password:” ConfirmNewPasswordLabelText=
“Confirm the new password:”
/>
</asp:Content>
The following paragraphs (ahem) elucidate the salient aspects of this listing:
1 The Page directive specifies that ~/MasterPage.master is the Master Page for this content page.
2 The <Content> element provides the content that’s displayed for the Recover Password page.
3 The ChangePassword control lets the user change his or her password. The attributes on this control simply customize the labels displayed for the password, new password, and confirm new password fields.
Building the User List page
The User List page is the only page of the User Authentication application that uses a code-behind file. It displays a list of all the users who are currently logged in to the application. The list itself is created by retrieving the user names from the .NET Membership class. The list is assigned to a single label, with break tags (<br />) used to separate the names. As a result, all the users are displayed on a single page.
If you expect the application to have more than a few dozen users logged in at once, you may want to provide a way to page the list. I suggest using a DataGridView control to do that.
Chapter 4: Building a User Authentication Application 103
Listing 4-10 shows the .aspx file for the User List page.
Listing 4-10: The User List Page (UserList.aspx)
<%@ Page Language=”C#” AutoEventWireup=”true” MasterPageFile=”~/MasterPage.master” CodeFile=”UserList.aspx.cs” Inherits=”UserList” Title=”User List” %>
<asp:Content ID=”Content1” Runat=”Server” ContentPlaceHolderID=”ContentPlaceHolder1” > <br />
Users currently online: <br /><br />
<asp:Label ID=”lblUsers” runat=”server” /> <br /><br />
<asp:Button ID=”Button1” runat=”server” Text=”Continue” PostBackUrl=”~/Default.aspx”/>
</asp:Content>
The following paragraphs describe the key lines in this listing:
1
2
3
4
1 The Page directive specifies ~/MasterPage.master as the Master Page.
2 The <Content> element displays the user list and a button that links back to the main content page.
3 The Label control is used by the code-behind file to display the list of logged in users. The ID attribute specifies lblUsers as the ID for this label.
4 The Continue button uses the PostBackUrl attribute to return to the main content page.
Listing 4-11 shows the C# version of the code-behind file for the User List page. As you can see, the user list is generated during the Page Load event for the page. The static GetAllUsers method of the Membership class returns a collection of all the members in the membership database. This collection is defined by the MembershipUserCollection class. Then a foreach statement serves to examine each item in the collection of users. If a user is currently online (as indicated by the IsOnline property), that
user’s name is added to the Text value of the label, along with a <br /> tag so that each user is listed on a separate line.
104 Part II: Building Secure Applications
Listing 4-11: The code-behind file for the User List Page (C# version)
using System; using System.Data;
using System.Configuration; using System.Collections; using System.Web;
using System.Web.Security; using System.Web.UI;
using System.Web.UI.WebControls;
using System.Web.UI.WebControls.WebParts; using System.Web.UI.HtmlControls;
public partial class UserList : System.Web.UI.Page
{
protected void Page_Load(object sender, EventArgs e)
{
MembershipUserCollection users; users = Membership.GetAllUsers();
foreach (MembershipUser user in users)
{
if (user.IsOnline)
lblUsers.Text += user.UserName + “<br />”;
}
}
}
Listing 4-12 shows the Visual Basic version of the code-behind file. It works the same as the C# version.
Listing 4-12: The code-behind file for the User List page (VB version)
Partial Class UserListVB
Inherits System.Web.UI.Page
Protected Sub Page_Load(ByVal sender As Object, _ ByVal e As System.EventArgs) Handles Me.Load Dim users As MembershipUserCollection
users = Membership.GetAllUsers()
For Each user As MembershipUser In users If user.IsOnline Then
lblUsers.Text += user.UserName + “<br />” End If
Next
End Sub
End Class
Part III
Building
E-Commerce
Applications

In this part . . .
In this part, I show you two ASP.NET 2.0 applications that help you sell products in an online store. The first
is a product catalog that lets Web users see what products you have for sale; the second is a shopping-cart application that lets users purchase items from your catalog. It’s a fairly standard practice to combine these applications so users can both browse through the product catalog and (ideally) buy your products.