

Beginning Object-Oriented ASP.NET 2.0 with VB.NET From Novice to Professional
.pdfC H A P T E R 5 ■ I N H E R I TA N C E |
79 |
Salaried label and button. Click the Executive button. The text “20% bonus, country club membership” will appear in the text box next to the Executive label and button. This is shown in Figure 5-10.
Figure 5-10. Results of Salaried and Executive button clicks
You can see that both classes produced the results that were expected. The SalaryEmployee class produced the text string that was in the DetermineBenefit method the salaried class inherited from the Employee class. The ExecutiveEmployee class produced the text string that was created in the DetermineBenefit method of the ExecutiveEmployee class, not the text from the Employee class, since the ExecutiveEmployee class overrode the Employee class.
This is not a completely real-world example, at least not yet. The executive does receive extra benefits such as a bonus and country club membership, but what the existing classes don’t take into account is that the executive also receives the same benefits as the other employees. So the text from the DetermineBenefits base class (employee) must be added to the text defined within the DetermineBenefits method of the Executive class. To do this, you’ll use the keyword MyBase.
The MyBase keyword is used to call a method in the base class while overriding that method in the derived class. This allows you to call the base class’s method while adding more functionality to it in the derived class. MyBase refers to the immediate base class and its inherited members, but it can’t be used to access private properties or methods of the base class. MyBase is a keyword, not an object, so it can’t be assigned to a variable or passed to a procedure. MyBase can’t be used to call methods from the base class defined as MustOverride.
To implement the complete executive benefits package, you must add the MyBase keyword to the DetermineBenefits method of the ExecutiveEmployee class. To do this, add the code & MyBase.DetermineBenefits to the DetermineBenefits method of the Executive class. The resulting implementation of the DetermineBenefits method of the Executive class will have the following code:
Return "20% bonus, country club membership" & MyBase.DetermineBenefits
To test this out, run the application again and click the Executive button. You may need to move within the text box, but you should see the salaried benefits appear along with the executive benefits. The resulting text in the Executive text box would be, “20% bonus, country club membership 70% paid health care, dental insurance, life insurance”.

80 C H A P T E R 5 ■ I N H E R I TA N C E
Abstract Classes
Abstract classes provide a simple skeleton of a class with methods and properties, but most of the methods do not actually have functionality. This creates a more generic class that can be used by others to implement functionality. In general, unlike overloading, where the base class provides a default implementation, an abstract class does not provide (or provides very little) implementation. A method or methods are declared, but they only provide a shell to be filled in when implemented by the derived class later. They are most useful when creating components, because they allow you to add functionality to some of the methods, but leave the functionality of other methods to be added later when the class is implemented for a specific reason. Abstract classes are implemented within VB.NET as classes with the MustInherit scope (access modifier). All methods defined within the abstract class must use the MustOverride key word as mentioned in the previous section. Each method must receive the same number and type of arguments and have the same return value as the overridden method in the abstract class.
To further expand on my example of the different types of employees, consider the possibility of having not just salaried employees and hourly employees but contract and part-time employees as well. For example, it’s possible that the contract employees would be paid only a certain percentage of their contract for each time period (such as a month) or that their pay would be based on a percentage of the contracted work they’ve completed. A part-time employee may be paid on a different schedule than a full-time employee. So you see, we could have four different types of employees—maybe an abstract class that creates a basis for the general employee and then can implement its own functionality would be better.
Our Employee class from this chapter can be changed to be an abstract class. Since there are a variety of types of employees and a variety of types of ways to calculate the pay for an employee, the employee base class may provide a method called CalculatePay but provide no actual implementation. Each class that derives from the base Employee class would need to provide the implementation of the CalculatePay method based on the characteristics of that derived class.
To do this, first delete the Default.aspx file (you will need to create a new web form) and then delete executive.vb from the app_code folder. These files need to be deleted, because they implemented the executive class and the client of an override class. You are now going to make the Employee base class an abstract class, which must be inherited and can’t be overridden. The two examples would get in each other’s way.
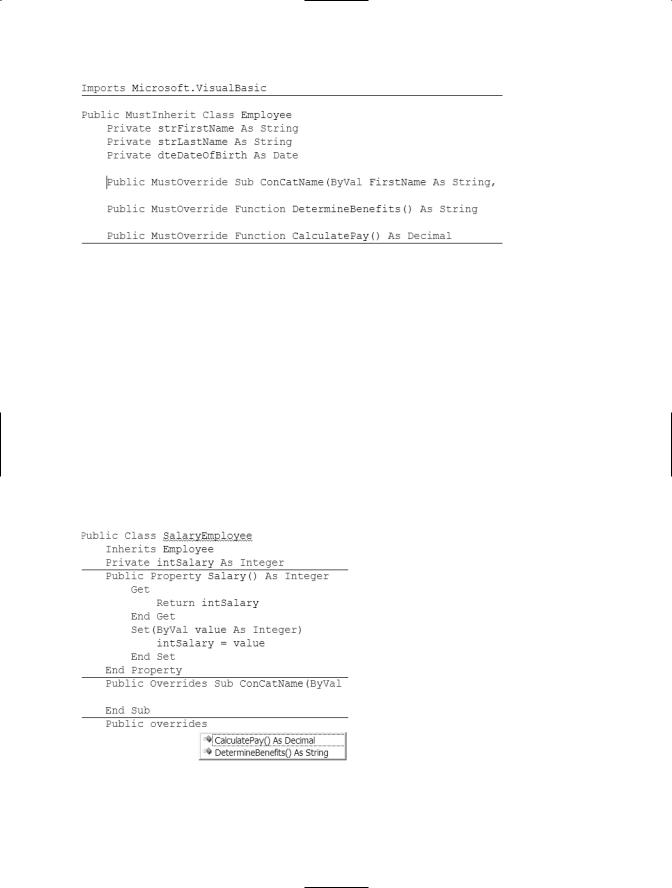
Open the Employee.vb file. Next, add MustInherit between public and class in the class declaration statement, so that the line looks like Public MustInherit Class Employee. Also, add MustOverride before the ConcatName sub you created and used earlier in the chapter. Remove the code that exists within the ConcatName sub and the DetermineBenefits sub.
The resulting sub declarations appear in Figure 5-11.
C H A P T E R 5 ■ I N H E R I TA N C E |
81 |
Figure 5-11. MustOverride
Notice that when MustOverride is present, you can’t define an End Function. Since you can’t define any implementation details, there is no End Function necessary.
Next open the SalaryEmployee.vb file. You will notice the SalaryEmployee class declaration has a blue squiggle line under it. That is VS2005 letting you know that the SalaryEmployee class must override all of the methods in the abstract class (Employee). Create a sub that matches the ConCatName sub, a function that matches the DetermineBenefits function, and a function that matches the CalculatePay function.
As you do this, you will notice if you enter Public Overrides followed by a space, the method names that you have not yet defined will appear as shown in Figure 5-12. Choose the name from the list and press the spacebar to have the method declaration automatically fill in.
Figure 5-12. IntelliSense shows methods to override
82 C H A P T E R 5 ■ I N H E R I TA N C E
After you declare the CalculatePay method, enter the following line of code for the method:
return cdec(intsalary)/52
This will convert the value of the salary to a decimal value, and divide that value by 52, which is the number of weeks in a year. This determines the weekly pay for the salaried employee.
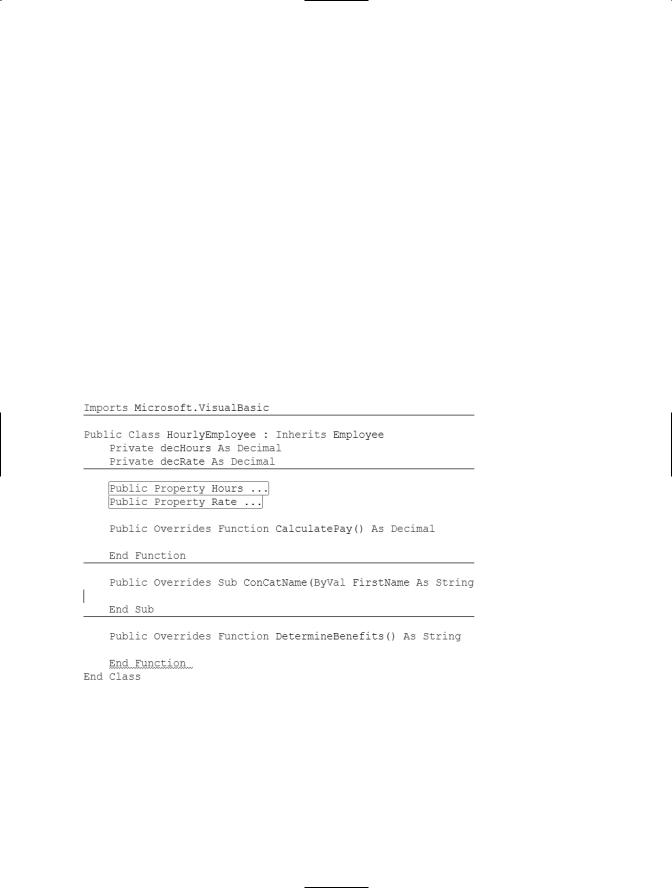
Now you should create a new class called HourlyEmployee that inherits from employee and overrides the necessary methods. The HourlyEmployee class should have a private variable called decHours that is declared as a decimal value, and a private variable called decRate that is declared as a decimal value. Finally, add two public properties to the class—one called Hours and one called Rate. The completed HourlyEmployee class code is shown in Figure 5-13. When you create the new class, the class declaration Public Class HourlyEmployee will be automatically filled in. At the end of the class declaration line add a colon (:) followed by Inherits Employee and press the spacebar. The class methods will be automatically filled in for you.
Figure 5-13. Completed HourlyEmployee class
I collapsed the public properties in Figure 5-13, so that I could show you the methods more clearly. After declaring all of the variables and having the methods created, add the line
Return decHours * decRate
to the CalculatePay method. This will calculate the pay for an hourly employee by multiplying the employee’s hours worked by their hourly rate.
C H A P T E R 5 ■ I N H E R I TA N C E |
83 |
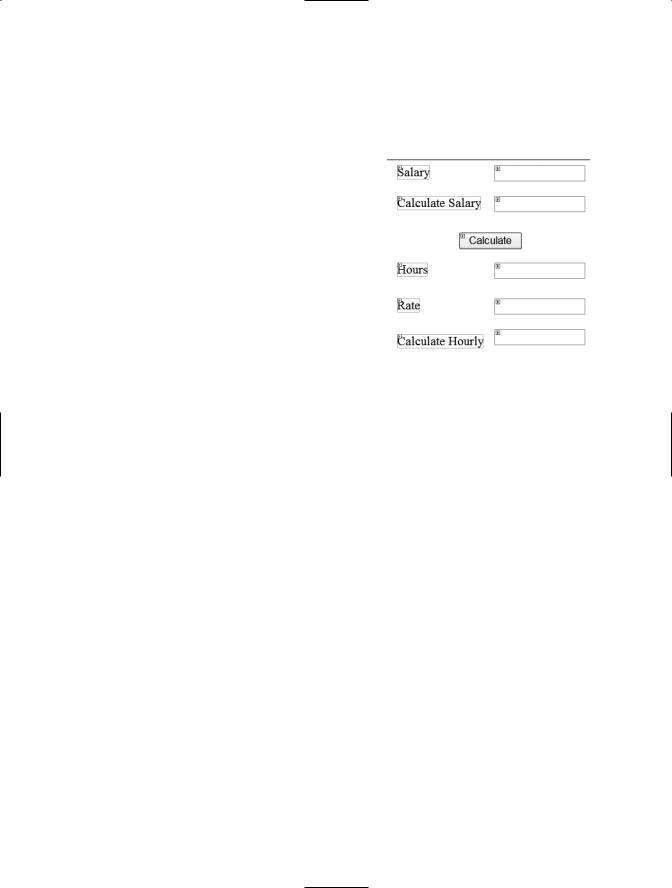
Now you’ve implemented a way to calculate the pay for both the SalaryEmployee class and the HourlyEmployee class. To see how this works, first create a new web form called Calculate.aspx. Next, add a new text box to the Calculate.aspx page called txtCalculateSalary, with a label called lblCalculateSalary and a text
property of Calculate Salary. Next, add a text box called txtSalary along with a label called lblSalary and a text property of Salary. Also, add a text box called txtHours along with a label called lblHours with a text property of Hours. Next, add a text box called txtRate along with a label called lblRate and a text property of Rate. Add a text box called txtCalculateHourly with a label called lblCalculateHourly and a text property of Calculate Hourly. Finally, add a button called btnCalculate with a text of Calculate. The resulting page should look like Figure 5-14.
Double-click the Calculate button, which will take you to the Calculate.aspx.vb file, and then create a btncalculate_click sub. Enter the following code in the btncalculate_click sub:
Dim clsSalaried = SalaryEmployee Dim clsHourly = HourlyEmployee clsSalaried = New SalaryEmployee clsHourly = New HourlyEmployee
clsSalaried.Salary = txtSalary.text txtcalculatesalary.Text = clsSalaried.CalculatePay.ToString
clsHourly.Rate = CDec(Trim(txtrate.Text)) clsHourly.Hours = CDec(Trim(txthours.Text))
txtcalculatehourly.Text = clsHourly.CalculatePay.ToString
This code will allow you to calculate the pay for both a salaried employee (salary divided by 52) and hourly (hours × rate). The first four lines of the code declare the necessary variables and create instances of the correct classes. The next two lines assign the value provided as the salary in txtsalary to the SalaryEmployee class, along with calculating the salary. The final three lines assign the rate and hours, as well as a calculation of the hourly pay.
To test this out, you may first have to set the Calculate.aspx page as the start page. To do this, right-click the Calculate.aspx page within the Solution Explorer, and choose Set
84 C H A P T E R 5 ■ I N H E R I TA N C E
Figure 5-15. Results
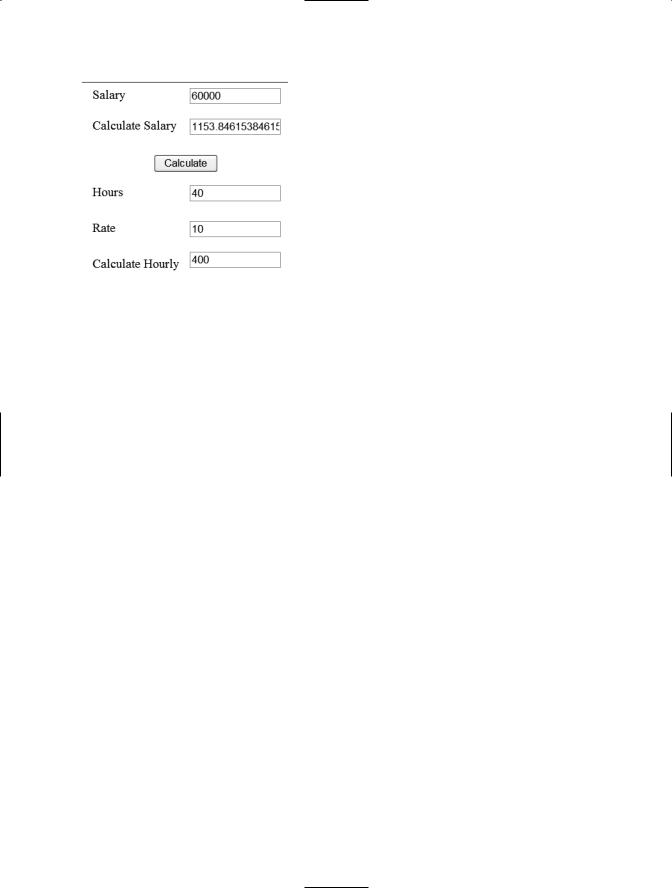
as Start Page. When the application starts, the calculate.aspx page will be the one to appear. Click Debug and then Start without debugging to view the page. Next, type a salary amount in the box next to the label Salary. My example shows 60,000. Next, enter values in the boxes next to the labels Hours and Rate. I entered 40 for the hours and 10 for the rate. Click the Calculate button. My results are shown in Figure 5-15.
You can verify these results with a calculator, but you will find that they are correct. This example has shown you how one abstract class with only method declarations can be used by the client to implement different functionality in different derived classes.
Conclusion
In this chapter, I’ve provided a definition of inheritance as well as an example of how inheritance is implemented within VB.NET. I gave you some information about overriding, and presented an example of how it could be used in a common business process. I also discussed abstract classes and how you can implement them.

C H A P T E R 6
■ ■ ■
Namespaces
In this chapter I’ll cover the definition of a namespace within the .NET Framework and how to create a namespace.
The Purpose of a Namespace
A namespace has several different purposes. First, a namespace organizes the objects that are defined within an assembly. Remember that an assembly is made up of a class. By default, every executable file you create contains a namespace with the same name as the project that was used to create it.
Second, a class library is also a namespace. When you choose to create a class library, you create a namespace. That namespace can then have many classes within it. In this way, a namespace can be used to organize common functionality. For example, my company has a namespace that contains all of the classes that are common to the applications that we build (more on this later in this chapter).
A third purpose of a namespace is to avoid naming conflicts. Namespaces are not an OOP concept, but instead are a logical way to organize classes in a meaningful way developed for the .NET Framework.
.NET Framework Class Library
The best way to learn about namespaces and their uses is to look at the .NET Framework Class Library. The VS2005 Object Browser was introduced in Chapter 2 and will be further used in this chapter to explain the use of namespaces.
To access the Object Browser, choose View then Object Browser, as shown in Figure 6-1. The Object Browser will appear in the middle of the screen.
85

86 C H A P T E R 6 ■ N A M E S PA C E S
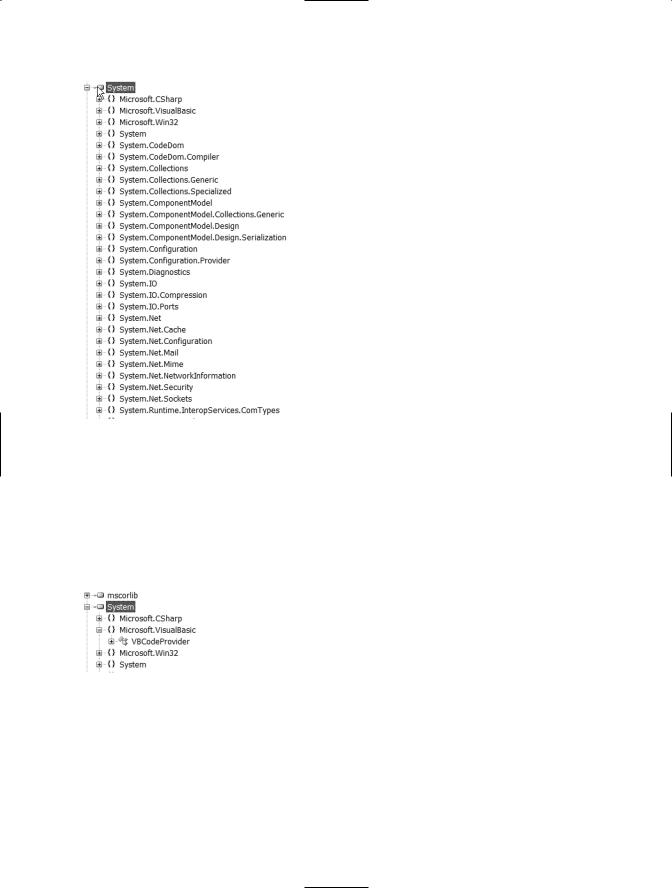
The first screen of the Object Browser will show all of the assemblies within the .NET Class Library. Each of these assemblies contains both namespaces and classes, and may well include other namespaces and the classes associated with those namespaces. If you click on one of the assemblies, additional information will appear at the bottom right of the screen. This is shown for the System namespace in Figure 6-2.
In this example, the first line tells what the assembly’s name is (System) and where the file for the assembly is located, in this case the system.dll file. Below the assembly name and location is other information about the assembly.
If you click on the System assembly and expand it, as shown in Figure 6-3, you will see a list of more namespaces. In this case, the System namespace has
several other namespaces within it. Namespaces found within other namespaces are called nested namespaces. In Figure 6-3, all of the namespaces shown are nested namespaces of the System namespace.
Within the Object Browser, there is a common technique for distinguishing namespaces from classes, methods, and properties. Each type should display differently, and you should become familiar with this technique so that you will know if a type you are looking at is a namespace, class, or something else. Notice, for example, the {} next to the namespace in Figure 6-3. You’ll see that there’s also
a rectangle icon next to the highlighted System in Figure 6-3 that represents an assembly or .dll file. There is an assembly called System (System.dll), which contains all of the items nested under the System assembly in the Object Browser (shown in Figure 6-3).
C H A P T E R 6 ■ N A M E S PA C E S |
87 |
Figure 6-3. Namespaces within the System namespace
Within the System assembly, you will notice namespaces such as Win32, CSharp, and VisualBasic. If you expand the VisualBasic namespace, as shown in Figure 6-4, you will notice there is a class named VBCodeProvider within that namespace. This is the only class within this namespace. The icon next to the VBCodeProvider class represents a class. If you see this icon next to an item within the Object Browser, the item is a class.
Figure 6-4. VBCodeProvider class within the Microsoft VisualBasic namespace
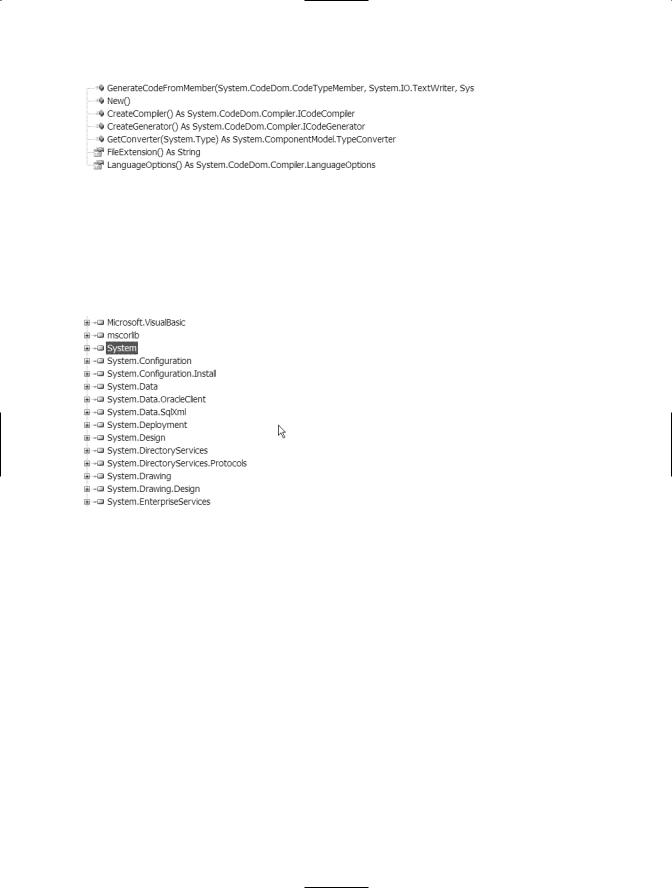
If you click on the VBCodeProvider class, you will see a list of the methods and properties appear in the top right of the Object Browser, as shown in Figure 6-5.
The methods in the list have a small block icon next to them and the properties have what looks like a card with a hand icon next to them.
88 C H A P T E R 6 ■ N A M E S PA C E S
Figure 6-5. Methods and properties of the VBCodeProvider class
If you collapse both the System namespace and System assembly (so that you are back to the top-level assembly view), you will see the other assemblies that make up the
.NET Framework, as shown in Figure 6-6.
Figure 6-6. Assemblies within the
.NET Class Library
Click the + sign next to System.Web. This is the assembly that contains all of the namespaces and classes that can be used for an ASP.NET application. You will notice a namespace called System.Web.UI in that list. If you click the + next to it, you will see a list of classes. These are the classes that make up the System.Web.UI namespace and that can be used to help build your ASP.NET application. You will also notice a class called Control. The Control class is the base class that all ASP.NET web form controls are derived from. Even further down the list is the Page class. This is the class that represents a web form and performs the request and response necessary for a web page to display.
Creating a Namespace
You can create your own namespace to provide better organization for your classes. For example, you might create a namespace named after your company, which might contain the classes with all of the reusable functionality for your company. This may include data access classes, exception classes, and others. Creating this namespace can be very useful for your company, because it would provide all your developers with common functionality. Once a namespace is coded and an assembly created, the assembly can be distributed to all developers and used with all applications. Any changes that need to be made to any of the functionality would need to be made within this namespace and then redistributed.
To begin creating a namespace, create a new class library project. Click File, then New Project. When the New Project window appears, choose Class Library, enter Chapter6 as the project name, and then c:\chapter6 as the location, as shown in Figure 6-7.