

Beginning Object-Oriented ASP.NET 2.0 with VB.NET From Novice to Professional
.pdfC H A P T E R 8 ■ A S P. N E T W E B F O R M S |
139 |
without debugging. The TechConsole.aspx page should now appear. The company name should be displayed along with Technician Console, as shown in Figure 8-7.
The next task is to gather the user name and determine whether that user is a technician, help desk manager, or general user. To accomplish this, a session variable will be created to hold the user’s login name. Also, the Default.aspx page will be set as the default page for the web site and will determine the user’s type. If the user is a technician or help desk manager they will be redirected from the
Default.aspx page to the Technician Console (TechConsole) page. If the user is a general user they will be redirected from the Default.aspx page to the User Console (UserConsole) page.
The first step for this task is to get the user’s login name when the session starts (or when the user accesses the web site). To do this, open the Global.asax page again and find the Session_Start sub. This sub will be executed when the user accesses the web site. Each user who logs in will get their own session. To access the user’s login, the virtual directory within IIS must be setup for Integrated Windows Authentication only. (This was covered in Chapter 6.) Add the following code to the Session_Start sub:
Dim intBegin As Integer Dim strName As String
intBegin = InStr(My.User.Name, "\") If intBegin > 0 Then
strName = Mid(My.User.Name, intBegin + 1, Len(My.User.Name) - intBegin) Else
strName = My.User.Name End If
Session.Add("UserLogin", strName)
Let’s go through this code line by line. The first two lines of code declare variables that are to be used just within this sub. The remainder of the code tries to determine if the user name has a slash in it. The importance of this is that the name property of the User class within the My namespace will provide the windows login which includes the domain. In most cases, you do not need the domain’s name, just the user’s login as you are only working with one domain. (This example assumes you are only working with one domain.) Line 3 determines if there is a \ in the user name. Remember, you can get the currently logged in user’s login name by using the User class within the My namespace. intBegin in line 3 will have a value of 0 if there isn’t a slash in the name. Line 4 determines if there was a slash by determining if intBegin is greater than 0.
Line 5 is a little tricky. This line uses the built-in Mid function to get part of the Name property after the domain’s name and the slash. The first parameter to the Mid function

140 C H A P T E R 8 ■ A S P. N E T W E B F O R M S
is the string to break apart, in this case My.User.Name. The second parameter to the Mid function is where to begin, so in this case you need to add one to intBegin. Remember intBegin will be the position of the slash within the My.User.Name string. The last parameter to the Mid function is how many characters to advance.
Use the Len function to make sure all characters are accounted for. The Len built-in function returns the length of the parameter passed to it, in this case My.User.Name. After Len returns its value, the value of intBegin is subtracted. For example, if the length of a string was 10 and intBegin was 2 the value passed as the final parameter to the Mid function would be 8. This will allow Mid to start at the position represented by intBegin and get the remaining characters of the first parameter. In the end, this will just provide the user’s login name, which follows the domain’s name and the slash.
Line 7 will just assign the value from the Name property of the User class of the My namespace instead of removing the domain’s name.
Finally, Line 9 will add a key value pair to the Session object with a key of UserLogin. This key can be used later to get the currently logged in user.
The next step is to verify that this is working correctly. To do this, add a text box to the Default.aspx page with an ID property of txtUserName. View the code for Default.aspx or open the Default.aspx.vb file. Create the Page_Load sub by using the drop-down lists at the top of the code page. Add
txtUserName.Text = Session("UserLogin").ToString
to the Page_Load sub.
This code will find the UserLogin key within the Session object and provide the value from that key value pair to the text property of the txtUserName control. This will verify that only the user’s login name is being stored in the session variable, rather than the whole user name and the domain name. Start without debugging to verify that the steps of the task were completed correctly.
After verifying that the user’s login is the only part being retrieved and stored in the session object, delete the text box control and any other controls you may have placed on the Default.aspx page. View the code for the Default.aspx page or open the Default.aspx.vb file and then delete the code within the Page_Load sub. The next step in this task is to determine whether the user that is currently logged in is a technician, help desk manager, or general user. If you remember in Chapter 7, you created the clsUser class which contains a New sub to make this very determination. The code that we entered there set the Is Technician public property to True and the IsHelpDeskManager public property to False. Now that needs to be tested. Add the following code to the Page_Load sub within Default.aspx.vb:
Dim clsUser As New User(Session("UserLogin").ToString)
If clsUser.IsTechnician Or clsUser.IsHelpDeskManager Then
Response.Redirect("TechConsole.aspx")
Else
Response.Redirect("UserConsole.aspx")
End If

C H A P T E R 8 ■ A S P. N E T W E B F O R M S |
141 |
The first line of code declares an instance of the User class and passes the UserLogin value from the Session object as the userlogin parameter. Remember that the New sub within the User class sets the public properties IsTechnician and IsHelpDeskManager. Either one of those two types of users is directed to the Technician Console form.
The second line determines whether one of the two public properties of the User class is true.
The third line uses the Redirect method of the Request object to actually send the user to the TechConsole.aspx page. The Redirect method sends the user’s browser to a new page that is provided as a parameter. In this case, the user will be sent to the TechConsole.aspx page.
The last three lines of code are the Else clause that is executed if the user fails both public property tests (meaning the user is a general user). General users are redirected to the User Console page instead of the Technician Console page.
The next step is to test this out. Start without debugging. You should see the Default.aspx web page appear and then immediately transfer to the TechConsole.aspx page. If you close the browser and start without debugging again, you probably won’t see Default.aspx page appear at all, but instead see the Technician Console right off. The reason is that the first time the application is started the .NET Framework does a just-in- time compile of the forms and this may take several seconds. But, after the first loading of the application, it will load much more quickly and so the second time you’ll only see the Technician Console page instead of the Default.aspx page first. This shows that the
task has been tested successfully. The session object holds the user’s login name and then passes it to the user class to determine if the user’s login is a technician, help desk manager, or general user.
The next task is to add a button to the Technician Console that will allow help desk managers to access the administration forms for the application. This should be restricted to help desk managers only. To do this, the technician console page must be opened and the user must be examined again to determine their status of either technician or help desk manager. It’s also possible for a user to jump into the middle of the application and figure out where the Technician Console is and therefore see tickets that they should not see. In the help desk application this is not a major issue. However, this task will also show how to redirect a user that may have jumped into the middle of your application.
The first step in this task is to open the Technician Console (TechConsole.aspx) page, add a button with an ID of btnAdministration, and then add a text of Administration. Next, view the code for the page or open TechConsole.aspx.vb from the Solution Explorer. The Page_Load sub should already exist and have code to assign the company name to the company name label. Within the Page_Load sub add
Dim clsuser As New User(Session("UserLogin").ToString)
If Not clsuser.IsHelpDeskManager Then
If Not clsuser.IsTechnician Then
Response.Redirect("UserConsole.aspx")

142 C H A P T E R 8 ■ A S P. N E T W E B F O R M S
Else
btnAdministration.Visible = False End If
Else
btnAdministration.Visible = True End If
The first line of code will create a new instance of the User class and pass the value from the UserLogin session object as a parameter.
The second line will determine if the user is a help desk manager by checking the IsHelpDeskManager property of the User class.
The third line will only be executed if the user is not a help desk manager and will determine whether the user is a technician.
The fourth line will only be executed if the user is neither a technician nor a help desk manager. This line will redirect the user’s browser to the User Console. This takes care of a user that may attempt to jump into the middle of the application without the correct security.
Line 6 will only be executed if the user is a technician and will set the visible property of the Administration button to false, making the Administration button invisible to the technician.
Line 9 will only be executed if the user is a help desk manager, and will set the visible property of the Administration button to true, making the Administration button visible to the help desk manager.
Now it is time to test this task. Start without debugging. The Technician Console page will appear, but the Administration button will not.
To test the scenario of the user being the help desk manager, open the clsUser.vb file and change the assignment statement blnIsHelpDeskManager = False within the New Sub to blnIsHelpDeskManager = True. The user will now be recognized as both a technician and a help desk manager and the Administration button should appear. Start without debugging again and the Technician Console will appear along with the Administration button.
Finally, to test the scenario where the user is neither a technician nor a help desk manager, change both lines within the New Sub in the User class to assign false. Start without debugging again. This time the User Console screen should appear instead of the Technician Console. This shows the redirect is working correctly for a user that is neither a technician nor a help desk manager.
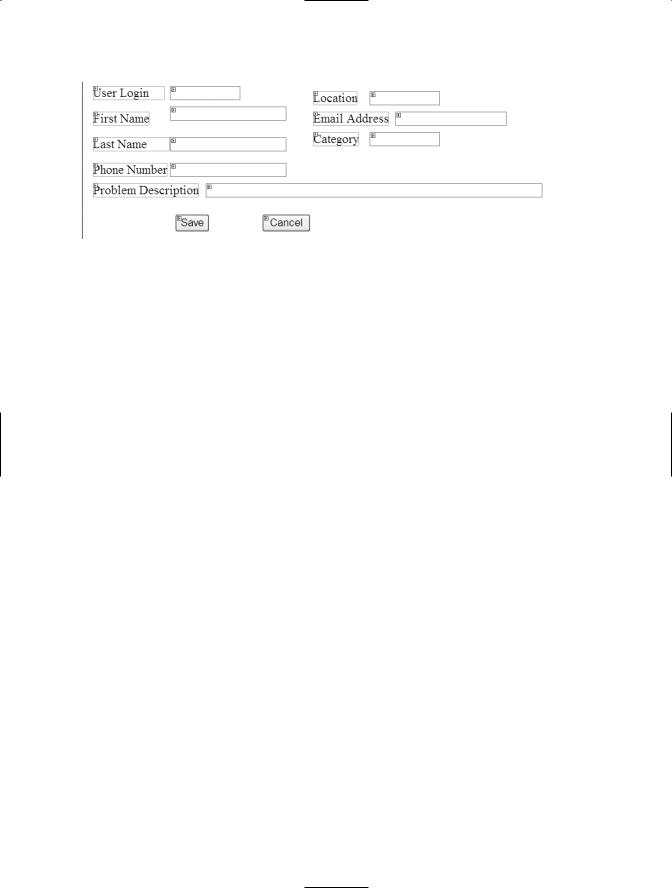
The next task is to provide a form to allow users to add a new ticket. This includes adding a form, the necessary controls, and the code to provide the inputted values to the Ticket class. The first step is to create a new web form called AddTicket. On the form, add labels and text box controls for user login, first name, last name, phone number, location, e-mail address, problem description, and category. Also, add a button with an ID property of btnSave and a text property of Save. The completed form design should look like Figure 8-8.
C H A P T E R 8 ■ A S P. N E T W E B F O R M S |
143 |
Figure 8-8. Design View of Add Ticket web form
Now that the form is laid out, it’s time to add the code to save the ticket. To do this, double-click the Save button. This will open up the AddTicket.aspx.vb file and automatically create a Click event for the Save button. Before adding the necessary code to the click event, a variable of type Ticket class needs to be created. To do this, move to the top of the code page (just under the class name) and add Private clsTicket as Ticket. The class needs to be initiated within the Save click event and the information needs to be added from the form to the class. To do this, use the following code:
clsTicket = New Ticket
clsTicket.UserLogin = Trim(txtUserLogin.Text) clsTicket.FirstName = Trim(txtFirstName.Text) clsTicket.LastName = Trim(txtLastName.Text) clsTicket.PhoneNumber = Trim(txtPhoneNumber.Text) clsTicket.LocationID = Trim(txtLocation.Text) clsTicket.EmailAddress = Trim(txtEmailAddress.Text) clsTicket.Category = Trim(txtCategory.Text) clsTicket.ProblemDescription = Trim(txtProblemDescription.Text)
The first line of code creates a new instance of the Ticket class and assigns it to the variable of type Ticket. The remaining lines assign the values from the form to the public properties of the Ticket class. Notice the use of the built-in Trim function. This function takes one parameter and returns a value that has stripped any blank spaces from the text. You should use this when passing data to a database. If, for example, the text box will hold 20 characters, and the user only types 5 but then presses the space bar 10 times, the value of the text property of the text box would still be 15 characters long. The Trim function would change that to only 5 characters long by removing the extra spaces.
You will probably also notice a squiggly line under txtlocation.text. The reason for this is that the public property of the Ticket class for location is expecting an integer. For now this is fine, but in Chapter 9 the location text box will be changed to a drop-down box, which will in turn provide a number value.

144 C H A P T E R 8 ■ A S P. N E T W E B F O R M S
After adding the previous code, the public properties of the Ticket class have all been set. The next step is to call the NewTicket method of the Ticket class. When a user is adding an item, whatever that item might be, it’s a good idea to let the user know that the information has been added. For that reason, open the AddTicket.aspx page again and add a label control with an ID property of lblStatus and a blank text property. This label will be used to let the user know whether the ticket was added or not and if the ticket was added what the ticket number was. Remember, the NewTicket method will return a Boolean value and the TicketID public property will contain the ID of the newly added ticket (this is hardcoded for now). Go back to the AddTicket.aspx.vb page and add
If clsTicket.NewTicket Then
lblStatus.Text = "Ticket added. Ticket number is " & clsTicket.TicketID Else
lblStatus.Text = "Ticket was not added" End If
to the end of the click event for the Save button.
The first line of code makes a call to the NewTicket method of the Ticket class. The NewTicket method is going to return either true or false. Based on the returned value, either line 2 or line 4 will be executed next. Notice line 2 includes the ticketid public property of the Ticket class.
The next step is to allow the user to cancel the inputted values and start again. To do this, add a new private sub called ClearValues within the AddTicket.aspx.vb file. Within the ClearValues sub set the text property of each control on the form to "" which will leave them blank. The code will look like
Private Sub ClearValues() txtUserLogin.Text = string.empty txtFirstName.Text = String.Empty txtLastName.Text = String.Empty txtPhoneNumber.Text = String.Empty txtLocation.Text = String.Empty txtEmailAddress.Text = String.Empty txtCategory.Text = String.Empty txtProblemDescription.Text = String.Empty End Sub
The ClearValues sub needs to be called from the click event of the Cancel button. To do this, choose btnCancel (or your own name for the Cancel button) from the top left dropdown list and then choose Click from the top right drop-down list. The btnCancel_Click sub should appear. Within that sub, add the following line of code, ClearValues. When the Cancel button is clicked, the ClearValues sub will be called. This example also shows that

C H A P T E R 8 ■ A S P. N E T W E B F O R M S |
145 |
the code for an event does not necessarily need to be within the event handlers declaration. You can also use this type of separation if you have a sub or function that needs to be called from multiple events. For example, you may want to clear all of the values on the form after the ticket is saved to allow the user to add another ticket immediately. Since you already have the ClearValues sub defined you would only need to call the ClearValues sub at the end of the click event for the Save button.
The last step in this task is to test the code. To do this, click on the AddTicket.aspx file in the Solution Explorer and choose Start without debugging from the Debug menu. Usually during the first test of a form, class, and, ultimately, database, I will type the name of the field into the text box so that I can make sure that each public property (and database column) is getting the correct value. For example, I would type User Login into the text box next to the User Login label. The only exception for this form is the location. Type 1 into the location field. The resulting test data should look like Figure 8-9.
Figure 8-9. Test data in AddTicket form
After the test data is added, click the Save button. After the Save button has been clicked, the information from the form will be assigned to the public properties of the Ticket class and then the NewTicket method will be called. Also, within the NewTicket method the private function ValidateTicket will be called. You can verify this by adding a breakpoint to the first line of code within the Save button click event on the form and then debugging and stepping through the code. After the button is clicked, the label that was added should show that the ticket has been added and then give the ticket ID value of 10.
Also notice that the information entered is still within the text boxes. Again this is an example of the view state which holds the data for each control and posts it back to the form automatically, without the developer needing to do it specifically.
The last test to be conducted for this task would be to click the Cancel button. When you click the Cancel button all of the fields should be blanked out. Remember the click event of the Cancel button calls the ClearValues sub which assigns a blank value to the text property of each text control.
146 C H A P T E R 8 ■ A S P. N E T W E B F O R M S
The last task for this chapter will be to make sure the validation of the public properties is correct and, if the validation fails, that the user is notified. Remember the NewTicket method of the Ticket class has a Try…Catch pair within it that throws any exceptions. Since the NewTicket method is called from the Save button’s click event, the click event would receive any thrown exceptions and must be able to handle them.
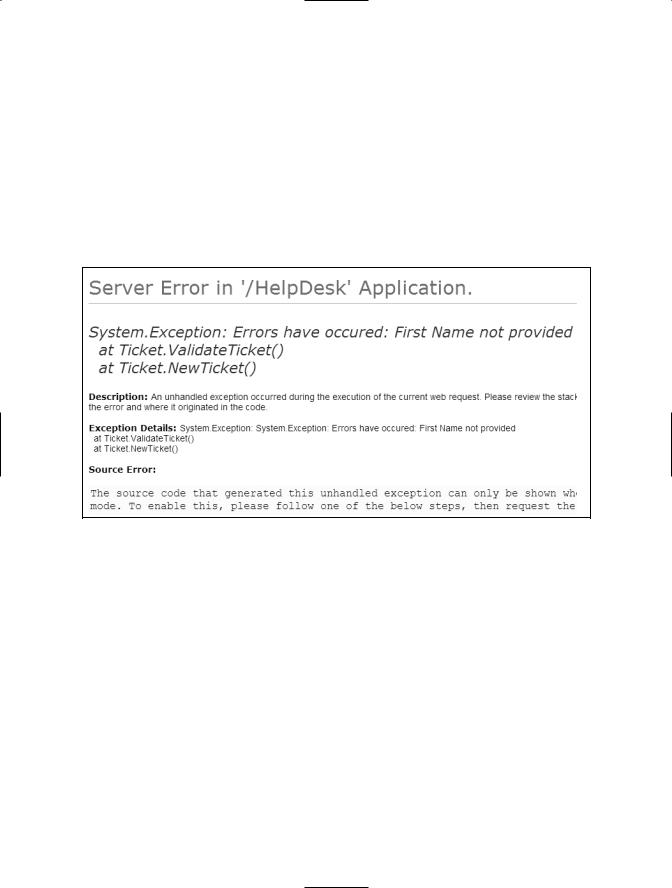
To first show what happens when an exception is thrown but not handled, choose Start without debugging from the Debug menu. Enter a value for each field on the AddTicket.aspx form except the First Name text box (make sure you enter a number for location). Click the Save button. You will see a page that looks similar to Figure 8-10.
Figure 8-10. Exception not handled
This type of message is not very easy for a user to understand. So you’ll need to add some exception handling to the Save button click event to handle any exceptions. To do this, add the word Try above the clsTicket = new Ticket line within the Save button click event. At the end of the code for the save button click event add
Catch ex As Exception lblStatus.Text = ex.Message End Try
This first line of code will catch any exceptions thrown from the code being executed. This catch statement will find any exceptions within the code that are between the try statement and this catch statement, including nested calls. Since the call to the NewTicket method of the Ticket class is between the Try and Catch statements, any exception thrown from the NewTicket method will be caught by this Catch statement. The second line of
C H A P T E R 8 ■ A S P. N E T W E B F O R M S |
147 |
code assigns the message property of the exception to the text property of the label that is on the form. This will basically display the error message for the user to see.
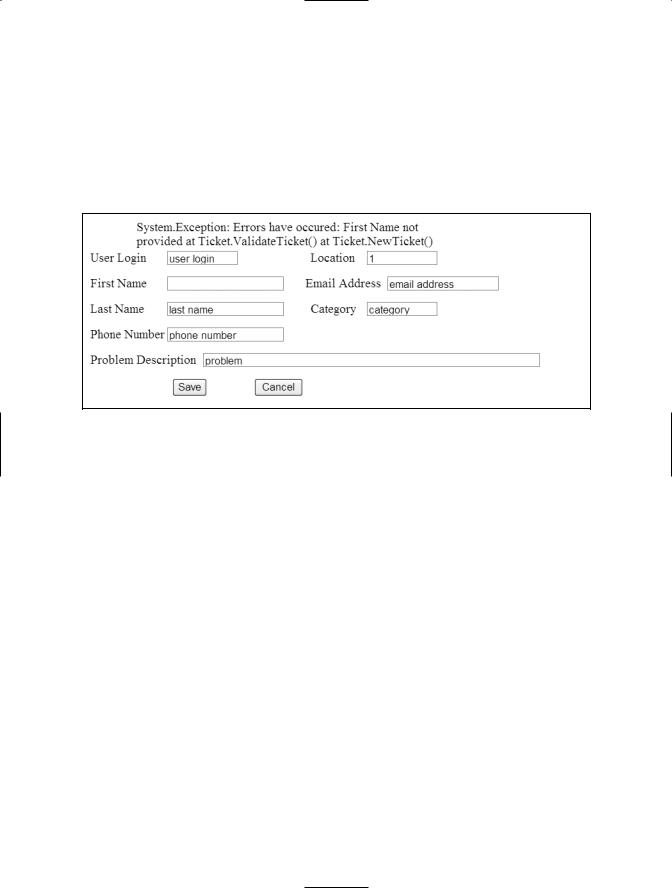
To test this out, choose Start without debugging and then, when the form opens, again enter information for all fields except the First Name field (making sure to enter a number for location). This time a more readable message will appear, as shown in Figure 8-11, and the form will still be displayed.
Figure 8-11. New Exception message
Now you know that the ValidateTicket method within the Ticket class is working correctly and that the exceptions are moved from the class code to the user interface.
Conclusion
In this chapter I provided an overview of the use of the Web Form Designer as well as an explanation of the life cycle of an ASP.NET page. I also expanded the Help Desk application you created in the previous chapter.
In the next chapter I’ll provide more information about controls and use that information to improve the Help Desk application.
