

Beginning Object-Oriented ASP.NET 2.0 with VB.NET From Novice to Professional
.pdfC H A P T E R 8
■ ■ ■
ASP.NET Web Forms
In this chapter, I’ll provide an introduction to ASP.NET web forms by first providing an overview of how web forms work and then showing you how to use them to develop a web site. I’ll expand on the previous chapter by adding forms to the web site that you created in Chapter 7. The forms will help to create more of a functioning site.
Using the Web Forms Designer
Before you can add a web form to your web site, you need to understand how both the Web Forms Designer and the Page class works. The Web Forms Designer is the tool within VS2005 that allows you to design and build web forms. To begin designing and building your web forms with Web Forms Designer, create a new web site project called Chapter8. When the web site project is created the area in the center of the screen that you see is the Web Forms Designer.
Notice that there are several tabs at the bottom of the Web Forms Designer window. The tab that is highlighted by default is labeled Design. The Design tab of the Web Forms Designer allows you to design the form by adding controls from the toolbox. The Source tab displays the HTML source code that will be used by web browsers to display the web form. You must have clicked on the Source view to see the HTML source. While in the Source view, you can click on the other tabs at the bottom to the right of the Source tab. These tabs include HTML and Body by default. When you click one of these tabs the HTML source within those HTML tags is highlighted.
■Note HTML tags are out of the scope of this book. However, you should be familiar with HTML tags when creating web forms, although it is not required. HTML tags are simply used to define the web form in a way that Internet browsers can understand. The Web Forms Designer automatically creates the HTML tags that are needed for a web form that is defined within VS2005.
129
130 C H A P T E R 8 ■ A S P. N E T W E B F O R M S
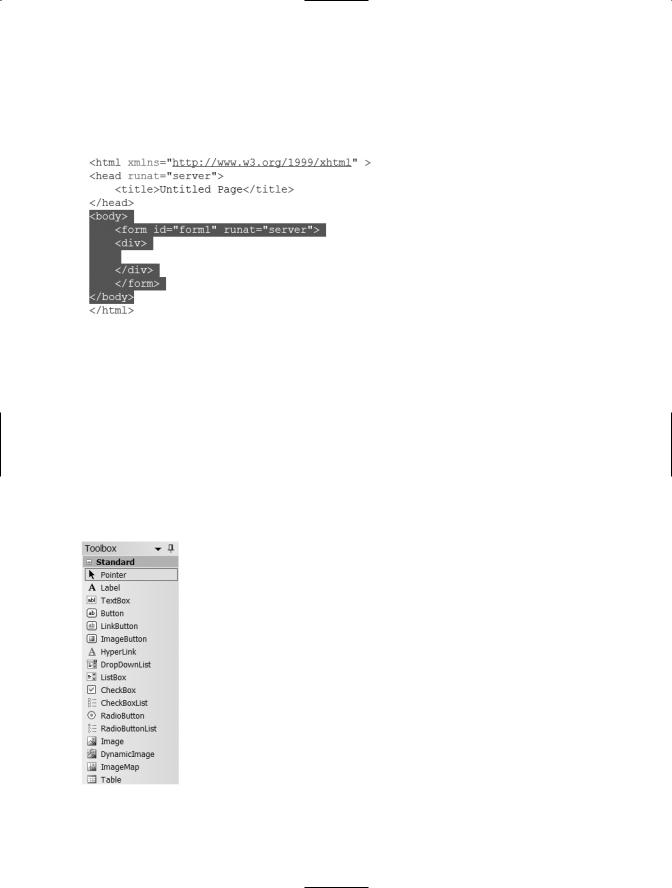
For example, if you click the Body tag, all HTML tags between the opening Body tag and the closing Body tag are highlighted, as shown in Figure 8-1. This allows you to verify both the opening and closing tags are there and helps with tag organization.
Figure 8-1. Content of Body tags
Adding Controls
The Web Forms Designer allows you to design forms without creating the HTML that is required for the Internet browsers to display the page. Instead, you can drag and drop web form controls from the Toolbox onto your page. After you drop the control on the form you can move it around and resize it, as well as provide values for various properties.
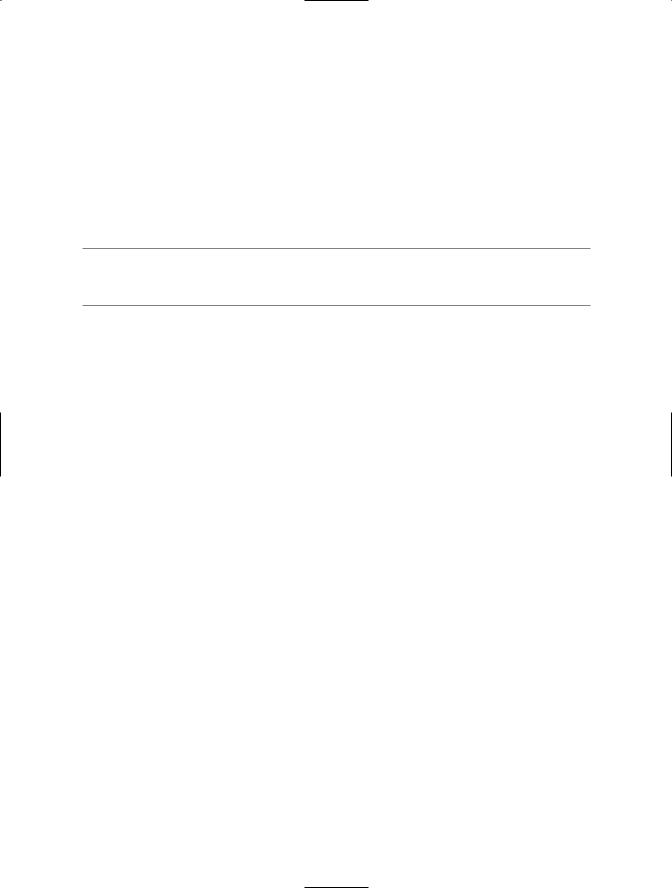
The Toolbox appears on the left side of the Web Forms Designer by default and is shown in Figure 8-2.
Figure 8-2. Web Forms Designer Toolbox

C H A P T E R 8 ■ A S P. N E T W E B F O R M S |
131 |
The ASP.NET Page Class
A web form created by the Web Forms Designer, along with any code that is associated with that particular page, makes up an ASP.NET page. When a page is compiled, a new class derived (inherited from) the base Page class is generated and compiled. The base class is System.Web.UI.Page. If the page contains controls, the Page class is a container for the controls. An instance of each control is created at run time and then that control renders output that the browser can understand. Since the ASP.NET page is a class, it has properties, methods, and events similar to any other class. The ASP.NET Page class raises events, and you can write event handlers that execute when an event is raised. To view the possible events for the page, open the Default.aspx.vb code file.
After the code page appears, click the drop down list at the top left of the Designer that says General. Select Page Events from the list, as shown in Figure 8-3.
Figure 8-3. Choosing Page Events
After choosing the Page Events category from the left drop-down list, go to the dropdown list on the right to see all of the page events as shown in Figure 8-4.
Figure 8-4. List of Page Events
To write code that will be executed when one of the events occurs, click the page event on the right drop-down list that you want to trigger your code. For example, to add code to the Load event, choose Load, as shown in Figure 8-5.

132 C H A P T E R 8 ■ A S P. N E T W E B F O R M S
Figure 8-5. Choosing the Load Page Event
After choosing Load from the drop-down list the sub definition will appear. You can add your code here to be executed when the load event is triggered.
Page Lifecycle
All web forms have a life cycle, which is the process that each form goes through. Understanding this process or life cycle will help you understand where to place your code and when that code will be executed.
Round Trips
It is also very helpful to remember that all web pages by nature are stateless. Stateless means that they are not connected to the web server at all times. When an HTML page is called from a browser client, the web server sends the HTML content to the browser. Then, the browser interprets the HTML content and displays it. Once the HTML is received by the browser, the connection to the server is disconnected. This process of sending HTML content to the client browser and then the client browser responding back to the server is called a round trip. In web forms, most of the user actions result in a round trip. For example, the click of a button on a web form by the user generates a round trip to the server to determine what to do when that button is clicked. Since each time an event is triggered a round trip is made, most controls do not have an event for mouse over. This would require too many round trips.

C H A P T E R 8 ■ A S P. N E T W E B F O R M S |
133 |
View State
View state is a server control property that allows the saving and restoration of information in the control across multiple requests to the same page. The view state property is enabled for all server controls by default. When a page is processed, the current state of the page and its controls are combined into a string and then saved in the page as a hidden field. When the page is sent back to the server, the page parses this string and
restores the property information to the page. Since this is done automatically, you don’t need to be concerned with losing data from one user action to the next. For example, if a user clicks a Save button, but you have a validation routine that determines the information can’t be saved, there is no need to determine the values that were in any of the controls on the form when the user clicked the Save button. Those values will appear in the controls, so the user can view them again if necessary.
To see this working, open the Help Desk web site (if it’s not already open). Then, open the Default.aspx page. Place a text box control and a button on the form. Start the application by choosing Start without debugging from the Debug menu. This action will just start the application and will not attempt to debug it. When you see that the Default.aspx page is displayed, type text into the text box and click the button. Notice the data is still there. If you right-click within the browser window and choose View Source, the HTML source code will appear. You‘ll notice an input tag of type hidden with a name __VIEWSTATE. This is a hidden text box that contains a hash of the contents of the form. This text box stores the information that is kept between page uses. (In previous versions of ASP the developer needed to move those values forward from one page to the next.)
Web Form Processing Stages
Here’s an outline of the most common processing scenario:
•ASP.NET Page Framework initialized
•The Page Init event is executed.
•The page and control view state are restored.
•User code initialized
•The Page Load event is executed.
•Stored values are read and restored.
•Validation
•The Validate method of any validator control is executed.

134C H A P T E R 8 ■ A S P. N E T W E B F O R M S
•Event Handling
•Any events triggered by the user are handled and their actions taken.
•Clean Up
•The Unload event is executed.
•Close any database connections and discard objects no longer needed.
One interesting detail about the Page Load event is you can use the IsPostBack property of the Page class to determine whether the page is being loaded at the request of a control on the form or the page is being loaded for the first time. Each control also has an AutoPostBack property. By default, buttons are set to true and all other controls are set to false. But when a control with an Autopostback property (which is false by default) has a value of true and is interacted with (either by clicking a button or selecting an item from a drop-down list) the page is requested again and the IsPostBack property of the page is true. This is best used if you have actions such as retrieving default data or setting control properties that you want to have happen the first time the page is displayed but not when the page is loaded at any time afterwards. To use IsPostBack, the following lines of code can be placed within the Page Load event handler:
If Not IsPostBack then
'Retrieve initial data to display End If
You can also add an Else clause to perform some work if the page has been requested by a control (posted back).
Session and Application Objects
ASP.NET maintains information about various processes while a web site is running. These include the current application and each user session. The information about user sessions maintained by ASP.NET and the application is stored in classes. The HTTPApplicationState class provides application-wide methods and events for all sessions as well as access to the application-wide cache that stores information. The HTTPSessionState object provides information to the current user session and provides a session-wide cache you can use
to store information in.
Application Object
An instance of the HTTPApplicationState class is created the first time any client requests a page within the virtual directory of an ASP.NET application. The HTTPApplicationState

C H A P T E R 8 ■ A S P. N E T W E B F O R M S |
135 |
is very similar to a global variable from VB6. The value is held across the entire application, no matter where it was assigned. The value can also be changed from anywhere within the application. The HTTPApplicationState class allows you to add key value pairs that store and retrieve information about the application. You can use this to store and retrieve information that is specific to the entire application, such as a connection string to a certain database. If you do choose to use the application object, be very careful. Remember, the application object holds information that can be changed from anywhere within the application. So you might have code on one page that changes the value and then you might call another page that changes the value as well. If you were looking for the first value you would not get it, you would get the second value. So, if you want to use the application object, use it for information that won’t change. For example, you can use the application object to hold the company name to assign to the text property on a label. In the last section of this chapter, which will expand on the existing Help Desk web site, I’ll show you how to set an application object to the company name and how to use that application object to retrieve the company name. You can use the intrinsic Application object to access the methods and properties of the HttpApplicationState class.
Session Object
The Session object can be accessed by just typing Session. You can use the Session object to store information about the specific user session. Each time a user accesses an ASP.NET site, a session is started. The session remains active until the user closes the browser. Each session is identified and tracked by ASP.NET by a session id string. The session id string can then be used to communicate across client-server requests either by using an HTTP cookie or a modified URL. The session id is generated by an algorithm and makes it difficult for a malicious user to get a new session id and determine an existing session id from that new session id. To use the session object you can use the contents collection to add the new items that you want to store information about. To do so just use the syntax:
Session.Contents("UserLogin") = "bmyers"
To retrieve the value, you can set a variable equal to the item in session.contents, such as:
StrLogin = Session.Contents("UserLogin").ToString
The ToString method needs to be used in this instance, because otherwise a warning will appear that an implicit conversion from System.Object to String is being performed. You do not need to use the ToString method, as the lack of it will not generate a compiler error, but it’s best to perform this conversion. This warning occurs because Session.Contents is an object and you are attempting to assign the value of that object to a string.

136 C H A P T E R 8 ■ A S P. N E T W E B F O R M S
Cookies
A cookie is data stored either in a text file on the client’s file system or in memory in the browser. It contains a small amount of page-specific information that the server sends to the client along with page output. Cookies can be either temporary (set to expire) or persistent. Use cookies to store information about a client, session, or application. Most of the time, cookies are used to store the user names (and potentially the password of the user on the client) or to store the last page visited by the user in order to jump back into a large application. However, you should not store the password for a user within a cookie on the client computer. It’s not a problem to store user names, or preferably an ID, for the user in the cookie, but it’s bad practice to store the password. The reason is that the cookie is in plain text and can easily be found by a hacker who has control of a client computer.
A good use of a cookie is to record when the user was last on the site. Use the following code to create a new cookie that stores the last visit date:
Dim MyCookie As New HttpCookie("LastVisit")
Dim now As DateTime = DateTime.Now
MyCookie.Value = now.ToString()
MyCookie.Expires = now.AddHours(1)
Response.Cookies.Add(MyCookie)
To retrieve the contents of cookies that are stored on the client:
Dim MyCookieColl As HttpCookieCollection
Dim MyCookie As HttpCookie
Dim LastVisit as Date
MyCookieColl = Request.Cookies
MyCookie = MyCookieColl("LastVisit")
LastVisit = MyCookie("LastVisit").ToString
Expanding the Help Desk Application
Now I’ll expand on the Help Desk web site that you created in Chapter 7. In that chapter you created the web site, the classes for the web site, and then you implemented some of the methods. This section will also add some of the implementation details for the business process defined in Chapter 7. This will include determining whether the currently logged-in user is a technician, help desk manager, or general user. Based on that determination, a page will be displayed for either the user console or the technician console. Next, some code will be used to either display a button if the user is a help desk manager or not display it if the user is just a help desk employee. Finally, I’ll show you how to add text boxes to a form in order to gather information for a ticket, pass the values to the tickets class, and validate the information.
C H A P T E R 8 ■ A S P. N E T W E B F O R M S |
137 |
The first task you need to accomplish is to set the company name when the application starts and then use the application object to retrieve the company name on each page. The first step in this task is to create a global.asax file. This page will be executed the first time the application is executed and can be used to set application level variables when the application starts. To add the global.asax page, right-click the web site URL within the Solution Explorer and choose Add Item. When the Add Item window appears, choose Global Application Class. The name will default to Global.asax; leave this as the name. Click Add to add the file to the web site.
■Note Once you add a Global Application Class file to a web site it won’t be available to add again. A web site can only have one Global Application Class file.
When the Global.asax page has been added to the application, open the file (if it isn’t already opened). You will notice an Application_Start sub. This sub will be executed each time the application is started. Notice there are also other subs such as Application_End and Application_Error. The Application_End sub will be executed when the application is shut down. You could use this to send e-mails or write to the event log if the application stops. The Application_Error sub will be executed when an error occurs anywhere within the application and is unhandled. You will also see Session subs that occur when a user session is started and ended.
Within the Application_Start sub add the following line of code:
Application.contents("CompanyName")="My Company Name"
This line of code will add a key value pair to an instance of the HTTPApplicationState class. The key is CompanyName and the value is “My Company Name”. When the application is started, this line of code will be executed and the instance of the HTTPApplicationState class represented by the Application object will have this key value pair available to it.
The next step in this task is to add two “console” pages. These pages will give users a way to see a list of help desk tickets. The first console is the Technician Console. Add a new web form to the web site called TechConsole. Drag a label onto the TechConsole form and change the ID to lblPageName and set the text property to “Technician Console”. The second console is the User Console. Add a new web form to the web site called UserConsole. Drag a label onto the UserConsole form, change the ID to lblPageName and then set the text property to User Console. Now there are a total of three forms within the web site (Default, TechConsole, and UserConsole). On both pages, drag a label to the form, set the ID property to lblCompanyName and then remove any value within the Text property. On each form, place this new label above the lblPageName label that you added previously.
138 C H A P T E R 8 ■ A S P. N E T W E B F O R M S
■Tip You can add the label lblCompanyName to just one of the forms and copy and paste the label to the other form. The label will retain the ID and text properties when pasted on the second form.
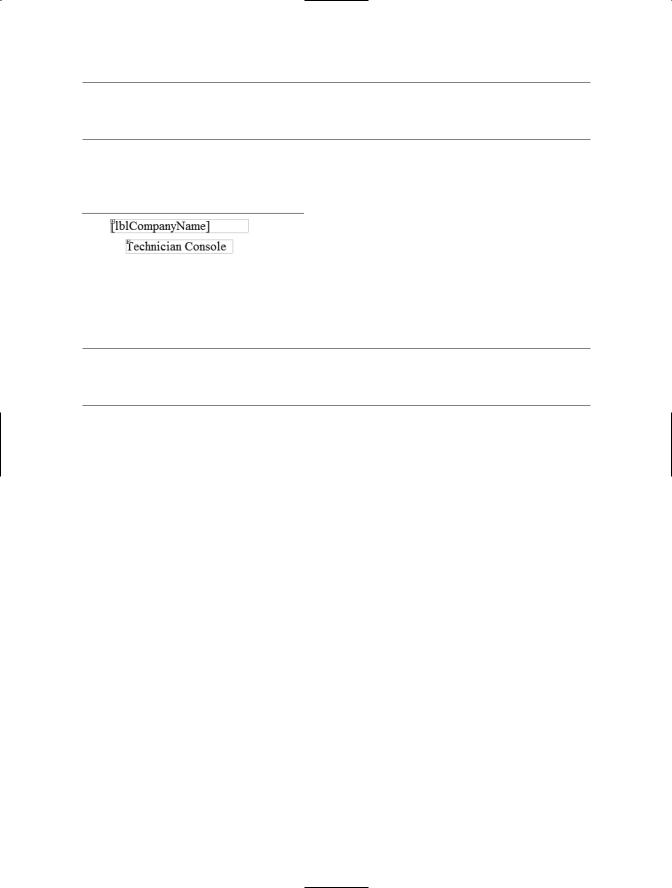
The Technician Console page should look like Figure 8-6.
Figure 8-6. Technician Console
■Note Notice the lblCompanyName that appears within the lblCompanyName label. When the text property of a label is blank, the ID property of the label appears within the label so you know which label it is.
View the code for the TechConsole page. Choose Page Events from the left dropdown list at the top of the page and then choose Load from the right drop-down list at the top of the page. This will create the Page_Load sub. Within the Page_Load sub, add
lblCompanyName.Text = Application("CompanyName").ToString
This line of code will use the Application instance of the HTTPApplicationState class to find the key value CompanyName and return the value portion of the key value pair to the text property of the lblCompanyName control. This is a way of getting the value using a short notation, but you could also have used the Item property:
lblCompanyName.Text = Application.Item("CompanyName").ToString
Also, you don’t need to use the name of the key—you can use the index, such as 1. However, this isn’t recommended as you might change the order of the items within the Application_Start sub and cause an issue with the numbering. So it’s always best to use the name of the key.
Now, copy the line of code that you just entered. Open the UserConsole page, create the Page_Load sub, and then paste the code within the Page_Load sub.
Now it is time to test the results of this task. Both the TechConsole and the UserConsole pages should have the name of the company and the name of the page at the top. Click on the TechConsole.aspx page within the Solution Explorer and then start the application