

Beginning Object-Oriented ASP.NET 2.0 with VB.NET From Novice to Professional
.pdfC H A P T E R 2 ■ O B J E C T- O R I E N T E D P R O G R A M M I N G |
39 |
Press F11 again and the debugger will be on the line ReturnString="MyClass". This line will assign the string “MyClass” to the action that was performed, which in turn will send that value (“MyClass”) back to the variable called strreturn within the Page_Load action. Press F11 two more times to leave both this action and MyFirstClass.
Now the debugger will be back within the Page_Load action again. Press the F11 key one more time to complete the assignment. Place your mouse over strreturn and you should see that the value “MyClass” has been assigned to that variable.
A very important point about the use of classes is that each instance of a class is unique. That is, if you had declared two variables, clsMy and clsMy1, both as an instance of the MyFirstClass, both would hold an independent copy of MyFirstClass. But remember that the values assigned to one instance may not be the same as the ones assigned to the second. For example, if you had a class with an attribute that could provide a random value, and you created two instances of this class, you would find that both have a different random value.
Conclusion
In this chapter I introduced objects, the core concept of OOP. I showed you why objects are necessary, and discussed the importance of reusability in development. I also gave you an introduction to classes within VB.NET.


C H A P T E R 3
■ ■ ■
Attributes and Actions
I’ll begin this chapter by taking a look at what attributes and actions are within OOP and then show you how to create attributes and actions using VB.NET.
Attributes
Attributes, in OOP, are a way to describe the characteristics of a real-world entity. In my car example from Chapter 2, the color of the car is an attribute. You can allow attributes to change, or not, depending on how you use them. When a real-world entity needs to be translated into an object, the attributes usually follow the descriptive words of the realworld entity. For example, a business process may state that the car must be red in color, must have four wheels, and must have mobility. The car, in this case, is the noun, so it’s the object. The first adjective (descriptive word) I’ve used is “red.” The attribute is the thing that follows the descriptive word, which in the case of the car is color.
In many business processes the descriptive words may not be actually followed by an attribute. Instead, you may need to infer the attribute, which makes the job of defining attributes more difficult. In the previous example, the business process might state that the car must be red, have four wheels, and be able to both go and not go, as needed. This business process appears to be very good, because the process is giving you the specifics of an object. However, the business process mentioned is specific to one instance of an object (called a class in VB.NET). Given this example, you must determine what the attribute is. Are the attributes red and four? This is a case where you need to infer the attributes. Based on your knowledge of the real world, you could probably determine that among the attributes for a car are color and wheels. However, if you aren’t as familiar with the business process, you may need to ask more questions, such as, in this case, what “red” is in terms of the car. I’ll discuss how to design classes based on business process information in Chapter 7.
41

42 C H A P T E R 3 ■ AT T R I B U T E S A N D A C T I O N S
Actions
Actions, in OOP, are a way to define what a real-world entity does. Using the car example from Chapter 2, let’s consider the idea that the car moves forward and backwards. Actions are typically verbs within a business process. If the business process dictates that the car must be red in color, have four wheels, and start and stop, note that start and stop are verbs, and therefore actions. Based on your knowledge of the real world, you would already know that a car can start and stop. In this way, actions are a little easier to determine than attributes when designing a class, because they are typically the verbs in a business process.
As you will see in Chapter 7, there may be other actions required of an object besides the obvious ones that you get from the business process. There also may be underlying actions that need to be performed before the actions specified in the business process can be performed. With the car example, the action of the driver pressing down the brake pedal may need to be performed before the stop action can take place. That isn’t obvious from the original business process, but you know that in the real world, if the driver does not press the brake, the car will neither stop nor attempt to stop (meaning that the stop action is not taken). Finding these hidden actions can be very difficult and can sometimes only be defined during the design or development phase of a project.
Attributes and Actions Within VB.NET
In this section, I’ll cover how attributes and actions defined within OOP are implemented in VB.NET.
VB.NET Properties
Within VB.NET, attributes of an object are called properties. Just like attributes, properties describe the object. Properties are found the same way that attributes are found within the business process.
Properties within a class have a data type associated with them, just as variables do. This data type must be given to the property when it is first defined within a class. The data type can be any valid data type within the VB.NET language.
■Note The data type you choose for a property may restrict the type of information that can be assigned to that property. For example, if you have data that can be either whole numbers or decimal numbers, you need to define that property as decimal. If you previously defined that property as an integer (whole number), but then attempted to assign a decimal value to it, only the whole number part of the value would be stored. To help prevent this, set Option Strict on as mentioned in the next section.

C H A P T E R 3 ■ AT T R I B U T E S A N D A C T I O N S |
43 |
Properties within a class have an access modifier. Access modifiers are ways to restrict the use of a property or variable. The four main access modifiers for properties are public, private, readonly, and writeonly. Public properties are available to any code using an instance of the class, while private properties are available only to the class. Readonly properties can only be read from the class and writeonly properties can only be written to the class.
Adding Properties to a VB.NET Class
Properties are most commonly defined with a variable and a property. I know I’ve said previously that properties and variables are the same thing, but in this case it’s how you define the access modifier that determines the difference. A very common way to create properties is to have a private variable defined within the class. Again, a private variable defined within a specific class can only be used within that class. Any code attempting to use the class will not be able to directly manipulate this private variable. The manipulation of this private variable is allowed via the creation of a public property. Any code wanting to use the class will use the public property to access the value in the private variable.
A class may be defined in the following manner, with both a public property and private variable:
Public Class Car
Private strColor as String
Public Property Color() As String Get
Return strColor End Get
Set(ByVal value As String) strColor = value
End Set End Property
End Class
In this example, the variable strColor is private to the class and therefore cannot be accessed from outside the class. If you have created an instance of this class (as we will do in the following sections), the strColor variable would not be available to you because it has been marked as private. The Color public property would be available for your use, however, since it’s marked as public. The public property Color is also defined as a data type string, which means that it will accept alphanumeric information. The Get group of statements returns a value when an instance of the class attempts to access the Color public property. When an instance of this class attempts to assign a value to the Color public property, the Set group of statements will assign the value given to the private strColor variable.

44 C H A P T E R 3 ■ AT T R I B U T E S A N D A C T I O N S
Using the private variable and public property setup, as I’ve just defined, gives you the advantage of adding more code to the Get and Set statements that validates the incoming or outgoing data or does other things with the data that you might not be able to do otherwise.
Another way to present the properties of a class is to just define all variables as public:
Public Class Car
Public strColor as string
End Class
Defined in this way, an instance of the class would be able to access the strColor variable, because that variable is now public. Any code using an instance of the class in this situation would have direct access to the variable that the class code will use to perform its tasks. Many developers use this kind of coding to save time, because defining private variables and public properties individually takes more time. I prefer not to assign all values via public variables, but rather define my variables with a standard naming convention. For example, all string variables begin with str. If I define all of my variables that way, and define them as public instead of private, then reusability becomes more difficult. Defining private variables and public properties makes reusability easier because by defining the public property as private, you can also give the property a more recognizable name. In my previous examples, you saw that the public property was called Color and the private variable was strColor. In this example, both the private variable and the public property would have the same meaning to someone writing code against your class. However, you may want to define the private variable with one name and the public property with a different one. Here I show the private variable with one name and the public property with
a friendlier name:
Public Class Car
Private blnCarStarted as boolean Public Property CarIsStarted as boolean
Get
Return blnCarStarted End Get
Set(ByVal value As String) blnCarStarted = value
End Set End Property
End Class
Here you can see that the private variable blnCarStarted might have the same name as the column in the database holding the value. To make the class easier to use for others, you may want to change the public property to a more easily understood name,

C H A P T E R 3 ■ AT T R I B U T E S A N D A C T I O N S |
45 |
such as CarIsStarted. When another developer using your class wants to let the class know whether the car is started or not, the developer will assign either true or false to the CarIsStarted public property.
This code is also an example of the encapsulation concept, which was introduced in Chapter 2 and will be further explained in Chapter 4. By making your variables private, you can hide (encapsulate) how the class’s actual work is done.
Using a Class Public Property in VB.NET
Now that you understand how to add a public property to a class, you need to know how to use the public property. I am now going to move away from the car example and try to present something more relevant to business. So, for the subsequent sections in this chapter, I will be working with a common business process: allowing an employee to enter his or her first name, last name, and date of birth. This could be for any type of application, such as a help desk ticket, a benefits form, or even payroll information.
In this business process, the employee is the noun, and therefore the object, and will become the class name. The attributes in this example are the employee’s first name, last name, and date of birth. These attributes will become the properties of the class.
First, create a new web site called Chapter3 (see Chapter 1 for more information on how to create a new web site). Leave the Default.aspx page as it is and add a new class, called Employee, to the web site (see Chapter 2 for details on how to do this).
Within the Public Class Employee and End Class lines, define two string variables: strFirstName and strLastName. Then, add a private date variable called dteDateOfBirth. The resulting code would look like
Public Class Employee
Private strFirstName as String
Private strLastName as String
Private dteDateOfBirth as Date
End Class
These are the private variables that will be used by the Employee class, but will not be accessible to new code using the class. Next, create the public properties within the Employee class for FirstName, LastName, and DateOfBirth. A quick way to do this is to type Public Property and then the public property name, followed by “As” and the type of variable (i.e., Public Property FirstName as String) and hit Enter. VS2005 will create the required structures for you:
Public Class Employee
Private strFirstName As String
Private strLastName As String
Private dteDateOfBirth As Date

46 C H A P T E R 3 ■ AT T R I B U T E S A N D A C T I O N S
Public Property FirstName() As String Get
Return strFirstName End Get
Set(ByVal value As String) strFirstName = value
End Set End Property
Public Property LastName() As String Get
Return strLastName End Get
Set(ByVal value As String) strLastName = value
End Set End Property
Public Property DateOfBirth() As Date Get
Return dteDateOfBirth End Get
Set(ByVal value As Date) dteDateOfBirth = value
End Set End Property
End Class
Note the As Date part of the declaration of the DateOfBirth public property. This is an example of the restriction of data types that you can implement with public properties. If a value is passed to the public property that is not of type Date, the call will fail. To help prevent this error from occurring, set Option Strict On by choosing Options from the Tools Menu within Visual Studio. Once there, open the Projects and Solutions folder and choose VB Defaults. Change the Option Strict setting to On.
Now open Default.aspx.vb, the code file for the Default.aspx page. Choose Page Events from the drop-down list on the top left of the Code Designer and then choose Load from the drop-down on the top right. Your code page should look like this:
Partial Class Default_aspx
Private Sub Page_Load(ByVal sender As Object, ByVal e As System.EventArgs) Handles Me.Load
End Sub
End Class

C H A P T E R 3 ■ AT T R I B U T E S A N D A C T I O N S |
47 |
Now, declare a local variable called clsEmployee of type Employee within the Page_Load sub:
Partial Class Default_aspx
Private Sub Page_Load(ByVal sender As Object, ByVal e As System.EventArgs) Handles Me.Load
Dim clsEmployee as New Employee End Sub
End Class
This declaration (Dim clsEmployee as New Employee) will create a new instance of the Employee class. On the next line, you can either type ClsEmployee or clsE, while holding down the Ctrl key and hitting the space bar. When you hold down the Ctrl key
and hit the space bar, VS2005 automatically completes the variable name for you. Notice that IntelliSense only shows the public properties, though—it doesn’t show strFirstName, strLastName, or dteDateofBirth. This is because you have defined those variables as private, so they can’t be accessed by other code using the class. After choosing ClsEmployee, choose FirstName, and then add an equals sign. Next, add your first name in quotes. On the next line, go through the same process with your last name and date of birth (I’ll use a fake date of birth):
Partial Class Default_aspx
Private Sub Page_Load(ByVal sender As Object, ByVal e As System.EventArgs) Handles Me.Load
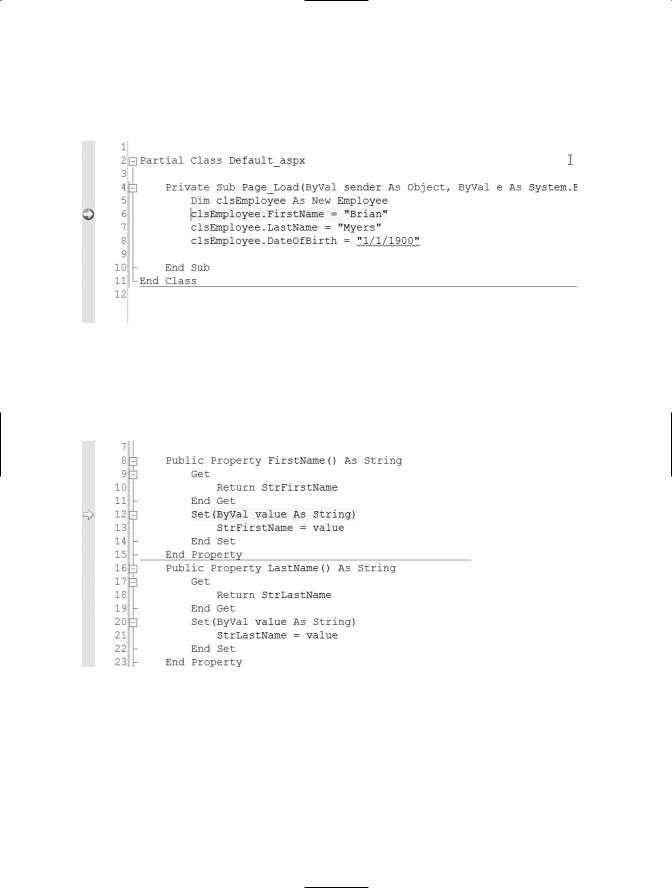
Dim clsEmployee as New Employee clsEmployee.FirstName = "Brian" clsEmployee.LastName = "Myers" clsEmployee.DateOfBirth = "1/1/1900"
End Sub End Class
■NOTE After entering the date of birth, you may see a gray squiggle line under the value 1/1/1900. If you mouse over this you will see that this is an implicit conversion between string and date. The squiggle line just lets you know that VB.NET will be converting the string value (between quotes) to a date value.
These lines of code will assign a value to each of the public properties of the class. To better see how this works, place a breakpoint on the first line of the assignment code (clsEmployee.FirstName = "Brian"). Next, click the Debug menu and choose Start. This
48 C H A P T E R 3 ■ AT T R I B U T E S A N D A C T I O N S
will begin debugging the application (click OK when asked to add a web.config file). When the breakpoint is activated, as shown in Figure 3-1, press the F11 key.
Figure 3-1. Activated breakpoint
After you press F11, the application execution will go to the Set statement of the Employee Class Public Property FirstName, as shown in Figure 3-2.
Figure 3-2. Set statement of the FirstName public property
Press F11 to move to the assignment statement, and then press F11 again to move to the End Set statement. If you mouse over the strFirstName variable in the line
strFirstName = value, you will see that the value of strFirstName is now the name that you assigned to it (in my case, this is “Brian”). Pressing F11 yet again will take you back to the Page_Load sub of the Default.aspx page. You can stop debugging by clicking the Debug menu and then selecting Stop Debugging.