

Beginning Object-Oriented ASP.NET 2.0 with VB.NET From Novice to Professional
.pdfC H A P T E R 7 ■ C L A S S D E S I G N |
119 |
Now that the classes have been designed and the .vb files have been created, it’s time to determine how each method of each class will be implemented. For example, this is a good time to determine how to get the user’s information, such as name and e-mail address. There are several ways you can get this information based on your environment. You might look this information up in a database or directory services such as Active Directory, for
example. Either way, now is the time for you to determine how to implement each method. Since the Help Desk User class is a base class, it should be created first. It must be created before the other two can be created, so that they can inherit from the base class.
To begin, open the HelpDeskUser.vb file.
There are several methods that you’ll need to create for the Help Desk User class. I will define these next. However, I won’t enter any code for them since they require a connection to a database. Instead, each method will return a Dataset, which is used to store data:
Public Function RetrieveNewTickets() As Data.DataSet
End Function
Public Function RetrieveAllAssignedTickets() As Data.DataSet
End Function
Public Function RetrieveAllResolvedTickets() As Data.DataSet
End Function
Public Function RetrieveAllUnresolvedTickets() As Data.DataSet
End Function
Public Function RetrieveAllClosedTickets() As Data.DataSet
End Function
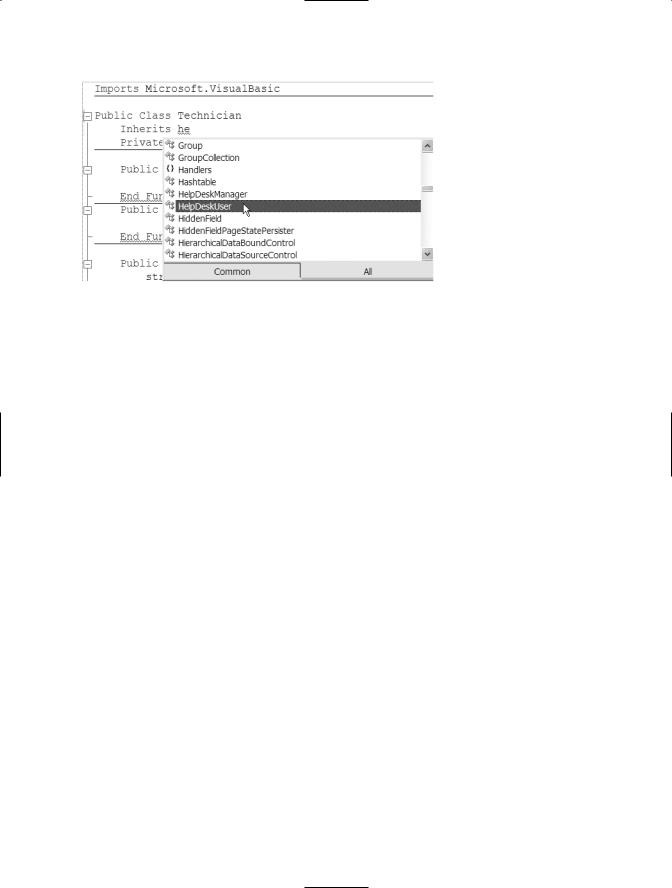
After creating the Help Desk User class, you need to create the Technician and Help Desk Manager classes. As mentioned previously, they need to be created after the Help Desk User class since they inherit from it. To begin, open the Technician class page. Just under the opening class line (Public Class Technician), add Inherits helpdeskuser, as shown in Figure 7-4.
120 C H A P T E R 7 ■ C L A S S D E S I G N
Figure 7-4. Inheriting from HelpDeskUser
After you set the inherits, you need to add the remaining methods. The Technician class design looked like:
•Technician (inherits from Help Desk User)
•List of tickets assigned to them
•List of tickets they resolved
Declare a private variable called strUserName, which is a string. This will hold the login name of the user for use within this class. Now you need to build a constructor to assign the login. You’ll remember that a constructor is a sub that always has the name New and must always be a sub. A constructor is the first method called when the class is initiated. This is done automatically when you declare a variable with the New keyword, such as clsTicket = New Ticket. The purpose of the constructor is to allow you to perform some actions when the class is created. Often, constructors are used to set variables that will be used throughout the class or to set or reset values. You can have multiple constructors by defining multiple subs called New, each with a different parameter set. For this class, there will be one parameter called UserLogin that will be a string.
To create the New sub, select Technician from the top left drop-down list, if it is not already selected. Next, choose New from the top right drop-down list. This will automatically create the New sub structure. After the New sub structure is in place, add a parameter called UserName that is defined as a string. Assign the value from the UserLogin parameter to the local variable strUserName as shown here:
Public Sub New(ByVal UserLogin As String) strUserName = UserLogin
End Sub

C H A P T E R 7 ■ C L A S S D E S I G N |
121 |
Next declare the two methods as functions that return a Data.Dataset data type:
Public Function AssignedToMe() As Data.DataSet
End Function
Public Function ResolvedByMe() As Data.DataSet
End Function
Next, open the HelpDeskManager.vb file. Add the Inherits HelpDeskUser line of code again, just like with the Technician class. The Help Desk Manager class design looked like:
•Help Desk Manager (inherits from Help Desk User)
•List of all tickets for a specific technician
•List of all tickets for a specific location
Create and code a New sub with a parameter of UserLogin, the same way you did for the Technician class. Next, declare the two methods as functions that return a Data.Dataset data type. The first method will be RetrieveTicketsForLocation, with a parameter of Location, which will be a string data type. The second method will be RetrieveTicketsForTechnician, with a parameter of Technician, which will be a string data type:
Public Function RetrieveTicketsForLocation(ByVal Location As String)
As Data.DataSet
End Function
Public Function RetrieveTicketsForTechnician(ByVal Technician As String)
As Data.DataSet
End Function
Now that the base and derived classes are completed, open the User.vb file. The user class design was:
•User
•Ticket not resolved
•Close ticket
•List of tickets created
•List of resolved tickets

122C H A P T E R 7 ■ C L A S S D E S I G N
•Is Technician
•Is Help Desk Manager
The user class has two properties: Is Technician and Is Help Desk Manager. Both will be defined as Boolean and will be read-only. The reason these properties will be read-only is that when the class is created, a determination will be made based on the user’s login as to whether the user is a technician or a help desk manager. To set this class up, declare a private variable called blnIsTechnician that is defined as a Boolean, and declare a private variable called blnIsHelpDeskManager that is defined as a Boolean. After defining the two variables, create a public read-only property for each variable called IsTechnician and IsHelpDeskManager, respectively. The code for these two public properties will look like this:
Private blnIsTechnician As Boolean
Private blnIsHelpDeskManager As Boolean
Public ReadOnly Property IsTechnician() As Boolean
Get
Return blnIsTechnician
End Get
End Property
Public ReadOnly Property IsHelpDeskManager() As Boolean
Get
Return blnIsHelpDeskManager
End Get
End Property
Next, you need to build a constructor to determine whether the user is a technician or help desk manager. For this class, there will be one parameter called UserLogin that will be a string. To create the New sub, select User from the top left drop-down list, if it is not already selected. Next choose New from the top right drop-down list. This will automatically create the New sub structure. After the New sub structure is in place, add a parameter called UserLogin that is defined as a string. Typically in this sub, you would want to write code that will determine whether the user is a technician or help desk manager. This would probably best include code to retrieve security information from a database.
Again, since the database interaction is outside the scope of this book, just type blnIsTechnician = True and blnIsHelpDeskManager=False. This will set the local variable blnIsTechnician to true and will set the local variable blnIsHelpDeskManager to false, which results in:

C H A P T E R 7 ■ C L A S S D E S I G N |
123 |
Public Sub New(ByVal UserLogin As String) blnIsTechnician = True blnIsHelpDeskManager = False
End Sub
Next create the methods for this class. The first method will require a parameter that is the ticket id of the ticket to set as “not resolved.” The first method doesn’t require a return value. The second method will require a parameter that is the ticket id of the ticket to be set as “closed.” The second method doesn’t require a return value either. The third and fourth methods will require a UserName parameter that is a string used to provide the name of the user you want to retrieve records for. Again, the most efficient way to return the list is to return a Data.DataSet. Therefore, methods three and four will have a return type of Data.DataSet. The user class code will look like:
Public Sub TicketNotResolved(ByVal TicketID As Integer)
End Sub
Public Sub CloseTicket(ByVal TicketID As Integer)
End Sub
Public Function TicketsCreatedByMe(ByVal UserName As String) As Data.DataSet
End Function
Public Function MyResolvedTickets(ByVal UserName As String) As Data.DataSet
End Function
Finally, the last class to be built will be the Ticket class. This class will require the most amount of code.
Each of the properties needs to have both a private and public variable defined for it. To begin, open the Ticket class file. Within the Ticket class structure, add a private variable for the user login. This should be a string value. The declaration should be Private strUserLogin as string.
After declaring the private variable, you should also create a public property by typing Public Property UserLoginName as string and pressing Enter. When you press Enter, the public property structure will appear.
Within the lines Get and End Get, type Return strUserLogin. Between the lines Set and End Set, type strUserLogin = value.
Continue this pattern for all of the properties. The private variable declarations will look like this:

124 C H A P T E R 7 ■ C L A S S D E S I G N
Private strUserLogin As String
Private strFirstName As String
Private strLastName As String
Private strPhoneNumber As String
Private intLocation As Integer
Private strEmailAddress As String
Private strProblemDescription As String
Private strCategory As String
Private strCreatedByLogin As String
Private strStatus As String
Private strImportance As String
Private strAdditionalComments As String
Private strAssignedTo As String
Private strResolution As String
Private decTimeSpent As Decimal
Private dteDateResolved As Date
Private intTicketID as Integer
Private dteDateClosed As Date
After adding all of the public properties, look at the methods. The class design for the methods is:
•Create new ticket
•Assign ticket
•Update ticket
•Validate ticket
•Change status
•Resolve ticket
•Notification of resolved ticket
•Notification of not resolved ticket
The first method will not require a parameter because it will create the ticket. It’s a good idea to return a Boolean when creating or updating a ticket, so that the calling application knows that the code has completed successfully. The Assign Ticket and Update Ticket methods will require a parameter for the ticket id and return a Boolean value denoting that they have completed. The Validate Ticket method is a private function to determine whether the data entered is valid. The Change Status method will require a

C H A P T E R 7 ■ C L A S S D E S I G N |
125 |
parameter for the ticket id and a parameter for the status id. It should also include a return Boolean value. The Resolve Ticket method will require a parameter for the ticket id and a return Boolean value. The Notification of Resolved Ticket method and the Notification of Not Resolved method will require a parameter for the ticket id, an e-mail address parameter, and a returned Boolean. The completed method declarations will look like:
Public Function NewTicket() As Boolean
End Function
Public Function AssignTicket(ByVal TicketID As Integer) As Boolean
End Function
Public Function UpdateTicket(ByVal TicketID As Integer) As Boolean
End Function
Private Function ValidateTicket() As Boolean
End Function
Public Function ChangeStatus(ByVal TicketID As Integer,
ByVal StatusID As Integer) As Boolean
End Function
Public Function ResolveTicket(ByVal TicketID As Integer) As Boolean
End Function
Public Function NotificationOfResolved(ByVal TicketID As Integer,
ByVal EmailAddress As String) As Boolean
End Function
Public Function NotificationOfNotResolved(ByVal TicketID As Integer,
ByVal EmailAddress As String) As Boolean
End Function
After you create all of the public properties and the methods you need, you might notice that the code page gets a little difficult to navigate. You can use a special tag within VS2005, known as # Region, to create a code region.
For example, prior to the first Public Property statement, you might enter #Region "Public Properties". (Make sure you have the quotes around the name of the region.) After the last End Property enter #End Region. This will create a code region. Now go back to the beginning of the code region, and you should see a minus sign next to the #Region tag. Clicking that minus sign will collapse the region, so that you will only see the name

126 C H A P T E R 7 ■ C L A S S D E S I G N
of the region, rather than all of the public property code. This is a nice way to organize your code.
Now that you’ve built the skeleton for all of your classes, you can concentrate on implementing each method. Again, since ADO.NET is outside the scope of this book, many of the methods can’t be implemented. However, other methods can be implemented to a point.
The first method to implement is the AddTicket method. There are several ways to validate input into a class and subsequently into a database. For one, you can define constraints within the database that will validate the data when it is being entered into the database. The problem with this strategy is that the error messages returned from SQL Server are not very user-friendly and will need to be interpreted before they are shown
to the user.
Another way to provide validation is to add a private method (like ValidateTicket), which will verify all necessary data that has been provided to the public properties before an attempt is made to push the data to the database.
The third way to validate data is at the user interface level, by using the validator control that is discussed in Chapter 9. My personal preference is to combine the last two options. This way you can create a validation method to make sure the values have been passed to the necessary properties and also use the validator control to show the user the data that fails validation. Therefore, the first method that needs to be implemented, even before the AddTicket method, is the ValidateTicket method.
Within the structure of the ValidateTicket method, add code to make sure that the user login, first name, last name, e-mail address, location, category, and problem description public properties all have values. First, there must be some way to collect the list of invalid properties to be returned. So, create a local string variable within the ValidateTicket method called strErrors. The code should look like this:
If strUserLogin.Length = 0 Then
strErrors = strErrors & "User Login not provided," End If
Continue that pattern for each of the public properties mentioned for testing. After you add all of the code needed to validate the public properties, you need to have a way to let the calling method know there was a problem. This is done by determining whether strErrors contains a string (has error messages) and if it does, throwing it an exception:
If strErrors.length > 0 Then
strErrors = Mid(strErrors, 1, strErrors.length - 1) Throw New Exception("Errors have occured: " & strErrors) Else
Return True End If

C H A P T E R 7 ■ C L A S S D E S I G N |
127 |
This first line determines whether the length of strErrors is greater than zero. If there were errors, then the length of strErrors would be greater than zero and the next line would be executed.
The second line removes the last comma from the value of strErrors by reassigning the value of strErrors from the first character to the character that is one less than the length (also known as the second to last character). This will produce a string that has the last character stripped from it. The third line will throw an exception object and give it a message to pass along. The Else part of the statement will return true if strErrors has no characters in it.
The ValidateTicket function needs to be called from the NewTicket method within a Try . . . Catch block in order to be used. The Try . . . Catch block is the way that VB.NET and C# handle exceptions. The first line is always Try followed by the lines of code that could cause an exception. After the code that might cause an exception, the Catch block
is added. The Catch block can be used to catch a variety of exceptions. The Catch block is also used to determine what to do when an exception is encountered. In this case, the keyword Throw will be used to raise the exception to the code that invoked the current code. You should have Try . . . Catch blocks within each layer of code, and with each block within the user interface displaying the exception. I’ll discuss the concept of displaying the exception in Chapter 8. For now, add the following code to the AddTicket method:
Try
If ValidateTicket() Then intTicketID = 10
return True End If
Catch ex As Exception
Throw New Exception(ex.ToString) End Try
As you can see, the first line starts the Try . . . Catch block. The second line calls the ValidateTicket private method in order to determine whether the public properties were provided. Since this sample application will not be tied to a database, I assigned 10 to the private variable intTicketID. This is the line used to take the database-generated ID and give it back to the calling code. If everything is all right with the validation, then True can be returned—otherwise an exception will be thrown. If any of the public properties are not provided, an exception will be thrown from the ValidateTicket method and will also be caught within the Catch block. Within the Catch block, the Throw line lets the .NET Framework know what to do with any exception that the block catches. In this case, the action is to throw the exception again, but to a higher level where it can be better dealt with. You will see in Chapter 8 that the higher level (the user interface) will catch the exception and display it.

128 C H A P T E R 7 ■ C L A S S D E S I G N
Other methods within this class might also require some validation, but will probably not need the use of an entire method for their testing. For example, the AssignTicket method will first validate that the AssignedTo public property has been provided. If the user that the ticket is assigned to is not provided, then the ticket can’t be assigned. To accomplish this, use another Try . . . Catch block that throws a new exception if the AssignedTo public property has not been provided. The code will look like this:
Try
If strAssignedTo.length=0 Then
Throw New Exception("Assigned To not provided")
End If
Catch ex As Exception
Throw New Exception(ex.ToString)
End Try
Conclusion
In this chapter, I’ve defined a process for designing classes as well as provided you with a step-by-step approach to the process. You also learned, in this chapter, to create a web site for a help desk application with several classes. You found that all of the classes have methods, and that some of them have the beginnings of implementation in them.
In the next chapter I’ll show you how to create web forms that can be used within the web site that use the classes you’ve created here. As I’ve mentioned, there won’t be very much functionality built into these classes yet, as ADO.NET is outside the scope of this book. However, you will learn how to code the user interface to make calls to the AddTicket and AssignTo methods as well as learning how to assign the public properties to the Ticket class. You will also learn how to step through the code to get a glimpse of how the exception handling is done.