

Beginning Object-Oriented ASP.NET 2.0 with VB.NET From Novice to Professional
.pdfC H A P T E R 1 0
■ ■ ■
Web Services
In this chapter, I’ll introduce you to XML,SOAP, WSDL, and web services. I’ll also explain how to create a web service and then deploy that web service. I’ll expand on the Help Desk application by showing you how to create a web service to retrieve user information and then add code to use this web service.
Introduction to XML, SOAP, and WSDL
XML, or Extensible Markup Language, is a markup language that provides a format for describing data. XML is similar to HTML in that both are markup languages and both use the concept of a tag. However, XML only has a handful of standard tags, and you can also create your own tags, which you can’t do with HTML. Also, XML tags are used to define the structure and the data types of the data itself. As I just mentioned, the advantage of XML is that you can create your own tags to describe your data. XML is used mostly to move data between different systems when the two systems involved don’t need to understand how the data was created. Unlike a comma delimited file, an XML file is grouped by the XML tags and doesn’t need to be in the same order all of the time. For more information about XML, check out the XML Developer Center at http://msdn.Microsoft.com/xml.
SOAP is a simple, XML-based protocol for exchanging structured and type information on the web. This protocol is highly modular and extensible. Web services use the SOAP protocol, which is similar to TCP/IP and HTTP, to communicate with clients. The SOAP messages sent to and from a web service must be in XML with a required Body and Envelope element and an optional Header element.
WSDL stands for Web Services Description Language, which is an XML grammar that is used to create an XML document. The XML document created by WSDL is a service description that describes a web service and defines the format of messages that the web service understands. The service description serves as an agreement that defines the behavior of a web service and instructs potential clients on how to interact with the service. The WSDL specification can be found at http://www.w3.org/TR/wsdl.
169

170 C H A P T E R 1 0 ■ W E B S E R V I C E S
Introduction to Web Services
Web services have received plenty of attention in the past few years. A web service is essentially an application that can be accessed by other applications via the web. Usually web services provide small amounts of functionality that are specific. One example of a web service would be a mailing address verifier. This kind of web service would have the functionality to determine whether a mailing address is in the correct format. In practice, the web service might receive a request via HTTP (internet protocol) that contains a mailing address. The web service would then perform the work to determine whether the mailing address was valid and would return either a true or false value, depending on the outcome. The advantage to a web service is that it is loosely coupled and can be reached over the internet. Loosely coupled means that the two systems (the web service and the client) only need to understand self-describing, text-based messages (XML). A company could use a web service to provide invoice information to customers very similar to the EDI (Electronic Data Interchange).
To use the functionality of a web service, a client application must exist. This client application can be a Windows client or a web client. The client application must reference the web service and must understand what to present to the web service and what the web service will return.
Creating a Web Service
To show you how a web service is created and then used, you’re going to create a web service, called UserInformation. The UserInformation web service will provide user information for other applications. In this case, it will be used by the Help Desk application to provide information about a user. In real life, this could be used as a way to retrieve user information about all users for all applications within a company. The web service could interact with either a database or a directory service like Active Directory to provide this information. The advantage is that you can build one web service and use it for multiple applications, instead of needing to include the classes necessary to retrieve user data in either a namespace for the company to use or in each individual application.
The first step in creating a web service is to install Internet Information Service (IIS) on the local computer. If you do not have IIS installed, you will not be able to create a web service. If you do have IIS installed, open Visual Studio 2005 and choose File New Web Site. In the New Web Site window, choose ASP.NET Web Service and enter UserInformation as the name of the web service, as shown in Figure 10-1.

C H A P T E R 1 0 ■ W E B S E R V I C E S |
171 |
Figure 10-1. Entering UserInformation as the new application name
When the project opens, a file called Service.vb will be automatically created and displayed. You can close this window. Next, open the Solution Explorer, find the file called Service.asmx, and delete it along with the Service.vb file. After deleting those two files, right-click on the URL at the top of the Solution Explorer and choose Add New Item. When the Add New Item window appears, choose Web Service and then give it the name UserInformation. A vb file is also created with the code itself. Now, open the UserInformation.vb file. The first line after the Imports line is a line that starts with WebService. Change that line so that it’s the same as Figure 10-2.
Figure 10-2. Updated UserInformation.vb file
This changes the namespace from the default name and adds a description that can be viewed by a user of the web service. There are several different items of information about a user. For each item, a method will be defined. Use the following code to define each method (GetFirstName, GetLastName, GetPhoneNumber, GetEmailAddress, GetLocation):

172 C H A P T E R 1 0 ■ W E B S E R V I C E S
<WebMethod(Description:="Retrieves the First Name of the user")> _ Public Function GetFirstName(ByVal UserLogin As String) As Boolean End Function
The first line of the previous code declares this as a WebMethod and provides a description of the method for users of the web service. The WebMethod line of code must be entered prior to any method that is to be exposed as part of the web service. After the WebMethod line, any function or sub can be written. Within each method, determine whether the login is equal to the login that you are going to test within. If it is, return a value—otherwise return an empty string. The resulting code should look like this:
<WebMethod(Description:="Get the first name for the user")> _ Public Function GetFirstName(ByVal UserLogin As String) As String If UserLogin = "Brian" Then
Return "Brian" Else
Return "" End If
End Function
<WebMethod(Description:="Get the last name for the user")> _ Public Function GetLastName(ByVal UserLogin As String) As String If UserLogin = "Brian" Then
Return "Myers" Else
Return "" End If
End Function
<WebMethod(Description:="Get the phone number for the user")> _ Public Function GetPhoneNumber(ByVal UserLogin As String) As String If UserLogin = "Brian" Then
Return "555-5555" Else
Return "" End If
End Function
<WebMethod(Description:="Get the email address for the user")> _ Public Function GetEmailAddress(ByVal UserLogin As String) As String If UserLogin = "Brian" Then
Return "email@company.com" Else
Return "" End If
C H A P T E R 1 0 ■ W E B S E R V I C E S |
173 |
End Function
<WebMethod(Description:="Get the location id for the user")> _ Public Function GetLocation(ByVal UserLogin As String) As Integer If UserLogin = "Brian" Then
Return 2 Else Return 0 End If
End Function
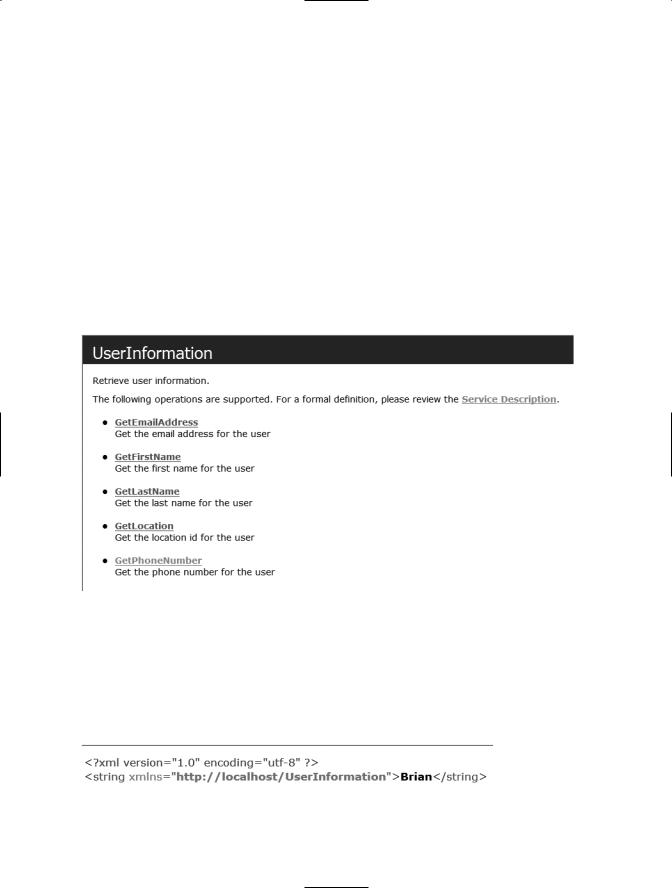
To test this out, switch to the Test.asmx file and execute the application (Debug Start without debugging). The .asmx file will appear and display the available methods for the service, along with a description of each, as shown in Figure 10-3.
Figure 10-3. .asmx file for the UserInformation service
You can test any of the web methods by clicking on its name, for example, GetFirstName. When you do this, another page will ask you to provide a parameter. Provide your login name and click Invoke. This will open another window, and will show you an XML result that should include the name that was provided by the method, as shown in Figure 10-4.
Figure 10-4. XML returned when GetFirstName invoked
174 C H A P T E R 1 0 ■ W E B S E R V I C E S
This result shows that the web service will be returning XML to the client that calls it. This also shows that the method is working correctly. To further test this, you can enter an invalid name in the UserLogin parameter and invoke the method again. If you do this, you should see an empty string in the XML results. Close the browser and the project.
Consuming a Web Service
Using a web service from a client application is called consuming the web service. This is done by first adding a web reference to the project and then using the exposed methods of the service.
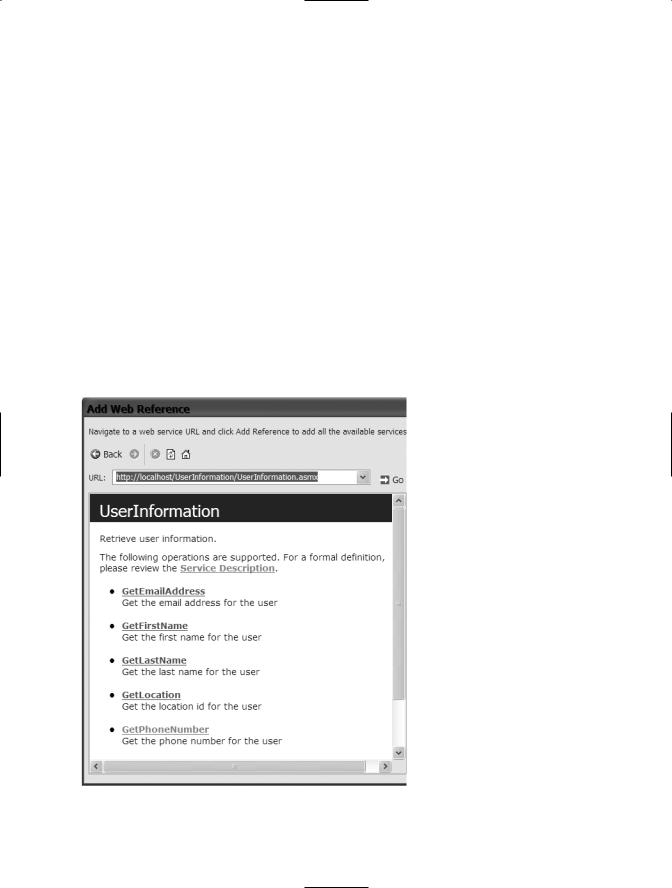
Open the Help Desk web site you created previously. When the project appears, open the Solution Explorer and right-click the project name. Choose Add Web Reference from the menu. There are several ways to find the web service you want to reference. In the Add Web Reference window type http://localhost/UserInformation/UserInformation.asmx
(using forward slashes) and click the Go button. VS will attempt to find the web service— if it does, the web methods available will appear, as shown in Figure 10-5.
Figure 10-5. Add Web Reference Dialog box
C H A P T E R 1 0 ■ W E B S E R V I C E S |
175 |
Along with the displaying of the web methods, you can now also see a link called Service Description. This is the WSDL file that was discussed at the beginning of the chapter. If you click on the link you will see an XML file that describes the service.
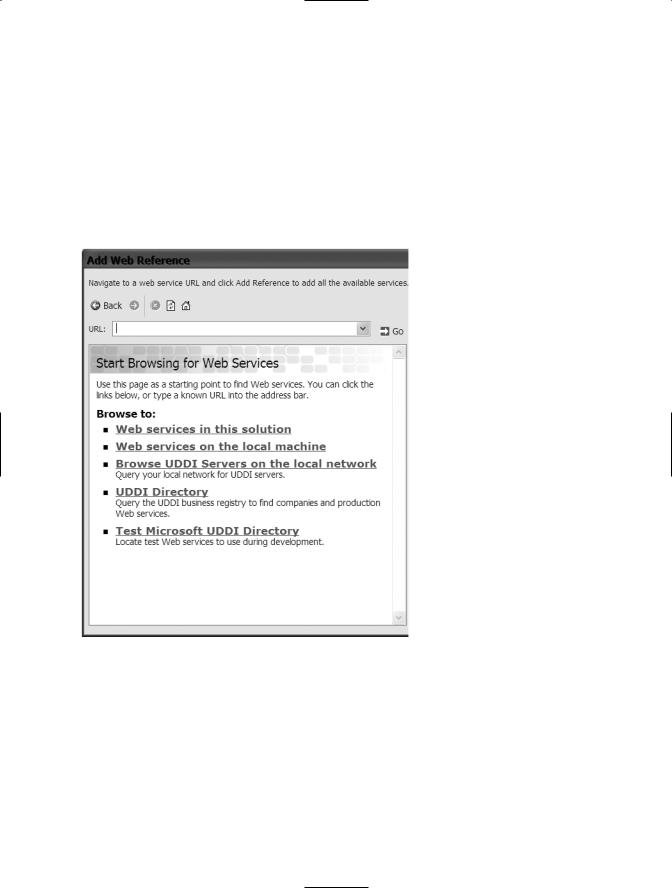
Another way to find the web service is to search for all the web services on the local computer or on the local network. To test this out, click the Home button at the top of the Add Web Reference window (the Home button is the house icon). This will take you back to the original screen that appeared when you first attempted to add a web reference, as shown in Figure 10-6.
Figure 10-6. Ways to find a web service
Click the Web services on the local machine link. This will display a list of all of the web services on the local computer. Next, find the correct UserInformation web service and click that link. You should see the list of methods for the web service again. To add the web reference to the project, change the web reference name from localhost to UserInformation and then click the Add Reference button. You will now see a new folder within the project called App_Webreferences, with a folder inside it called UserInformation. The App_Webreferences folder contains all of the web references within the web site. The UserInformation folder contains all of the files necessary to
176 C H A P T E R 1 0 ■ W E B S E R V I C E S
work with the web service from within the web site. Notice the .wsdl file within this second folder.
Next, you need to use the web service. The best place to use this web service is within the AddTicket.aspx page. When the page is loaded, you’ll determine the user’s login, pass that to each method and then assign the results to the appropriate text box. If you remember from previously, the Session object already contains the user’s login, so you don’t need to determine that. Within the Page Load event add the following code:
Dim wsUserInformation As New UserInformation.UserInformation
This line of code will declare a variable to represent the web service. Next, add the following line of code to assign the value from the Session variable for the user login to the user login text box:
txtUserLogin.Text = Session("UserLogin").ToString
Now add one line for each control and method in order to call the web method and assign the returned value to the appropriate text box. The resulting code will be:
Dim wsUserInformation As New UserInformation.UserInformation txtUserLogin.Text = Session("UserLogin").ToString txtFirstName.Text = wsUserInformation.GetFirstName(Session("UserLogin").ToString)
txtLastName.Text = wsUserInformation.GetLastName(Session("UserLogin").ToString) txtPhoneNumber.Text = wsUserInformation.GetPhoneNumber (Session("UserLogin").ToString)
txtEmailAddress.Text = wsUserInformation.GetEmailAddress
(Session("UserLogin").ToString)
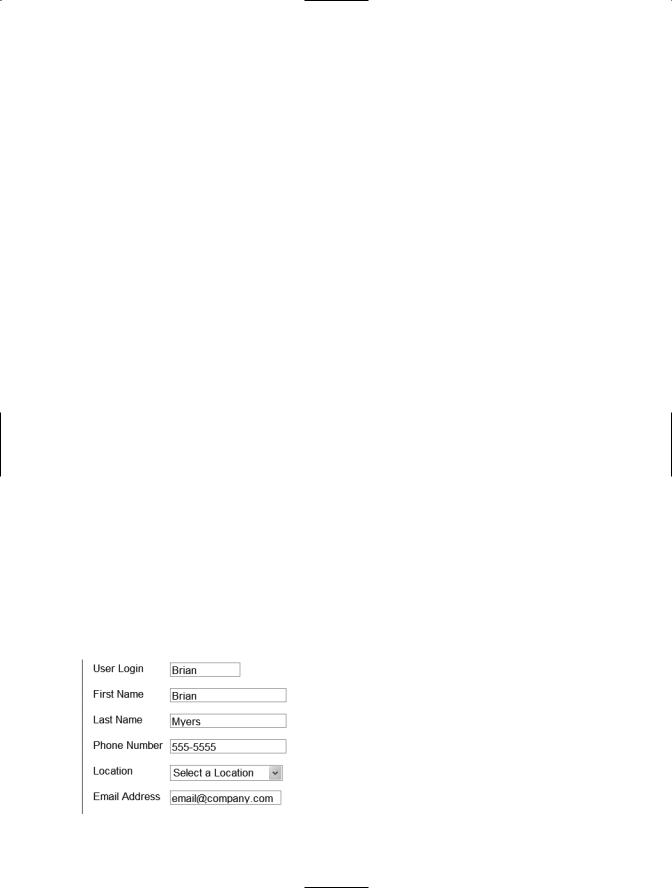
To test this out, choose Start without debugging from the Debug menu. The AddTicket.aspx page will appear with all of the information filled in, as shown in Figure 10-7.
Figure 10-7. Data is displayed.

C H A P T E R 1 0 ■ W E B S E R V I C E S |
177 |
The location assignment was left out of the previous code because it’s a little different. You need to make the drop-down list use the value from the web service. To do this, add the following lines of code to the page load event after the call to AddItem:
Dim intLocation As Integer
intLocation = wsUserInformation.GetLocation(Session("userlogin").ToString) If intLocation > 0 Then
DDLocation.SelectedValue = DDLocation.Items.FindByValue(intLocation.ToString).Value Else
DDLocation.SelectedValue = "999" End If
The first line declares a holding variable, which is used on the second line to receive the value from the web method. The third line determines whether the value from the web method was greater than 0. The fourth line selects the value from the drop-down list, (found by using the FindByValue method of the items collection within the drop-down list). The FindByValue method requires a parameter telling it which value to find. Basically the FindByValue method tries to find a value within the collection and then provide its value. If the value from the web method isn’t greater than 0 then the Select a location item is selected.
To test what happens when the login is not found, open the Global.asax page and change the Session assignment to Session.Add("UserLogin", strName & "1"). This is an easy way to test what happens if the user login is not a value and it’s easy to reverse. Now, choose Start without debugging from the Debug menu. No information (other than the login name) will appear, since the login name now has a 1 attached to the end and is therefore invalid.
Conclusion
In this chapter, I introduced the concepts behind web services and expanded the Help Desk application by creating a web service. I showed you how to use this web service to provide user information and how to consume that web service within the Help Desk application.
