Beginning Object-Oriented ASP.NET 2.0 with VB.NET From Novice to Professional
.pdf
C H A P T E R 6 ■ N A M E S PA C E S |
99 |
Open the Default.aspx page and drag a label onto the form. Give it an ID property of lbllogin and leave the text property blank. Now open the Default.aspx.vb file. From the top left drop-down box choose Page Events, then from the top right drop-down box choose Load. This will create the Page_Load sub within the Default.aspx.vb file. Add:
lbllogin.text = "Login: " & My.User.Name
to the Page_Load sub.
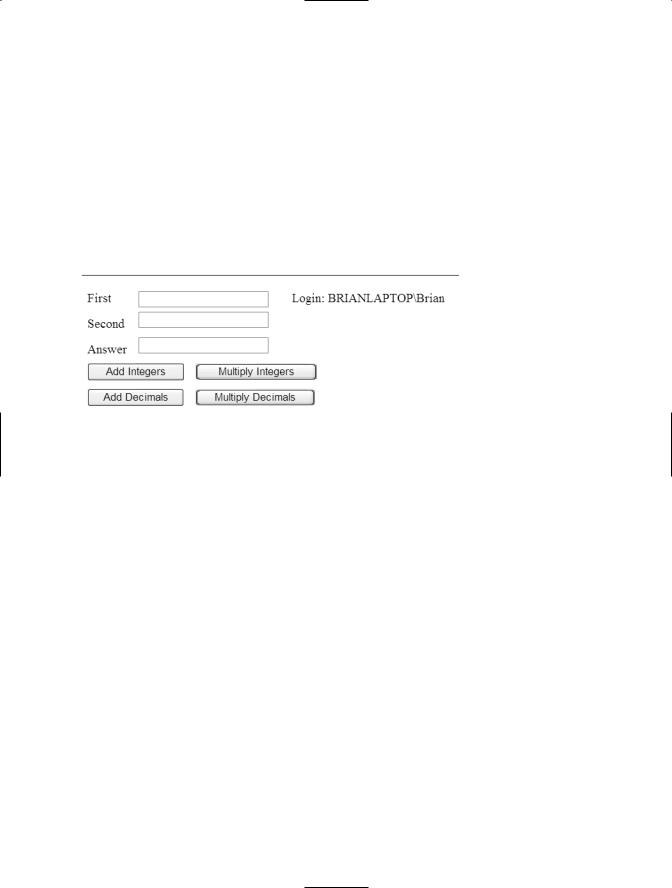
Start the web application and you should see the name of the currently logged-in user appear within the label that was just added, as shown in Figure 6-20.
Figure 6-20. The login name appears.
This example shows you how to get and use the name property of the User class within the My namespace. Now you can use this value to determine if the user is an administrator using the UserAuth class within the MyCompany namespace. Drag another label onto the Default.aspx page with an ID property of lblAdmin and with no value in the Text property. Open the Default.aspx.vb code page again, and then add a new declaration at the top:
Private clsauth as MyCompany.UserAuth
This will create an instance of the UserAuth class from within the MyCompany namespace and call that instance clsauth. Change the code with the Page_Load sub to be:
Dim strLogin As String Dim intBegin As Integer
intBegin = InStr(My.User.Name, "\") + 1 strLogin = Mid(My.User.Name, intBegin) lbllogin.Text = "Login: " & strLogin clsAuth = New MyCompany.UserAuth
lbladmin.Text = "Admin: " & clsAuth.IsUserAdmin(strLogin)
As you probably noticed from the previous example, the Name property of the User class provides both the domain name and the user name. This set of code will determine

100 C H A P T E R 6 ■ N A M E S PA C E S
both where the domain name ends and where the user name begins, and it will only display the user name. The first two lines of code declare variables that are local to the Page_Load sub. The first (strLogin) will hold the login name, while the second (intBegin) will be used to determine where the domain name ends and the login name begins. The third line of code uses the built-in InStr function to determine if the string “\” is contained within the name property of the User class. A value of 1 is added to that number and assigned to intBegin. intBegin then has the position of the first character of the user name (not the domain name). The next line uses the built-in function Mid to extract the characters from the name property of the User class, starting from the position represented by intBegin. The next line sets the text for the lbllogin control. The sixth line creates a new instance of the UserAuth class within the MyCompany namespace. The final line calls the IsUserAdmin method of the UserAuth class within the MyCompany namespace and passes the user name to determine if the user is an admin or not.
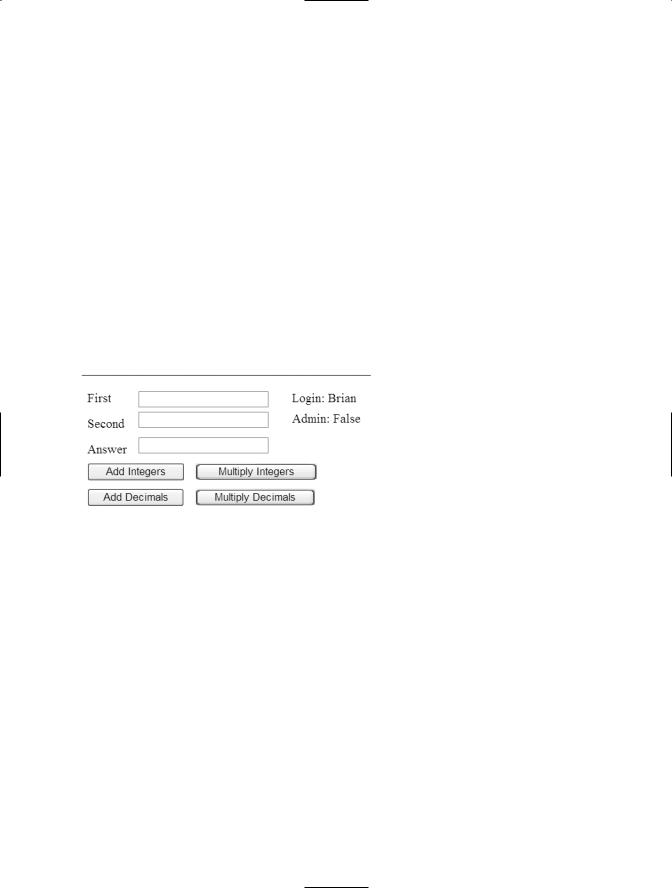
After the code is in place, start the application. The results should look similar to Figure 6-21, but with your currently logged in user name and False.
Figure 6-21. Completed form
This example showed you how to get solely the name of the currently logged-in user by skipping over the domain name. There are more uses for the My namespace within ASP.NET applications; however, if you are writing applications for intranet sites, the User class within the My namespace will be very useful. You can look up more about the My namespace by searching for My within the MSDN help file.
Conclusion
In this chapter I’ve discussed namespaces in depth. Though namespaces aren’t an OOP concept, they still provide a useful way to organize classes of functionality when using VS2005. In Chapter 7, I’ll cover how to design classes based on business processes.

C H A P T E R 7
■ ■ ■
Class Design
In the first part of this chapter, I’ll cover how to design classes for an application based on a business process. In the second part of this chapter, I’ll cover how to create the classes and then use those classes to lay the groundwork for an ASP.NET web site. The next chapter will cover designing and building web forms, which uses the classes you create in this chapter to build the web site.
Class Design Process
Class design is the process used to transform the written business processes for an application into one or more classes that will be used to implement the application. The input into this process is an overview of both the application and the business process the application will facilitate. The output will be code structures for all classes that will be used for the application.
The class design process is comprised of six steps:
1.Define the business process
2.Review the business process
3.Break down the business process
4.Create the class or classes
5.Define the properties and methods of the class or classes
6.Create the class structure
Case Study
To best illustrate the class design process, I have developed a case study based on a real- |
|
world application. This case study will explain each step in the class design process and |
|
also apply each step to the real-world application. The case study I’ve chosen is based on |
101 |

102 C H A P T E R 7 ■ C L A S S D E S I G N
a help desk system. But it’s important to note that the application that you will build over this chapter and the next will not be feature complete. This is because, as this is an introductory book, I don’t want to go into the use of ADO.NET, which is used to connect to a database. Instead, for the purposes of this book, some of the methods will be hard-coded to show the concept. And later, when you are learning about ADO.NET, you can use this application to write your first ADO.NET code. What follows next is the business process overview provided as the first input into the class design process.
Business Process Overview
Your company needs a help desk system. The help desk system should allow users to create new help desk tickets and then send them to the help desk technicians to be reviewed and worked on. The user should be able to choose from a list of categories for the ticket.
The user must also provide their login, their first and last names, their phone number, their location, e-mail address, a category for the ticket, and a description of the problem. The ticket itself must record the date created, the login that created the ticket, the date assigned, and the date closed. After the ticket is created (with a status of new), a technician at the appropriate location must be able to view the ticket. The technician should then be able to choose a level of importance for the ticket (high, medium, or low) and add any additional comments. The technician will then assign the ticket to herself and begin work on the ticket. When the work is completed the technician should be able to change the status to resolved, provide a resolution, and record her total number of minutes spent on the ticket. The user should then be able to either close the ticket or say the ticket is not resolved, depending on the situation. If a technician is waiting for parts or other support, the status can be set to pending.
Technicians must be able to see a list of the new tickets for their location, the tickets they’re assigned to, and the tickets they have resolved. Users must be able to see the list of tickets they have created, as well as the tickets they have created that have been resolved. The Help Desk Manager must be able to see all tickets assigned to a specific technician, all unresolved tickets (not closed), and all tickets for a location. The Help Desk Manager and technicians should be able to see a list of all new tickets, all assigned tickets, all resolved tickets, all unresolved (not closed) tickets, and all closed tickets.
Define the Business Process
The first step in the class design process is to define the business process. This may be simply taking a written document that defines the business process already in use, or it could be working with the process owner (the person most responsible for the process) and others to define a new business process. This step is always the same no matter which state the existing business process is in. You should rewrite the business process in your own words and define any terms or processes that you are unsure of. The document

C H A P T E R 7 ■ C L A S S D E S I G N |
103 |
that results will be the input for your next step in the class design process. While you are working on defining the business process, don’t worry about how the application will be implemented. For example, this case study has the user providing their login and name. It is true that this information could be retrieved from somewhere else. With the .NET programming languages, it’s possible to use Active Directory to retrieve information about a user, as well as the login of the currently logged in user (remember the My namespace from the previous chapter). However, at this point in the development process you should not worry about how those things are going to be implemented. You can deal with these issues when you are ready to actually implement the methods that are being defined during this step.
Case Study: Define the Business Process
First, break the business process down into steps, so that you can handle all of the peripheral actions that need to take place. For example, the business process states that technicians and the Help Desk Manager must be able to view certain information. While this not in the sequence of a process flow, it must be captured. The rewritten business process may look something like the steps listed next.
Help Desk System: Ticket Creation Process
1.The user creates a new help desk ticket providing their login name, their first name, last name, phone number, location, e-mail address, and problem description. The user chooses a category for the ticket and submits.
2.The date created and the login used must be captured.
3.The status of the ticket is new.
4.The technician views the list of new tickets.
5.The technician views the new ticket.
6.The technician sets an importance of either high, medium, or low.
7.The technician may add any additional comments.
8.The technician assigns the ticket to himself.
9.The status is changed to “assigned” and the assigned date is set.
10.The technician performs work on the ticket.
11.If the technician must wait for parts or other support, the status is set to pending.

104C H A P T E R 7 ■ C L A S S D E S I G N
12.The technician completes the work.
13.The technician provides a resolution and records the amount of time spent on the ticket in minutes.
14.The technician sets the status to “resolved,” and records the date resolved.
15.The user is notified of the resolved ticket.
16.If the user is satisfied with the resolution, the user sets the status to closed, and the date closed is recorded.
17.If the user is not satisfied with the resolution, the user sets the status to “not resolved” and a notification is sent to the technician.
Help Desk System: Technician Views
•Technician can see a list of new tickets for their location.
•Technician can see a list of tickets assigned to them.
•Technician can see a list of tickets they resolved.
Help Desk System: User Views
•The user can see a list of tickets they’ve created.
•The user can see a list of tickets they’ve created and resolved.
Help Desk System: Help Desk Manager Views
•The Help Desk Manager can see a list of all the tickets assigned to a specific technician.
•The Help Desk Manager can see a list of all tickets for any location.
Help Desk System: Help Desk Manager and Technician Views
•The technicians and the Help Desk Manger can see a list of all new tickets.
•The technicians and the Help Desk Manager can see a list of all assigned tickets.
•The technicians and the Help Desk Manager can see a list of all resolved tickets.

C H A P T E R 7 ■ C L A S S D E S I G N |
105 |
•The technicians and the Help Desk Manager can see a list of all unresolved (not closed) tickets.
•The technicians and the Help Desk Manager can see a list of all closed tickets.
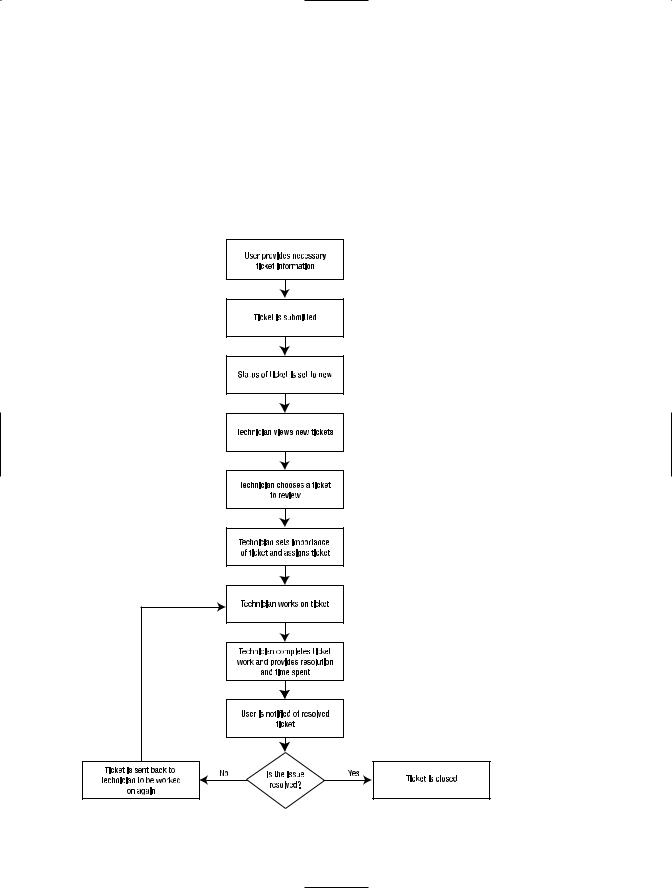
After listing each step of the process, it may be a good idea to create a flowchart that shows the business process flow as you understand it. The flowchart for the business process in our case study is shown in Figure 7-1.
Figure 7-1. Business Process Flow Chart

106 C H A P T E R 7 ■ C L A S S D E S I G N
Review the Business Process
The second step in the class design process begins with the output of the first step that we just covered—a document in your own words that defines the business process that the application is to facilitate, along with a flowchart to show the business process flow visually. This second step involves meeting with the process owner to discuss the business process and go over your initial document. There is a chance that you will have misinterpreted an item in the business process or that after reading your summation of the process, the process owner will realize that something is missing or incorrect in your understanding of the process. This could be anything from the result of a miscommunication to a process owner forgetting a step in the process. Your reviewed document will be an input for the next step in the class design process.
Break Down the Business Process
The input for this next step is the reviewed business process document written in your own words, along with any definitions that may be required. In this step, you’ll pull out, or categorize, the nouns, adjectives, and verbs (or actions) that you‘ll need to complete the business process.
First, you’ll begin pulling out the various nouns in the business process that may become classes. Next, you’ll want to pull out all of the adjectives that relate to each noun. The adjectives may become the properties of a class. Then, continue your breaking down of the business process by pulling out all of the actions from the business process. These may become the methods of the class or classes.
Finally, you’ll need to review the business process and your potential classes, properties, and methods, as well as determine any supporting classes, properties, or methods. These will be the most difficult to define as they are not listed specifically within the business process and must be inferred.
For example, there is required information that must be provided in order to create a new ticket. The validation that this data is in fact present can be performed in several ways. One way is to add a method called Validate ticket that includes the validation logic. The Validate ticket method would then be a supporting method for a class. The resulting document of classes, properties, and methods will be the input for the next step in the class design process. Again, at this point in the development process you don’t care about how the methods that are being defined are going to be implemented. That will come in time.
Case Study: Break Down the Business Process
Begin the breakdown step by first finding the nouns that appear to represent various classes. For our case study, the result would be the classes in the following section.

C H A P T E R 7 ■ C L A S S D E S I G N |
107 |
Potential Classes
•Ticket
•User
•Technician
•Help Desk Manager
Next, find all of the adjectives that describe the previous nouns. These will be the potential properties. In this case the result would be:
•Ticket (noun)
•User login name
•First name
•Last name
•Phone number
•Location
•E-mail address
•Problem description
•Category
•Date created
•Created by login
•Status
•Importance
•Additional comments
•Assigned to
•Resolution
•Time spent in minutes
•Date resolved

108C H A P T E R 7 ■ C L A S S D E S I G N
•Date closed
•Ticket ID
•User
•Technician
•Help Desk Manager
As you can see from this breakdown, the adjectives all describe the class called Ticket. So maybe the other classes are not necessary. This will be determined later. The next step is to define the actions for each potential class (noun). The resulting list would be:
•Ticket
•Create new ticket
•Assign ticket
•User
•Ticket not resolved
•Close ticket
•List of tickets created
•List of resolved tickets
•Technician
•List of new tickets
•List of tickets assigned to them
•List of tickets they resolved
•List of all new tickets
•List of all assigned tickets
•List of all resolved tickets
•List of all unresolved tickets
•List of all closed tickets
