

Beginning Object-Oriented ASP.NET 2.0 with VB.NET From Novice to Professional
.pdfC H A P T E R 2 ■ O B J E C T- O R I E N T E D P R O G R A M M I N G |
29 |
Objects As the Building Blocks of OOP
Objects are called the building blocks of OOP because a program written with an OOP language such as VB.NET may have many objects within it. Take, for example, a web site for scheduling college courses. There may be a student object with information about students, a room object with information about classrooms, a course object with information about courses, and finally a schedule object that holds information about the final schedule for each course in each room and the number of students in each course.
These objects are independent of one another but may be loosely tied together. For example, the schedule object would need to reference the other objects, since the schedule is made up of courses, rooms, and students. All of these objects could be written by the same programmer or split up to be written by a few different programmers. The programmer working on the schedule object would only need to know what information to give to and expect from the course object. She would not need to ask the course object programmer about the detailed code or how the object actually works. In fact, with the
.NET Framework, it doesn’t even matter which language each object was written in, because they will all work together as if written with the same language.
When programming the student object, the programmer doesn’t know which particular actions pertaining to the student object that a future developer might take and in what order they might be used. For example, the student object might have two actions, one called CheckPrerequisites and another called CheckGradeLevel, which only come into play if the student is registering for classes. One or both of these actions might be taken to determine if the student qualifies for the course. However, it’s also possible the course the student is attempting to enroll in doesn’t have prerequisites, meaning that the schedule object wouldn’t need to request that the course object perform the CheckPrerequisites action. Alternatively, it’s possible that the school in question allows any student at any grade level to take a specific course. Therefore, the CheckGradeLevel action would not be required for that particular course, and the schedule object would not need to request that the course object perform the CheckGradeLevel action.
This has been yet another example showing that objects are not procedural. However, a programmer would still need to follow certain steps when writing the code for the CheckPrerequisites action. For example, the CheckPrerequisites action may require that the program first check to ensure the student is truly enrolled at the college, then determine if there is any money owed, and finally, make sure the student has passed the prerequisite course. If you can remember the last time you attempted to enroll in a course at a college, you will realize that these objects do model the real world. But keep in mind that for any given problem, the objects required and the actions required may be different.
The object (or in this case objects) really implements the business rules that are defined within the real world. For example, the CheckPrerequisites action mentioned

30 C H A P T E R 2 ■ O B J E C T- O R I E N T E D P R O G R A M M I N G
in my college scheduling example performs checks that are defined by business rules. The business rules help to determine what actions to take and what steps are involved when performing actions.
Introduction to Reusability
Reusability is the concept of using the same object for multiple purposes and multiple applications. Reusability is really a by-product of OOP. The idea is that a single object should not be tied, or at most, very loosely tied, to other objects. This way the object can be used by any other object or client. (Loosely tied objects are objects that rely on one another but are not entirely dependent on one another.)
Importance of Reusability
Objects should be built to be reused as often as possible, because reusability helps to decrease development time. If an object that is known to work well and has been tested previously can be used in development, then valuable development time can be used for other purposes, rather than in creating new, redundant objects. As a rule of thumb, if there are multiple types of applications that are similar, there is a good chance that the code can be reused. Also, if you find yourself copying and pasting code from one application to another already, you can probably put that code into an object to be reused. Finally, an object can be used if an application requires certain services (such as printing services) that other applications can also use and that can be detailed in general terms. For example, a printing object could be created to send items to printers, but that particular printing object could also be used by many applications to send items to a printer, instead of each application including its own object code for printing.
It’s a fact that in some applications, reusability may not be practical. For many applications there are multiple layers of objects. For example, you may have an object that is used to provide all services related to database manipulation. This object can be reused. However, if the same application has an object that is specific to itself, the object may not be able to be reused. Using the example of the course scheduling that I discussed in the last section, consider that the student object could be reused in other applications within the college if it contains actions other than those specific to scheduling. For example, the student object could be used to enroll students in the college or to keep track of financial aid for a specific student. However, the rooms object probably would not be useful in any other application within the college. These decisions are best made during the design of the application and must be looked at closely (I’ll talk more about object design in Chapter 7).

C H A P T E R 2 ■ O B J E C T- O R I E N T E D P R O G R A M M I N G |
31 |
Incorporating Reusability
Reusability can be very difficult to implement, especially within larger organizations. Within a small organization, there may be only one or two programmers, who are likely familiar with their own code and can easily recognize instances when another programmer might be able to use it to solve a specific problem. In larger organizations, reusability must be looked at from an enterprise level. Someone within the organization must break down the objects that are required for each application and then decide whether existing objects can be used or not. To make this easier, a set of reusable objects that perform the common actions specific to the organization should be kept in a library. This library can also be considered a framework.
A framework is a group of objects that are reusable and that may or may not depend on one another. Many companies (like mine) have a framework that includes all common objects that are used for applications. Objects that fit in this category are usually the “lower level” objects that provide for tasks that are common across most, if not all, of the applications within a company. The biggest problem with using a library or framework is that developers must have a central place to determine which objects exist within the library or framework and must have access to their documentation. Developers must also be able to determine whether there is an object that has already been built to perform the work that they need. Within the .NET Framework, this organization-specific library could be a namespace (collections of classes that are similar). I will discuss the concept of a namespace in Chapter 6.
The .NET Framework also provides an object library called the .NET Class Library. This is a library of many different objects that perform the common programming functions that most applications need. For example, there is the ActiveX Data Object (ADO)
.NET object that is used for working with databases. This object provides services for connecting to a database as well as for getting information back out of databases. If this object did not exist, each application would need to have separate code in order to use the low level database provider to connect to the database. This would require more time for each application and would require a programmer with a greater knowledge of the low-level database provider. Instead, the ADO.NET object hides all of the ugly details from us. As you now know, this is called encapsulation, and you can find more about it in Chapter 4.
Introduction to OOP with .NET
The .NET Framework, and all of the programming languages for .NET, are based on the concepts of OOP. The .NET Framework itself is very reliant on the concepts of OOP. In this section I’ll discuss which objects are within the .NET Framework and show you how to create objects within VB.NET.

32 C H A P T E R 2 ■ O B J E C T- O R I E N T E D P R O G R A M M I N G
Objects in .NET
Objects in .NET are called classes. Simply put, classes are another name for objects. The
.NET Framework not only includes the Common Language Runtime (CLR), as mentioned earlier in the book, but also includes a class library. This class library contains a large number of predefined classes that are included to handle common programming tasks. These classes reflect the real world, just as any object does. For example, there is a class called SQLConnection that provides services for connecting to a database. This class simplifies the code that would need to be written each time an application needed to connect to a database. Therefore, this class is considered to be reusable. Most applications need to connect to a database and any application that connects to a SQL Server database will most likely use this class. The SQLConnection class is also a member of a larger organization of classes called a namespace. The System.Data.SQLClient namespace provides services for all database functionality. The System.Data.SQLClient.SQLConnection class is just one of those classes, and provides just a part of the overall functionality. Namespaces will be covered later in this chapter.
OBJECTS IN ASP.NET WEB APPLICATIONS
When creating ASP.NET web applications, everything is an object or class. The page that will hold user interface controls is a class, and the user controls themselves are classes. Again, each of the classes represents the real world. For example, consider the Page class, which is the container for all user interface elements. This class represents what users will see when interacting with the ASP.NET application. Any user interface element, such as a text box, is a class. All user interface elements have attributes and a core set of actions that they perform. Then, each specific type of user interface element adds actions and attributes that are specific to that type of element. For example, all of the elements have an ID attribute that corresponds to the name of the control. However, buttons have actions that determine what to do when a user clicks the button. The text box user interface element doesn’t have an action that determines what to do when a user clicks the text box because it isn’t necessary.
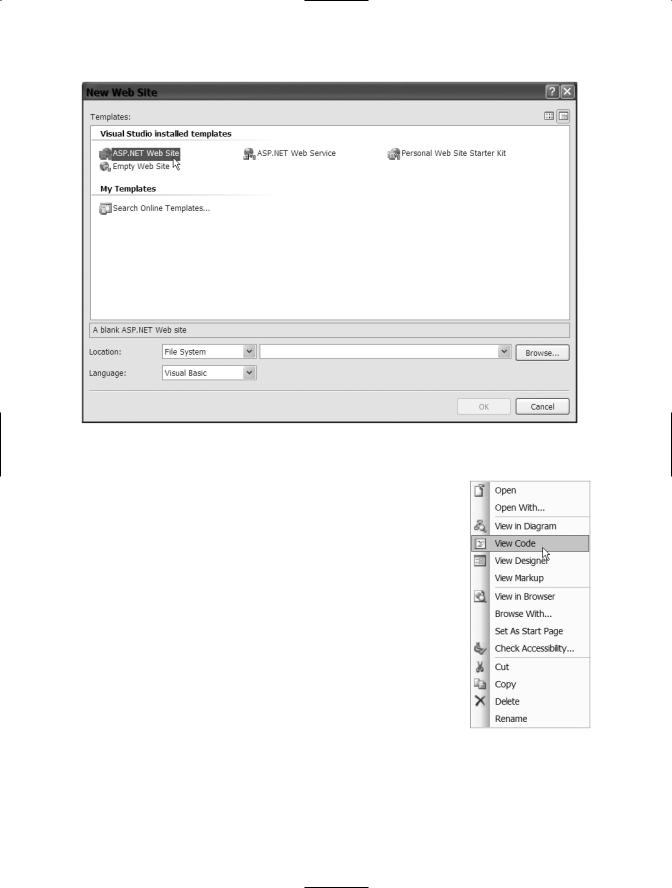
To illustrate this point, create a new file system web site (see Chapter 1 for instructions on doing this) that points to a folder on your computer called Chapter2, as shown in Figure 2-1.
C H A P T E R 2 ■ O B J E C T- O R I E N T E D P R O G R A M M I N G |
33 |
Figure 2-1. Creating a new file system web site called Chapter2
Right-click on the Default.aspx file and choose View Code, as shown in Figure 2-2. This will open the code file Default.aspx.vb in the middle of the viewing area.
Click the down arrow for the drop-down on the top-left side of the page. It should say (General). From that list, choose (page_events). Now, click the down arrow for the drop-down list on the right. Choose Load from the right drop-down list. (The left drop-down is a list of classes, and for each class chosen from the left drop-down list there is a list of method or actions on the right.) Actions and attributes will be discussed in Chapter 3.
After you’ve completed the previous instructions, the first and last line of code for the action called Page_Load should have been created, as shown in Figure 2-3. Page_Load is an action that can be taken on the Page class. Basically any code you want to be executed when the page is loaded goes into this Sub.
Figure 2-2. Choosing View Code to view
the coding window

34 C H A P T E R 2 ■ O B J E C T- O R I E N T E D P R O G R A M M I N G
Figure 2-3. The Page_Load action
Using the Object Browser in Visual Studio 2005
The Object Browser is a tool within Visual Studio that shows you all of the objects that are part of a project or application. This includes all of the objects that are part of the .NET Class Library within the .NET Framework. Using the Object Browser will give you a chance to see all of the objects that you can use and also give you some insight into how objects can model the real world.
To access the Object Browser, choose View Object Browser, as shown in Figure 2-4. The Object Browser will appear in the middle of the screen.
The first screen of the Object Browser will display all of the namespaces within the
.NET Class Library. A namespace is essentially a collection of classes (and remember that classes are objects). Namespaces will be covered in more depth in Chapter 6.
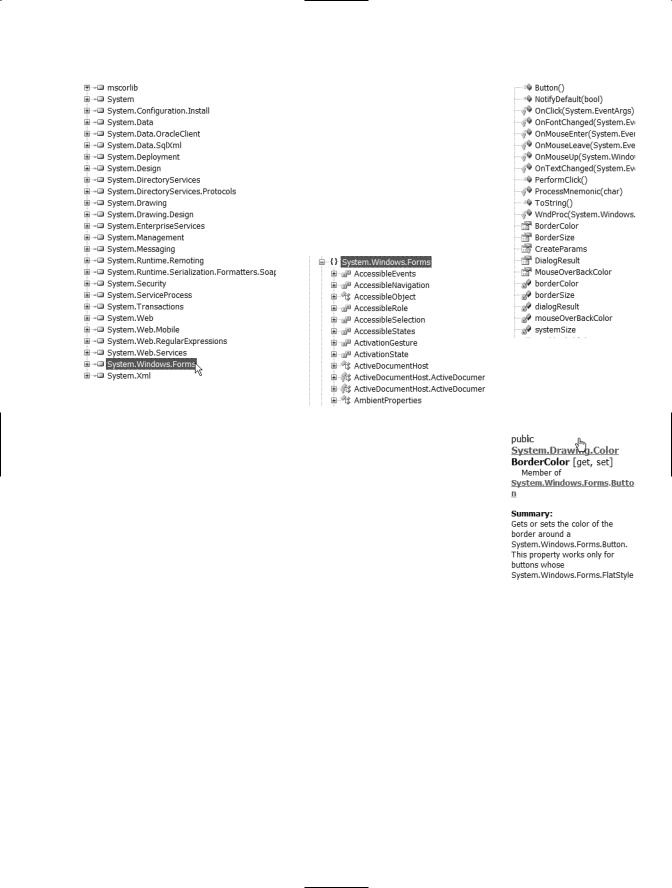
Double-click on the System.Windows.Forms namespace within the Object Browser, as shown in Figure 2-5. This will expand the current namespace and show other namespaces located within that namespace.
Find the System.Windows.Forms namespace and double-click it. You will see a long list of items, as shown in Figure 2-6.
The items with the multicolored icons (such as AccessibleObject in Figure 2-6) are classes. If you go down the list and click on some of the various classes, you’ll see the area to the right of the class list fill up with a list of actions and attributes. Click the class called Button under the System. Windows.Forms namespace and the list of actions and attributes for the Button class will appear on the right, as in Figure 2-7.
C H A P T E R 2 ■ O B J E C T- O R I E N T E D P R O G R A M M I N G |
35 |
Figure 2-5. Choosing |
Figure 2-6. Part of the |
System.Windows.Forms from |
System.Windows.Forms |
the Object Browser |
namespace |
The items that have a purple icon next to them are actions, while the items with a hand beside them are “public” attributes. The items with the blue icons beside them are the “private” attributes of the classes. If you click on one of these attributes or actions, some more information about the item will appear in the small box below the attribute and action list. For example, click on the BorderColor attribute with the hand icon beside it (meaning the public BorderColor attribute). You’ll see that more information for that attribute will appear below the list, as shown in Figure 2-8.
If you continue to scroll up and down, clicking on classes and
namespaces, you will see that there are hundreds of classes and thousands of attributes and actions. These are all part of the .NET Framework. It’s not necessary to memorize any of these. Many of these items are used behind the scenes by the .NET Framework. For example, when you create a new web application, the default page created is automatically based on the Page class.
36 C H A P T E R 2 ■ O B J E C T- O R I E N T E D P R O G R A M M I N G
Creating a Class with VB.NET
This is the moment you have been waiting for. You may have been asking yourself, “What does all of this mean to me? I just want to create a web site!”
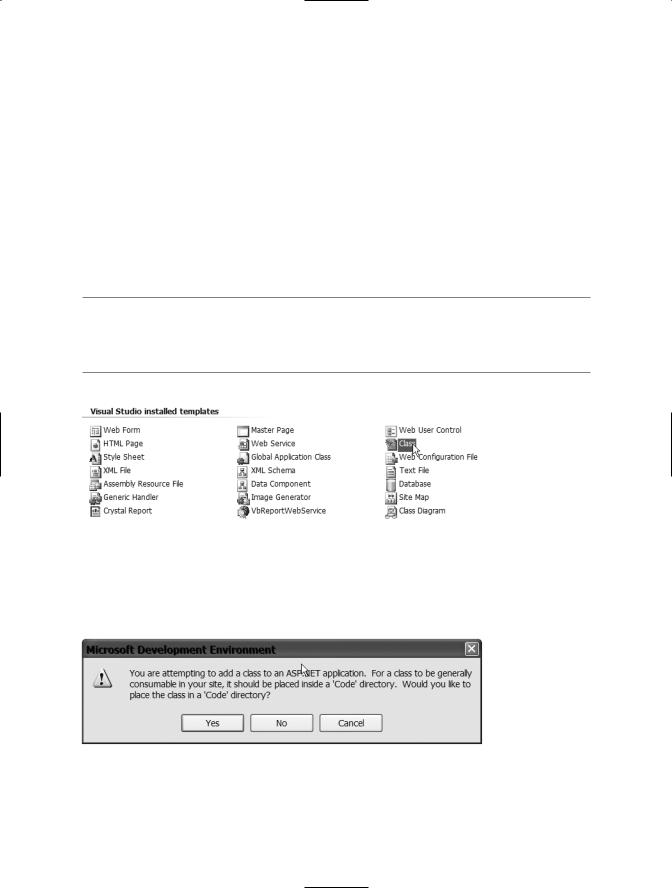
Up to this point, I have covered the theory behind the objects that are the classes within VB.NET, and I’ve covered the objects that exist within the .NET Class Library. Now that you have some background information, it’s time to create a web site with VB.NET. The first step is to create your very first class. To create a new class within VB.NET, rightclick the name of the project at the top of the Solution Explorer (should be c:\chapter2) and choose Add New Item. From the Add New Item window, choose Class, as shown in Figure 2-9, and then enter MyFirstClass in the name field. Next, click Add.
■Note If you do not see the Solution Explorer, it may be closed or hidden. If the Solution Explorer is closed, click the View menu, then choose Solution Explorer to view the Solution Explorer again. The Solution Explorer is hidden at the right edge of the screen. Move your mouse over to the tab for the Solution Explorer to expand it.
Figure 2-9. Choosing Class from the Add New Items window
After you click Add for the new class, a window will appear (shown in Figure 2-10), asking if you want to create a code directory. Click Yes.
Figure 2-10. Adding a Code directory

C H A P T E R 2 ■ O B J E C T- O R I E N T E D P R O G R A M M I N G |
37 |
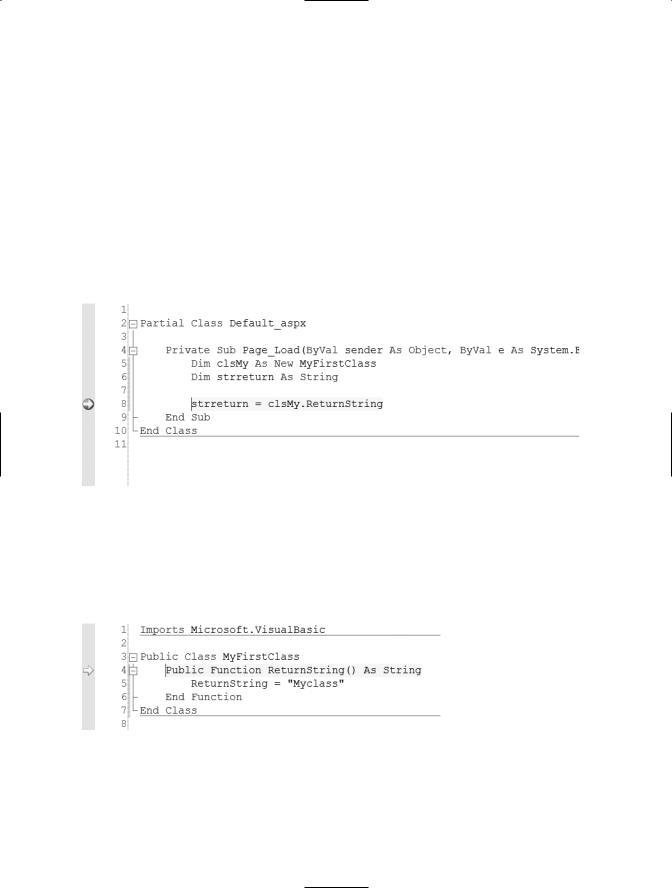
Your new class will be created and the code window will now appear in the middle of the screen. The actual file name will be MyFirstClass.vb and it will be visible in the Solution Explorer on the right. Do not remove the two lines of code that are added by default. Every class must begin with a declaration line that includes the name and access modifier (Public in this case) and every class must end with an End Class.
Enter the following code between the existing lines:
Public Function ReturnString() As String
Return "Myclass"
End Function
This code will create a function (or action) that will return a string value of general text to the code that requests this action. The first line of this code is the action declaration, which defines what action to take. The first line of this code is the only information that other code wanting to perform the ReturnString action of the MyFirstClass object will see.
Using a Class in VB.NET
After adding an action to the class, you can now use the class. To use a class, a variable must first be created with a data type that matches the class name. Click on the Default.aspx.vb tab to add code to the page. The Page_Load action of the page should still be visible. If not, click the left drop-down list at the top of the window, choose Page Events, and then choose Load from the drop-down list on the right. Add the following lines of code on the line after the Page_Load declaration line:
Private Sub Form1_Load(ByVal sender As System.Object, ByVal e As
System.EventArgs)
Handles Form1.Load
Dim clsMy As New MyFirstClass
Dim strReturn As String
End Sub
The first line of code (carrying on to the second line in the previous example) is the sub declaration. The second line of code (starting with dim clsMy as New MyFirstClass) declares a variable called clsMy that is an instance of the MyFirstClass class, and this declaration will make an exact copy of MyFirstClass. The third line will declare a variable that is a string, to hold a string value.
Now add this line of code below the other two:
strreturn = clsMy.ReturnString
38 C H A P T E R 2 ■ O B J E C T- O R I E N T E D P R O G R A M M I N G
This line of code will accept the value from the ReturnString action and will then ask the MyFirstClass class to perform the action and provide a string value back. I’ll discuss how actions and attributes are defined and used in Chapter 3.
Now that all of the code has been added, place a breakpoint on the line that requests the instance of MyFirstClass to perform the ReturnString action (strreturn=clsMy.ReturnString). This will allow you to walk through the code as the application executes. You can do this by clicking the gray area to the left of the line so that a maroon bar appears over the line. You can start to debug the application by choosing Start from the Debug menu. If you do this, you may be told that a configuration file must be created first. Click OK and the page should begin to load in a Web browser. Next, the code page should appear with a yellow line over the breakpoint, as shown in Figure 2-11.
Figure 2-11. Breakpoint on the action callck
When the breakpoint appears, press the F11 key. This will actually transfer the debugger to within the MyFirstClass file, since the F11 key tells the debugger to move to the next line of code, as shown in Figure 2-12.
Figure 2-12. Debugger transferring to MyFirstClass file