

Beginning Object-Oriented ASP.NET 2.0 with VB.NET From Novice to Professional
.pdfC H A P T E R 3 ■ AT T R I B U T E S A N D A C T I O N S |
49 |
VB.NET Methods
Actions within OOP are implemented as either functions or subs within VB.NET. Subs and functions are smaller groupings of code that perform a specific task. Subs do not return a value, while functions do. A public function or sub is called a Method. For instance, with our car example, one method might be start and another stop.
Functions and subs within a class have the same class-specific access modifiers that properties and local variables do. A public function or sub is considered a method because it is exposed to other code using the class. A private function or sub is still considered a function or sub, rather than a method, since the private function or sub is not exposed
to any code outside of the class.
Every class has a constructor, which is a sub that is called when an instance of the class is created. You can add code to this sub if you want a task to be performed each time an instance of the class is created. For example, you might want to add code to the constructor that allows the initialization of some values when the class is created. Using our car example from before, the constructor would be the same as getting in the car. That must be accomplished before any of the other car actions (such as start) can take place.
Parameters in VB.NET
Functions and subs within VB.NET were introduced in the last section, but in this section I’ll expand on what you learned and show you the usage of ByVal and ByRef.
A sample function and sub follow:
Public Function ValueSwitch() as Boolean
Public Sub ValueSwitch()
There are two ways to get data into a function or sub. First, you can define public properties within the class that will accept values before the function or sub is called. The problem with this approach is if the function or sub is dependent on the value, and the public properties are not set before the function or sub is called, the function or sub will fail. This approach will work, however, if your class is specific to an application and if you are the only one working on that application.
The other approach is to use parameters, sending a value when calling the function or sub, to pass important values into the function or sub. If a parameter is defined, the function or sub can’t be called unless a value is provided for said parameter. Therefore, there is no chance that the function or sub will be called without a value provided. The value may not be correct, or even in a correct range, but it must be both provided and provided in the correct data type in order for the function or sub to be called. Here is
a sub and function that contains a parameter:
Public Function ValueSwitch(ByVal FirstValue as integer) as Boolean Public Sub ValueSwitch(ByVal FirstValue as integer)

50 C H A P T E R 3 ■ AT T R I B U T E S A N D A C T I O N S
Parameters can be passed either ByRef (by reference) or ByVal (by value). The default, and the option used by programmers most of the time, is ByVal.
ByVal is the code equivalent to a one-way street. Though the value given to the parameter is passed into the function or sub to be used, the function or sub doesn’t change the parameter value. Instead, the function or sub receives a copy of the value in the variable and therefore cannot change the actual value.
ByRef is the equivalent of a two-way street. The value you give to the parameter may be changed by the function or sub and used again when calling the code. The parameter itself is really a pointer to the actual value of the parameter, unlike ByVal, which just gives a copy of the value. Using parameters within functions and subs will be covered more in the next section.
Adding Methods in VB.NET
Methods within VB.NET are implemented as either functions or subs. A public function or sub is considered a method because it is exposed to the code that is using the class. To create a method, simply create a function or sub as public.
In our car example from previous sections, a function could be created for the Start action. The class code begins with the declaration of a private variable and a public property:
Public Class Car
Private strColor as String
Public Property color() As String Get
Return strcolor End Get
Set(ByVal value As String) strcolor = value
End Set End Property
End Class
Next, a function is added after the public property called Start, which returns a Boolean value to determine if the car has really started or not:
Public Class Car
Private strColor as String
Public Property Color() As String
Get
Return strcolor
End Get

C H A P T E R 3 ■ AT T R I B U T E S A N D A C T I O N S |
51 |
Set(ByVal value As String) strcolor = value
End Set End Property
Public Function Start () as Boolean
End Function
End Class
■NOTE Each function or sub declaration must be concluded with an End Function. When you are typing this into Visual Studio (as I will do in the next section), if you hit the Enter key after typing the function or sub declaration, the End Function or End Sub will automatically be created.
The code you need to make the car start should go between the declaration statement, Public Function Start() as Boolean, and the End Function statement. Since this is a function, it must return a value; for that, use the Return statement. In this case, the value must be either True or False, and the function would look like this:
Public Function Start () as Boolean
Return True
End Function
To create a function or sub that accepts parameters, define the name of the parameter and the data type within the parentheses following the name of the function or sub:
Public Function Start (ByVal NumberofTries as Integer) as Boolean
Return True
End Function
Public Sub Start (ByVal NumberofTries as Integer)
End Sub
Using a Method in VB.NET
This section will expand the employee class that you created in the “Using a Class Public Property in VB.NET” section. In this business process, there is also a requirement that the employee’s first and last name be concatenated together (or added together as one string of characters).
To begin, open the web site called Chapter3 if you haven’t already opened it. If you didn’t create this web site previously, you’ll need to do so now. Once you open the web site, click on and open the Employee class file called Employee.vb. At the end of the class,

52 C H A P T E R 3 ■ AT T R I B U T E S A N D A C T I O N S
just before the End Class statement, add a function called ConCatNames. This function should accept two parameters, both the first name and last name, and then return the concatenated name:
Public Function ConCatNames(FirstName as string,LastName as string) as string Return Firstname & LastName
End Function End Class
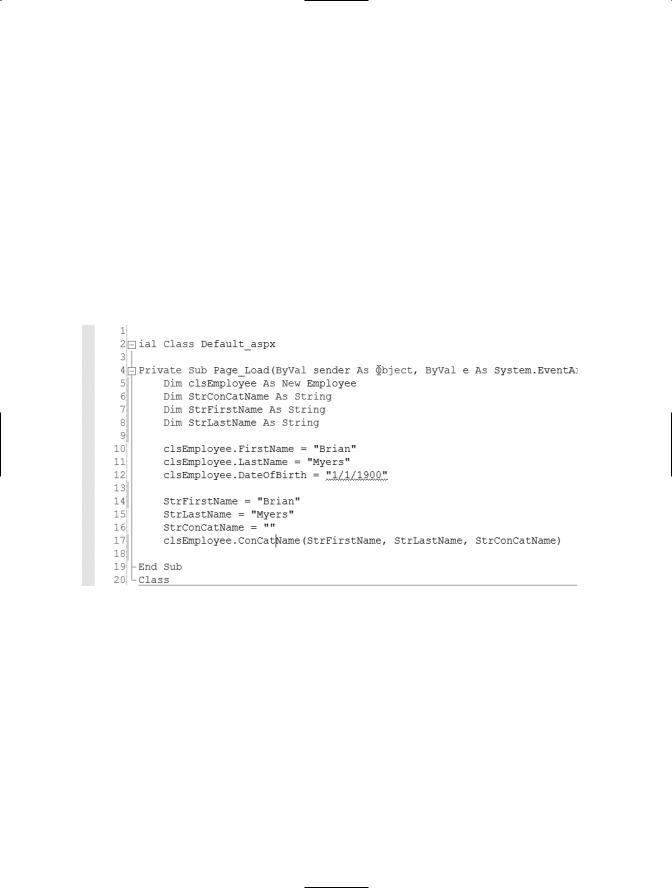
Now, open the code page for the Default page (Default.aspx.vb). Declare a new variable called strConCatName as a string. Declare a new variable called strFirstName as a string, and then declare another new variable called strLastName as a string. Add a statement assigning a value to strFirstName and strLastName after the assignment statements that are already there, then add the following call to the ConCatNames function:
strConCatName = clsEmployee.ConCatNames(strFirstName,strLastName)
Your code under the Page_Load section should look like Figure 3-3.
Figure 3-3. Completed code for Page_Load
Next, place a breakpoint on line 14 (strFirstName=“Brian”) and then debug the application (Debug Menu Start). When the execution of the application comes to the breakpoint, hit the F11 key to move to the next line. Next, hit the F11 key to move the call to the ConCatName function at line 16. Press the F11 key again to move into the ConCatName function within the Employee class. Then, press the F11 key again to move to the assignment statement, and then again to move to the End Function line. Press F11 again to return

C H A P T E R 3 ■ AT T R I B U T E S A N D A C T I O N S |
53 |
to the code in the Default.aspx page. Finally, press F11 one last time to move off the call and to the End Sub line (line 18).
Now place your mouse over the variable strConCatName and you will see that the value is now the concatenation of the strFirstName and strLastName values (in my case, BrianMyers). You can stop the debugging by clicking the Debug menu and then choosing Stop Debugging.
You should glean a few important things from this example. First, you will notice that when you are calling the function on the Default.aspx page, the parameters are strFirstName and strLastName. Within the Employee class, however, the parameters are FirstName and LastName:
strConCatName = clsEmployee.ConCatNames(ByVal strFirstName,By Val strLastName) Public Function ConCatNames
(ByVal FirstName as string,ByVal LastName as string) as string
The names of the parameters and variables that are passing the values to the parameters aren’t important to this process. What is important is that both the function declaration (within the class) and the call to the function (the code using the class) use the same data types for the parameters. As long as you make sure that the string value is defined with the function there is little that can cause a problem. But, for example, if the function has a parameter with a data type of Date and you attempt to pass an integer value to the function, an error will occur.
Now I am going to change the ConCatNames function to a sub by changing its type from Function to Sub and removing the return value declaration (as string):
Public Sub ConCatNames(ByVal FirstName as string,ByVal LastName as string)
Within the ConCatNames sub, remove the assignment line (ConCatNames = strFirstName & strLastName). Add a new parameter, ByRef, to the end of the parameter list called FullName. The sub declaration within the employee class would look like the following statement:
Public Sub ConCatNames
(ByVal FirstName as string,ByValLastName as string,ByRef FullName)
Add a new assignment line that concatenates the FirstName and LastName parameters and assigns that value to the FullName parameter:
FullName = FirstName & LastName
Since FullName is a parameter with a ByRef option, the value passed into the parameter can be modified by the function and the value doesn’t need to be returned through a function (remember the two-way street idea). The completed function definition for ConCatNames would be as follows:
54 C H A P T E R 3 ■ AT T R I B U T E S A N D A C T I O N S
Public Sub ConCatName(ByVal FirstName As String, ByVal LastName As String, ByRef FullName As String)
FullName = FirstName & LastName End Sub
Now go back to the code page for Default.aspx, called Default.aspx.vb. You’ll notice that there is now a squiggle line under the call to ConCatName. First, add a new assignment line under strLastName, which should read strConCatName = “”, completely remove the line that calls ConCatName, and then replace it with the new call:
clsEmployee.ConCatName(strFirstName, strLastName, strConCatName)
The completed code will look like Figure 3-4.
Figure 3-4. Revised code for Page_Load
Next, place a breakpoint on line 14 (strFirstName = “Brian”) and debug the application by choosing Debug Menu Start. When the execution stops at the breakpoint, hit the F11 key to move to the strLastName assignment line and then F11 again to move to the strConCatName assignment line. Hit the F11 key to move to the call to ConCatName and then move your mouse over the strConCatName variable in the parameter list. Note that there is no value (value = Nothing). Now, hit the F11 key again to move into the sub and then again to move into the assignment statement. Next, hit the F11 key to move to the End Sub statement. Now, place your mouse over the FullName parameter in the parameter list and notice there is now a value (in my case BrianMyers). Hit the F11 key one more time to move back to the Default.aspx.vb file, and then again to move to the

C H A P T E R 3 ■ AT T R I B U T E S A N D A C T I O N S |
55 |
End Sub on the Page_Load. Move your mouse over the strConCatName parameter in the parameters list and notice that it now also has a value, and that the value is the same as the FullName parameter was when the execution was inside the ConCatName sub.
Overloading
Overloading basically allows multiple functions or subs to exist with the same name but different parameters. This is most useful when you are unsure of the parameters that will be provided and there are values that are not required. An example of the code used to define a set of overloaded functions would look like this:
Public Function OverLoaded () as Boolean
Public Function OverLoaded (By Val Parameter1 as string) as Boolean
You can have more than two functions with the same name when you are overloading. Actually, there can be as many as you want, as long as they all have the same name, the same access modifier (public, private, and so on), and the same return value. Using our car example again, the car might have two methods for moving forward. The first method might not have any parameters and would be the same as moving forward in an automatic car. The second method might have a parameter for gear that would make it the same as moving forward in a standard car (with a gear shift). The gear parameter itself would then have a value of which gear to put the vehicle into, such as first, second, or third.
Conclusion
In this chapter I covered the implementation of attributes as properties in classes and the implementation of actions as methods. I also covered the creation of properties and methods within VB.NET. In the next chapter, I’ll go over the concept of encapsulation and how it is implemented in VB.NET.


C H A P T E R 4
■ ■ ■
Encapsulation
In this chapter, I’ll cover the concept of encapsulation and show how it is implemented within VB.NET.
A General Overview of Encapsulation and
Information Hiding
Encapsulation is a way to group methods (actions) and properties (data) into one unit and then control how these properties are changed and these methods are used. Information hiding is the idea that an object should not expose its data directly, but instead provide another mechanism to allow clients indirect access to the data.
Encapsulation and information hiding provide two advantages. First, other objects (sometimes known as client objects) can use an encapsulated object without knowing the inner workings of the encapsulated object. Even if the inner workings of a properly encapsulated object change, the encapsulated object will still function as it did before.
This means that the client object will continue to function with the encapsulated object the same way as well. If the object is not properly encapsulated, the client objects would break when the object was changed.
The second advantage is that the implementation of the encapsulated object is not accessible by the client object. In this scenario, all the private variables and subroutines aren’t known to a client object because of information hiding. If you like, you can think of an encapsulated object as a black box. You provide information to it, in the form of necessary parameters, and you receive the return value if there is one. In the meantime, you don’t know what the encapsulated object is doing to perform the work, but you know that the work will be completed. The main reason for using information hiding is for situations where you know that if the method was readily available it might be broken by another developer who was attempting to tweak it. Information hiding is really a doubleedged sword. If you need to perform an action similar to an action already taken by an object, but you want a different value returned or you want to provide a different parameter for it, with information hiding implemented on your object you couldn’t do that. More importantly, you wouldn’t be able to determine how the work was done, so you couldn’t
57

58 C H A P T E R 4 ■ E N C A P S U L AT I O N
determine how to retrofit the method to accept your parameter or return a different value to you in the first place.
Since encapsulation makes the methods and properties of an object work as a unit, you can create two instances of the same object, provide different values to a given property of each instance, and then use that property without the two instances crossing. Consider this case: object A and object B are both instances of the object called Math. You assign a value of 4 to a property called InValue for object A, and you assign a value of 8 to the property called InValue for object B. The Math object has a method called MultiplyBySelf that multiplies the InValue property and returns the result as an integer. When you execute the MultiplyBySelf method of object A, the result would be 16. However, when you execute the MultiplyBySelf method of object B, the result would be 64. Thus the two objects are completely separate from each other.
Encapsulation in VB.NET
Say you are a developer within a large company. Many of the applications built by the company will require more complex mathematical equations. You need to create a class called Math that implements the functionality I mentioned previously. Of course there is nothing complex about this functionality, but it’s a good way to show you the ideas
behind encapsulation and information hiding. This class could be a part of a much larger company class library. However, to make the example simpler the class will be a single class that is built into an assembly (.dll file) to be used by other applications.
Keep in mind, you do not need to create a separate project for each class you want to create. You could create the class within the same project; however, in this case you want to create the class for all applications within your company to use. The best way to do that is to create a single assembly that can be referenced by other projects (referencing will be covered later in this chapter). You can also follow these steps if you want to create a class library for your company to facilitate reuse within your organization.
Getting Started
To begin, you need to create a class file and build it into an assembly (.dll file) to be used by a web application. To do this, open VS2005 and choose File New Project. The New Project window will then appear. Select Visual Basic as the language from the left-hand side.
Then choose Class Library from the right. Change the project name to Encapsulation and place this class in a folder called C:\Encapsulation, as shown in Figure 4-1. Click OK when all the information has been added.