


1
Getting Started with Groovy
In this chapter, we will cover:
ff ff ff ff ff ff ff ff ff ff ff ff
Installing Groovy on Windows Installing Groovy on Linux and OS X
Executing Groovy code from the command line
Using Groovy as a command-line text file editor
Using Groovy to start a server on the command line Running Groovy with invokedynamic support Building Groovy from source
Managing multiple Groovy installations on Linux Using groovysh to try out Groovy commands Starting groovyConsole to execute Groovy snippets
Configuring Groovy in Eclipse Configuring Groovy in IntelliJ IDEA
Introduction
The first chapter focuses on the basics of getting started with Groovy. We begin by showing how to install Groovy on the most popular operating systems and we move to some command-line tools available with the language distribution. The remaining recipes
offer an overview of how the language easily integrates with the most popular Java IDEs.
www.it-ebooks.info
Getting Started with Groovy
Installing Groovy on Windows
In this recipe, we will provide instructions on installing the Groovy distribution on the Windows operating system.
Getting ready
The requirement for installing Groovy 2.0 is JDK 1.5 and higher. We assume that you have JDK installed and know how to use Java. In case you use JDK 7 or later, then you can take advantage of the dynamic language optimization present in that version. For instance, the invokedynamic bytecode instruction (see the Running Groovy with invokedynamic support recipe).
To install Groovy on Windows, you need to download the ZIP distribution from http://groovy.codehaus.org/Download.
The latest major version at the time of writing is 2.1.6. The latest minor version is 2.0.8. Since v2.0, Groovy has changed the release version numbering, so the next major version of Groovy will be 3.0 and the next minor versions will have the second digit increased (2.1, 2.2, 2.3, and so on).
Alternatively, you can build Groovy from the source distribution which is described in the
Building Groovy from source recipe.
How to do it…
After downloading the zipped distribution, you need to unzip the archive to a directory of your choice and carry out the following steps to install Groovy on Windows:
1.For simplicity, we will assume that the directory is C:\Applications\groovy-2.0. The contents of the directory should look as shown in the following screenshot:
2.In order to have the groovy command available on your command line, you need to add it to your system's path by setting the environment variable named PATH. We also advise you to create a GROOVY_HOME variable for simpler reference.
8
www.it-ebooks.info
Chapter 1
3.To access the Windows environment variables, you need to press the Windows + Break key combination. On Windows Vista, Windows 7, or later, it will open the Control Panel page for system settings.
4.Click on Advanced system settings to open the System Properties window.
5.Then you need to click on the Environment Variables... button to finally get to the list of the system variables.
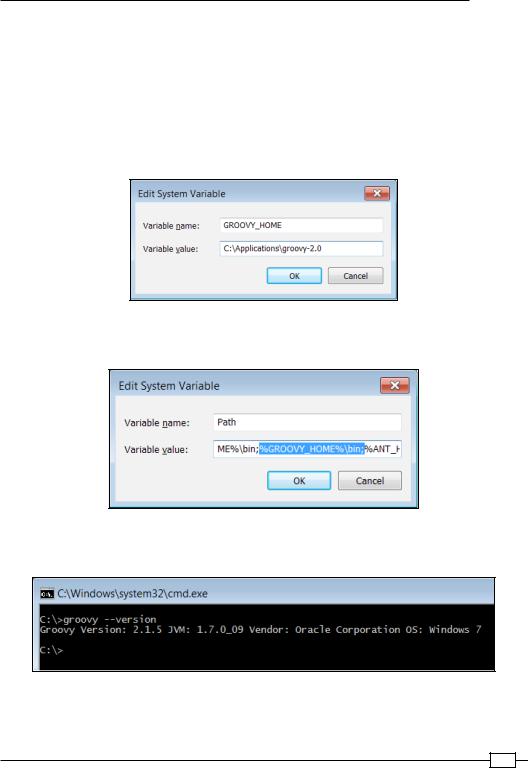
6.Click on the New... button and add the GROOVY_HOME variable pointing to your Groovy installation path:
7.Then find the Path variable in the list of system variables and append or insert the
%GROOVY_HOME%\bin; string to it:
8.You can now fire the Windows command line and verify that Groovy is installed correctly by issuing the groovy --version command:
If you get the output displayed as in the previous screenshot, your Groovy installation is complete.
9
www.it-ebooks.info

Getting Started with Groovy
There's more...
As an alternative to the zipped archive, Windows users can also download a one-click installer (you can find the link on the same download page under the Download Windows-Installer link). Execute the installer and follow the instructions to get a fully functional Groovy installation.
Installing Groovy on Linux and OS X
This recipe gives you instructions for installing Groovy on any Linux distribution and Mac OS X.
How to do it...
As a starter, download the Groovy 2.0 binaries as described in the Installing Groovy on Windows recipe and perform the following steps to install Groovy on Linux and OS X:
1.Create a new folder for the Groovy distribution: sudo mkdir /usr/share/groovy
2.Move the unzipped Groovy folder into /usr/share/groovy and create a symlink to the folder, without using the version number:
sudo mv groovy-2.1.6 /usr/share/groovy/
sudo ln -s /usr/share/groovy/groovy-2.1.6 current
3.Finally, add Groovy to the path by editing your ~/.profile (or ~/.bash_profile) file. You can use vi or an editor of your choice:
export GROOVY_HOME=/usr/share/groovy/current export PATH=$GROOVY_HOME/bin:$PATH
4.Your JAVA_HOME variable should be set as well. On OS X, the recommended way to set the variable is as follows:
export JAVA_HOME=$(/usr/libexec/java_home)
5.Reload your ~/.profile file by typing: source `~/.profile`
6.To test if your installation is successful, type: groovy -version
The output should display the installed Groovy version and the JDK in use.
 10
10
www.it-ebooks.info