


Chapter 1
Downloading the example code
You can download the example code files for all Packt books you have purchased from your account at http://www.packtpub.com. If you purchased this book elsewhere, you can visit http://www.packtpub. com/support and register to have the files e-mailed directly to you.
How it works...
Using the symbolic link called current, which we created in step 2, makes it very easy to upgrade to a newer version of Groovy by changing the folder to which the symbolic link points to.
There's more...
Most *nix-based operating systems (such as Linux or Mac OS X) have package manager systems that allow you to install Groovy by simply typing a command in the terminal.
In Ubuntu, Groovy can be installed by simply typing:
sudo apt-get install groovy
The version installed by the Ubuntu package manager is quite old (1.7.10), so you may want to install Groovy manually as described in this recipe.
In OS X, you can use Homebrew as follows:
brew install groovy
If you are happy with running a stable version of Groovy, but possibly not the most recent one, a package manager is the recommended way to get Groovy quickly and easily. If you want to install a beta version of Groovy or a version that is not yet available on the package manager system used by your OS, install the binaries from the website.
See also
ff Managing multiple Groovy installations on Linux
Executing Groovy code from the command line
Groovy, by definition, is a language with scripting features. Many developers approach Groovy by writing short scripts to automate repetitive tasks. The language provides a set of command-line tools that help you create scripts that are usable within your favorite shell.
11 
www.it-ebooks.info

Getting Started with Groovy
In this recipe, we will cover the execution of a simple script with the help of the groovy command, which is made available to you after a successful Groovy installation (see the
Installing Groovy on Windows recipe and Installing Groovy on Linux and OS X recipe).
How to do it...
Let's start with the most abused example in programming books, printing Hello, World!:
1.The simplest way to execute Groovy code is by using the -e option and starting to write Groovy code on the same line:
groovy -e "println 'Hello, World!'"
2.You can also place the println 'Hello, World!' statement in a separate file; for example, hello.groovy, and execute that script with the following simple command:
groovy hello.groovy
3.In both cases, you'll see the same results:
Hello, World!
How it works...
In step 1, the actual Groovy code resides in the double quotes (") and uses the predefined println method to print a Hello, World! string. But to explain where the println method actually comes from, we need to give a bit more details on Groovy internals.
Every script in Groovy (a command-line parameter or a standalone script file) is compiled on the fly into a class that extends thegroovy.lang.Script class (Javadoc for this class can
be found at http://groovy.codehaus.org/api/groovy/lang/Script.html).
Naturally, a Script class is eventually inherited from java.lang.Object, which is the base class for all classes in both Java and Groovy. But since Groovy adds its own extension methods to many standard JDK classes (see the Adding a functionality to the existing Java/Groovy classes recipe in Chapter 3, Using Groovy Language Features for Information on Custom Extension Modules), java.lang.Object is enriched with many useful methods including println (the relevant Java documentation can be found at http://groovy.codehaus.
org/groovy-jdk/java/lang/Object.html#println(java.lang.Object)).
There's more...
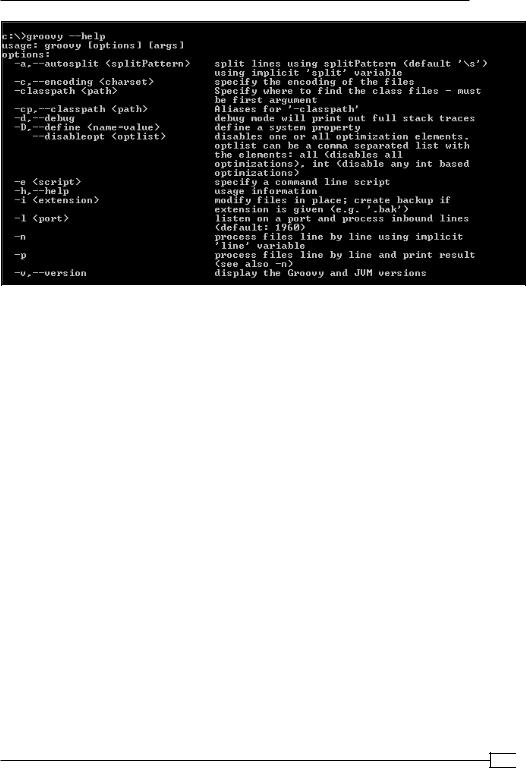
In fact, the groovy command has several other useful command-line options. If you type groovy --help, you can get a full list of them as shown in the following screenshot:
 12
12
www.it-ebooks.info
Chapter 1
Let's go through some of those options to get a better overview of the possibilities.
First of all, -classpath, --classpath, and -cp options work in a very similar way to the java command. You just specify a list of the *.jar files or list of directories with the
*.class files. The only peculiarity is that -classpath must come as the first parameter in the command line; otherwise Groovy will not recognize it.
Another parameter that is common with the java command is -D, which allows to pass the system properties to your script in the following way:
groovy -Dmessage=world
-e "println 'Hello, ' + System.getProperty('message')"
One of the strengths of Groovy (as opposed to Java) is its conciseness. This rule is also applied to what Groovy prints out if an exception occurs in your script:
groovy -e "throw new Exception()" Caught: java.lang.Exception
java.lang.Exception
at script_from_command_line.run(script_from_command_line:1)
To print the conventional full Java stack trace, you can use the -d or -debug options (some stack trace lines are omitted for brevity):
groovy -d -e "throw new Exception()" Caught: java.lang.Exception java.lang.Exception
at sun.reflect.Native...
13 
www.it-ebooks.info

Getting Started with Groovy
...
at script_from_command_line.run(script_from_command_line:1)
...
at org.codehaus.groovy.tools.GroovyStarter.main(...)
See also
For additional command-line features, please refer to the following recipes:
ff
ff
Using Groovy as a command-line text file editor
Using Groovy to start a server on the command line
For more information on the Groovy script structure and Groovy additions, go to:
ff http://groovy.codehaus.org/api/groovy/lang/Script.html
ff http://groovy.codehaus.org/groovy-jdk/java/lang/Object.html
Using Groovy as a command-line text file editor
The groovy command, which we introduced in the Executing Groovy code from the command line recipe, can also be used as a stream editor or text file filter. In this recipe, we will cover the -i, -n, and -p parameters that can be used to leverage file editing and processing functionality.
How to do it...
Assume that you have a file, data.txt, which contains five lines with numbers from 1 to 5:
1.To multiply each number by 2, you can use the following command: groovy -n -e "println line.toLong() * 2" data.txt
2.We can even omit the println method call if we pass additional the -p parameter to the command:
groovy -n -p -e "line.toLong() * 2" data.txt
 14
14
www.it-ebooks.info

Chapter 1
3.In both cases, Groovy will print the following output:
2
4
6
8
10
How it works...
Due to the fact that we are using the -n option, the code in double quotes is applied to each line read from the datafile specified as the last parameter in the command line. The line variable is predefined by Groovy, and you can use it to access, filter, or modify the line's content.
There's more...
If you add the -i option to the previous command, then it will actually modify the input file, with output values as follows:
groovy -i -n -p -e "line.toLong() * 2" data.txt
Adding a suffix .bak to the -i option will save the original input file data.txt under data. txt.bak:
groovy -i .bak -n -p -e "line.toLong() * 2" data.txt
You can use the -n and -p options to filter the input stream of other operating system commands. For example, if you want to filter the output of a directory listing command (dir) to show only the *.jar files, on Windows you can use the following command:
dir | groovy -n -e "if (line.contains('.jar')) println line"
Or on *nix-based operating systems, you can use the following command:
ls -la | groovy -n -e "if (line.contains('.jar')) println line"
Of course, the result of the previous commands can be easily achieved by more efficient operating system instructions. However, these examples are given to demonstrate that you can actually leverage the full power of the Groovy and Java programming languages to implement more complex processing rules.
15 
www.it-ebooks.info
Getting Started with Groovy
See also
ff
ff
Executing Groovy code from the command line Using Groovy to start a server on the command line
Using Groovy to start a server on the command line
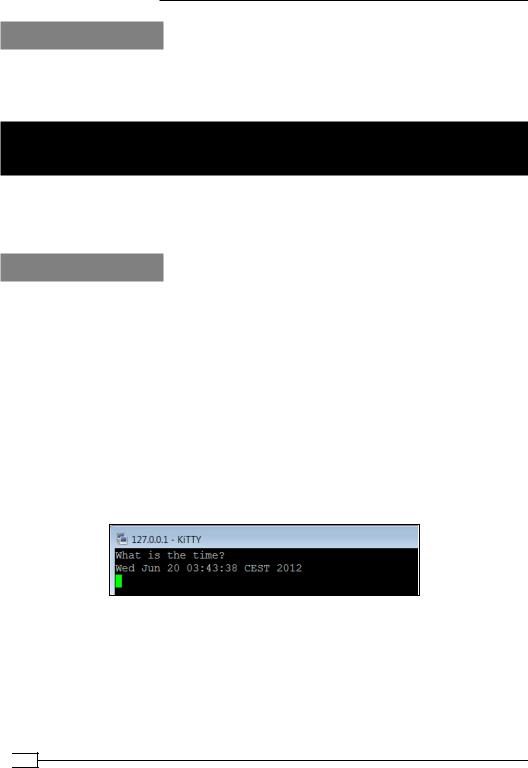
In this recipe, we continue to explore the groovy command's features at one's disposal. This time, we show how to create a process capable of serving client requests through TCP/IP directly from the command line and with one line of code.
How to do it...
The command-line option that we are going to use for this purpose is -l:
1.By using the -l option, it is trivial to start a simple socket server in Groovy: groovy -l 4444 -e "println new Date()"
2.The previous line will start a server that listens to port 4444 and returns the date and time string for every line of data it receives from the clients:
groovy is listening on port 4444
3.In order to test whether the server actually works, you can start any telnet-like program (for example, KiTTY, if you are on Windows) to connect to a localhost on port 4444, and type any string (for example, What time is it?), and press Enter. The server should reply with a date/time string back as shown in the following screenshot:
In this way, you can quite easily organize communication channels for ad hoc notifications on different hosts.
 16
16
www.it-ebooks.info