

- •Credits
- •About the Authors
- •About the Reviewers
- •www.PacktPub.com
- •Table of Contents
- •Preface
- •Introduction
- •Installing Groovy on Windows
- •Installing Groovy on Linux and OS X
- •Executing Groovy code from the command line
- •Using Groovy as a command-line text file editor
- •Running Groovy with invokedynamic support
- •Building Groovy from source
- •Managing multiple Groovy installations on Linux
- •Using groovysh to try out Groovy commands
- •Starting groovyConsole to execute Groovy snippets
- •Configuring Groovy in Eclipse
- •Configuring Groovy in IntelliJ IDEA
- •Introduction
- •Using Java classes from Groovy
- •Embedding Groovy into Java
- •Compiling Groovy code
- •Generating documentation for Groovy code
- •Introduction
- •Searching strings with regular expressions
- •Writing less verbose Java Beans with Groovy Beans
- •Inheriting constructors in Groovy classes
- •Defining code as data in Groovy
- •Defining data structures as code in Groovy
- •Implementing multiple inheritance in Groovy
- •Defining type-checking rules for dynamic code
- •Adding automatic logging to Groovy classes
- •Introduction
- •Reading from a file
- •Reading a text file line by line
- •Processing every word in a text file
- •Writing to a file
- •Replacing tabs with spaces in a text file
- •Deleting a file or directory
- •Walking through a directory recursively
- •Searching for files
- •Changing file attributes on Windows
- •Reading data from a ZIP file
- •Reading an Excel file
- •Extracting data from a PDF
- •Introduction
- •Reading XML using XmlSlurper
- •Reading XML using XmlParser
- •Reading XML content with namespaces
- •Searching in XML with GPath
- •Searching in XML with XPath
- •Constructing XML content
- •Modifying XML content
- •Sorting XML nodes
- •Serializing Groovy Beans to XML
- •Introduction
- •Parsing JSON messages with JsonSlurper
- •Constructing JSON messages with JsonBuilder
- •Modifying JSON messages
- •Validating JSON messages
- •Converting JSON message to XML
- •Converting JSON message to Groovy Bean
- •Using JSON to configure your scripts
- •Introduction
- •Creating a database table
- •Connecting to an SQL database
- •Modifying data in an SQL database
- •Calling a stored procedure
- •Reading BLOB/CLOB from a database
- •Building a simple ORM framework
- •Using Groovy to access Redis
- •Using Groovy to access MongoDB
- •Using Groovy to access Apache Cassandra
- •Introduction
- •Downloading content from the Internet
- •Executing an HTTP GET request
- •Executing an HTTP POST request
- •Constructing and modifying complex URLs
- •Issuing a REST request and parsing a response
- •Issuing a SOAP request and parsing a response
- •Consuming RSS and Atom feeds
- •Using basic authentication for web service security
- •Using OAuth for web service security
- •Introduction
- •Querying methods and properties
- •Dynamically extending classes with new methods
- •Overriding methods dynamically
- •Adding performance logging to methods
- •Adding transparent imports to a script
- •DSL for executing commands over SSH
- •DSL for generating reports from logfiles
- •Introduction
- •Processing collections concurrently
- •Downloading files concurrently
- •Splitting a large task into smaller parallel jobs
- •Running tasks in parallel and asynchronously
- •Using actors to build message-based concurrency
- •Using STM to atomically update fields
- •Using dataflow variables for lazy evaluation
- •Index

Chapter 8
The code is way more compact than the custom solution we presented in the beginning. Rome handles the differences between feed types (it also supports less common formats).
See also
ff http://rometools.org/
ff http://en.wikipedia.org/wiki/RSS
ff The Reading XML using XmlParser recipe in Chapter 5, Working with XML in Groovy
Using basic authentication for web service security
Basic authentication is one of the simplest and thus the least secure authentication mechanism. It sends a combined string, which contains username and password encoded with base64 encoding, inside a special HTTP header. Password and username can be very easily discovered, if the HTTP request is intercepted by an attacker. On the other hand, if a request goes through using the HTTPS protocol, then header discovery is less likely to happen. The combination of HTTPS and basic authentication makes a rather popular choice as a starting security scheme for web services.
In this recipe, we will demonstrate how to use the HTTPBuilder library, which we already covered in previous recipes (for example, the Issuing a SOAP request and parsing a response recipe), to achieve the basic request authentication.
How to do it...
The following steps present how simple it is to inject basic authentication credentials into your requests:
1.First of all we need to create an instance of HTTPBuilder pointing to our service URL:
def service = new HTTPBuilder('https://localhost:5000/')
2.Username (groovy) and password (cookbook) values can be set in the following way: service.auth.basic('groovy', 'cookbook')
3.At this point, you can construct HTTP requests to the secured web service as follows: def response = service.get(path: 'secret-service')
283
www.it-ebooks.info

Working with Web Services in Groovy
How it works...
Under the hood, the HTTPBuilder library just encodes username and password into the required HTTP header. All other HTTPBuilder's methods can be used in the same way they were used in other recipes.
See also
ff http://groovy.codehaus.org/modules/http-builder/
ff http://groovy.codehaus.org/modules/http-builder/doc/auth.html
Using OAuth for web service security
The OAuth protocol became one of the dominant ways to perform authorization in the emerging amount of web applications and services. The final draft of v1.0 was released in 2007. In 2009, v1.0a was published to fix a security flaw known as session fixation.
In October 2012, OAuth 2.0 was released. It is not backward compatible with OAuth 1.0a. OAuth 2.0 received a lot of negative criticism, even though some of the major providers (such as Google or Facebook) support OAuth 2.0 already. Furthermore, the new protocol specification leaves too many open points to the implementer, which makes it somewhat hard to apply a generic approach to.
In this recipe, we will cover the OAuth 1.0a protocol and how it can be used to authorize your access to the Twitter API.
Getting ready
The scenario that we will try to achieve is a standalone application that reads tweets on a user's behalf:
1.First of all, you need to register your application (script) with Twitter through this page https://dev.twitter.com/apps/new. Obviously, before you can do it, you should also sign up for a Twitter account. After you registered your application, you will get a unique consumer key and consumer secret values that you will need to identify your application.
2.That's only half of the story, because now you need to get an access token and a token secret from the user, on whose behalf you are going to access Twitter's API. In order to do that, we will use the oauth-signpost library (http://code.google.com/p/ oauth-signpost/) that offers lightweight support for the OAuth 1.0a protocol.
 284
284
www.it-ebooks.info

Chapter 8
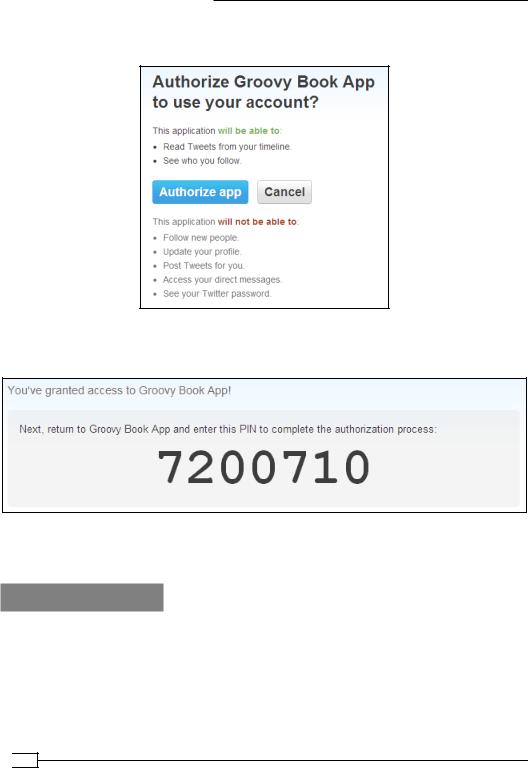
3.The following script performs the application authorization flow, which involves interaction with a user who needs to open the authorization URL in his browser, accept the authorization request, and give a generated PIN code back to the script:
@Grab('oauth.signpost:si parentFilegnpost-core:1.2.1.2') import oauth.signpost.basic.DefaultOAuthConsumer
import oauth.signpost.basic.DefaultOAuthProvider import oauth.signpost.OAuth
def consumer = new DefaultOAuthConsumer('...', '...')
def provider = new DefaultOAuthProvider( 'http://twitter.com/oauth/request_token', 'http://twitter.com/oauth/access_token', 'http://twitter.com/oauth/authorize')
String authUrl = provider. retrieveRequestToken(
consumer, OAuth.OUT_OF_BAND
)
println "Open this URL in the browser: ${authUrl}" print 'Authorize application and enter pin code: '
def pinCode = null System.in.withReader {
pinCode = it.readLine() println()
}
provider.retrieveAccessToken(consumer, pinCode)
println "Access token: ${consumer.token}" println "Token secret: ${consumer.tokenSecret}"
285
www.it-ebooks.info
Working with Web Services in Groovy
4.While executing, the script will print the authorization URL, which you should open in your browser.
5.After you pressed the Authorize app button, you are supplied with a PIN code that you should submit back to the running script console, which is waiting for user input.
6.Eventually the script will print the access token and token secret that can be used to call Twitter's API in the script described in the next section.
How to do it...
Now, we are ready to send authorized requests to twitter through our script:
1.First of all we need to import the RESTClient class, which is part of the
HTTPBuilder library:
@Grapes([
@Grab( group='org.codehaus.groovy.modules.http-builder',
 286
286
www.it-ebooks.info

Chapter 8
module='http-builder', version='0.6'
), @Grab('oauth.signpost:signpost-commonshttp4:1.2.1.2'), @Grab('oauth.signpost:signpost-core:1.2.1.2')
])
import groovyx.net.http.RESTClient
2.Then we need to define the variables that hold our security keys, tokens, and secrets:
def consumerKey = '...' def consumerSecret = '...' def accessToken = '...' def tokenSecret = '...'
For obvious reasons, you need to add your own values.
3.After that, we can create a RESTClient instance:
def url = 'https://api.twitter.com/1.1/statuses/' def twitter = new RESTClient(url)
4.Then we need to set OAuth details in the following way:
twitter.auth.oauth(consumerKey,
consumerSecret,
accessToken,
tokenSecret)
5.Now, we are ready to use the Twitter's API and call operations to retrieve JSON data with tweet information:
println twitter.get(path : 'mentions_timeline.json').data
How it works...
Under the hood, HTTPBuilder uses the oauth-signpost library to sign HTTP requests with OAuth-specific headers. This gives the ability to access the public APIs on behalf of a user. It is important to understand that, for each new application (consumer) and for each different Twitter user you need a separate set of keys, tokens, and secrets. If your script needs to access different user data on their behalf, then you need to generate a new access token and a token secret, which requires the active involvement of the user.
See also
ff http://groovy.codehaus.org/modules/http-builder/
ff http://groovy.codehaus.org/modules/http-builder/doc/auth.html ff http://code.google.com/p/oauth-signpost/
287
www.it-ebooks.info
www.it-ebooks.info