

ASP.NET 2.0 Everyday Apps For Dummies (2006)
.pdfChapter 2: Using Visual Studio 2005 |
47 |
Note that none of the applications in this book use the App_ GlobalResources, App_LocalResources, App_WebReferences,
App_Browsers, or Themes folders. As a result, you can safely ignore these folders until you’re ready to dig deeper.
Debugging Web Applications
Visual Web Developer includes a variety of built-in debugging features that can help you track down the nasty bugs that are sure to creep into your application. With the application we’ve presented so far, it’s hard for anything to go wrong because the application doesn’t really do any significant work. So, this section starts by presenting a simple calculator application that we can use to explore Visual Web Developer’s debugging features.
Creating a calculator page
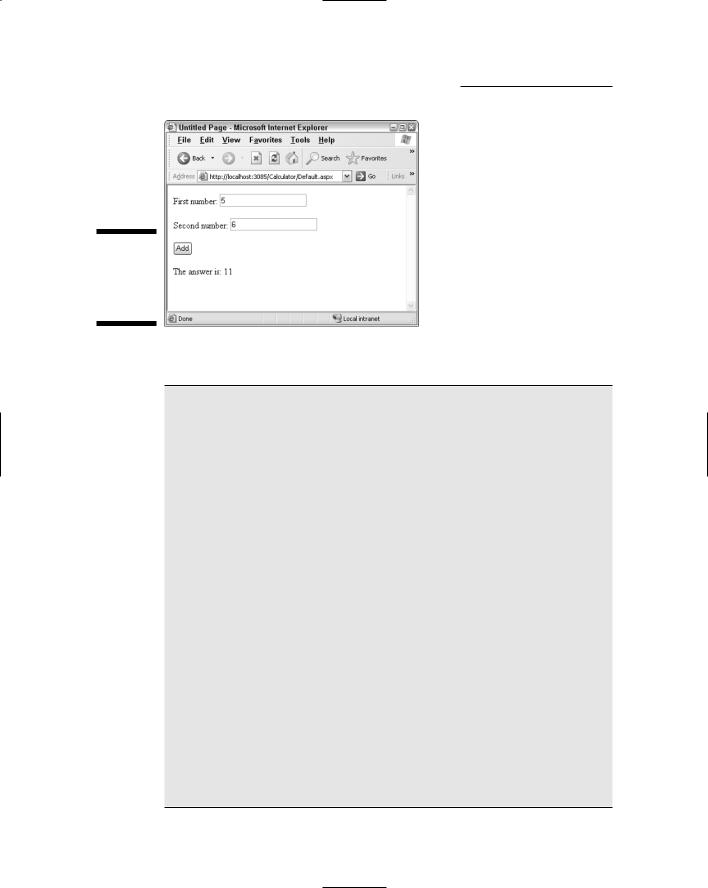
Figure 2-11 shows a simple Web page that accepts two numbers as input and displays the sum of the numbers when the user clicks the button. The
.aspx file for this page is shown in Listing 2-4. Listing 2-5 shows the C# version of the code-behind file for this page, and Listing 2-6 shows the Visual Basic version.
Note that for the Visual Basic version of the code-behind file to work, you must change the language reference in the .aspx file, the CodeFile attribute to Default.aspx.vb, and the AutoEventWireup attribute to “false”. Thus, the Page directive for the VB version should look like this:
<%@ Page Language=”VB” AutoEventWireup=”false”
CodeFile=”Default.aspx.vb”
Inherits=”_Default” %>
In addition, you should remove the OnClick attribute for the Button control.
You can see right away the problem waiting to happen with this application. It parses whatever the user enters into the two text boxes to decimal types, and then adds the numbers and displays the result. The application will work fine as long as the user enters valid numbers in both text boxes. But if the user leaves one or both boxes blank, or enters something other than a valid number, the program will fail.
In this case, the problem is easy enough to find. However, this simple program is adequate to demonstrate most of Visual Web Developer’s debugging features.
48 |
Part I: Introducing ASP.NET 2.0 Application Development |
Figure 2-11:
A simple calculator program in action.
Listing 2-4: The Default.aspx page for the Calculator application
<%@ Page Language=”C#” AutoEventWireup=”true” CodeFile=”Default.aspx.cs” Inherits=”_Default” %>
<!DOCTYPE html PUBLIC “-//W3C//DTD XHTML 1.1//EN” “http://www.w3.org/TR/xhtml11/DTD/xhtml11.dtd”>
<html xmlns=”http://www.w3.org/1999/xhtml” > <head runat=”server”>
<title>Untitled Page</title> </head>
<body>
<form id=”form1” runat=”server”> <div>
First number:
<asp:TextBox ID=”txtFirst” runat=”server”> </asp:TextBox>
<br /><br /> Second number:
<asp:TextBox ID=”txtSecond” runat=”server”> </asp:TextBox>
<br /><br />
<asp:Button ID=”btnAdd” runat=”server” OnClick=”btnAdd_Click” Text=”Add” />
<br /><br /> The answer is:
<asp:Label ID=”lblAnswer” runat=”server”> </asp:Label>
</div>
</form>
</body>
</html>

Chapter 2: Using Visual Studio 2005 |
49 |
Listing 2-5: The C# code-behind file for the Calculator application (Default.aspx.cs)
using System; using System.Data;
using System.Configuration; using System.Web;
using System.Web.Security; using System.Web.UI;
using System.Web.UI.WebControls;
using System.Web.UI.WebControls.WebParts; using System.Web.UI.HtmlControls;
public partial class _Default : System.Web.UI.Page
{
protected void btnAdd_Click(object sender, EventArgs e)
{
decimal a = decimal.Parse(txtFirst.Text); decimal b = decimal.Parse(txtSecond.Text); decimal c = a + b;
lblAnswer.Text = c.ToString();
}
}
Listing 2-6: The Visual Basic code-behind file for the Calculator application (Default.aspx.vb)
Partial Class _Default
Inherits System.Web.UI.Page
Protected Sub btnAdd_Click(ByVal sender As Object, _ ByVal e As System.EventArgs) _
Handles btnAdd.Click Dim a, b, c As Decimal
a = Decimal.Parse(txtFirst.Text) b = Decimal.Parse(txtSecond.Text) c = a + b
lblAnswer.Text = c.ToString() End Sub
End Class
Working in Break mode
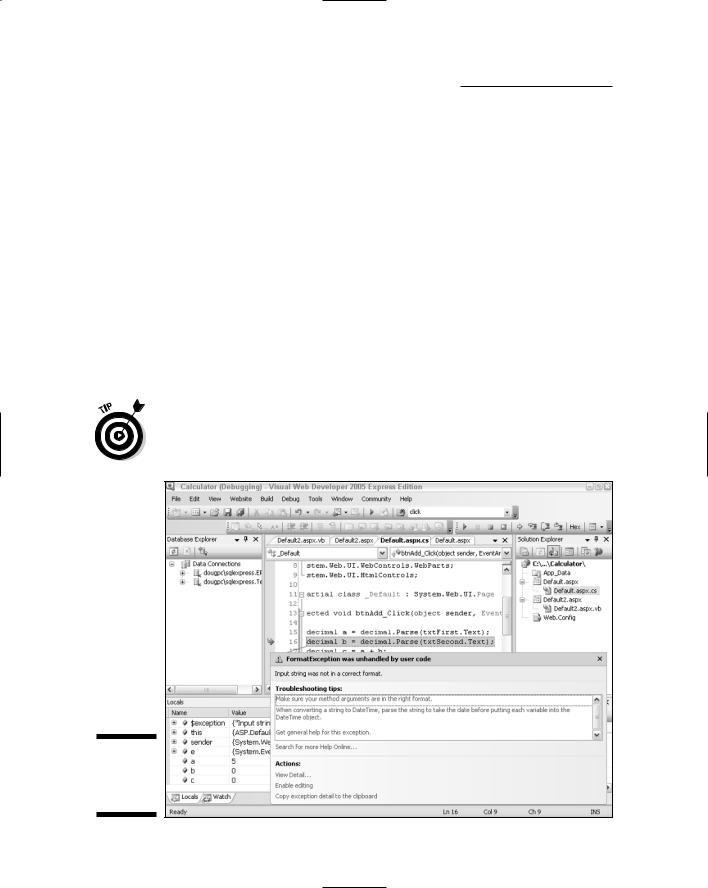
Run the Calculator application by pressing F5, which starts the application in debugging mode. Just to make sure it works, enter a number in each of the text boxes and click Add. The program should add the numbers together and
50 |
Part I: Introducing ASP.NET 2.0 Application Development |
display the result. Now enter 5 for the first number and abc for the second and click Add again. This causes the program to throw an uncaught exception, which in turn throws Visual Web Developer into Break mode, as shown in Figure 2-12.
As you can see, Visual Web Developer highlights the statement that threw the exception and displays the details of the exception. In this case, the message
FormatException was unhandled by user code indicates that a
FormatException was thrown and wasn’t handled.
Displaying data values
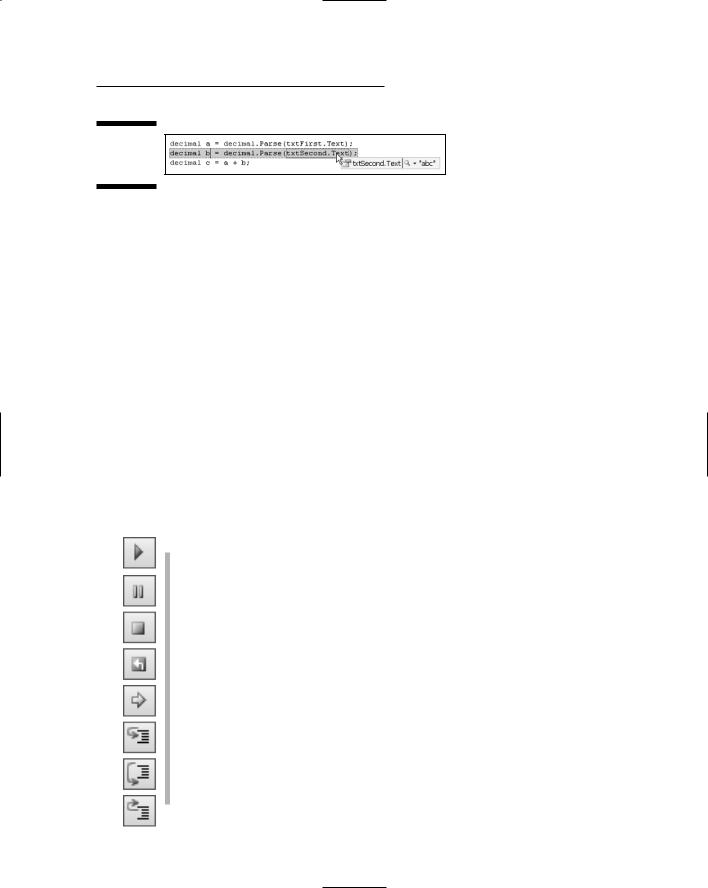
One of the most useful debugging features in Visual Web Developer is the DataTips feature, which displays the value of a variable when you point at it while the system is in Break mode. For example, if you point at the Text property for the txtSecond text box, a tip balloon will appear showing the current value of this property, as shown in Figure 2-13.
You can even use a data tip to change the actual value of a variable while the program is running. Just click the value in the data tip, and then type a new value.
Figure 2-12:
Debugging an uncaught exception.
Chapter 2: Using Visual Studio 2005 |
51 |
Figure 2-13:
Displaying a
data tip.
Another way to determine the values of variables is to use the Locals window. Looking back at, Figure 2-12, you’ll find the Locals window in the lower-left corner of the screen. As you can see, the value of the a variable has been properly parsed to the value 5, but the b and c variables remain at their default values: 0 (zero).
To find the value of the Text property in the Locals window, first expand the this node. (If you’re working in Visual Basic, use the Me node instead.) This lists all the controls on the current page. Locate and expand the txtSecond node, and then locate the Text property.
Controlling execution and setting breakpoints
You can control the execution of the application by stepping through the application one or more lines at a time. In addition, you can set breakpoints, which cause the debugger to interrupt the program when they are encountered. The following buttons appear on the Debug toolbar to help you control the program’s execution:
Continue: Continues execution with the next statement.
Break: Interrupts the application and places Visual Web Developer into Break mode.
Stop Debugging: Stops the application.
Restart: Restarts the application.
Show Next Statement: Highlights the next statement to be executed.
Step Into: Executes the next statement and then breaks. If the statement calls a method, execution stops with the first statement in the method.
Step Over: Executes the next statement, and then breaks. If the statement calls a method, the entire method is executed without breaking.
Step Out: Finishes the current method and then breaks.

52 |
Part I: Introducing ASP.NET 2.0 Application Development |
You can set a breakpoint at any statement in your program by clicking in the gray border on the left edge of the Designer window, next to the statement where you want the program to break. A large dot appears in the gray border to mark the breakpoint.
Deploying ASP.NET Applications
Eventually, the Big Day comes: You’ve finished the application, tracked down and removed all the bugs, and you’re ready for the application to go live. That’s when Visual Web Developer’s deployment features come in handy.
In general, there are three ways to deploy an ASP.NET application:
Xcopy deployment: This is the simplest type of deployment. You simply copy the files from your development server to the production server. You can use this deployment method by choosing the Web Site Copy Web Site command.
One problem with Xcopy deployment is that the application isn’t compiled on the production server until the first time the application is accessed. To solve that problem, you can use precompiled deployment instead.
Precompiled deployment: In this type of deployment, the entire application is compiled. Then the compiled assemblies are copied to the production server. To use precompiled deployment, choose the Build Publish Web Site command. Or use the aspnet_compiler command from a command prompt. (Note that the Publish Web Site command isn’t available in Visual Web Developer 2005 Express Edition.)
Setup project: A third way to deploy a Web application is to create a Setup project for the Web site. Then you can deploy the application by running the Setup program on the target server. This is the most complicated (and least used) form of deployment for ASP.NET applications. (Setup projects are only available if you use Visual Studio 2005; VWDE doesn’t provide Setup projects.)
Before you deploy an ASP.NET application, be sure to nail down a few final changes to make the application ready for production — in particular, these:
Turn off debugging in the web.config file:
<compilation defaultLanguage=”C#” debug=”false” />
Check the Page directive for all pages; make sure tracing is not turned on by removing any trace=”True” attributes.
Make sure the web.config file contains this line:
<customErrors mode=”RemoteOnly” />
That way detailed error pages won’t be displayed for production users.

Part II
Building Secure
Applications

In this part . . .
This part covers one of the most important aspects of building ASP.NET applications: security. Chapter 3
begins with an overview of security issues for ASP.NET application developers. Then Chapter 4 shows you how to develop a complete user-registration-and-authentication application.
Many of the other applications in this book can be integrated with the application presented in Chapter 4. For example, you may want to require users to register before they can use the Shopping Cart application (presented in Chapter 6). And for the back-end applications shown in Part IV, you may want to limit access to users who have been registered as administrative personnel.

Chapter 3
Designing Secure ASP.NET
Applications
In This Chapter
Understanding user authentication and authorization
Looking at membership providers
Using ASP.NET 2.0 login controls
Examining other security issues
In the 1960s television series Get Smart, they had a top-secret security device known as the Cone of Silence. Whenever Max (Agent 86) and The
Chief were about to discuss matters of importance, Max would insist that they use the Cone of Silence. The Chief would protest, but Max would eventually win out and they’d lower the Cone over themselves.
Of course, the gag was that the Cone of Silence was so effective they couldn’t even hear themselves talk. Computer security is sometimes like that. The key is designing an application secure enough that sensitive data is protected, but not so secure that the application becomes unusable.
This chapter describes some of the most important techniques for creating secure Web applications using ASP.NET 2.0. Most of this chapter explores ASP.NET’s built-in features for user authentication, including the new login controls. You’ll also find tips for creating applications that are safe from various types of security threats such as cross-site scripting and SQL injections (more about those shortly).
Understanding ASP.NET User
Authentication
Many Web applications require that the user register with the system and log in before using the application. For example, a shopping-cart application

56 |
Part II: Building Secure Applications |
requires that the user log in before completing a purchase. That way, the application knows who is purchasing the items, who to ship the items to, and who to send the bill to. Similarly, community applications such as forums and blogs require users to log in before posting content to the application.
Some applications require the user to log in before he or she can view any page in the application. Other applications have some pages that can be viewed anonymously and others that require a log in. For example, an online store might allow users to view a catalog and add items to a shopping cart without logging in, but require a login to complete a purchase. And a forum or blog might allow anyone to view other users’ posts without logging in, but the user must log in to make a post of his or her own.
In addition, some applications have more than one kind of user. For example, most of the users of a shopping-cart application can view the company’s products, add items to a shopping cart, and make purchases, but can’t make changes to the items in the Products database. To do that, the user must be an administrator. Similarly, forums typically distinguish between normal users (who are allowed to post information) and moderators (who can delete questionable posts or ban abusive users).
There are two aspects of user registration and login security in ASP.NET:
Authentication, which refers to the process of determining who a user is, and whether the user really is who he or she claims to be.
Authorization, which refers to the process of determining whether a particular user, once authenticated, can access a particular Web site page.
The following sections describe the authentication and authorization features available in ASP.NET.
Examining three types of authentication
ASP.NET provides three basic methods for authenticating users:
Forms-based authentication: Uses a membership database to store the names and passwords of valid users. Whenever a user attempts to access a restricted page, ASP.NET automatically redirects the user to a login page (normally named Login.aspx), which prompts the user for a name and password and attempts to authenticate the user. The originally requested page is then displayed if the user is valid. This is the most common type of authentication for Web sites that allow public access but require that users create login accounts to access the application.
Windows-based authentication: Uses existing Windows accounts to authenticate users. This type of authentication is used mostly for intranet applications, where the users already have valid Windows accounts.