

ASP.NET 2.0 Everyday Apps For Dummies (2006)
.pdfChapter 2: Using Visual Studio 2005 |
37 |
Note that if you selected Visual Basic as the language for the Web site, the Default.aspx page is opened in Design view rather than in Source view. I guess Microsoft figures that C# programmers like the hard-coding efficiency of Source view, while Visual Basic programmers prefer the drag-and-drop comfort of Design view. Either way, you can switch between Design and Source view by clicking the Design and Source buttons located at the bottom of the Designer window.
Adding a label control
To display the “Hello, World!” greeting, we’ll add a label control to the
Default.aspx page. Follow these steps:
1.If the page is currently displayed in Source view, click the Design button at the bottom of the Designer window.
This switches the Designer to Design view.
2.Drag a Label control from the Toolbox onto the page.
The Toolbox is located to the left of the Designer. If the Label control isn’t visible, click the + icon next to the word Standard in the Toolbox.
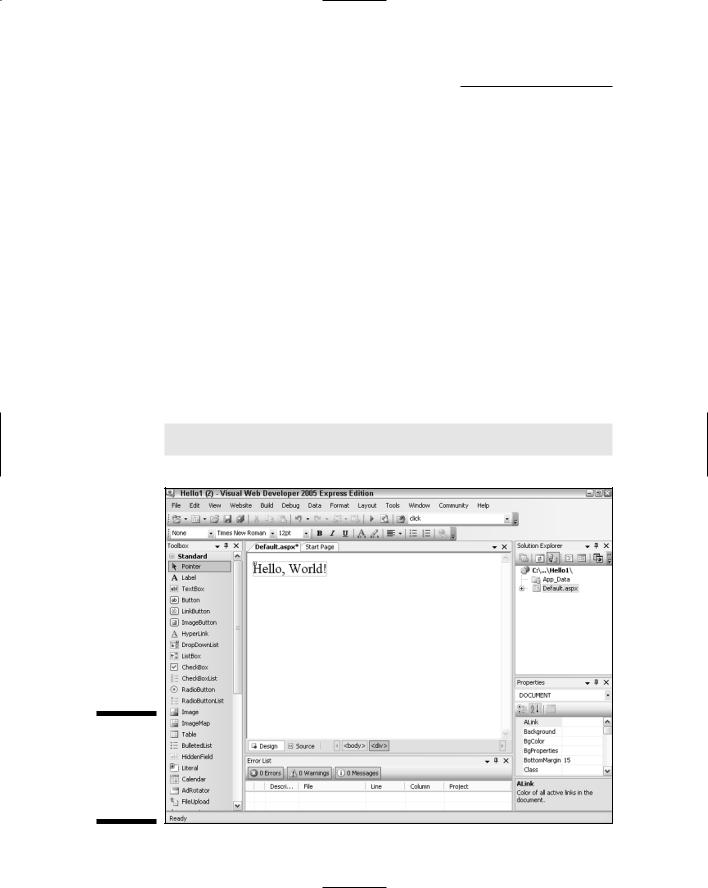
Figure 2-4 shows how the label should appear.
Figure 2-4:
The
Default.
aspx page
with a Label
control.
38 |
Part I: Introducing ASP.NET 2.0 Application Development |
3.In the Properties window, set the Text property of the label to Hello, World!.
You can set the Text property by using the Properties window, which is usually located at the bottom-right edge of the Visual Web Designer window. First, select the label. Then, locate the Text property in the Properties window and change its value to “Hello, World!” by clicking the Text property and typing the new value. (If the Properties window isn’t visible, press F4 to display it.)
4.Expand the Font property in the Properties window, and then set the
Size property to X-Large.
To expand the Font property, click the + icon next to the word Font.
Figure 2-5 shows what the page looks like after you’ve set the properties for the label.
Note that when you add a control in Design view, Visual Web Developer automatically adds code to the Default.aspx file to declare the control. You can switch back to Source view to see this code. Here’s the code that’s generated for the label in the Hello World application:
<asp:Label ID=”Label1” runat=”server” Font-Size=”X-Large”
Text=”Hello, World!”></asp:Label>
Figure 2-5:
The label after its properties have been set.
Chapter 2: Using Visual Studio 2005 |
39 |
Here, the <asp:Label> element defines the label control. The ID attribute identifies the label’s name as Label1. The runat attribute is required for all ASP.NET controls; it simply indicates that the control runs on the server rather than on the client. Next, the Font-Size attribute specifies the size of the font used to display the label’s text, and the Text attribute provides the text displayed in the label.
Running the application
The Hello World application is now ready to run. There are several ways to run an application from Visual Web Developer; the easiest is simply to click the Start button (pictured in the margin). Here are a few other alternatives:
Choose Debug Start Debugging
Press F5
Right-click the Default.aspx page in the Solution Explorer window and choose View In Browser.
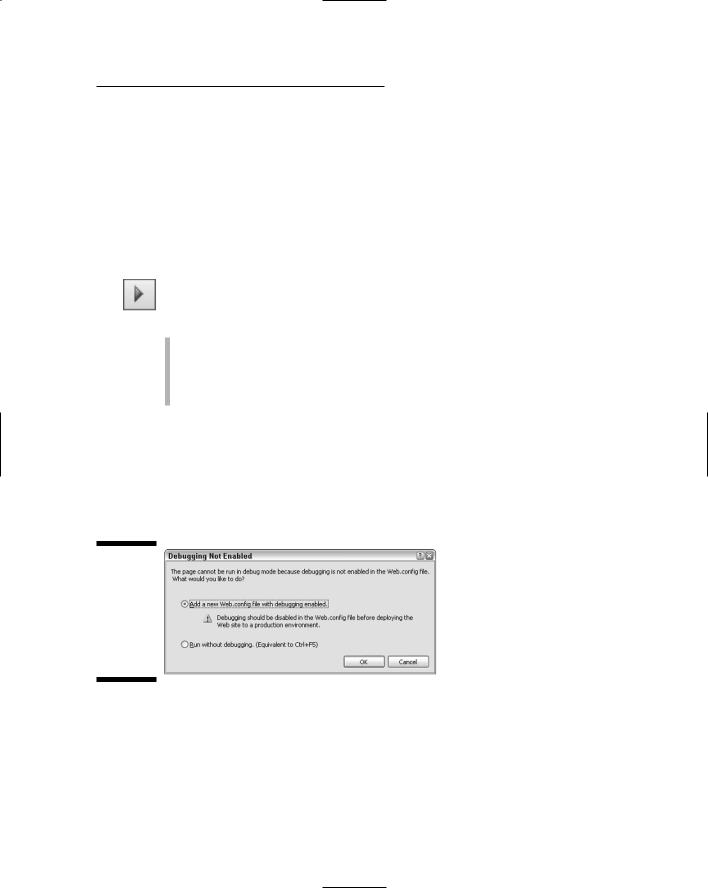
The first time you run an ASP.NET application, Visual Web Developer displays the dialog box shown in Figure 2-6. This dialog box appears because in order to debug an ASP.NET application, debugging must be enabled in the web.config file. Unfortunately, the default template for new ASP.NET applications doesn’t include a web.config file. So, this dialog box offers to create a web.config file for you so that the application can be run in debugging mode.
Figure 2-6:
The dialog box that’s displayed the first time you run an ASP.NET application.
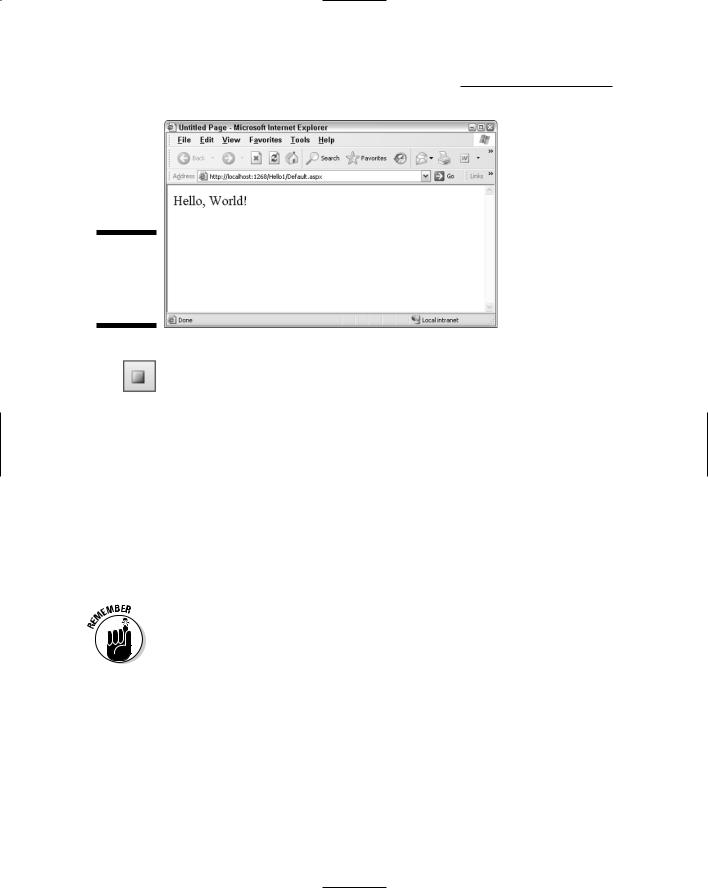
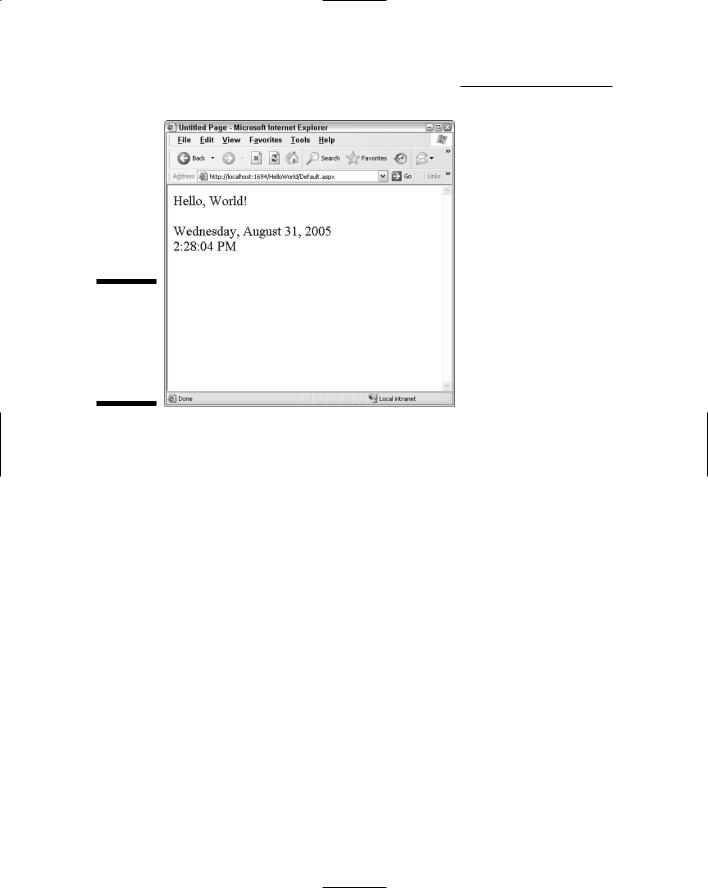
To run the application, click OK. Visual Web Developer then compiles the application. Assuming there are no compiler errors, the built-in development Web server starts and the application runs. After a few moments, a Browser window appears and shows the application’s start page (usually Default.aspx), as shown in Figure 2-7.
40 |
Part I: Introducing ASP.NET 2.0 Application Development |
Figure 2-7:
The Hello World application in action.
When you’re satisfied that the application has run correctly, you can stop the application by closing the Browser window. Alternatively, you can return to the Visual Web Developer window and click the Stop Debugging button (shown in the margin).
Adding a Code-Behind File
So far, the Hello World application doesn’t do anything other than display a static message on a Web page. To make the application a little more interesting, in this section we add a code-behind file — a separate file that contains the program logic for the application — to display the time as well as the “Hello, World!” greeting. Here are the steps:
1. If the Default.aspx page isn’t already on-screen in Design view, switch to Design view now.
To switch to Design view, click the Design button at the bottom of the Designer window.
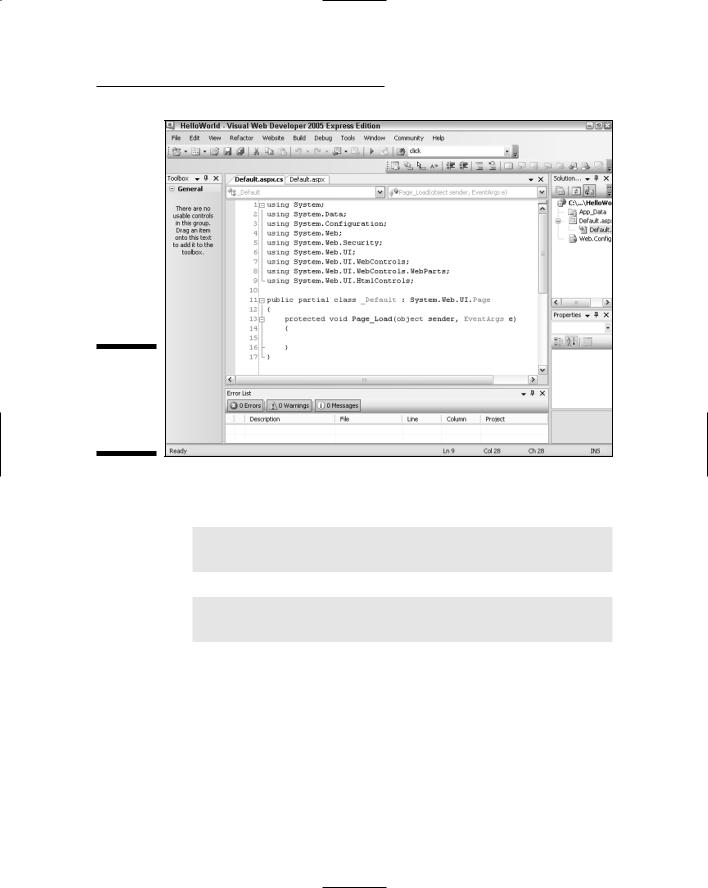
2.Double-click anywhere on the background of the page.
This opens the code-behind file for the Default.aspx page and creates a Page_Load method that’s executed each time the page is loaded. Figure 2-8 shows how this appears when C# is the selected language. (For VB, the code-behind file is similar, but naturally is coded in Visual Basic rather than C#.)
Chapter 2: Using Visual Studio 2005 |
41 |
Figure 2-8:
The codebehind file for the
Default. aspx page.
3. Add code to the Page_Load method.
If you’re working in C#, add this code:
Label1.Text = “Hello, World!<br /><br />”
+DateTime.Now.ToLongDateString() + “<br />”
+DateTime.Now.ToLongTimeString();
If you’re working in Visual Basic, add this code instead:
Label1.Text = “Hello, World!<br /><br />” _
+DateTime.Now.ToLongDateString() + “<br />” _
+DateTime.Now.ToLongTimeString()
4.Run the application again.
This time the date and time should appear on the page, as shown in Figure 2-9.
Note that the Page_Load method is executed each time the page is loaded. As a result, you can update the date and time by clicking the browser’s Refresh button.
42 |
Part I: Introducing ASP.NET 2.0 Application Development |
Figure 2-9:
The Hello World program displays the date and time.
Adding a Text Box and a Button
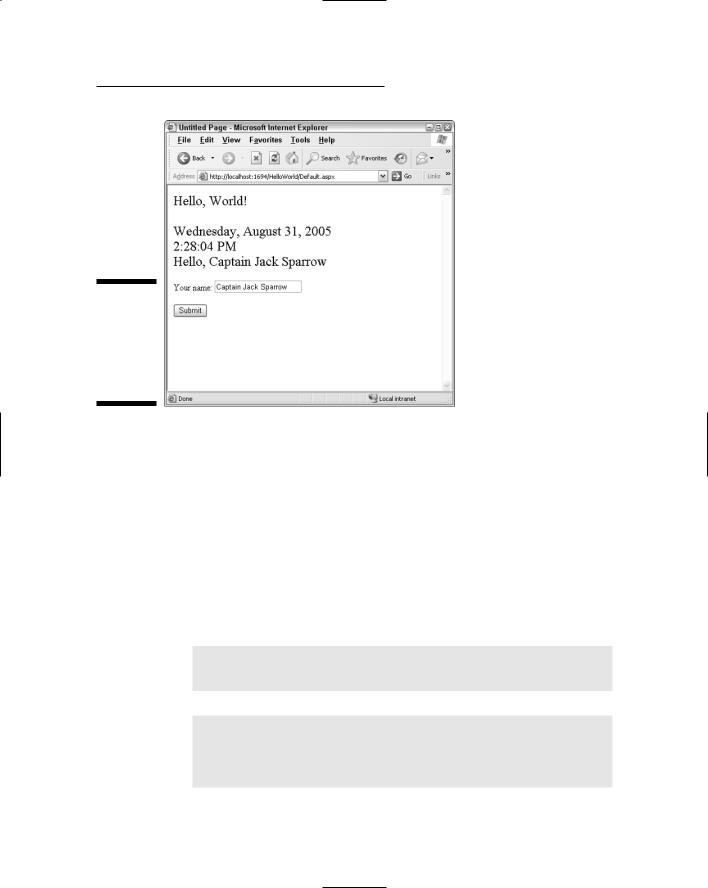
To show how you can accept user input in an ASP.NET application, in this section we modify the Hello World application so it includes a text box and a button. The user can enter his or her name in the text box. Then, when the user clicks the button, a personalized greeting is added to the page. Figure 2-10 shows the revised Hello World application in action.
To add the text box and button to the page, switch to Design view and follow these steps:
1.Place the insertion point right after the existing label, hit the Enter key a couple of times, and type Your Name:.
Type it as text string, not as your name. (But you knew that.) Doing so creates the descriptive text that will identify the text box.
2.Double-click the TextBox icon in the toolbox.
This adds a text box to the page.
3.Press the right-arrow key to move the cursor to the end of the line, then press Enter twice.
This adds a blank line after the text box.
4.Double-click the Button icon in the toolbox.
This adds a button to the page.
Chapter 2: Using Visual Studio 2005 |
43 |
Figure 2-10:
The Hello World program displays a personalized greeting.
5.Click the text box to select it, and then use the Properties window to change the ID property from TextBox1 to txtName.
This gives the text box a more meaningful name than TextBox1.
6.Click the button to select it, and then use the Properties window to change the Text property to Submit.
This changes the button text to Submit.
If you want, you can switch to Source view to see the ASPX code that’s generated for the text box and the button.
7.Double-click the button.
The code-behind file appears and a skeleton method is created to handle the Click event for the button. In C#, this skeleton method looks like this:
protected void Button1_Click(object sender, EventArgs e)
{
}
If you’re working in Visual Basic, the skeleton method looks more like this:
Protected Sub Button1_Click(ByVal sender As Object,
ByVal e As System.EventArgs) Handles
Button1.Click
End Sub
44 |
Part I: Introducing ASP.NET 2.0 Application Development |
8. Add code to the Click Event handler.
For C#, you should add the following code:
Label1.Text += “<br />Hello, “
+ txtName.Text;
For Visual Basic, use this code instead:
Label1.Text += “<br />Hello, “ _
+txtName.Text
9.Run the application.
This time, the text box and button should appear. When you enter a name and click the button, a greeting will be added to text displayed in the label.
For your reference, Listing 2-1 shows the complete Default.aspx file, Listing 2-2 shows the C# version of the code-behind file, and Listing 2-3 shows the Visual Basic version of the code-behind file.
To use the Visual Basic code-behind file, you must change the Language attribute of the Page directive from C# to VB, and you should change the
CodeFile attribute from Default.aspx.cs to Default.aspx.vb.
Listing 2-1: The Default.aspx page
<%@ Page Language=”C#” AutoEventWireup=”true” CodeFile=”Default.aspx.cs” Inherits=”_Default” %>
<!DOCTYPE html PUBLIC “-//W3C//DTD XHTML 1.1//EN” “http://www.w3.org/TR/xhtml11/DTD/xhtml11.dtd”>
<html xmlns=”http://www.w3.org/1999/xhtml” > <head runat=”server”>
<title>Untitled Page</title> </head>
<body>
<form id=”form1” runat=”server”> <div>
<asp:Label ID=”Label1” runat=”server” Font-Size=”X-Large”
Text=”Hello, World!”></asp:Label><br /> <br />
Your name:
<asp:TextBox ID=”txtName” runat=”server”></asp:TextBox><br />
<br />
<asp:Button ID=”Button1” runat=”server” Text=”Submit” OnClick=”Button1_Click” />
</div>
</form>
</body>
</html>
Chapter 2: Using Visual Studio 2005 |
45 |
Listing 2-2: The C# code-behind file
using System; using System.Data;
using System.Configuration; using System.Web;
using System.Web.Security; using System.Web.UI;
using System.Web.UI.WebControls;
using System.Web.UI.WebControls.WebParts; using System.Web.UI.HtmlControls;
public partial class _Default : System.Web.UI.Page
{
protected void Page_Load(object sender, EventArgs e)
{
Label1.Text = “Hello, World!<br /><br />”
+DateTime.Now.ToLongDateString() + “<br />”
+DateTime.Now.ToLongTimeString();
}
protected void Button1_Click(object sender, EventArgs e)
{
Label1.Text += “<br />Hello, “ + txtName.Text;
}
}
Listing 2-3: The Visual Basic code-behind file
Partial Class _Default
Inherits System.Web.UI.Page
Protected Sub Page_Load(ByVal sender As Object, _
ByVal e As System.EventArgs) Handles Me.Load
Label1.Text = “Hello, World!<br /><br />” _
+DateTime.Now.ToLongDateString() + “<br />” _
+DateTime.Now.ToLongTimeString()
End Sub
Protected Sub Button1_Click(ByVal sender As Object, _ ByVal e As System.EventArgs) _
Handles Button1.Click
Label1.Text += “<br />Hello, “ _ + txtName.Text
End Sub
End Class
46 |
Part I: Introducing ASP.NET 2.0 Application Development |
Working with Folders and
Other Project Items
By default, a new ASP.NET Web project includes just one subfolder, named App_Data. This folder is designed to hold databases used by the application, but in practice it sees action only if the application uses Access databases or text files. If the application uses a SQL Server database or a database managed by some other database server, the actual database is usually stored in a location that’s independent of the Web application.
You can add other folders to a Web project by right-clicking the project node in the Solution Explorer and choosing the Add New Item command. This brings up a dialog box that enables you to add a variety of items to the project — including Web forms, HTML files, text files, Master Pages, and so on.
When you add a Web form to a project, you must supply the name and language to use for the page. In addition, check boxes let you indicate whether you want to use a Master Page and place the code in a separate code-behind file. You should almost always select both of these options. You can also add additional folders to a project by right-clicking the project in the Solution Explorer and selecting the Add Folder command. This brings up a submenu, from which you can choose to add any of the following types of folders:
Regular folder: Adds a regular Windows folder to the project. Use regular folders to organize the application’s Web pages into groups or to store related items such as images.
Bin folder: Adds a folder to store pre-compiled class libraries.
App_GlobalResources: Adds a folder that contains global resources that
can be accessed by any page in the application.
Consider carefully which resources you want to place in this folder.
App_LocalResources: Adds a folder that contains local resources, which are available only to pages in the same folder as the App_LocalResources folder. App_LocalResources folders are sometimes used along with regular folders that contain logically related pages to hold resources available only to those pages.
App_WebReferences: Adds a folder that holds references to Web services.
App_Browsers: Adds a folder that can hold browser-definition files. ASP.NET uses these files to identify the capabilities of individual browsers.
Themes: Adds a folder that holds files related to themes — a new ASP.NET feature that helps ensure a consistent appearance throughout a Web site and makes it easier to change the Web site’s appearance when necessary.