

Изделия из кожи
.pdfCHANGING FROM 6 to 4
When the plaiting gets to within 100mm of the end of the short strands they are dropped into the centre of the whip as shown and the sequence changes to 4 plait for the rest of the whip.
Make sure that the short ends are properly thinned down, and take care doing this change - over so that the whip keeps a smooth taper all the way.
It is not necessary to wait u n t i l t h e s h o r t e n d s a r e almost used up before dropping them. If the whip begins to look too thick they may be dropped at any time.
144
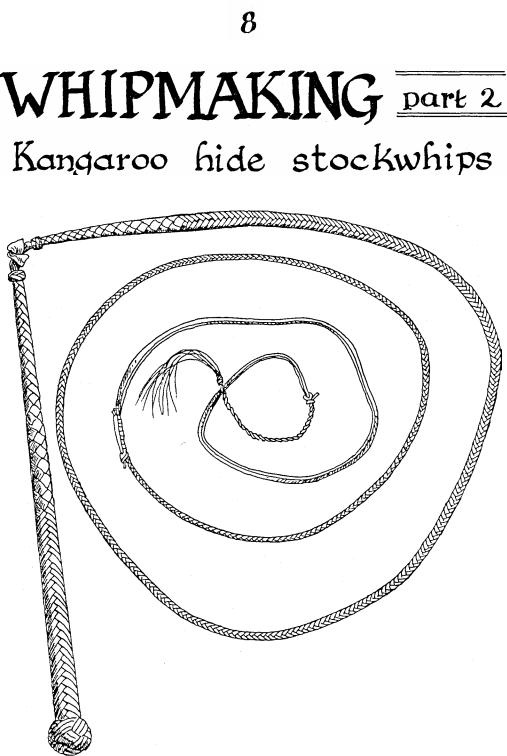
Stockwhips come in two forms, the
basic whip described in part one, and the kangaroo hide whip.
The kangaroo hide whip is really two whips in one, for the belly of the whip is in itself a four plait whip over which the kangaroo lace is plaited.
This section also contains instructions for plaiting a bullwhip and a snakewhip.
14
5
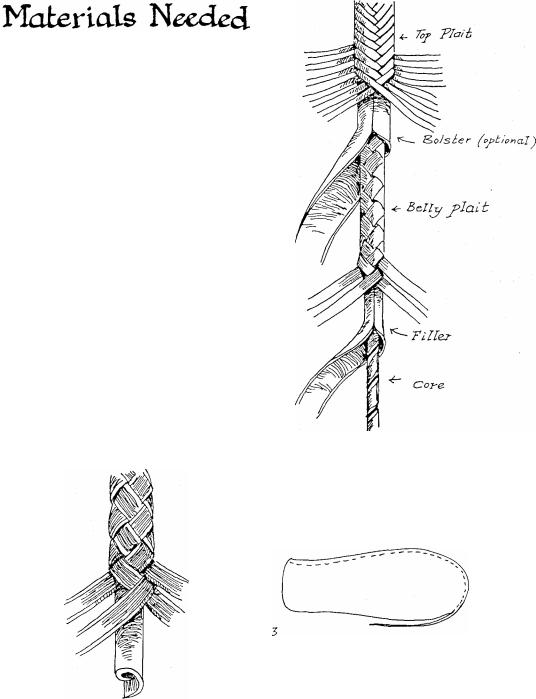
A full kangaroo hide. A knife.
A strand-cutter (optional). Mutton fat or leather dressing.
A long strip of 3 or 4mm thick cowhide for the core.
A long strip of thin soft leather for the bolster (optional).
Redhide fall and nylon or horsehair cracker.
Black waxed thread.
500mm of cane or timber for the handle.
Whips can be made to any desired length. In this case the instructions are for whip of 2300mm with a 600mm fall, an average sort of whip.
Whipmakers develop different techniques, and each man thinks tha t his method is the best. The methods described here are probably the most popular.
Fig.l. shows the way a plain stockwhip is often made, a four plait over a belly of rolled leather.
146
Fig.2. shows a kangaroo hide whip, which can consist of up to five la yers. A whip of this type will probably take five times as long to make as a plain stockwhip, but the final result should almost be a work of art as well as a very practical whip.
THE CORE
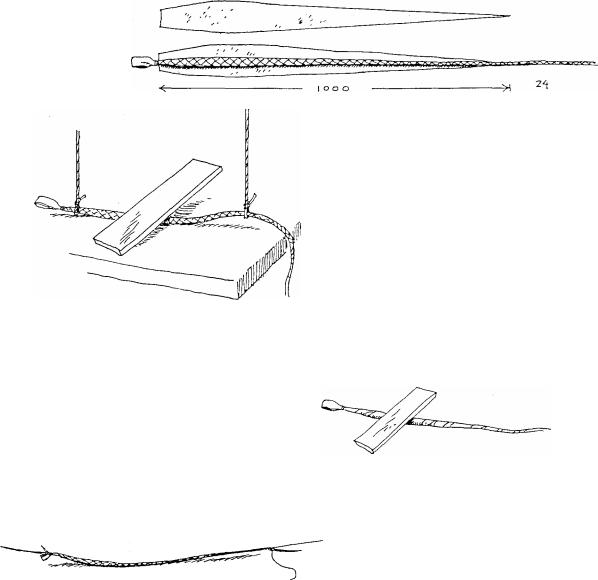
Fig.3. The core is cut from an ordinary hide of any strong leathe r 3- 4mm thick. Because whips are longer than hides no attempt is made to make a straight cut, the strip is simply cut by running around the outer edge of the leather.
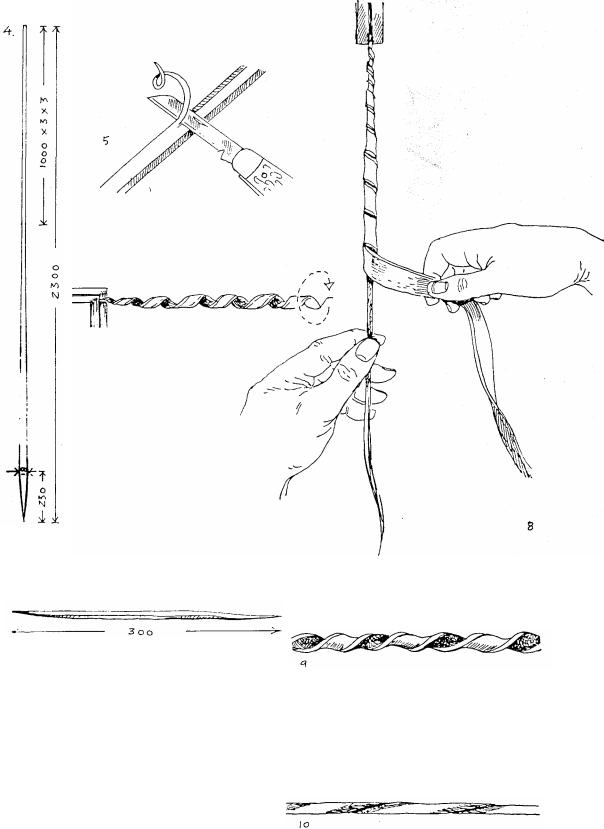
Fig.4. Cut to these dimensions, this represents the final length of the whip.
Fig.5. Very sharp knives are needed for whipmaking. The two top edges of the leather should be skived, or all
four edges if the leather is thick.
Next soak the leather in water for a few minutes until it is thoroughly wet.
Fig.6. Put the end
nearest the wide part into a vice, or under a
weight, or tack it down. Twist it tightly
u n t i l i t f o r m s a cylinder, or as close as
you can get to one before it begins to kink.
Fig.7. Where the leather is wide it
will twist into a hollow tube. This does not matter, but some people prefer to have a solid core.
This can be done by cutting a scrap of leather to about 300mm long to go inside the tube.
In the old days whips were often weighted with lead at the handle end. A small cotton tube filled with lead shot would be inserted into the tube instead of the scrap of leather.
Fig.8. Both the core and the scrap of leather are held in the vice • and the core is wrapped around as shown.
Fig.9. The wrapping is only done for the first 300mm. The rest of the leather will twist up like this.
At this stage the core may look rather rough, but later it will be rolled smooth and should then look like fig.10.
7

Fig.11. In theory the twisting of the leather should shorten the core,
but in practise the wet leather will also stretch while the twisting is being done, and so end up at its original length.
It is now wrapped around something and left to dry.
Fig. 12. When dry it is rolled firmly under a board. In our business we use a big cement paving slab as a base and a board about 500x100x15.
A cement floor can be used, or a strong bench. Sometimes a lot of force is needed to get a good even roll.
It may be necessary to slightly dampen the leather if it will not roll properly.
The life of a whip will depend upon regula r oiling, and this should start right from the beginning.
Use leather dressing of any type, or even mutton fat, thoroughly oil the core and roll it again.
When rolling the core put some sort of weights on it so that it will not unwind.
Once properly rolled it will remain in this form permanently.
148
THE FILLER AND BELLY PLAIT
Fig. 13. The filler and the belly plait are cut from one single strip of
kangaroo. The method of cutting out the kangaroo hide is illustrated
further on.
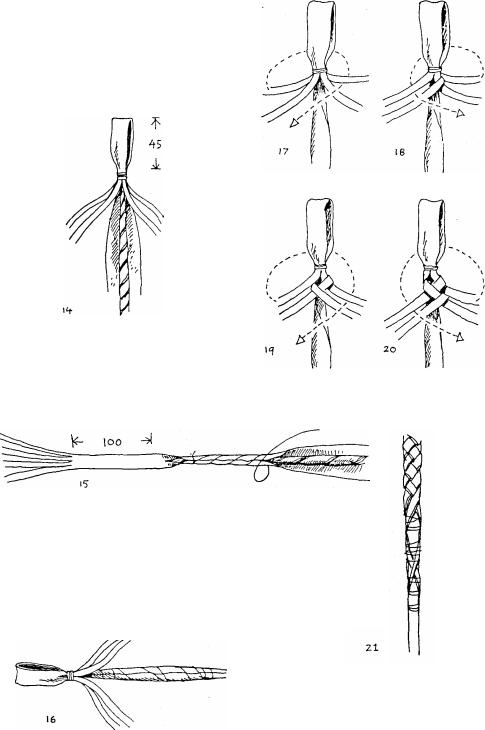
Fig. 14. The kangaroo hide is now tied to the core. The loop at the top will be part of the keeper of the whip.
Fig. 15. Professional whipmakers often omit this step and simply fold the filler around the core as they are doing the plaiting.
Beginners will find it more convenient to use a scrap of cotton to tie the filler up before beginning to olait.
Fig.16. With the filler in place around the belly plaiting can now begin.
Figs 17-20. A four plait is now worked over the filler.
Fig.21. When all the strands have been used up the ends are tapered and thinned down if necessary, and then tied down with a scrap of thread.
Make sure to get a smooth line when doing this, abrupt changes in outline will show up on the finished whip.
149
21
Fig.22. The completed belly is rolled to make it smooth and even. At every stage in making a whip there is some rolling to do.
If at any point you find a bad lump o r a t h i n p a r t t h e n i t m u s t b e remedied before going on to the next stage.
The whip will thrash about when being rolled, and knock almost everything off the bench. One way to stop this is to hang down a couple of lengths of cord. The whip can easily slip through the loops in the cord, and they will help restrain it.
Fig.23. When rolling a whip on the floor the ends can be tied to keep the whip in the right place.
THE BOLSTER
Fig.24. A strip of soft leather called a bolster is used if you wish to build up the thickness of the whip.
For extra thick whip s more than one thickness can be used. Soft, thin leather is best for the job, and whipmakers often take this as the opportunity to use up flanky pieces of leather that are not suitable for any
150
other job.
A bolster is only used if it is felt to be necessary. Many whipmakers prefer to do all their shaping when
forming the belly and not use a bolster.
The bolster is of the shape shown, and about a metre long.
Fig.25. It can be formed around the belly as plaiting progresses, but it is m o r e c o n v e n i e n t t o t i e i t o n beforehand.
Use dark thread and dark leather, as light colours will be very obvious if there are any small gaps in your final plaiting.
Fig.26. Once more roll the whip, and make sure that there are no wrinkles or lumps.
THE TOP PLAIT
The top plait is the slowest and most complex part of the job. Here whipmakers show their skill and knowledge, and the expert whipmaker can introduce all sorts of fancy plaiting patterns.
However here I am including only two sound, basic plaits that are easy to remember and work.
The whip begins with an over- under-over sequence that is sometimes called a diamond pattern and then changes to a herringbone pattern. This continues down the whip even though the number of strands diminish.

The cutting out of the strands
would be much easier if kangaroos were five metres long, but as they
are not special techniques have to be used.
There are a number of ways to cut out the 'set' as this part of the work
is known.
The great advantage of this method
is that the keeper can never be pulled loose, as it is permanently locked into
place.
The keeper is the 100mm section shown in the upper half.
Fig.28. This is a close-up of the keeper section. For the sake of clarity it has been drawn with sharp angles, but when cutting out curve these.
151
There are two quite different approaches to cutting a set. The first method is to taper the strands along their entire length. This calls for great skill, and is not recommended for the beginner.
The second method uses strands of uniform length for almost the whole length, except for a short section near the keeper.
With the tapered strands the entire whip can be done with the minimum number of strands in the hand.
With the second method a larger number of strands have to be handled at the beginning of the job, but these are gradually reduced as the job progresses.
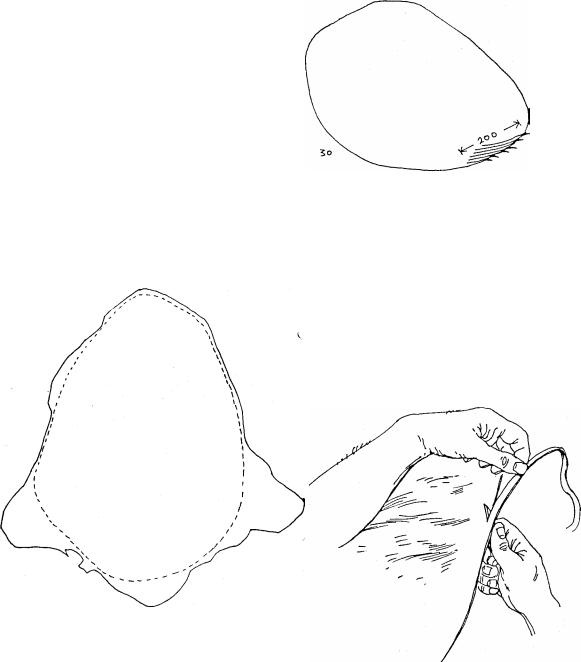
The hide is first trimmed to a
smooth shape. When cutting strands for belt making we trim to a full circle (see the section 'Stockmen's Plaited Belts), but for whipmaking this is of no advantage.
The scraps can be used for small jobs, and short lengths of lace can be cut from them for such things as the Turk's-heads that go on the keeper end of the whip.
Fig.30. Begin by cutting out 6 strands, each 5mm wide and 1400mm long.
As racing people, know, the inside track is the shortest, and so the inside strands will be too short unless some adjustment is made.
Begin by spacing the start of the outside and inside strands 200mm apart.
Although most of the cutting can be done with a strand cutter, there is a section on each side of the keeper that must be cut by hand. This is the section where the eight strands become four, and are tapered.
31
Fig.31. There are various ways to cut strands, and some are illustrated in the section on plaited belts. The method shown here is favoured by some experienced plaiters.
It requires skill, steady hands and a very sharp knife to cut strands in this way.
152
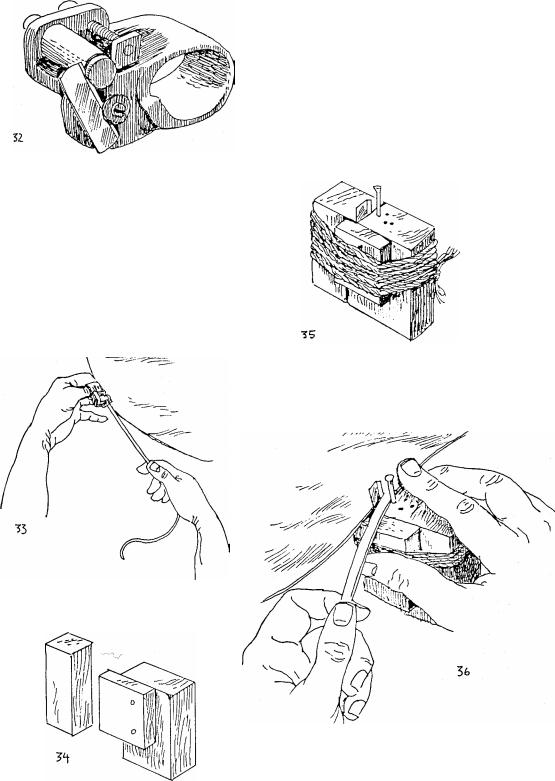
Fig.32. This is the best type of strand cutter. It is a small iron tool fitted with a blade, and it fits over the thumb.
These cutters are distributed by the stockmen's outfitters, R.M.Williams, and any leather shop should be able to order one in.
They come with their own blades, but as these become blunt ordinary razor blades can be used.
Fig.33. The cutter is held like this. Some people also use it on one of their fingers
Fig.32. A homemade strand cutter does not take long to make. The one in the sketches was put together in less than ten minutes. It is not as easy to use as the R.M.Williams one, but it will do the job.
Three scraps of timber are put together as shown, dimensions do not matter.
The smallest scrap is nailed to the largest to stop the razor blade from moving backwards.
Fig.35. The blade is put between the two pieces of timber and they are tied together.
A small nail acts as a distance guide.
Fig.36. The cutter is used as shown. The first finger of the right hand prevents the leather from rising up.
153