

Изделия из кожи
.pdfTHE POUCH SECTION
Before starting carefully check
the lace to see that it has no weak spots or joins. As the work
progresses it becomes tighter, and the best of splices tend to snag and
pull apart.
The sketch shows numbers all around the mandrel, but there is no
need to do this. Just mark number one and number 10.
Fig. 5. A simple loop will hold the lace in place. Go from number 1 to
number 10.
Fig.6. Around number 2 and up to number 11.
AMOUNT OF LACE NEEDED.
Strands of 4.5mm (3/16") kangaroo hide lace are used for the pouch.
Depending on the tanning and the thickness of the hide some lace
stretches more than others, and so
exact measurements for plaiting can never be given.
The measurements given here are what I used for the pouch shown in
the drawings.
POUCH SECTION. 3200mm (10'6"). Best allow another 600mm to be on the safe side.
FLAP. Cut 8 lengths, each 800mm. SMALL KEEPER. Cut 3 lengths each
550mm.
TOTAL LENGTH. 11.25metres (37')
Fig. 7. The plaiting now begins to follow an under - one -over - one
sequence.
Fig.8. The work continues in this manner. NOTE. For the sake of clarity the lace has been shown very thin, but in practice each strand must just touch the previous strand.
10
Fig.9. This is how the lace should really look. From 5 it goes to 14.
Fig. 10. From 14 it goes down to 6 and so on.
A lacing needle is really needed for this sort of work. If one cannot
be obtained a rough one can be improvised with fine wire.
Loop of wire
Lace screws i n
The best needle is called a Life-eye needle. It has a threaded end, and the lace screws into it.
Another trick is to harden the point of the lace with super-glue.
A lacing fid is also needed to open up tight places, otherwise the needle will keep pulling out of the leather.
86
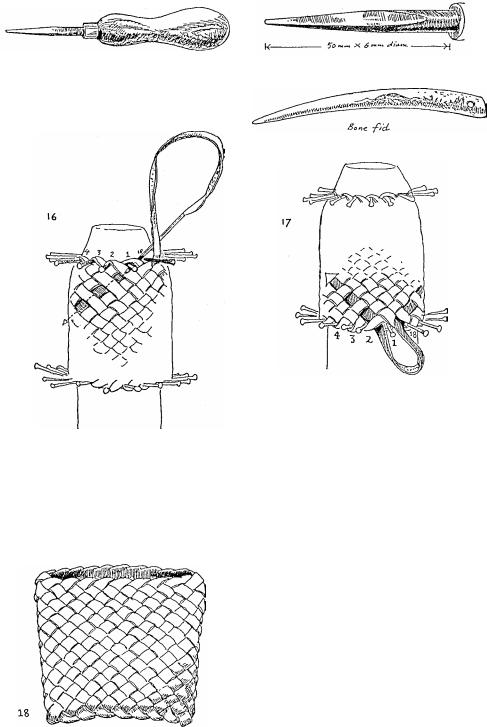
Proper fids can be bought, but they are easy to make from a scrap
of steel rod. I made mine from a bone.
Fig. 16. As the work progresses it gets slower and slower. In time, and
if all your calculations are correct, you will come around once more to
number 1 and find a gap of only the thickness of a strand of lace.
Take the lace under the loop of number 1 and work down as shown.
Remove all the tacks and slide the plaited work off the mandrel. It should look like fig. 18.
Fig. 17. The mandrel will now be fully plaited over. To finish off take
the end of the lace up on top of the
strand that started the job, the one that went from number 1 to number
10.
Work up as least as far as shown,
pull tight and cut of f flush. The pouch section is now complete.
PROBLEMS. Because of variations in the thickness and stretch of the lace
it may be that the plaiting becomes
either too tight or too loose. It is possible to see this happening quite
early in the plaiting, and steps must then be taken to correct it.
If the plaiting is going to be too loose then add in 2 more tacks both
top and bottom. If it is becoming too cramped for space then remove 2
tacks top and bottom.
Either way this will mean repositioning most of the other
tacks, though it is often possible to do this without having to undo what
work has already been plaited, if you get in early enough.
87
|
|
|
THE SMALL KEEPER |
|
|
The |
pouch |
section is |
by far the |
Take |
3 lengths of lace, each |
slowest |
part of |
the job, |
the rest is |
in fig. 19. 550mm long and place them |
|
as shown |
|
|
|
|
|
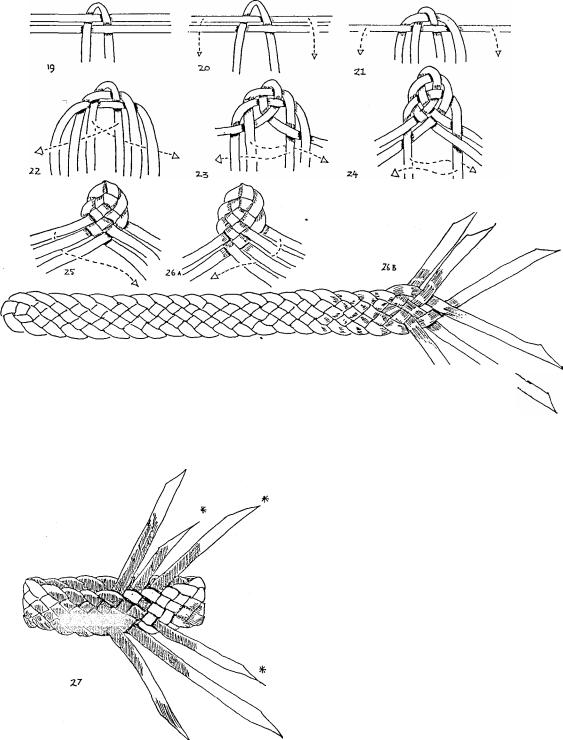
Figs. 20-26. The keeper is made in the same way as an ordinary plaited belt.
Fig.26B. Keep plaiting until almost |
much easier to do. |
|
all the lace has been used up. |
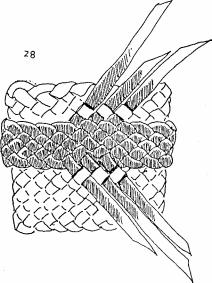
Fig.28. Slip the small keeper over |
|
Fig.27. Form the strap into a loop |
||
the pouch section, and on the back of |
||
that will fit snugly around the pouch. |
the pouch plait the ends in as shown. |
|
Plait the 3 ends marked * into the |
Continue this plaiting until all the |
|
ends go under 2 loops of the pouch |
||
start of the strap as shown. |
and then cut the ends off flush. |
|
|
The small keeper will now be |
|
|
firmly attached to the pouch section. |
88
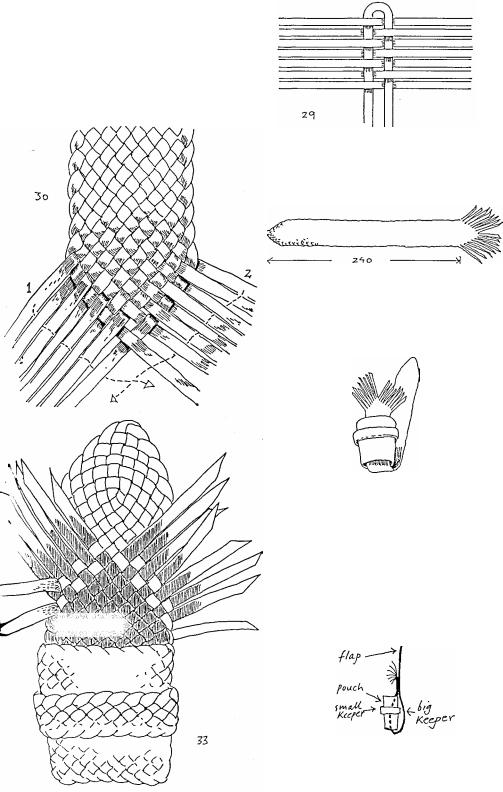
THE FLAP
Cut 8 lengths of lace, each
800mm long and arrange them as shown in fig.29.
The point is formed in the same way as was shown for the small keeper, except that more strands are
Fig. 30. When the point has been
formed plaiting continues in the sequence shown.
Plaiting continues until almost all the lace has been used up, the
plaited section should be about 240mm long.
Feed the flap through the pouch section so that it comes out through
the hole in the bottom and lays at the back as shown.
Fig.33. The ends are now plaited into the beginning of the same strap.
Use a lacing fid to open up the
previously plaited strands so that the ends can be fed through.
involved.
35
Fig.35. A side view before the ends are trimmed flush.
89
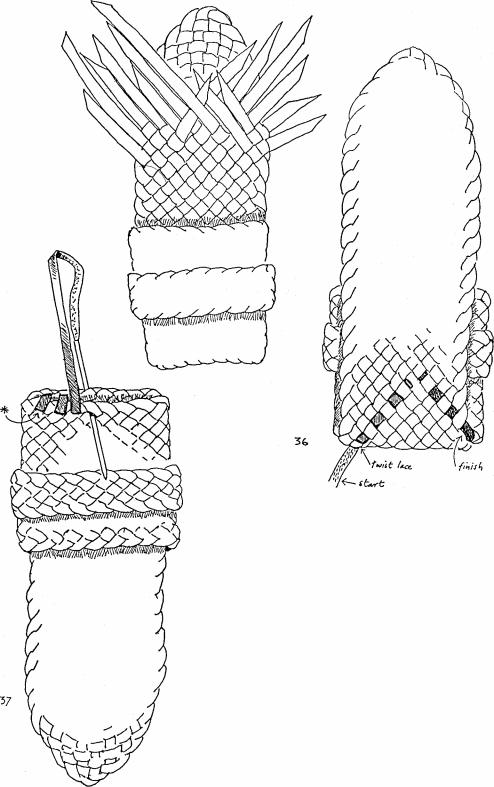
Fig.34. Keep on plaiting until all
the ends are
firmly in place, then trim them
off flush.
Fig.36. The last job is to stitch up the bottom of the pouch. This view
is of the back of the pouch and shows how the lace is plaited in at
the start and finish of this job.
The lace has to be reversed at the start, and this twist should be done
at the point shown, so that it is hidden under a strand.
Fig.37. The lace comes through at the point marked *. Try and make the stitches as neat as possible, so that they match the rest of the plaiting.
Finish as shown in fig. 36.
The pouch is now ready to be slipped onto the belt.
90
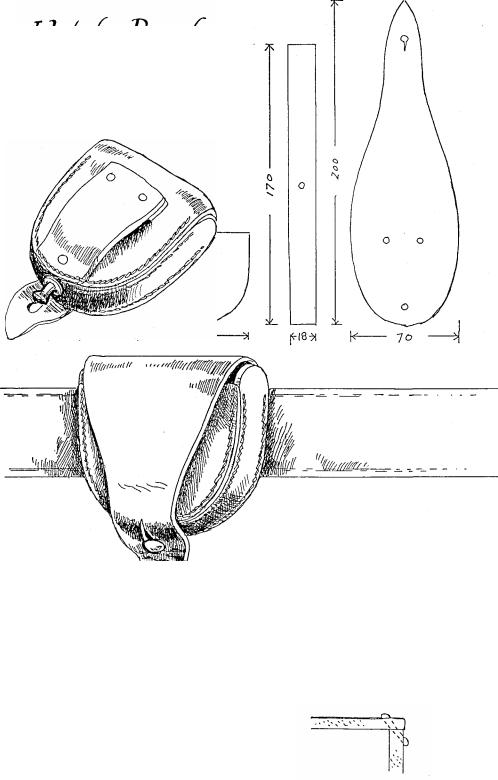
are of 4mm leather and the rest of 3mm leather. It fastens with a pouch stud.
In another version the stud is on the flap.
Care should be taken when making
watch pouches not to have the metal parts of the studs exposed on the
inside where they will rub against the watch. Thin leather or cloth
should be glued in to cover any metal.
Some leatherworking skill is required to make this type of pouch,
as the stitching goes through at an angle.
91

An easier pouch to make, and one that is in many ways better, is the
dropdown pouch. The great advantage of this design is that the
watch does not have to be handled, it can even be wound while still in
the pouch.
The pouch is fastened with a press stud or a pouch stud, and when undone the watch drops down to
where it can be read.
This pouch has a small welt on each side. The pouch should be a
snug fit for the watch so that it cannot move about.
92
93

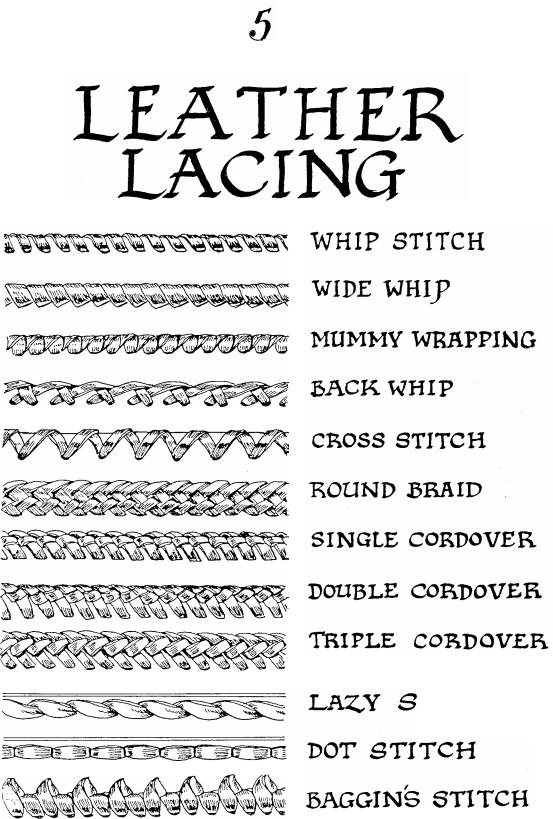
The whip stitch is the most simple stitch of all, and the one most often used for fastening two pieces of leather together.
The only problem likely to be encountered in doing this stitch is in making a neat start and finish.
AMOUNT OF LACE NEEDED. Four times the length to be covered.
Fig. 1. This shows the job from the b a c k . P u t o n e e n d o f t h e l a c e through the bottom hole in the front piece of leather.
Fig. 2. Now bring the two pieces of leather together and begin lacing.
Fig. 4 When going around a corner take the lace through the corner hole twice. This looks better and makes for a stronger corner.
Fig.5. FINISHING OFF. Take the end over and go through the last hole in the back piece of leather again.
94
Fig. 3. This shows the job from the front. The start of the lace will be hidden from view between the two
pieces of leather.
Fig. 6. Bring the end out between the two pieces of leather.