

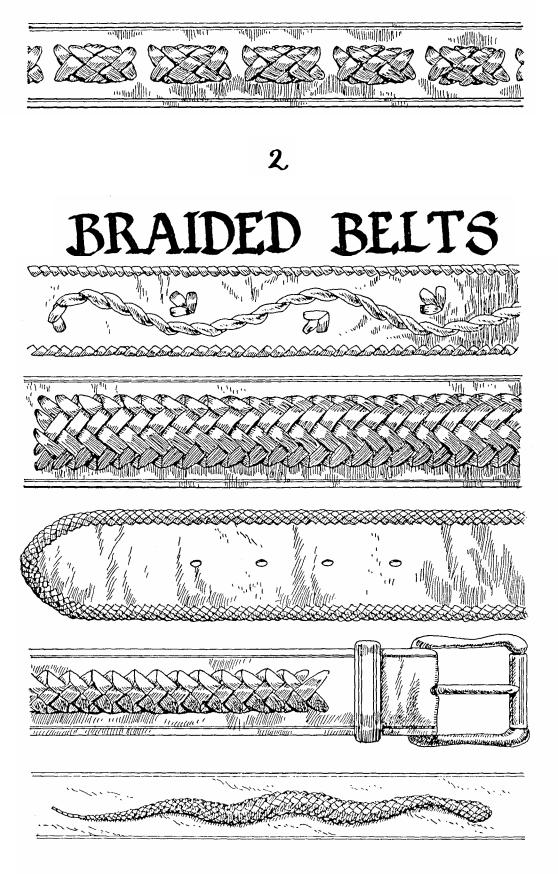
Изделия из кожи
.pdfThe basic principle of forming the ridge is shown in figs. 68 and 69. Fig.68 shows the normal plaiting technique in which the strands go from o n e side of the belt to the other.
Fig. 69 shows the crocodile ridge. Notice that the strands do not go from side to side but instead meet in the middle and then
go back to the same side. Where the leather wraps around the strand from the opposite side it buckles up a little, and this forms the distinct ridge down the centre of the belt.
It is not convenient to run a crocodile ridge the entire length of a belt as the ridge would interfere with the belt slipping through the buckle, and so the belt is begun and ended as an ordinary flat belt as described earlier.
Some plaiters do the flat plait and then go directly into the crocodile ridge, but this is a poor practice as the belt will be seen to narrow at this point. A well made belt will introduce an extra strand for the length of the ridge and so keep the belt a uniform width.
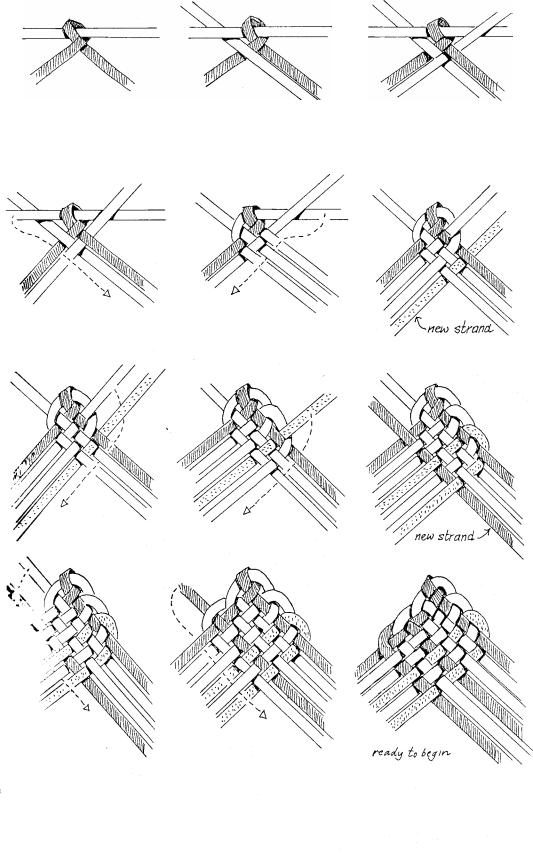
Fig.70. Having plaited at least 200mm of ordinary plaiting an extra strand is folded in as shown.
70
Figs 71 & 72. The outside strands are
brought across as shown. Note that the strands are only bent in the centre, they are not twisted over in any way.
30

Figs 73 - 76 This shows the basic method of working the ridge. Before the buckle end of the belt is reached ordinary flat
plaiting is resumed, and so the two ends of the extra strand must be hidden. Fig.77 shows how the left strand comes across and goes beneath the centre strand.
Fig . 78 shows the right strand coming across and sitting on top of t h e c e n t r e s t r a n d .
31
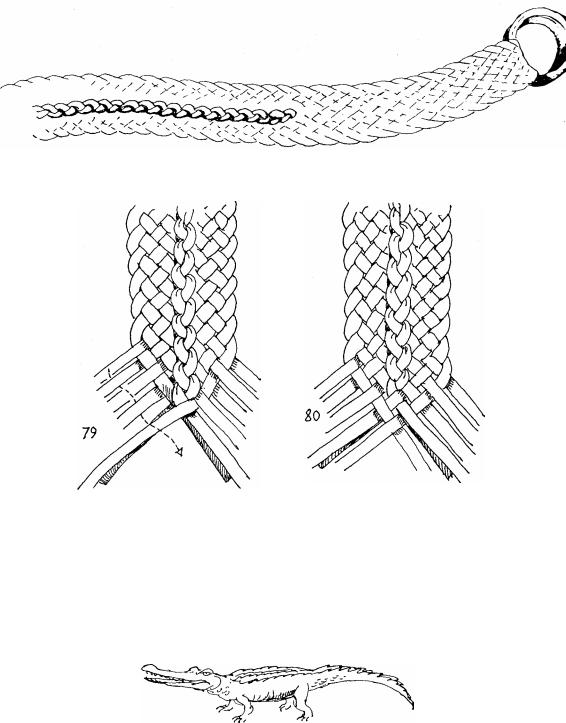
In this way the belt is brought back to its original number of strands and so plaiting goes on in the normal way.
After a few passes the lower strand of the doubled strands can be trimmed off.
The belt is now completed in the normal way.
32
RAISED EDGE PLAIT
The raised edge plait is known to most good bush plaiters even though they may seldom use it. The method is s i m p l e ,
instead of |
b e g i n n i n g |
w i t h |
t h e |
o u t s i d e |
s t r a n d |
t h e |
s e c o n d |
s t r a n d |
i s p i c k e d |
u p . This is |
bent |
as |
shown in |
fig.81 |
and |
neatly |
folded |
around the outside s t r a n d , t h u s f o r m i n g a r i d g e .
A l t h o u g h t h e s e v a r i o u s r i d g e p a t t e r n s a r e s i m p l e e n o u g h t h e y
onl y loo k |
g o o d |
when done |
by |
a |
skilled |
|||
plaiter a s |
t h e |
e f f e c t |
r e l i e s |
o n |
|
uniform |
||
pressure and precise positioning. |
|
|
||||||
81 |
|
|
|
Fig.82 |
gives |
an idea of |
||
t h e f i n i s h e d |
e f f e c t . |
T h e |
b e l t |
is |
started |
|||
and finished as an |
o r d i n a r y |
f l a t p l a i t . |
||||||
TRIPLE RIDGE PLAIT
This only looks good when do n e
o n a 1 2 p l a i t b e l t o r |
o ver. |
I t is e a s y e n o u g h t o |
d o o n c e a |
c e r t a i n a m o u n t o f s k i l l i n p l a i t i n g ha s b e e n a c h i e v e d , t h o u g h |
|
tim e consuming . I t simpl y consist s o f a |
ra i s e d |
e d g e |
p l a i t |
w i t h |
a c r o c o d i l e r i d g e d o w n t h e c e n t r e . |
|
|
|
|
B u s h p l a i t e r s w i l l u s u a l l y b e g i n w i t h a n o r d i n a r y f l a t |
||||
p l a i t then i n t r o d u c e t h e r a i s e d e d g e |
p l a i t . |
T h e y |
w i l l |
d o a |
f e w c e n t i m e t r e s o f t h i s t o g e t i n t o t h e r h y t h m t h e n i n t r o d u c e t h e crocodile ridge.
33

|
|
"COP THIS YOUNG HARRY" |
|||||||||
|
|
N o t h i n g a n n o y s a c r u s t y |
|||||||||
|
o l d b u s h m a n m o r e t h a n t h e |
||||||||||
|
a r r i v a l o f a y o u n g s t o c k m a n |
||||||||||
|
w h o c a n p l a i t a s w e l l a s h e |
||||||||||
|
c a n . W h e n t h i s h a p p e n s t h e |
||||||||||
|
old expert usually asserts his |
||||||||||
|
position |
by |
creating |
the |
most |
||||||
|
c o m p l i c a t e d |
p a t t e r n s |
|
a n d |
|||||||
|
t e c h n i q u e s t h a t h e c a n r e c a l l o r |
||||||||||
|
invent. |
|
|
|
|
|
|
|
|
|
|
|
|
T r a v e l l i n g |
a r o u n d |
|
t h e |
||||||
|
o u t b a c k I h a v e o f t e n b e e n |
||||||||||
|
s h o w n e x a m p l e s o f t h i s s o r t of |
||||||||||
|
w o r k , |
w h i c h |
|
i s |
|
a l w a y s |
|||||
|
beautifully |
|
done, |
though |
often |
||||||
|
no t ver y practical . |
|
|
|
|
|
|||||
|
|
An example of this is |
|||||||||
|
illustrated . Thi s i s a 1 2 plait |
||||||||||
|
belt |
which |
|
is then |
divided |
into |
|||||
|
t h r e e p a r t s a n d t h e s e a r e |
||||||||||
|
then w o r k e d a s s e p a r a t e |
|
|
|
|||||||
|
4 |
plaits |
for |
s o m e d i s t a n c e |
|||||||
|
b e f o r e c o m i n g t o g e t h e r a g a i n |
||||||||||
|
a s a 1 2 |
plait . |
|
|
|
|
|
|
|||
|
|
T h e s e |
|
t h r e e |
s t r a p s |
|
a r e |
||||
|
then worked together with the so- |
||||||||||
|
called 'secret' plait. The |
result is |
|||||||||
|
a belt which is |
not |
p a r t i c u l a r l y |
||||||||
|
a t t r a c t i v e |
|
b u t |
which |
will |
set |
|||||
|
the |
rest |
of |
the |
c a m p s c r a t c h i n g |
||||||
|
thei r head s . |
|
|
|
|
|
|
|
|||
|
|
As a matter of interest I |
|||||||||
|
plaite d |
on e |
u p |
i n |
orde r |
t o |
do |
||||
|
t h e s k e t c h a n d f o u n d t h a t i t |
||||||||||
|
did not take much longer than a n |
||||||||||
|
ordinary plaited belt. |
I n |
a n o t h e r |
||||||||
|
v e r s i o n o f t h i s b e l t t h e t h r e e |
||||||||||
|
c e n t r e s t r a p s a r e |
|
|
|
|
|
|||||
|
w o r k e d i n t o r o u n d p l a i t s , |
|
|
||||||||
|
u s i n g l e n g t h s o f c o r d o r |
|
|
|
|||||||
|
g r e e n h i d e a s a |
|
|
|
|
|
|
||||
|
c o r e . T h e s e t h r e e r o u n d s e c t i o n s |
||||||||||
a r e t h e n p l a i t e d t o g e t h e r w i t h t h e |
|
|
|
|
|
|
|
|
|
|
|
s e c r e t p l a i t . T h i s l o o k s a l i t t l e b e t t e r t h a n t h e p r e v i o u s o n e . |
|||||||||||
I n |
ye t anothe r variatio n thes e thre e o r |
mor e roun d |
|
||||||||
sections |
|
|
|
|
|
|
|
|
|
|
|
a r e n o t p l a i t e d t o g e t h e r b u t a r e |
l e f t p a r a l l e l a n d l i n k e d |
|
|||||||||
t o g e t h e r |
|
|
|
|
|
|
|
|
|
|
|
w i t h l a c e i n o n e o f a n u m b e r o f w a y s .
I n t e r e s t i n g a s a l l t h e s e v a r i a t i o n s a r e t h e r e i s n o d o u b t t h a t
t h e b e s t l o o k i n g b e l t o f a l l i s t h e s i m p l e t w i n r i n g b e l t , t h e r e a l
bushman's belt.
34
A variation of the previous idea can be used to create small openings in the belt from which can be hung keyrings, snap hooks and similar items.
In this case a 12 plait is divided i n t o t h r e e s e t s o f 4 , a n d t h e s e a r e t h e n p l a i t e d f o r a s h o r t d i s t a n c e before coming together again in the 12 plait.
Variations of this idea can be worked with any number of strands.
3
5
HAT BANDS
Bushmen often plait hat bands in the same way as ordinary belts. However because of the relative narrowness of the band they usually do not bother to plait a keeper. Instead when trimming off the surplus lace they will leave a single strand and pass this around the strap to form a keeper as in fig. 88.
88
WATCH BANDS
Plaited watch bands can be made quite quickly, and are extremely light and comfortable as well as being very strong. Just as a matter of interest I timed myself from measuring the lace to completing the strap ready to fit the buckle and found that a 6 plait of 4.5mm lace took only 9 minutes.
The simplest calculation for the length of lace in a watchband is to make the strands double the circumference of your wrist.
36
Plaiting expert Lindsay Whiteman of Townsville, Qld, showed me another method of starting a belt.
He prefers this method as it gives the same pattern in the point as in
the rest of the belt. In the common method of starting, shown earlier in this book, the strands in the point follow a curve.
37
38
This is a very attractive addition to a plain belt. The method is easy to
remember and simple to do. |
in four |
The braiding is done |
|
operations, and only the last |
one is |
time consuming. |
|
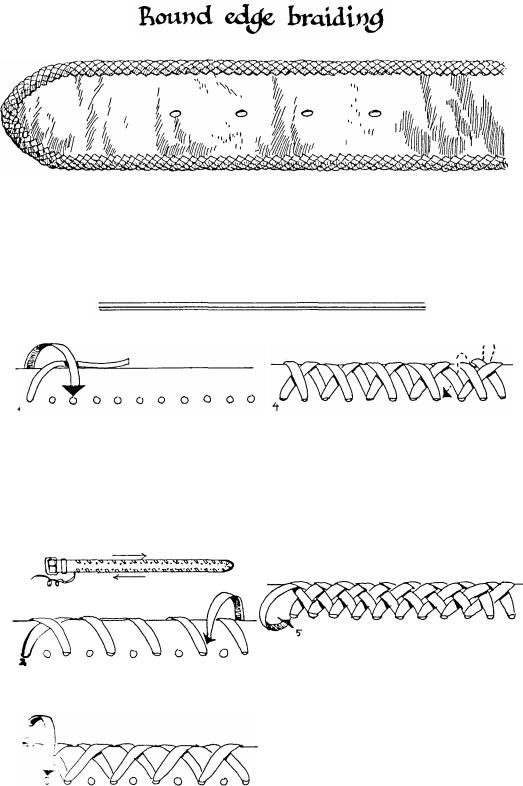
Fig1. The end of the lace is put up out of the way and soon is hidden by the braiding.
Begin at the buckle end of the belt and go through every second ho le.
Go right around the belt and back to the buckle end on the opposite side.
Fig.2. When the end is reached back again through the same holes.
Fig.3 The third time around the lace is taken through the empty holes.
Before beginning punch a dozen holes in a scrap of leather and try out a small section. In this way you can find out the best distance to have the holes according to the lace that is being used.
Fig.4. The fourth pass is the slow one, and a lacing needle is needed, even a home-made one consisting of a bent p i e c e o f t i e - w i r e i s b e t t e r t h a n nothing.
The lace is taken in a sequence of underoverunder, and then into the holes that only have one strand of lace through them.
Fig.5. When the braiding is complete take the end through the last hole and then use the needle to take it back under a few strands at the back of the of the job, and so lock it in place. In the drawings the lace has been s h o w n t h i n i n o r d e r t o b e t t e r illustrate the method. When actually doing the braid the lace should be wide enough so that the belt leather cannot be seen through the braiding, as shown in the sketch of the finished job.
39