

Изделия из кожи
.pdfFig.6. The |
end of the belly is no |
l o n g e r n e e d e d a n d c a n b e c u t o f f . |
|
Fig.7. A keeper |
cut from kangaroo |
skin is tied firmly on .
Fig.8. The belly is given a good rolling until it is quite smooth .
If there is any difficulty in getting a good finish it may be necessary to g i v e t h e l e a t h e r a g o o d s o a k i n g i n water before rolling.
When rolling is complete let the belly dry out and then give it a heavy dressing with fat or leather dressing .
APPENDIX H
A WHIP FROM PRECUT LACE
Because of the complexity of their shape whips are usually cut from a kangaroo hide. However for a person w h o w i s h e s t o m a k e a w h i p f o r himself and cannot obtain a hide it is p o s s i b l e t o m a k e o n e w i t h p r e -c u t
lace, obta i n a b l e |
f r o m |
l e a t h e r-c r a f t |
shops or saddlers. |
|
|
The belly is |
made |
as described |
e a r l i e r , u s i n g t h e w i d e s t a v a i l a b l e
lace. The keeper can be of any good
quality leather, bound tightly to the belly.
A better idea is to make the core extra long, say 3300 instead of 2300,
and of a tapered shape so that it is a combination core and filler.
It is folded as shown to form the keeper.
Narrow lace is used for the top p l a i t . T h e n u m b e r o f s t r a n d s a r e calculated by measuring around the belly at the thickest part and divid ing this measurement by the width of the s t r a n d s b e i n g u s e d , t h e n a d d i n g a n extra strand if the answer is not an even number.
For instance, if the circumference of the belly is 45mm it will need ten strands of 4.5mm lace.
The start of the whip is narrower than the widest part of the belly, and so plaiting should start as shown. The full number of strands are tied at the t o p , b u t o n l y s o m e o f t h e m a r e u s e d in the first plaiting .
E x t r a o n e s a r e p i c k e d u p a s t h e whip widens, then plaiting continues as explained earlier, dropping strands as the whip narrows .
174
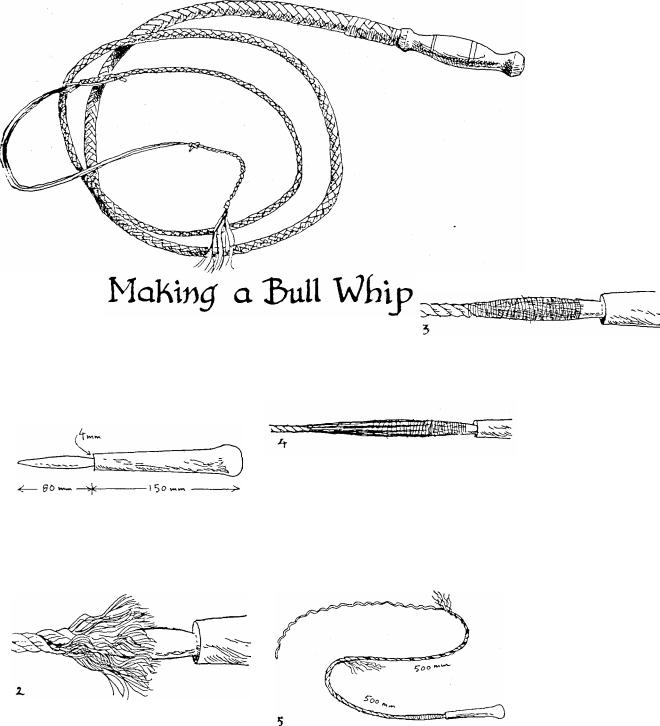
These instructions are for a simple but efficient bull whip, a fancy whip would have a leather core and more elaborate plaiting.
To make this whip you will need wood for a handle, rope, cord, cowhide and kangaroo hide.
Fig.l. The handle can be shaped from any strong piece of timber, and to whatever shape you like. Note how the point is shaped so that the whip will not be able to slip off.
Fig.2. Take some rope of around 8mm in diameter and 1800mm Jong, or as Jong as you wish.
Tease the end of the rope out and put it around the point of the handle.
Fig.3. Bind the rope on with strong thread, making sure that there are no lumps.
Fig.4. Cut and taper some scraps of leather and bind them on in order to get a good taper. The final shape of your whip will depend on getting a good shape at this stage.
Fig.5. The rope is now tapered by unwinding some of the strands and cutting them off.
175
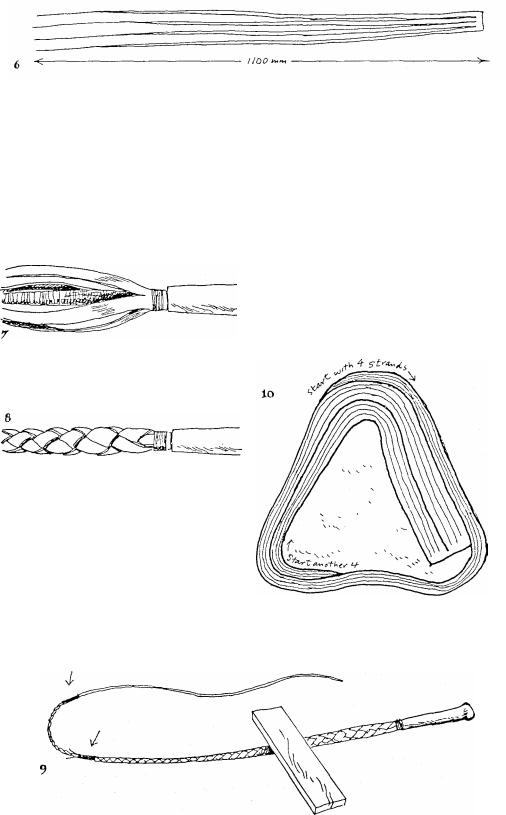
Fig.6. The belly is formed around the core, and this gives the whip its shape and bulk.
The leather for the belly can be 3mm cowhide, redhide, or you can even use kangaroo hide.
Cut the leather just over a metre long , and with a wide end that just fits around the point of the handle. Taper the four strands.
Fig.7. Use a whipping, as described elsewhere, to fasten the leather to the handle, or put in a few tacks.
Fig.8. Plait the belly with a four plait.
Fig.9. Take a board and give the belly a firm roll. Keep rolling it until it is quite round and smooth, especially at each end.
This can also be done by rolling it under your boot.
Tape or tie up the end. Note that the frayed part of the rope has also been taped or tied up with thread.
176
The outer covering can now be plaited on. It is best to cut this from a kangaroo hide so that you can taper the strands, but if this is not practical then you can use pre-cut lace.
Let us say we are going to use an eight plait for the start of this whip. Measure around the handle where the whip is to begin, and divide this measurement by 8. This will give you t h e w i d t h o f e a c h l a c e a t the beginning.
If the measurement is 56mm then each strand will be 7mm wide.
If using pre-cut lace you will not be able to get lace of this width, and so would have to do a 10 plait.
Fig. 10. This is not as complicated as it may first look. First the kangaroo

hide |
is trimmed to |
a smooth shape, |
|
|
and it will look something like this. |
|
|||
|
Begin cutting , start with only |
|
||
strands and make them each 3mm |
|
|||
wide. Having decided what the final |
|
|||
width will be at the handle you |
|
|||
slowly taper the strands as you go. |
|
|||
|
When you have cut 1200mm of |
|
||
lace you begin cutting another 4 |
Fig.13. Tie these strands onto the |
|||
strands, so that you are now cutting |
handle. Divide the strands so that |
|||
the full 8, all of the same width. |
||||
you have two short and two long in |
||||
Continue cutting until you have a |
each hand. |
|||
total |
length of |
3200mm. For |
|
|
convenience of handling leave the strands connected together at the top.
Fig. 14. Begin an eight pla it.
Fig.
15.
Fig.11. This is the cutting method shown to me by Lindsay Whiteman of Townsville. Sit down and put the hide on the bench. The thumbnail of the knife hand acts as a gauge while the other hand pulls the lace.
The knife needs to be extremely sharp to use this technique.
Fig. 12. Your set, as it is called, should now look like this.
Continue plaiting until the work begins to bunch up. This will happen at about 1400 mm. Now you have to drop a couple of strands. Trim them off and lay them down on the belly as shown. Now continue plaiting a six plait.
When you have nearly used up the short strands drop them in the same way and continue to the end with a four plait.
177

Fig. 16. Take a board and give the plaiting a good hard roll until the
surface is smooth and round. Take
care to do this firmly where the plaiting began.
Fig.17. Put a whipping |
on at the |
handle end as described elsewhere.
18
Fig. 18. Cut the fall out of strong cowhide or redhide. It has a slit at the wide end.
Fig. 19. Open the slit and put the end of the whip through it, then fasten it on as shown.
Fig.20. The cracker is attached as shown.
178
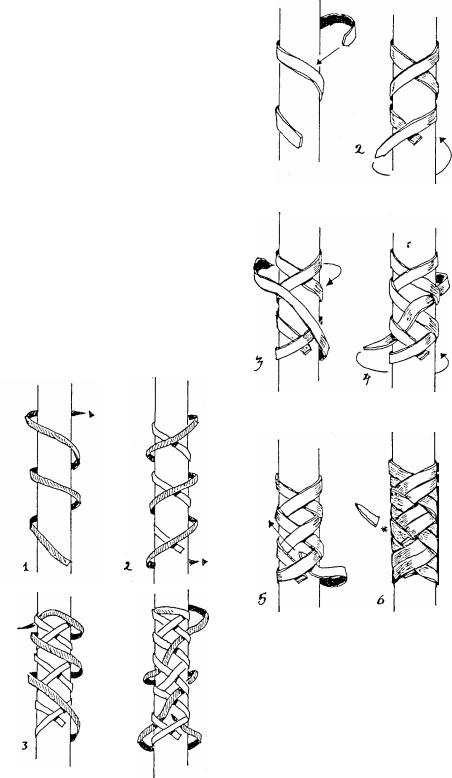
For all practical purposes the whip is now complete. However if you would like to make it look just a little bit better then you can cover up the whipping on the handle with a Turk's-head.
There are hundreds of different sorts of Turk's-heads, but this is probably the easiest to work.
You may use the same kangaroo lacing, or use some of a different colour.
The method is simple, you wind up, then down, then up again, going in between the previous strands. When the strand comes down again it goes under-over-under as in fig.4.
If you are using wide lace the turkshead will now be complete. If there are gaps you continue following round the previous working. This can be done twice, or even three times, and improves the look of the finished job.
When the beginning is reached again, work the knot tight and trim off the ends.
This sort of Turk's-head can be extended to any length, the drawings on the left show a longer version.
Having got to fig.4. you can go around once or twice again.
179
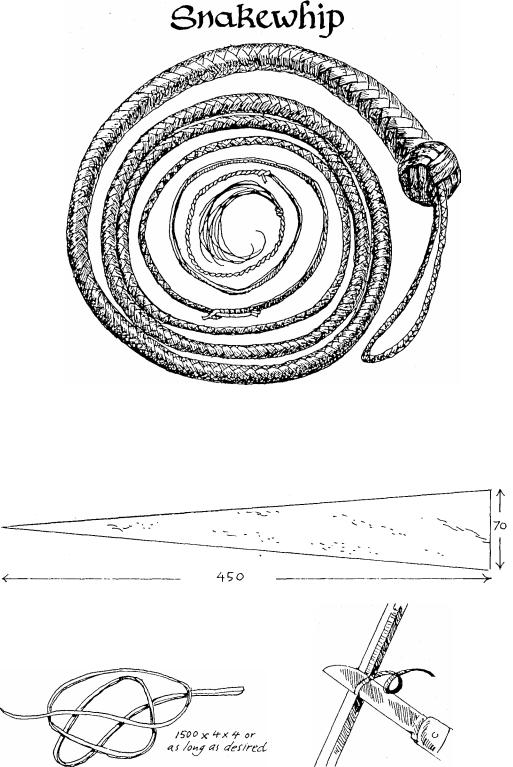
A snakewhip is rather like a bullwhip, except that the handle is also flexible. It is also usually a lighter whip. Its main advantage is that it can be rolled up and slipped into a large pocket out of the way when not needed.
Fig.l. The handle can be of kangaroo skin or heavy canvas. It can be 60mm wide at the end or 70mm as shown here. The length can also be increased to 600 mm.
Fig . 2 . The core of the whip is of good quality leather 1500x4x4mm, or it can be made as long as desired.
180
Because of its shape it is also a favourite for playing tricks on new chums of nervous disposition, who are forever being scared out of their wits by someone throwing a snakewhip beside them and shouting out "Snake!".
Fig.3. Use a sharp knife to round off the edges of the leather. It should be made as round as possible.
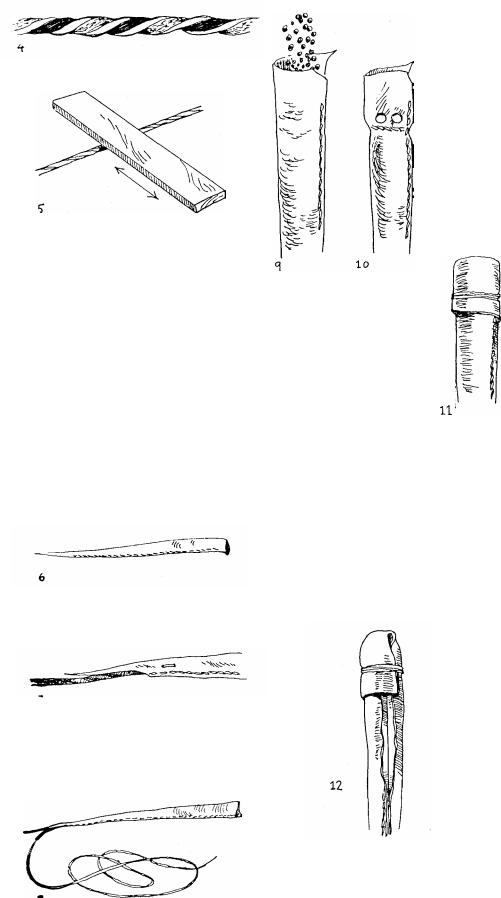
Fig.4. If you do not have any 4mm
leather then thinner leather will have to be used. Soak it in water and then twist it like this.
Fig. 5. Give it a firm rolling under a board until you have a uniformly round length of leather. If it shows no signs of unwinding you can go on with the whip making, otherwise it must be tied down and left until it has dried.
Fig. 6 The triangular piece of canvas hide is now sewn into
a tube.
Fig.9. The handle is filled with lead shot. Some gun shops stock this. If it cannot be obtained the next best thing is small fishing sinkers.
F i g . 10. Sew the end closed leaving about 25mm spare. Punch two holes above the sewing if you are going to put a loop on the handle.
Fig.11. If you do not wish to put a loop on the handle then simply fold over the extra material and tie it down.
Fig. 7 |
The |
core |
is placed into the |
end of |
the |
tube |
and held firm with at |
least one stitch. |
|
||
Fig. 8 The job should now look like this.
Fig. 12. If the tube is of canvas it is turned inside out as soon as it is made to hide the seam. If it is of leather this will usually be too difficult, so the seam should now be spread out and smoothed flat.
18
1

Fig. 19. Now comes the be lly of the whip. This is an extra plaited section that gives the whip its shape.
This can be cut from 2 or 3 mm cowhide, or whatever leather is available.
One end of the leather is cut so that it just fits neatly around the lead filled handle. The remaining metre is cut into four strands each 4mm wide.
Fig. 13. A loop allows the whip to be hung up, and also is handy for hanging the whip up when doing the plaiting.
Take a strip of leather 600x3x3 and roll it under a board to make it round. Tie four strands of 4.5mm lace
to it and begin a four plait. Figs. 14-16. This is the sequence for a four plait.
If you use a light leather for the
Fig. 17. Put the ends of the plaitedloop through the holes in the handle and tie them together very firmly.
Fig. 18. Fold over the end and also tie this down firmly. The loop gets quite a lot of pulling so it must be made quite secure.
belly, such as kangaroo hide, it may be necessary to make it a bit thicker before doing the final plaiting.
This is done by wrapping a strip of leather right around the belly. The strip is cut to the length of the whip.
This is known as a bolster, and should be of flexible leather. Fig.20.
Use |
fine |
thread |
to |
tie the belly |
to |
the |
handle. |
It |
should |
completely cover it with no overla p.
182