

Изделия из кожи
.pdfAnother piece of rod fixed to a handle and with a smooth end can be used for drawing the design on the leather.
The technique of embossing is also very simple. The design is drawn onto the leather, the leather is dampened
and the embossing tool is used to push down the background and
so give the effect of the design standing above the surface.
I was taught the technique at the age of twelve and found that it was no trouble at all.
The sketch is a detail from a book cover that I embossed when about sixteen. Once done the embossing is there forever, and this specimen is getting on for forty years old.
This is an early type of strap cutter that I found with some old tools.
It consists of a stick with a small blade wedged tight into a hole at one end, and a sliding piece which is held in position with a wedge.
It is included as a matter of interest, but it is not an easy tool to use.
|
trick |
One |
by |
used |
|
old |
time |
bootmakers when cutting straps was to jab one of their very sharp knives into the bench top and pull the leather against it. They would either do the cut by eye or clamp a block of wood to the bench to act as a guide. Bootlaces would be cut by
eye.
The main problem with this method is that if you are cutting thick leather it is difficult to get the knife fixed so firmly that it will not fall over backwards when you begin work.
193

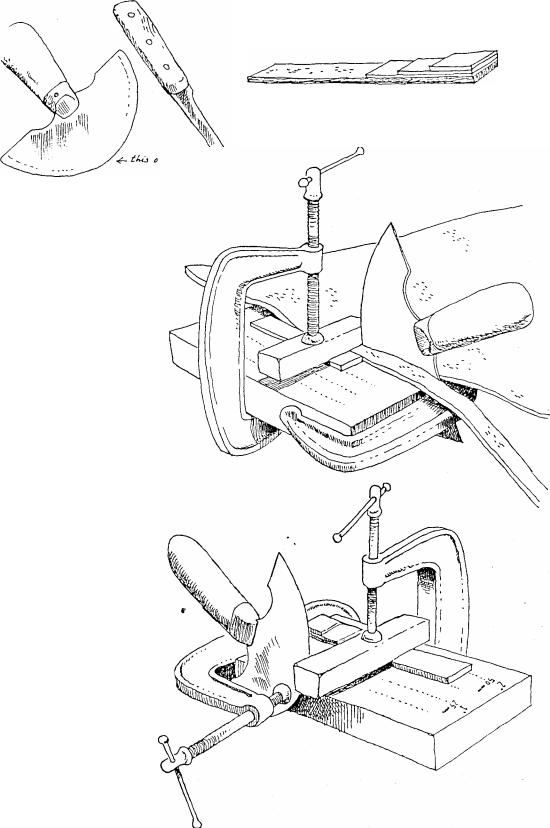
If you do a lot of leatherwork it would be best to buy a proper plough gauge for the cutting of straps. There are all sorts of tools designed for cutting straps, and many of them are very cheap and nasty.
Unfortunately the best type of plough gauge is also the most expensive, and is of the style shown in the sketch.
On the left is the handle and the blade. To the right of this is a roller which can be moved up and down, and is adjusted according to the thickness of the leather being cut.
The roller stops the leather buckling up, and so ensures a good even cut.
To the right is a sliding bar that is adjusted according to the width to be cut.
It is usually necessary to begin the cut with a sharp knife and then feed it into the plough gauge. The right hand grasps the blade handle while the left holds the strip being cut, pulling it slightly away from the side as the cut is made.
The blade must be kept very sharp, and one old leatherworker's secret is to sharpen the inside of the blade more than the outside.
This helps prevent any tendency that the knife might have to wander inwards and make the strap thinner than was intended.
HOME-MADE PLOUGH GAUGE
The factory made plough gauge is a very nice piece of equipment, but it is also very expensive.
However if you have to cut a lot of straps it is quite possible to make a plough gauge that will work almost as well as a bought one, and will certainly speed the work up to a marked extent.
Two variations are described here, and the first is the most simple.
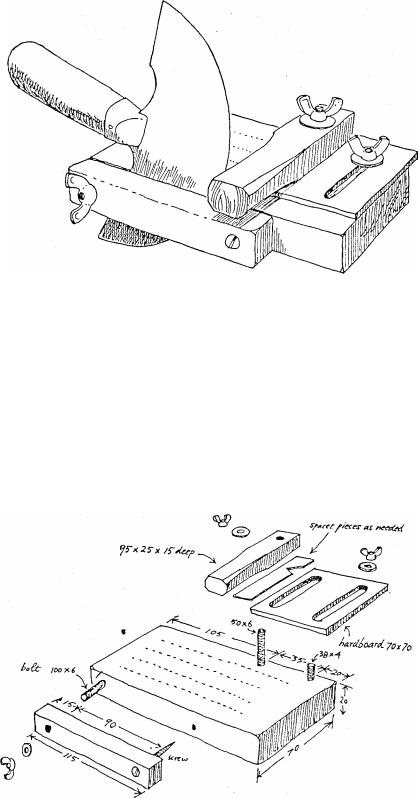
The materials for this one consist of two scraps of timber, plu s a piece of hardboard or plastic the same thickness as the leather to be cut, two small G cramps and a knife.
194
The top block can then be
positioned on whichever height is the correct one for the leather being cut.
These steps can be cut out of the plastic used for margarine containers, or other household containers
All leatherworkers should have a round knife, they are very useful for trimming straps and skiving, but if you do not have one then you can make do with a bootmaker's knife, though this does not work nearly as well.
In the sketch you will notice that the larger piece of wood has lines ruled on it and these are used to measure out the width of strap to be cut.
The piece of hardboard is placed on this board with its edge against the measurement that the strap is to be cut to.
The remaining block of wood sits on this at right angles, and is held in place with a G clamp. This forms a bridge under which the leather has to pass.
The blade is clamped into position and the gauge is ready to us e. The right hand grasps the handle of the round knife while the left holds the end of the leather to be cut. The round knife is then pushed through the leather. In order to make this simple tool capable of handling various thicknesses of leather the strip of hardboard can have steps glued to it as shown.
195
A MORE ELABORATE GAUGE
This gauge works on the same principle as the previous one, but does away with the G cramps, which do tend to get caught up in things.
A larger piece of hardboard is used, and this is slotted so that it can be moved to whatever position is required. It is held in place with bolts and wingnuts.
The top piece sits on this, and spacer pieces are slipped under it if it needs to be raised. These can be cut from the plastic sides of margarine
196
packets.
When the gauge is to be used the round knife is slipped into the slot and held firm with a wingnut.
In theory any sharp knife could be used in this gauge, but in practise I have found the round knife to be by far the best.
Not only does it provide a handle in the right place but the blade seems to be at the best angle for cutting.
The measurements given here can be modified as desired, the design is quite flexible.
This tool is used to give a nice rounded edge to the leather. All good
leatherworkers use one of these tools on
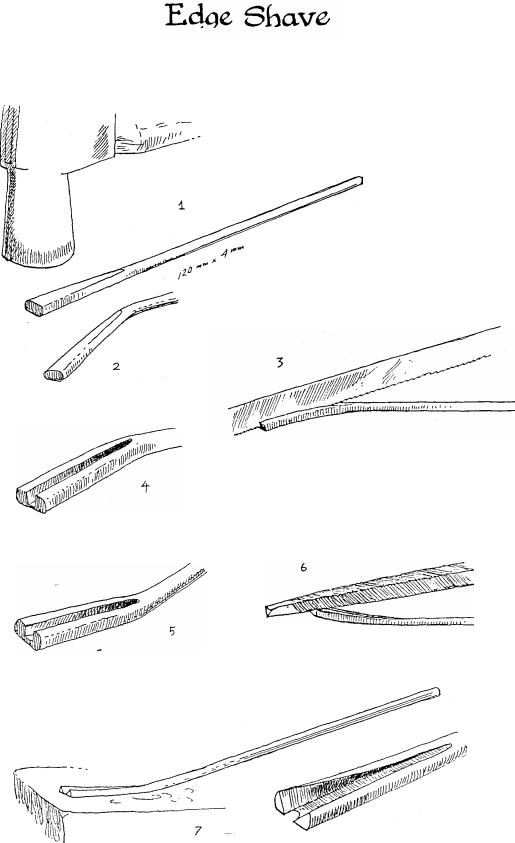
Fig.2. Bend the wire down a little.
every job.
Fig.4. This is how the groove should look.
F i g .5 . N o w b e n d t h e w i r e u p a l i t t l e .
Fig.7. The bottom of the tool is now ground on an oil -stone until a sharp
A few years ago, due to some shipping problem, we could not get any edge shaves for six months, and as customers were waiting for them we had to set to and make them ourselves. We made several dozen, and they worked just as well as the imported models.
F i g . 3 . U s e a
h a c k s a w t o c u t a g r o o v e i n t h e e n d .
Fig.l. Take a 120mm length of heavy f e n c i n g w i r e a n d f l a t t e n o n e e n d a s s h o w n . T h e r e i s n o n e e d t o h e a t t h e wire.
cutting edge is produced. The close -u p shows what it will look li k e .
Fig.6. Use a three -cornered file to w i d e n t h e m o u t h o f t h e g r o o v e .
197
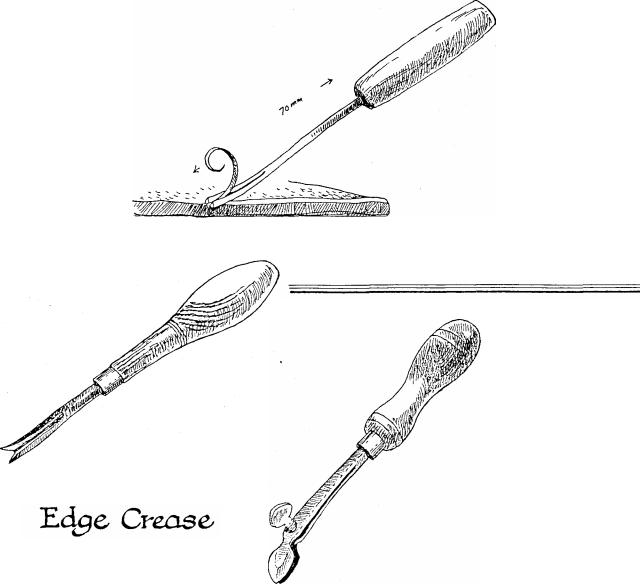
Fig.8. A piece of wood is chosen for a handle, a hole drilled in it and the wire pushed into place. It should be a good tight fit so that it will remain in position without needing to be glued.
The tool is now complete and ready for use.
If you look at any well made piece of saddlery you will notice a groove runs along the edge of all the strapping. This decorative touch gives a good finish to the article.
This same groove also has a practical application when stitching leather, as it provides a guide for the stitching, and the thread sits neatly into the groove and is less likely to get rubbed.
If you decide to buy a factory made crease then get the one called a screw crease. This type allows you to vary the distance of the groove from the edge of the leather.
Another popular shave on the market is an American brand, but this
type cannot be re -sharpened and has only a limited life.
my
of
to
use
A screw crease. The thumbscrew allows a variation in the distance of the line from the edge.
198
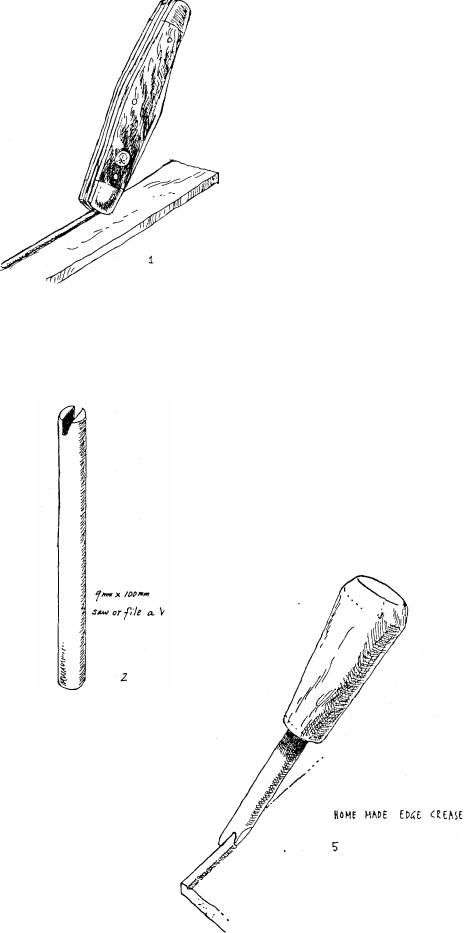
Fig.2. Take a piece of mild steel rod of around 9mm in diameter and 100mm long.
Saw or file a V cut into the end. Note that one side of the cut is vertical, the other sloping.
Fig.l. Many bushmen use the end of their penknife as an edge crease. With
most brands of knives this works well, and is a simple answer to the
problem.
However it is not difficult to make a simple edge crease.
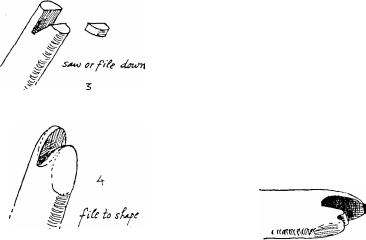
Fig.3. Saw or file the side shown so as to remove around 3mm of metal.
Fig.4. File the end to this shape. The right hand side should be sharp enough
t o m a k e a c l e a n g r o o v e i n t h e leather.
Fig.5. Fix on a handle and the tool is complete. The longer prong runs along the edge of the leather while the shorter one makes the groove.
Some people make two or three of t h e s e t o o l s e a c h o f a s l i g h t l y different size so as to be able to make a variety of grooves.
It is also possible to make one that will crease a double line, but these are not so common.
199
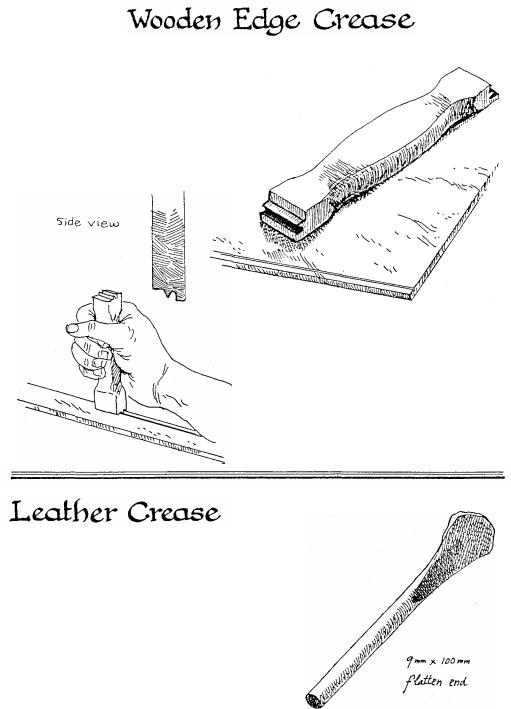
In the old days saddlers would
make wooden edge cre ases. These were used to make grooves along the
edges of heavy straps of harness leather.
This type of crease can be made very quickly. Select a scrap of hardwood big enough to be grasped in
the hand and cut it as shown in the side view.
This simple tool is used to make decorative curves and patterns on leather. The saddle flaps on good quality stock saddles are decorated in this way. Cheaper saddles have a design pressed in mechanically.
When making handbags and suchlike the leather can be dampened before the crease is used.
For heavy leather such as saddle flaps the leather is not dampened, but instead the end of the crease is heated, often over a candle. It is then rubbed on a piece of beeswax and then applied to the leather. The crease does not have to be very hot, just as long as it will make a good mark on the leather.
200
One part of the crease runs along the outer edge of the leather while the centre part makes the groove.
This type of crease is good for heavy leather because quite an amount of pressure can be exerted when using it.
The one in the sketch is a double -ender.
Fig.l. Take a piece of mild steel rod of around 9mm diameter and 100mm long. Flatten the end with a hammer. If the iron is soft you will be able to do this cold, if not the iron will have to be made red hot.